Posted on 1 Comment

Hp WebInspect: Beginners guide

Hello, aspiring ethical hackers. In our previous blogpost on web application hacking, you learnt about various vulnerabilities a web app or website may contain. It would be good if these vulnerabilities are detected and patched before they are exploited by hackers in real-world. The vulnerabilities can be detected either manually or by using automated scanners. HP WebInspect is one such automated tool.

Hp WebInspect is an automated web application security scanning tool from HP. It helps the security professionals to assess the potential vulnerabilities in the web application. It is basically an automated dynamic application security testing (DAST) tool that mimics real-world hacking techniques and attacks, and provides comprehensive dynamic analysis of complex web applications and services. It can be downloaded from here.

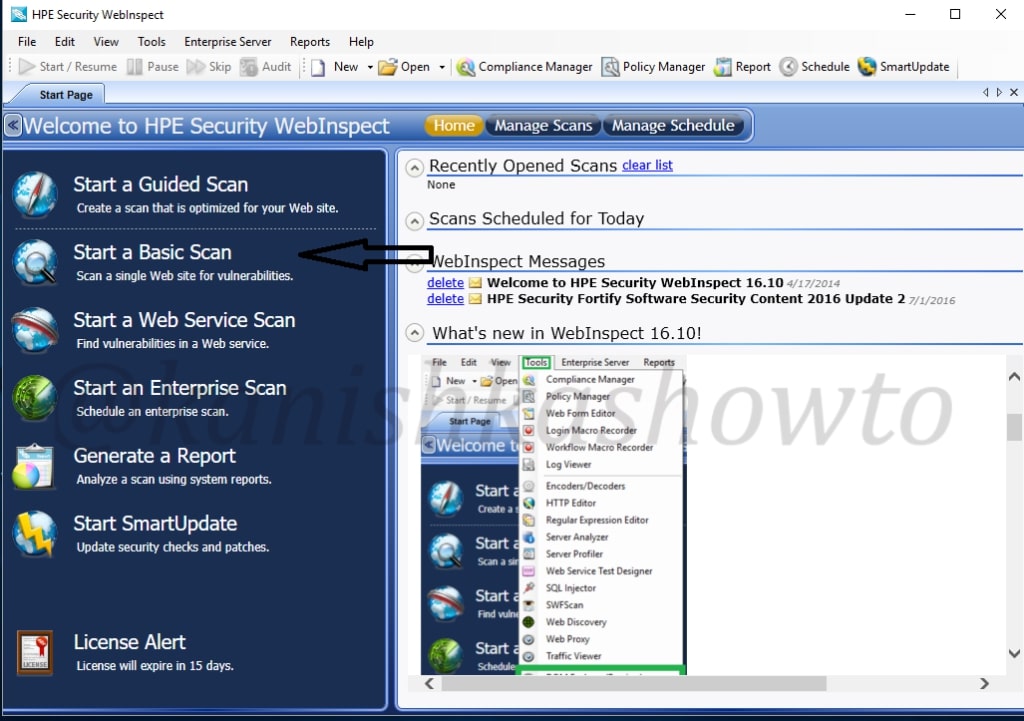
Let’s see how to perform website vulnerability assessment with HP WebInspect. Open the program and click on basic scan. We will see other scan options in the following parts of this tutorial. As its name implies, this option performs a basic security scan on a website.

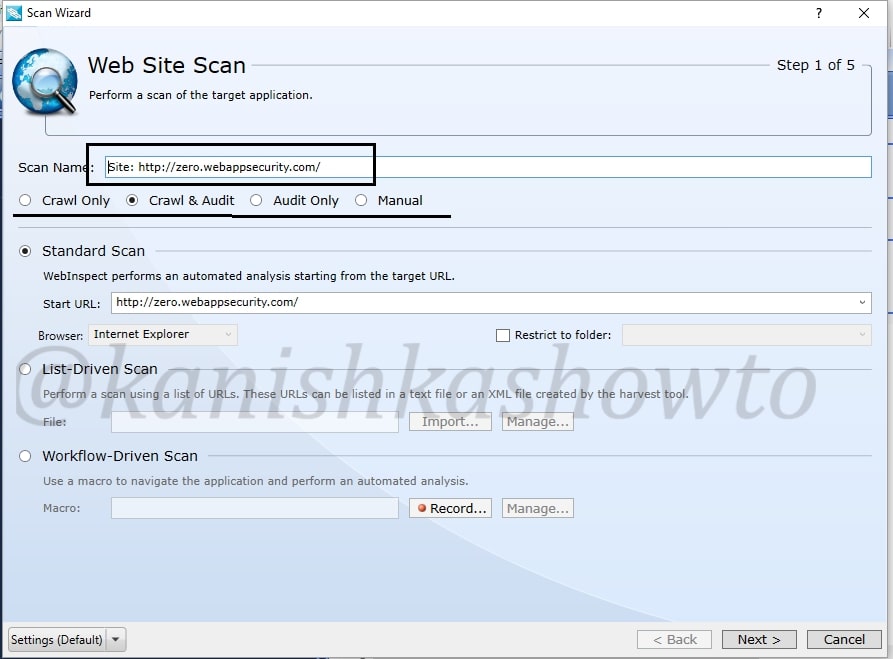
As we select the basic scan option, the “scan wizard” opens as shown below. As I am using a trial version of HPWebinspect I am only allowed to scan the website deliberately provided by HP for this purpose. This website simulates a bank ( named zero bank ) and this will be our target from now on.

I allot the given name. Below the scan name option, we have features with radio buttons. Let’s see these options.

crawl:- This process makes a list of all the pages  on the entire website and builds its structure.

auditing:- Auditing is the process in which HPwebinspect will attack the website to find out the vulnerabilities.

I have selected the “crawling and auditing” option. HP Webinspect provides four types of scans.

Standard scan:- Normal scan.
List Driven scan:- You can specify the list of urls for the tool to scan. It will only scan those urls.
Workflow Driven scan:- Similar to list driven scan. You can scan a port of your website by specifying a macro.
Manual scan:- You can specify each link you want to scan. step by step.

Next specify the website you want to scan and click on “Next”.

wapt

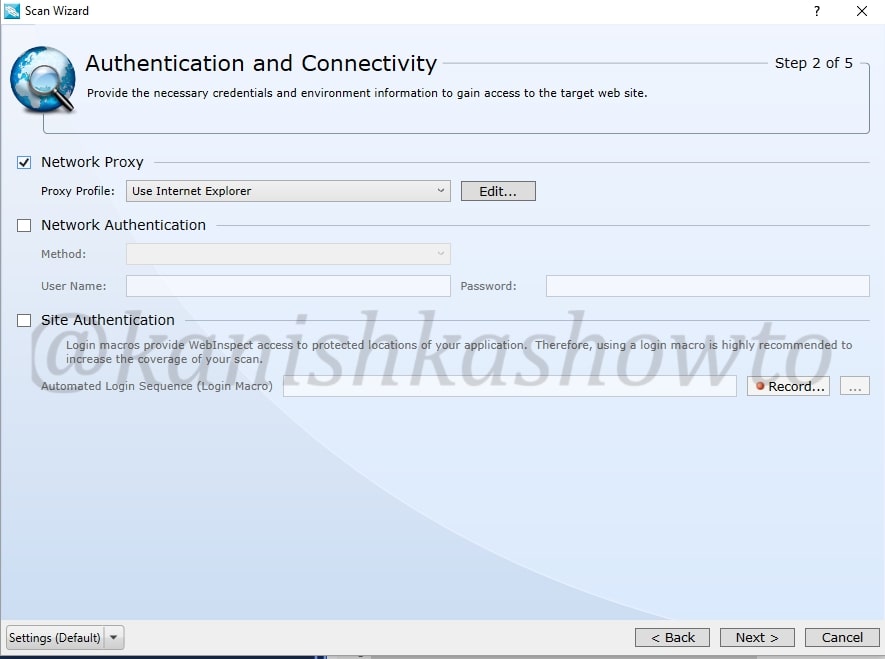
In the next window, you will be prompted for authentication. If your website or network requires authentication, provide them . Choose if you want network proxy or not and click on “Next“.

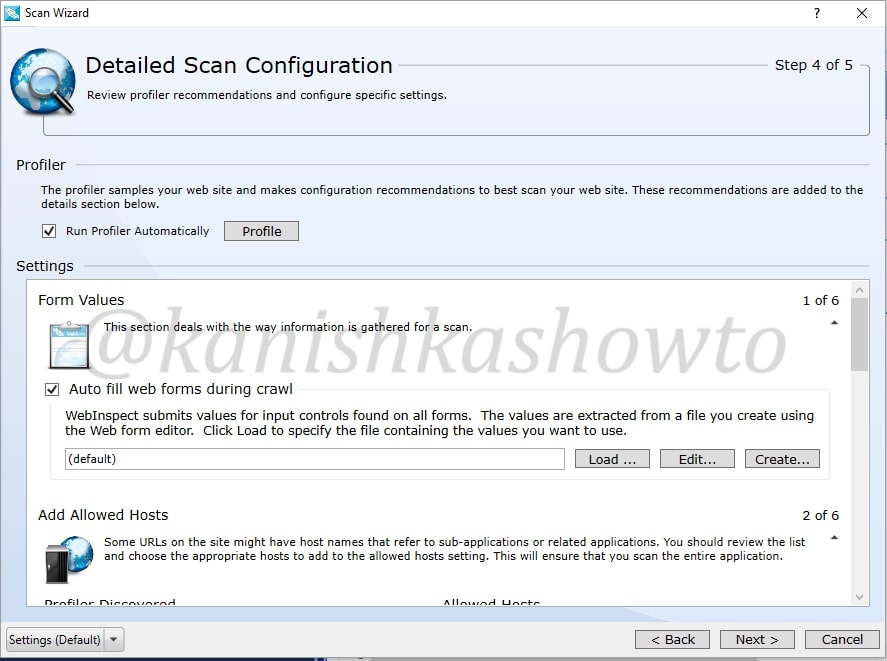
The profiler automatically samples the website and recommends best configuration for the scan. You can select the option. We will see more about profiler later. There are some other settings. Leave them to their default settings and click on “Next”.

You will get a congrats message telling about the successful configuration of scan settings. It’s time to start the scan. Click on “scan”.

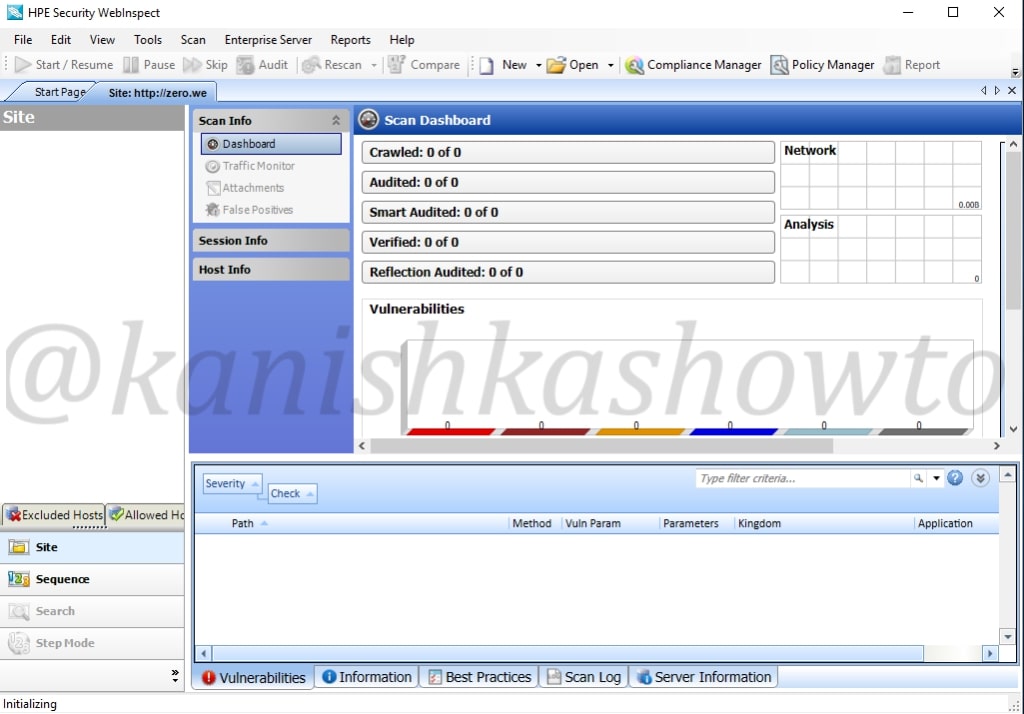
The scan will start as shown below. It will take some time dependent on the size of the website you are scanning.

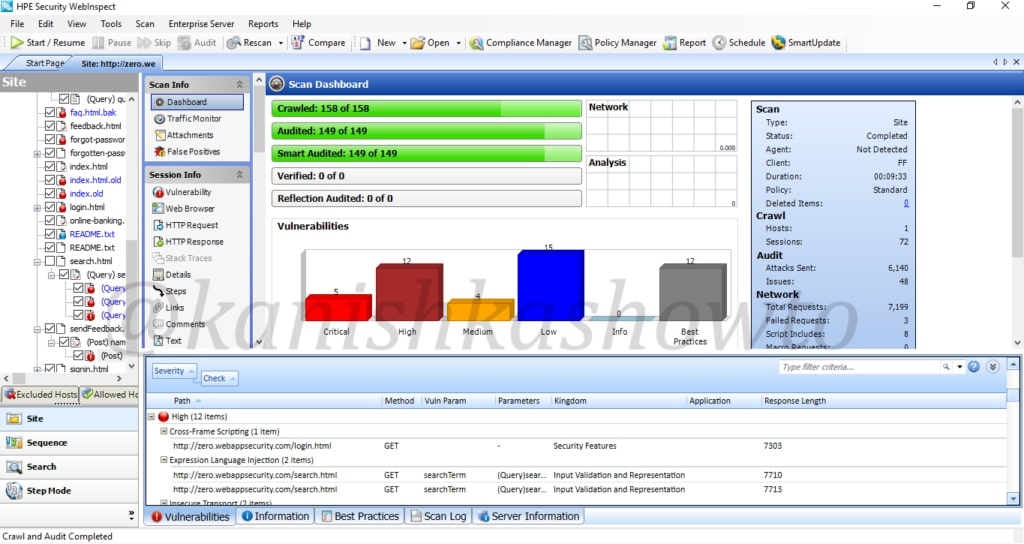
After the scan is finished, it will show the results as shown below. This tool classifies vulnerabilities into critical, high, medium, low and info. That was about basic scanning of website with HPWebinspect.

That’s all in WAPT with HP WebInspect. Now, we will see analyzing these vulnerabilities. Wait, but why do we need this analysis? Just because we have used an automated tool doesn’t mean it is cent percent effective. There may be lot of false positives and in the worst case false negatives. The threat it shows as critical may not be really that dangerous or a threat it shows as medium may be critical depending on the situation. The analysis part is very important part of the WAPT. Let us see how to perform this analysis . We will take our previous scan report.

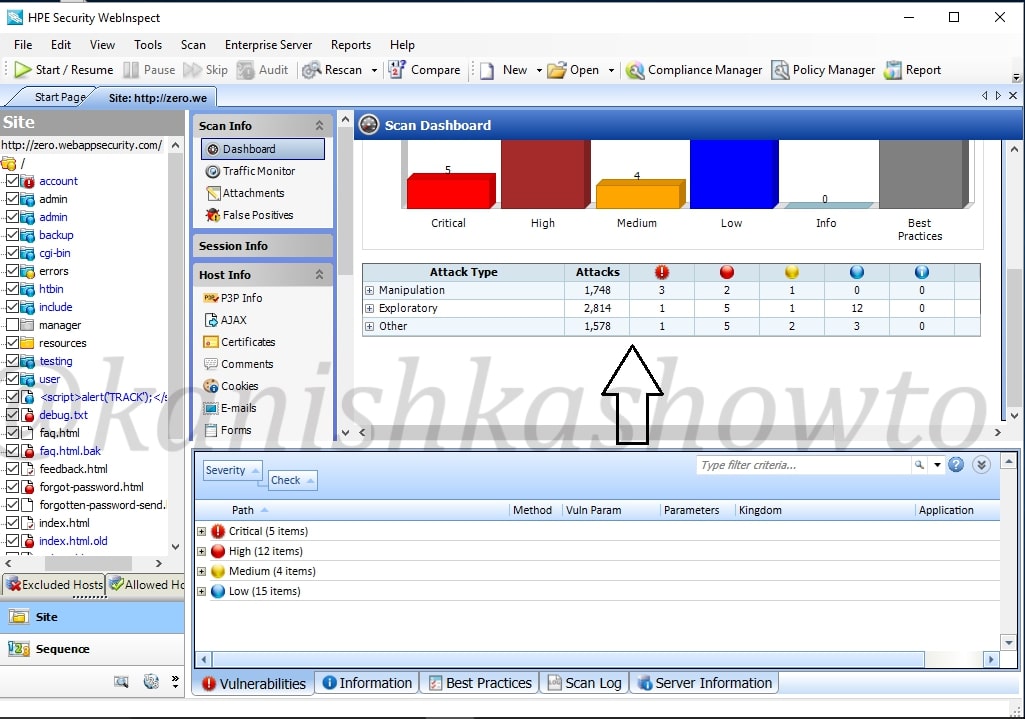
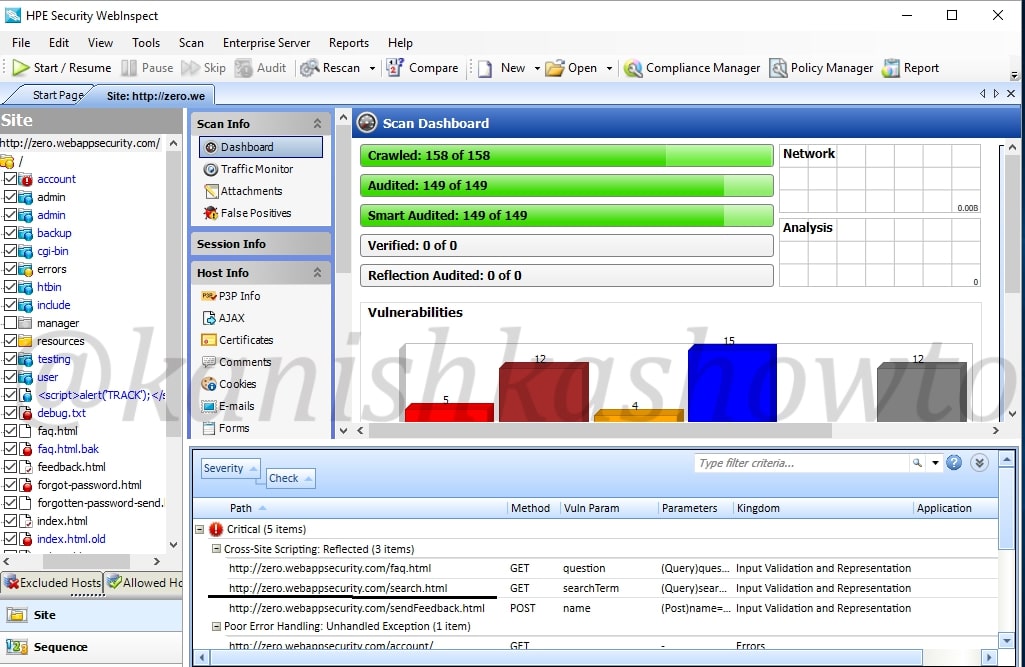
Before we do the analysis, let us have a look at the interface of HPWebinspect.  To the down left, we have view options of the scan ( site and sequence ). The “site view” shows us the hierarchical structure of website we just scanned with vulnerabilities found highlighted as shown below to the left. We can see that in account part of the website there is a critical vulnerability.

The sequence view shows us the order in which WebInspect scanned the URLs. It is shown below.

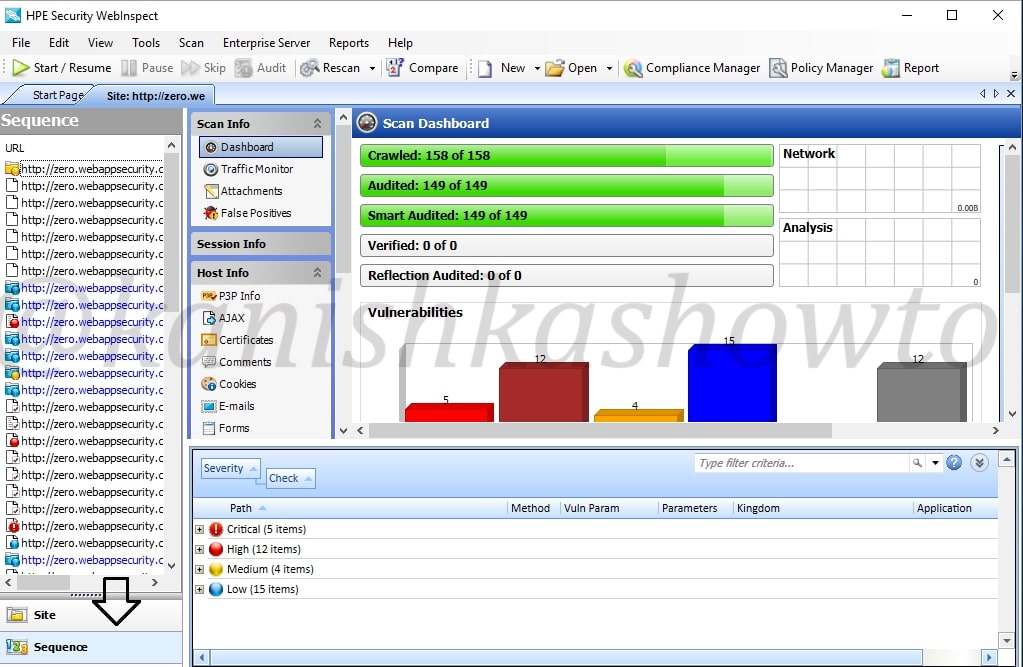
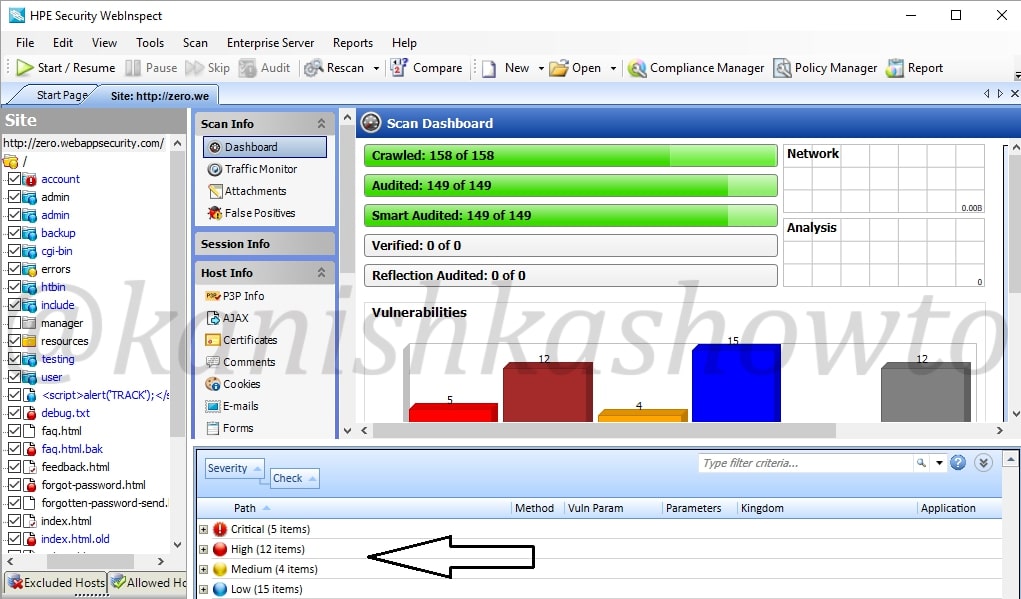
Occupying large area of the interface is the Scan dashboard with a pictorial representation of vulnerabilities. It also has vulnerabilities classified into its attack types ( how exactly these vulnerabilities will be used ).To its left, we have sections called scan info, session info and host info. The scan info has four options : dashboard, traffic monitor, attachments and false positives. We have already seen dashboard and others are self explanatory.

Below scan info we have have session info. It is empty because we didn’t include any sessions in our scan.

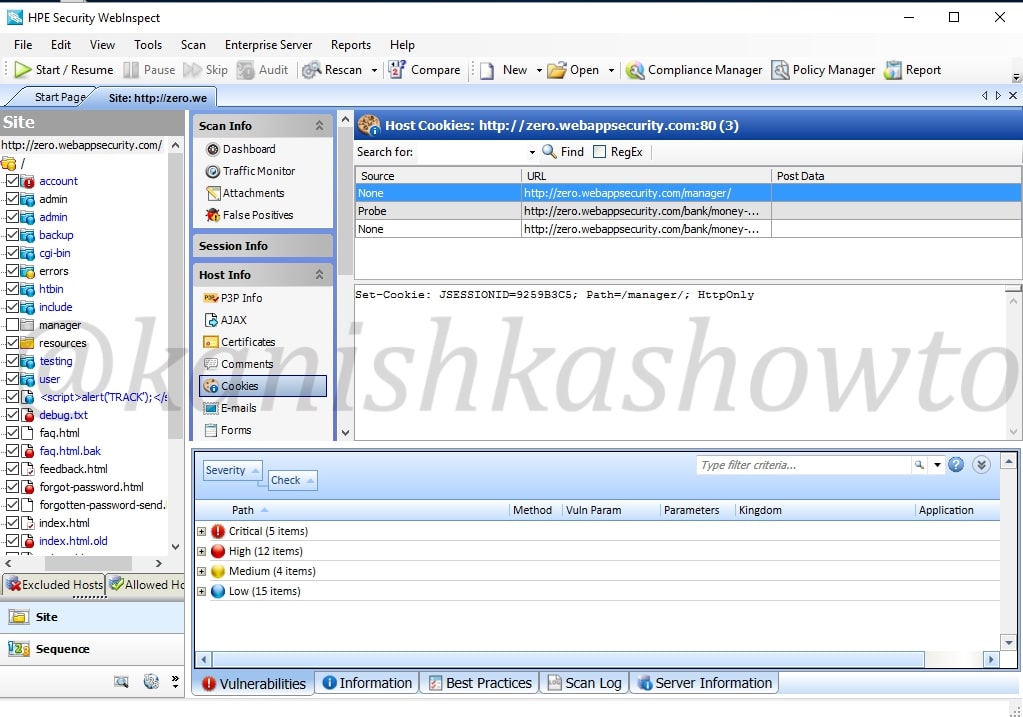
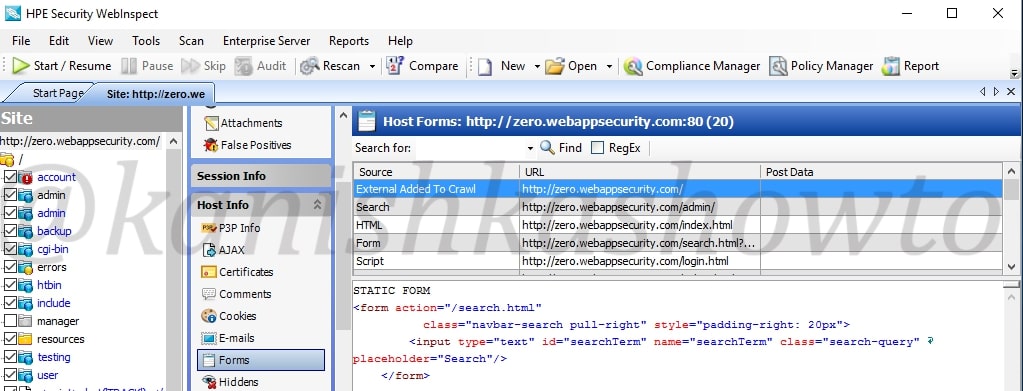
Below session info, we have the host info which is obviously information about the host we scanned. It will provide us info like P3P info ( protocol allowing websites to declare their intended use of information they collect about users) , AJAX, certificates etc, etc, etc. Let us look at the cookies collected by the scan.

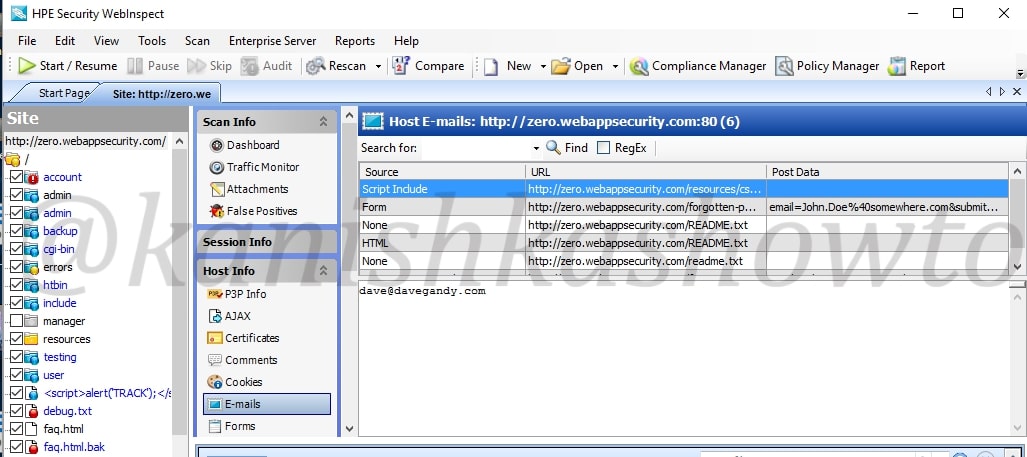
It also shows us the emails we found during scan.

Also the forms.

Now we come to the most important part of the interface which is right down below. These are the vulnerabilities found during the scan. As already said, these are classified according to the dangers posed by them but there may be false positives. We need to analyze each vulnerability for this exact reason.

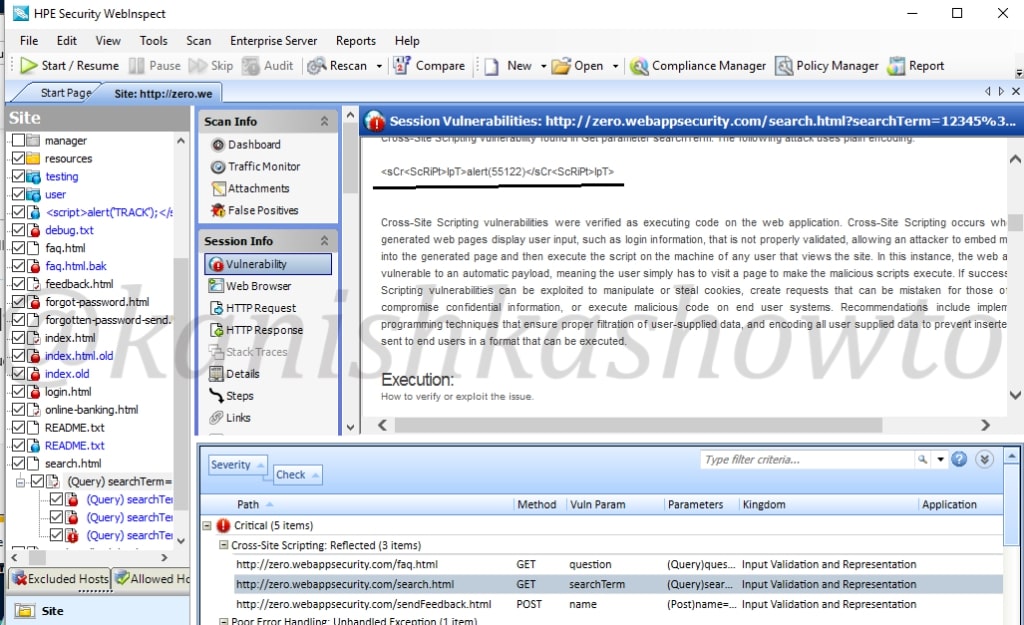
In this howto, we will cover analysis of one or two vulnerabilities. Expand the “critical” section of vulnerabilities. We can see that there is a XSS vulnerability in the search page. We will analyze this vulnerability.

Click on the vulnerability. The dashboard of HPWebinspect will show information about the particular vulnerability ( in our case XSS ) and how hackers might exploit this.

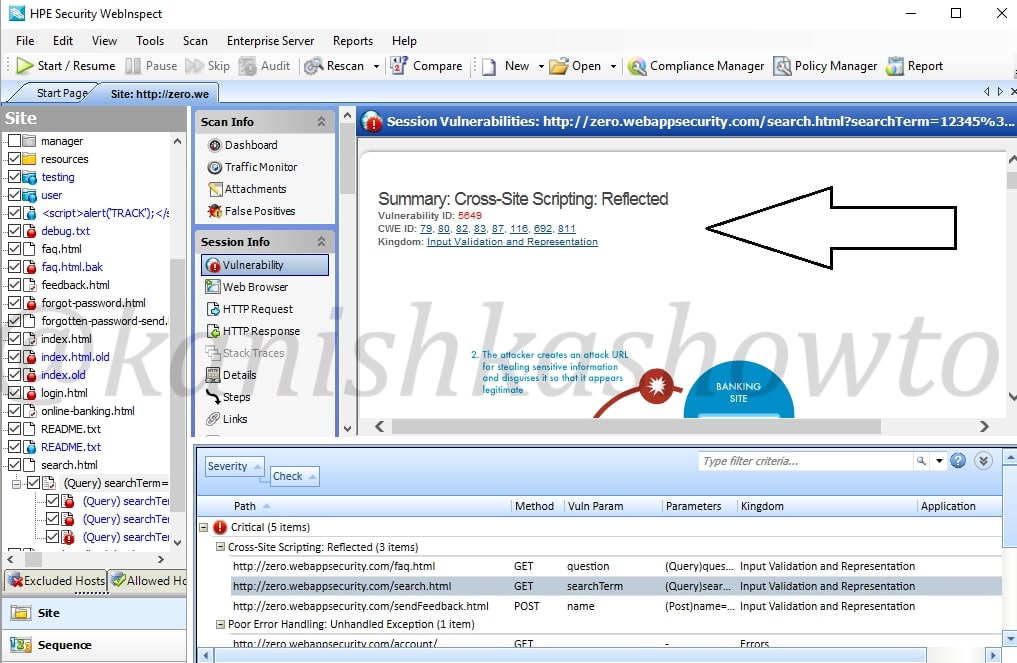
Scroll down the dashboard to get more info about the vulnerability. We can see the exact query used by the tool to get the result. In this case, our target is using tag removal to prevent XSS but we can bypass using the query given below. ( We will learn more about XSS and its evasion filters in a separate howto)

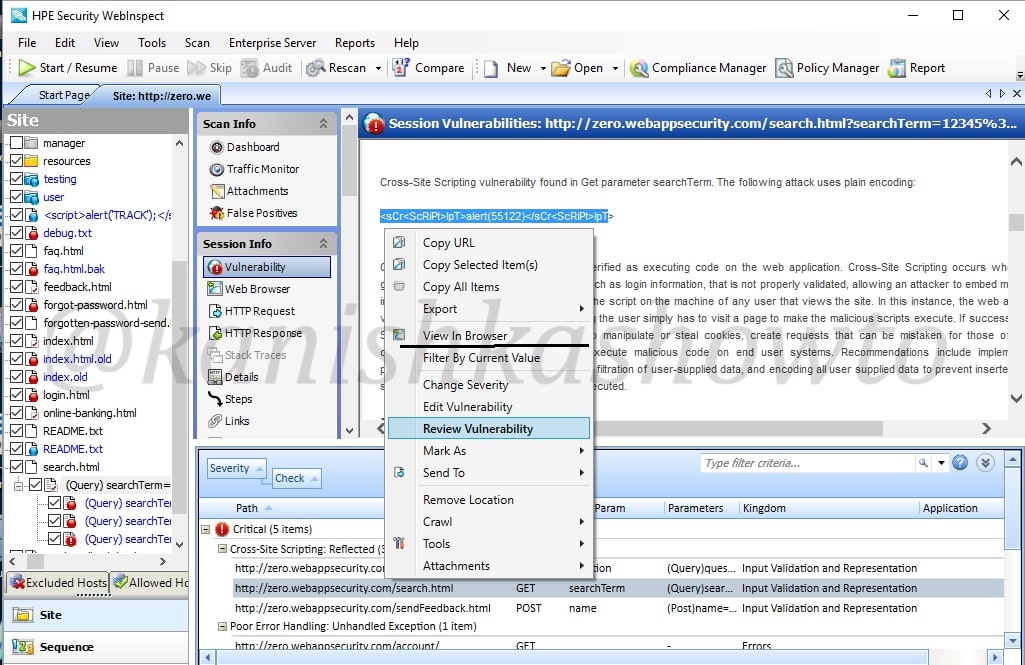
Now right click on the vulnerability we are analyzing. In the menu that opens, click on “View in Browser” to see this exploit practically in the browser.

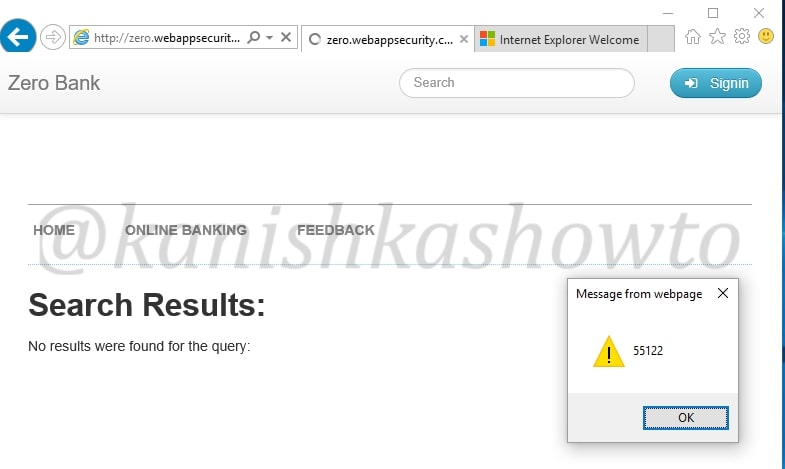
We can see the browser result below. In this case, it is displaying a messagebox with a number but hackers can use it to display cookies and session ids. Hence this is definitely a critical vulnerability.

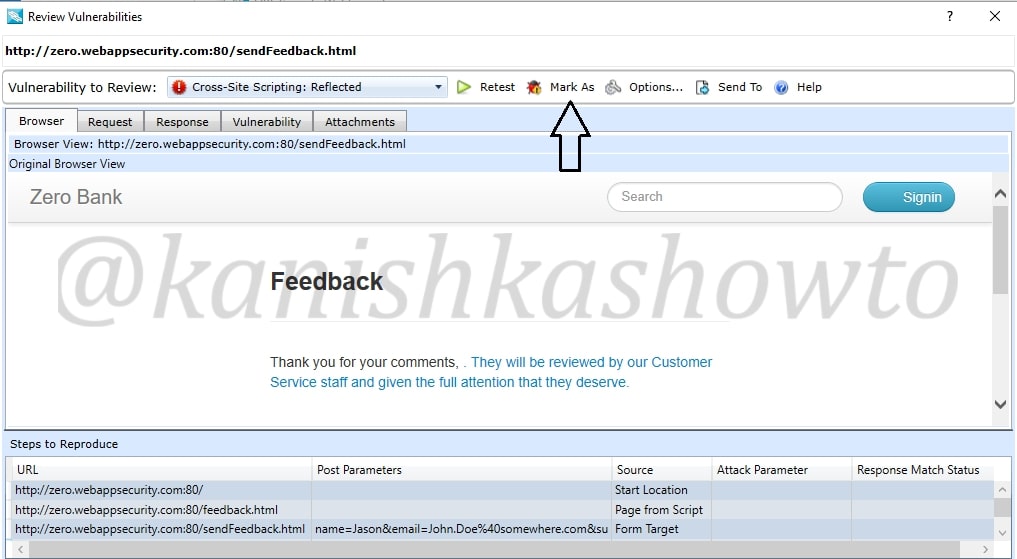
Right click on the vulnerability and select the option “Review vulnerability”. This is helpful in knowing more precisely about the vulnerability.

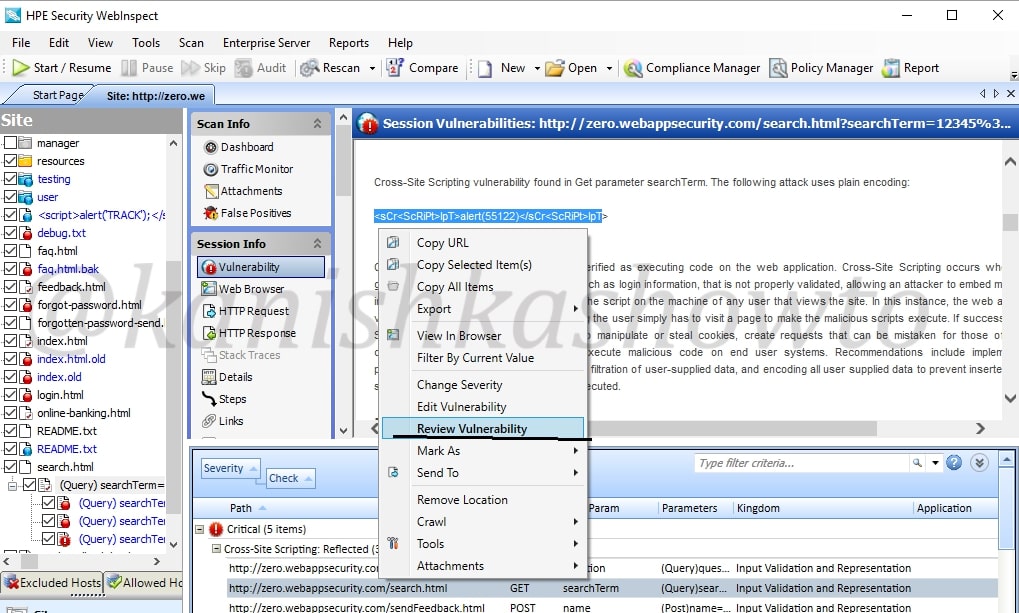
Another window will open as shown below. It will automatically show you the browser view.

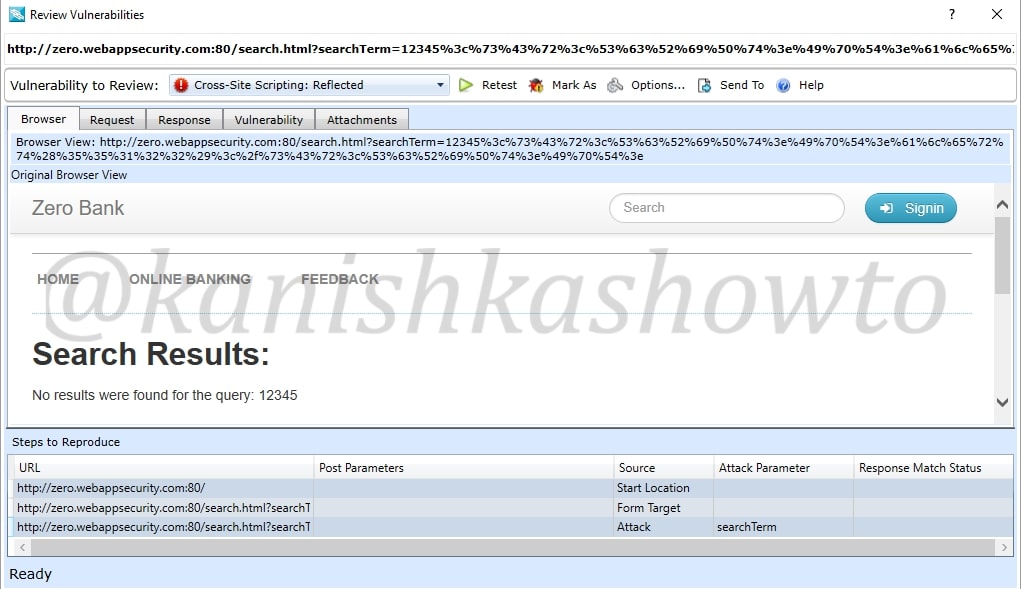
We can click on “Request tab”to see the request sent by our tool.

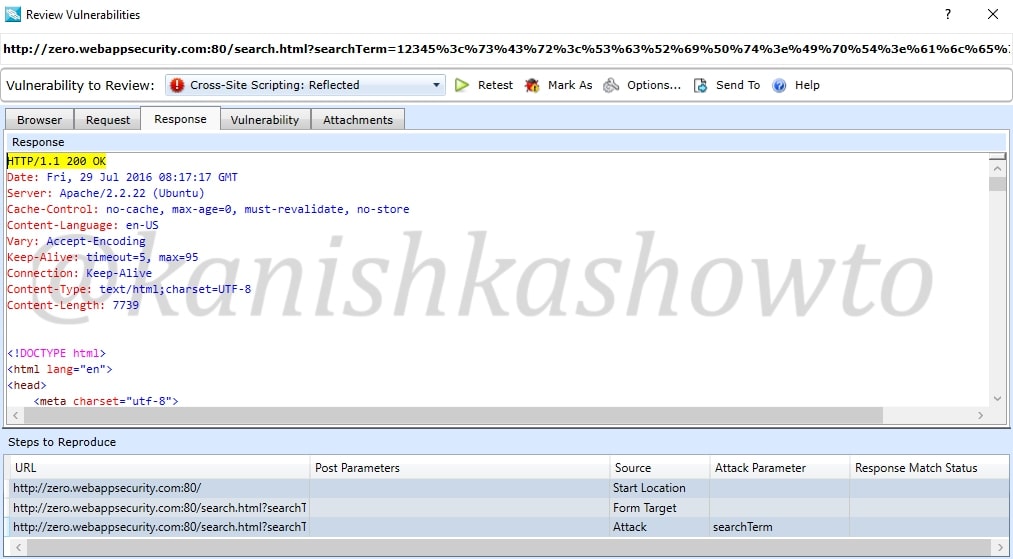
Similarly the response tab shows us the response given by the target.

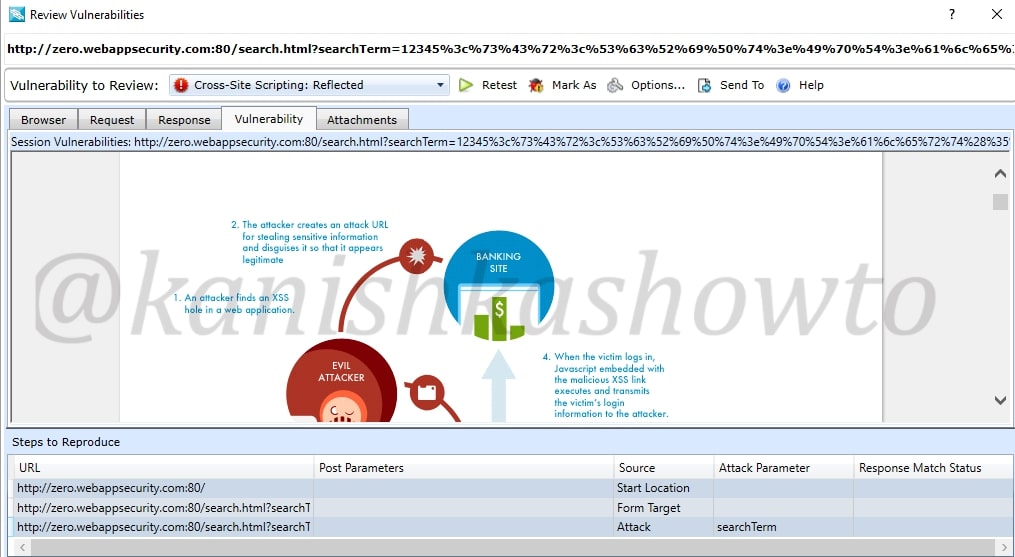
We already saw this before in the dashboard. The “vulnerability tab” give us information about the vulnerability and how hackers might exploit it. There are also options like “Retest” and “Mark as”. The Retest option allows us to test the vulnerability again. We shall see the “mark as” option below.

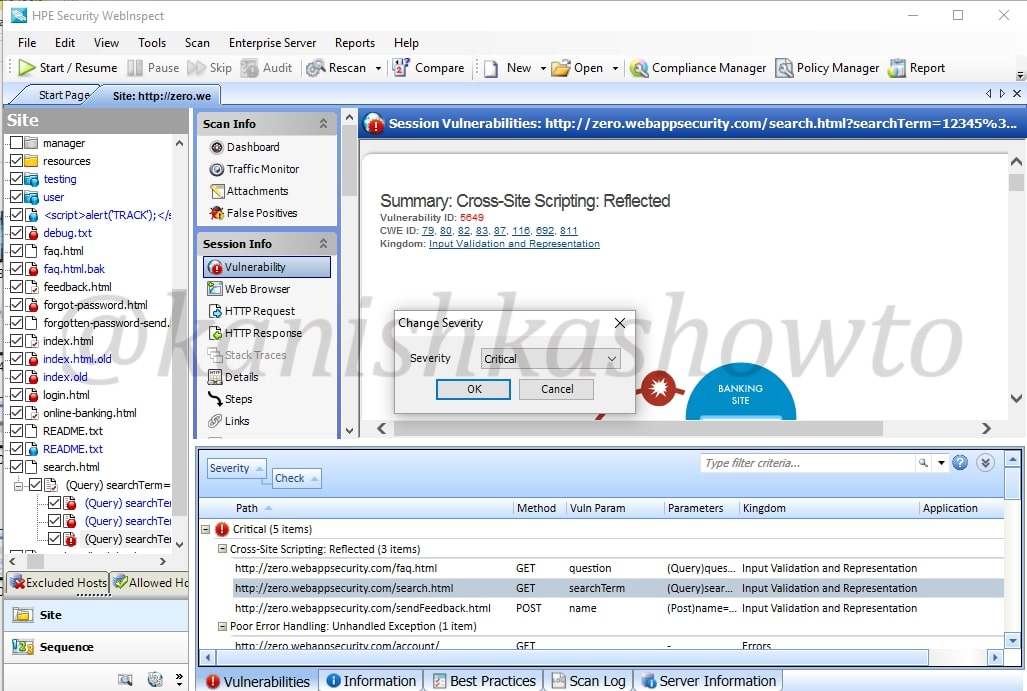
Close the window. Once again right click on the vulnerability. You can see the option “change severity”.

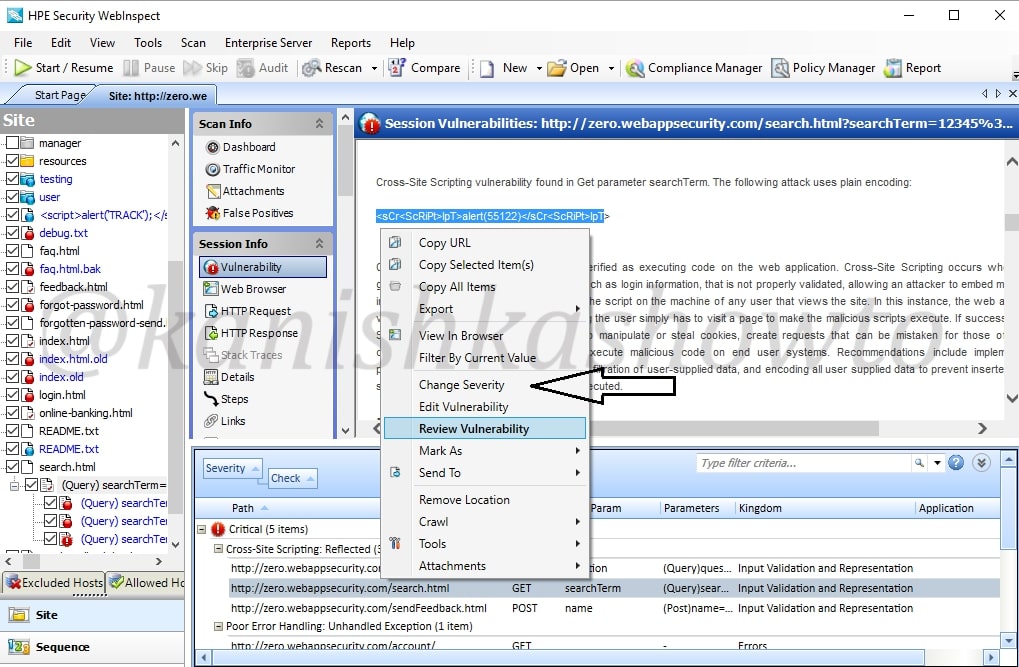
For instance, the vulnerability detected is not that critical, we can change its severity suitably to high or medium or low.

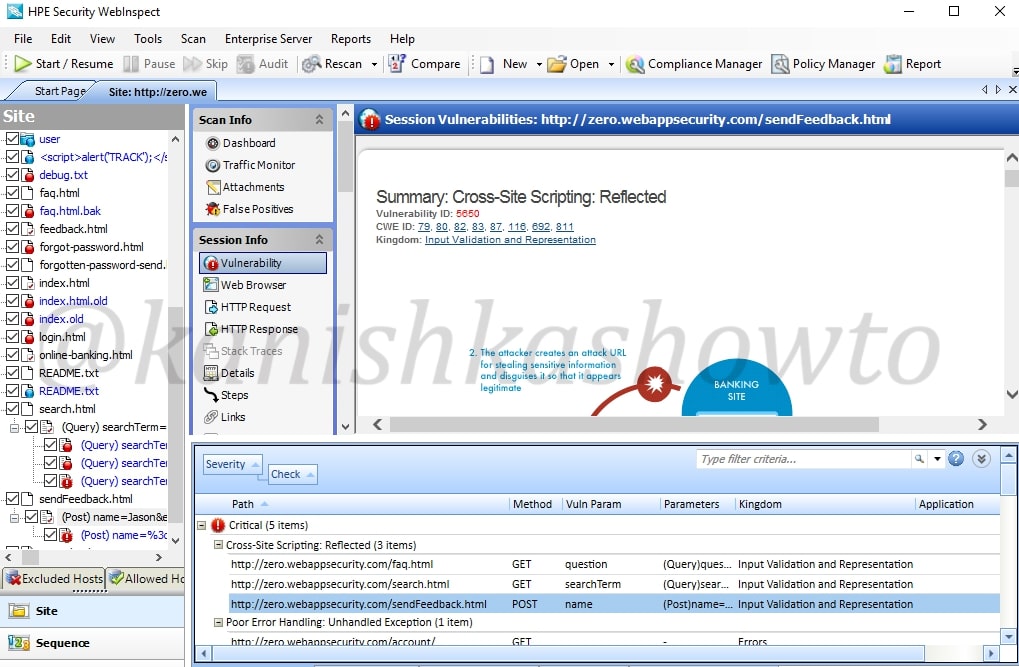
Now what if the vulnerability detected  is not an actual vulnerability. This is known as false positive. For example, we have this send feedback page of the target website. Let us assume it is just a false positive. In that scenario, just below the “review vulnerability” option we have “Mark as” option.

We can also access this option from the “review vulnerability” window as already shown above.

When we click on that option, we get two sub-options to mark it either as false positive as shown below

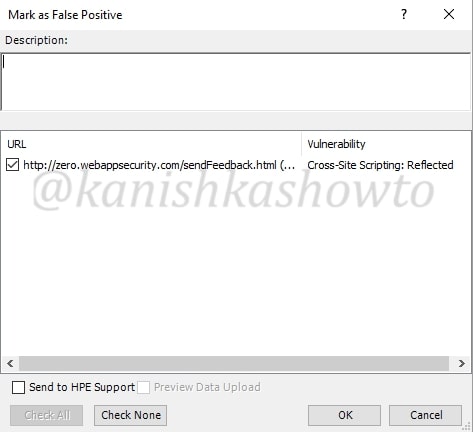
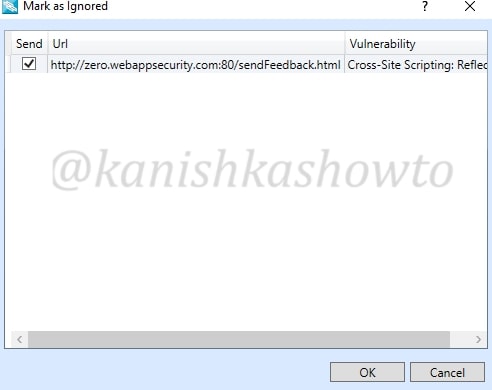
or to completely ignore the vulnerability. We can only ignore the vulnerability if it doesn’t pose any valid threat. We can also provide some description about why we are marking it as false positive or ignoring.

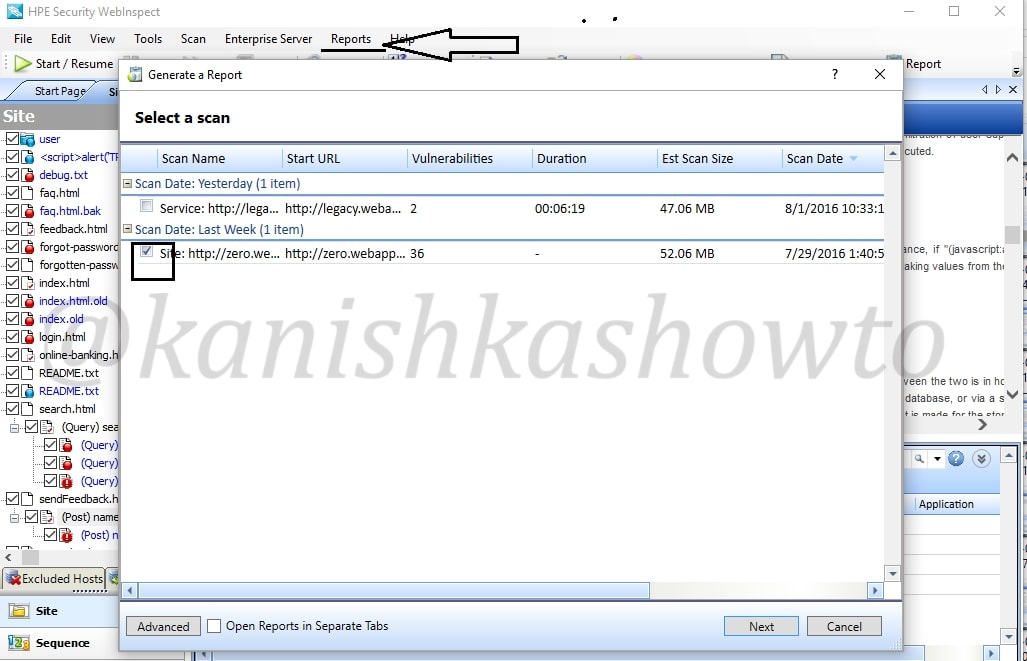
When we have successfully finished reviewing each vulnerability, it’s time to write the penetration testing report. To automatically generate a report, click on “Reports” tab. Select the scan for which you want to generate the report and click on “Next”.

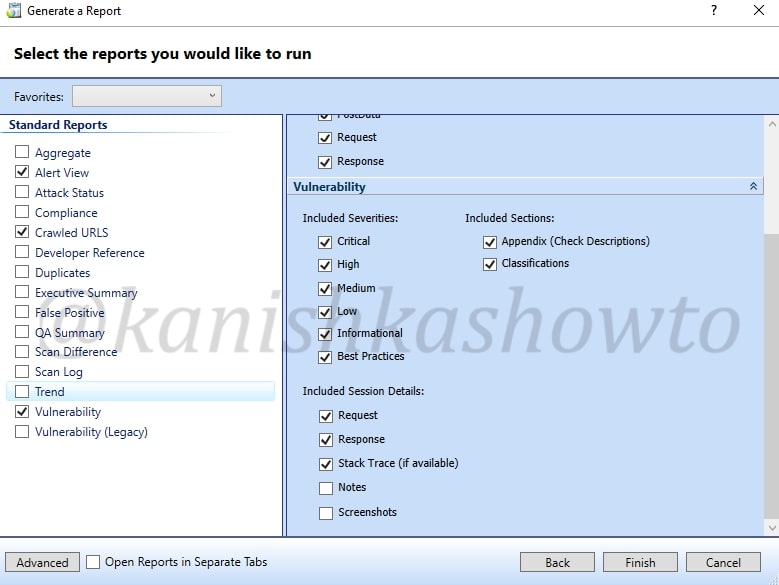
Select whatever you want to include in your report as shown below and click on Finish.

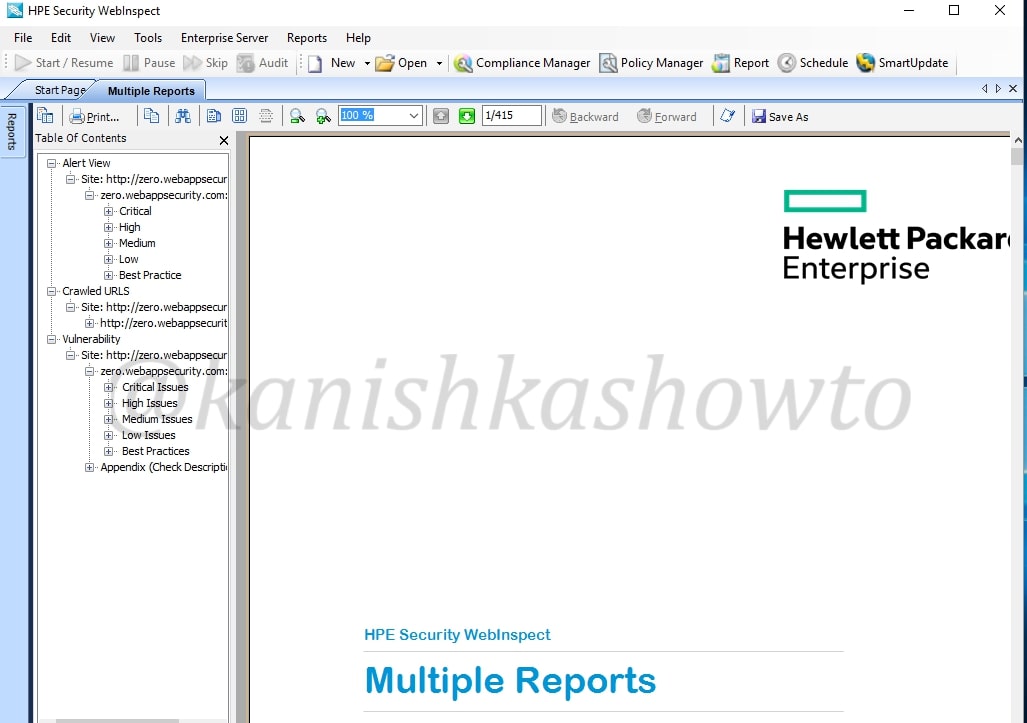
The report generation takes some time depending on the options you selected. The report generated would be in the format as shown below. That’s all for now and in our next howto, we will see more about the tool.

That’s how we can find vulnerabilities in website with HP WebInspect.

Posted on 2 Comments

How to phish with Weeman HTTP Server

Good morning friends. Today I will go back to the topic which sparked my interest in the starting days of blogging: phishing. Phishing is one of the most popular hacking attacks even today. Earlier we have seen howto’s on phishing and Desktop phishing. Today we will see how to phish with Weeman Http server.

Weeman Http server is a simple server for phishing written in Python. So let us see how to phish with Weeman HTTP server. We will use Kali Linux as our attacker system. Download Weeman HTTP server from Github in Kali.

Go to the directory where the server is installed and check its contents. There should be a python script named weeman.py.

Now start the server by typing command “./weeman.py“. It should look like below.

Check all the options by typing command “help“.

We will use the default settings for this how to. Type command “show“. You can see all the options required for phishing.

Set the url option as the website you want to phish. For this howto, I am using Facebook (sorry Mark). Set the port appropriately( but use 80 ). The action_url option sets the page you want the victim to redirect after entering his credentials. This sis shown below.

Type command “run” to run our server. The server will start as shown below.

Now find out your IP address, obfuscate it, shorten it( this is shown in the video ) and send the link to the victim. When the user clicks on the link, he will get to our phishing page as shown below.

When the user enters his credentials and clicks on Login, he will be redirected to the original website.

While on our attacker system, we can see the credentials of our victim. Happy hacking.

Posted on 2 Comments

Beginners guide to WPScan

Hello aspiring ethical hackers. In this blogpost, you will learn about WPScan, a tool used to perform WordPress vulnerability assessment. WordPress is one of most popular Content Management system (CMS) WPScan is a black box WordPress vulnerability scanner that can be used to scan remote WordPress installations to find security issues and also for enumeration. Let’s se how it works. It is installed by default in Kali Linux and we are going to use the same for this tutorial. Now open a terminal and update our tool by typing command as shown below.

wpscan

To scan a WordPress website, all you have to give is the URL as shown below. For this blogpost, I am using a local installation of WordPress as target.  Assign the target as shown below. The scan will start as shown below.

Here are the screenshots of result of this scan. As you can see we have  13 vulnerabilities in the present installation and the vulnerabilities are given below.

One of the easiest ways to hack a WordPress site is to exploit the plugins installed in the target as most of the WordPress vulnerabilities nowadays exist in the plugins installed on it. So it is very important to enumerate the plugins installed on our WordPress target. We can enumerate the plugins using the “enumerate” option as shown below.

The scan result will be as shown below.( And there you have the first Easter egg). So totally we found four plugins. The first one is Ajax Load More Plugin. As the red exclamation mark shows, it is vulnerable.

wpscan

The second plugin is the vulnerable version of Akismet.

The third vulnerable plugin is the WordPress Slider revolution plugin. We will see more about this in our next blogpost.

Another important aspect to find vulnerabilities in the WordPress is its theme.  Now let’s enumerate the theme as shown below. The vulnerabilities present in the theme are given below.

After that let’s enumerate the users in our remote target as shown below.

We can see that the only username in our target. That’s WPscan for you. Hope it was helpful to you and wait for the sequels.

Posted on 2 Comments

Beginners guide to OpenVAS

Hello, aspiring ethical hackers. In our previous blogpost, you learnt about vulnerability scanning. In this blogpost, you will learn about OpenVAS. OpenVAS or Greenbone Open Vulnerability Assessment Scanner is a fully featured vulnerability scanner. Its features include unauthenticated and authenticated testing, various high-level and low-level internet and industrial protocols, performance tuning for large-scale scans and a powerful internal programming language to implement any type of vulnerability test. This article is a beginners guide to this tool.

It is an open source software and can be installed on Linux systems. Let’s start with installing OPENVAS on Kali Linux. Before you start the installation, update the Kali Linux system using the command shown below.

OpenVAS scanner is a part of Greenbone Vulnerability Manager (GVM) software. So, we have to install this software using command shown below.

sudo apt install gvm -y

After successfully installing it, we need to set gvm. This can be done using a simple command.

sudo gvm-setup

This simple command will take care of everything needed to setup this tool.

At the end of the setup, a password is created for the admin user of OpenVAS. It’s very important to make a note of this password. Otherwise you will not be able to login into the web interface of OpenVAS. The setup of OpenVAS is finished. It’s good to check if everything is installed correctly. Use the command below for that.

sudo gvm-check-setup

If you get a message as highlighted in the above image, it means the installation is successful without any errors. Everything’s done. Now let’s start the OpneVAS service. This can be done using command below.

sudo gvm-start

This will start OpenVAS and present you with URL of the web interface. By default, OpenVAS runs on port 9392. Click on the URL to go to its web interface. When the browser starts, you will most probably be greeted with a potential security risk. Click on “Advanced”.

As an ethical hacker, you will have to take lot of risks. This is one of the HARMLESS risks you will be taking. Click on “Accept the Risk and Continue” button.

You will be taken to the login screen of OpenVAS.

Login with the credentials. The username is “admin” and password is the password I told you to take not at the beginning of this blogpost.

You will be taken to the dashboard of OpenVAS. I don’t know about you but the first thing I want to do is change my password. To do this, go to the Admin menu and click on “My settings”.

This will take you to the “settings” page as shown below. You can see some general settings of OpenVAS.

Click on Edit tab highlighted in the above image. Next, change your password and click on “Save”.

Next to change is how you want to access the web interface of OpenVAS. By default, you can only access it from he local machine. i.e the machine on which its is installed. If you want to access the web interface from any machine on the network, it can be changed too. This configuration is stored in the “gsad.service” text file. Open it with your favorite text editor (In my case it is nano).

The line you want to change is the one that starts with ExecStart as shown below.

On that line, you can see the IP address and port on which the web interface of OpenVAS is running. By default, the IP is 127.0.0.1. Change it to 0.0.0.0. don’t forget to save the changes.

Restart the OpenVAS daemon and the gsad service.

If there ever arise a need to check logs of OpenVAS, this tool’s logs are given below.

You can stop the OpenVAS service using the command shown below.

sudo gvm-stop

Posted on

JoomScan: Joomla vulnerability scanner

Hello, aspiring ethical hackers. In this blogpost, you will learn about JoomScan, a vulnerability scanner designed for Joomla. Joomla is one of the most popular  CMS which is widely used for its flexibility, user-friendliness and extensibility. Popularity has its own cost in cyber world. It would be pretty helpful if the pen testers know the vulnerabilities in their Joomla CMS before any hacker takes advantage of them.

JoomScan is one such tool which will help web developers and web masters to help identify possible security weaknesses on their deployed Joomla! sites.

The features of JoomScan include,

  • 1. Exact version probing
  • 2. Common Joomla! based web application firewall detection
  • 3. Searching known vulnerabilities of Joomla! and its components
  • 4. Reporting to Text & HTML output
  • 5. Immediate update capability via scanner or svn.

    JoomScan is open source and is installed by default in almost all pen testing distros. We will be using Kali Linux for this tutorial. Now let’s see how to use this tool. Open a terminal and type command “joomscan update” first. We will update the tool first.

    joomscan

    Once the tool is updated as shown above, type command “joomscan” to see the options as shown below.

    Next, give the target joomla website as shown below. In this howto, I’m using my own Joomla website.

    The result would seem like below. Below we see that our target doesn’t have any firewall, it’s server is apache and it is powered by PHP version 5.3.10. Unfortunately it didn’t detect the version. Hmm, no probs.

    Next it will scan for vulnerabilities and check whether if this site is vulnerable for a particular vulnerability as shown below.

    At the end, it will show us the number of vulnerabilities present in our target.

    We can see that our target has 2 vulnerabilities as shown in the above image. We will see how to exploit those vulnerabilities in our future howtos. But for now we have successfully performed a vulnerability assessment of our target. Learn about WPscan, a tool used for WordPress vulnerability scanning.