Posted on

SMTP enumeration for beginners


Enumeration is the process of collecting information about user names, network resources, other machine names, shares and services running on the network. Although a little bit boring, it can play a major role in the success of the pentest. In the previous howto, we saw how to perform SMB enumeration and got some usernames on our target. So we don’t need to perform SMTP enumeration. But we may not be so lucky that SMB enumeration will be successful on every network. For networks like these, we may need to enumerate other services like SMTP.

First let me give you a basic introduction of SMTP. SMTP stands for Simple Mail Transfer Protocol. As the name implies, it is used to send email. It uses port 25 by default. If you ever sent an email, you have definitely used SMTP. SMTP servers talk with other SMTP servers to deliver the email to the intended recipient. Luckily this all happens behind the scenes and we don’t have to break our heads to understand this. But there are some things we have to understand about SMTP that will help us in enumeration.

As the term “simple” implies, SMTP server can only understand simple text commands. Sender of the mail communicates with a mail receiver by issuing these command strings and supplying necessary data. Some of the important commands are

1. HELO – sent by a client to introduce itself.

2. EHLO – another way of client introducing itself to server

3. HELP – used to see all commands.

4. RCPT – to identify message recipients.

5. DATA – sent by a client to initiate data transfer.

6. VRFY – verify if the mailbox exists.

7. QUIT – to end the session.

SMTP enumeration can be performed in many ways. The easiest way to do this is by connecting to the SMTP service port of the target with telnet (we have seen this in scanning and banner grabbing).

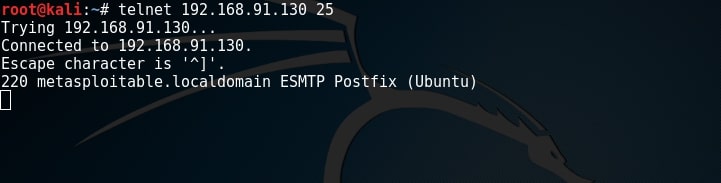
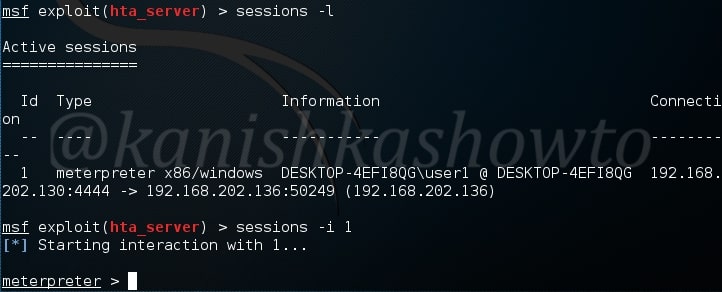
As you can see, we got successfully connected. From here, we can verify manually if each user exists or not. If you remember the article on SMB enumeration, we already have some usernames available. Lets use the VRFY command to check if users “user”, “msfadmin” and “root” exist in this system.

Image explaining about SMTP enumeration

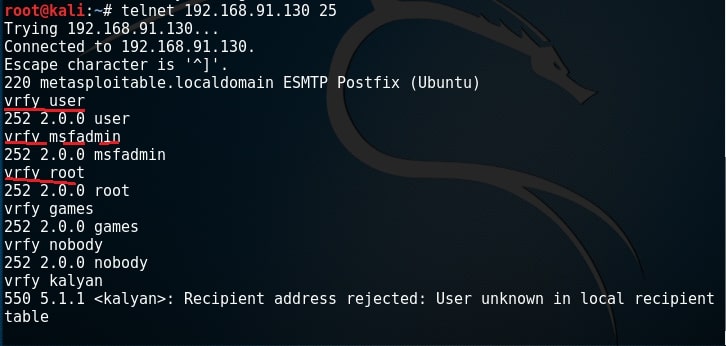
Yes, they exist. Similarly, let us test if user kalyan exists. As you can see in the above image, the user kalyan doesn’t exist. Nmap also has a script to perform SMTP enumeration. We can use the script as shown below.

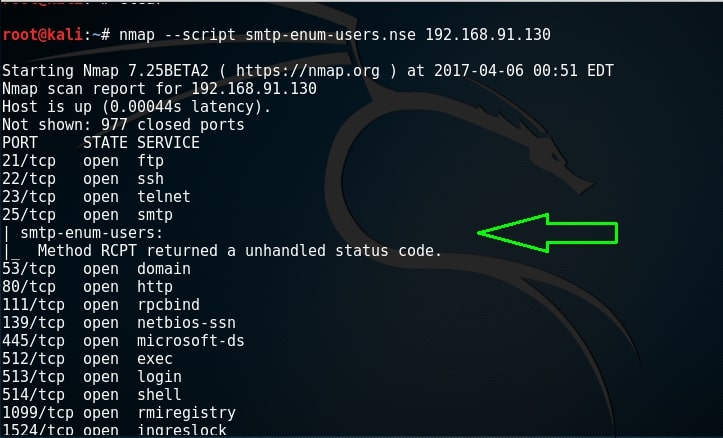
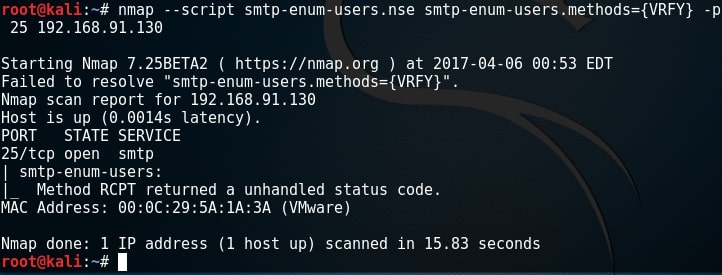
By default, Nmap uses RCPT method to check if a particular user exists. Unfortunately for me, it gave unhandled status code here. This Nmap script can be modified to use different methods. Here I changed it to use VRFY method to enumerate users. I have only scanned port 25 to remove the clutter. But still it gave me the same error.

There is another tool in the arsenal of Kali Linux which is built specifically for SMTP enumeration. Its called smtp-user-enum. Here let us test if a user called “root” exists on the target system as shown below.

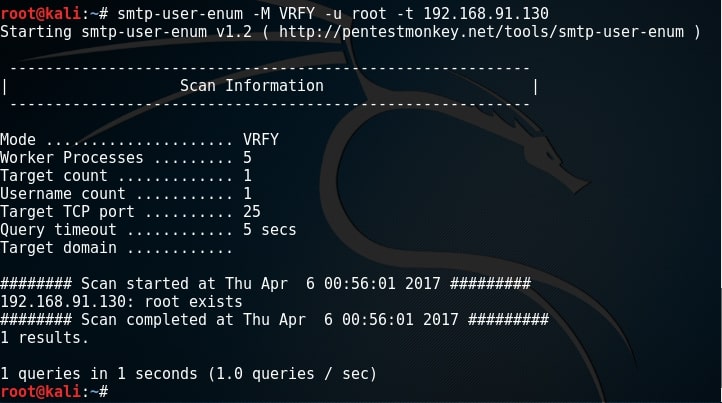
Since user “root” exists, I’m assuming other users like “msfadmin” and “user” also exist. While performing SMB enumeration, we created a wordlist which can be users on the target system. Now let’s enumerate if all the users in that wordlist exist. It can be done as shown below.

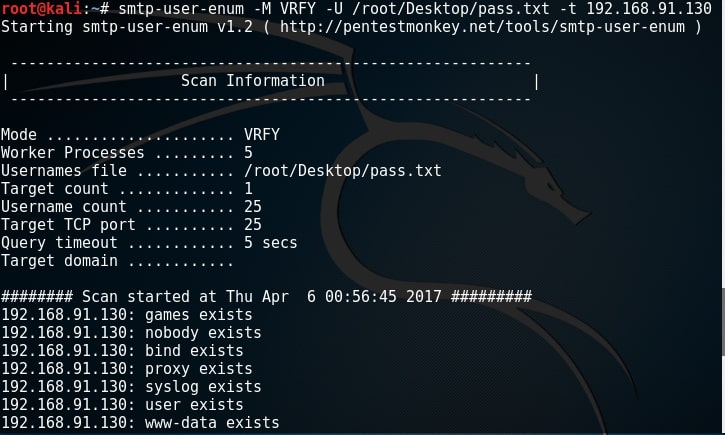
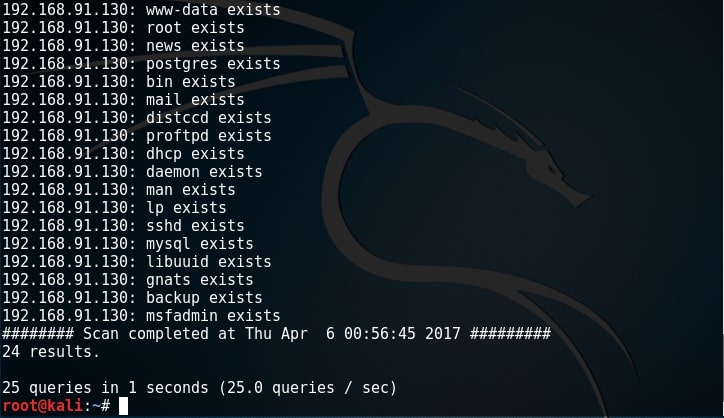
All the users we got during SMB enumeration exist. That’s good. In this case, we already have the wordlist of usernames (we got during SMB enumeratin). What if we don’t have the exact wordlist. We can use different wordlists present in Kali Linux. These wordlists are present in /usr/share/dirb directory.

What We Achieved?

We got some usernames which may be useful to us while exploiting the system in future. All these usernames have a recipient email address to them.

Posted on 2 Comments

HTA attack for beginners

Hello aspiring hackers. In our previous blogpost, you learnt about Windows hacking. In this article, you will learn about HTA attack, an attack that helps in gaining access to Windows systems. In this attack, HTA file are used to hack the target system.

What is a HTA file?

What is HTA file? HTA stands for HTML application. An HTML Application (HTA) is a Microsoft Windows program whose source code consists of HTML, Dynamic HTML and one or more scripting languages supported by Internet Explorer, such as VBScript or JScript. A HTA file gets executed without the constraints of the internet browser security model. In simple words, it gets executed as a “fully trusted” application.

Let’s see an example of how to create this attack. For this, we will be using Metasploit’s windows/misc/hta_server module. In this module, the server hosts a HTA file, which when opened on the target system, will execute a payload via PowerShell. Of course, the browser warns the user before executing the payload. But social engineering can be used to convince the target users to execute the HTA file.

Now let’s see how this attack works. We will use this exploit to gain access to Windows 10 target. Start Metasploit and load the module as shown below.

Set the reverse meterpreter payload.

Type command “show options” to see the options we need to set for this exploit. Set the required options and type command “run” to start the exploit.

Image explaining about usage of hta web server exploit

As you can see, it has generated an URL where the payload is being hosted. We need to make the target user click on this URL. When the target user clicks on this URL as shown below.

The browser opens and prompts a warning about the file as shown below.

When the user ignores the warning and clicks on “run”,  a meterpreter session is opened as shown below.

This session can be viewed and opened as shown below. 

That’s how HTA attack works.

Posted on

Windows POST exploitation with Metasploit

Hello aspiring hackers. In our previous blogpost, you learnt in detail about POST exploitation. In this blogpost, you will learn how to perform Windows POST exploitation with Metasploit. Metasploit has many modules that help us in POST exploitation activities on a Windows system after gaining access. Let’s learn about some of the modules.

Reconnaissance

The first module you will learn about in reconnaissance in the arp scanner module. ARP scanner helps us to identify any hidden devices on the network. Hidden devices are those devices which don’t respond to normal requests like ping etc. For example, some firewalls intentionally don’t respond to ping requests. ARP scanning module can detect these devices.

The checkvm module helps us to find out if the machine we hacked is a virtual machine, which in this case is true.

The dumplinks module will parse .lnk files from a user’s Recent Documents folder and Microsoft Office’s Recent Documents folder, if present. Windows creates these link files automatically for many common file types. The .lnk files contain time stamps, file locations, including share names, volume serial numbers, and more.

In some cases, we need to know what are the applications installed in the system we hacked. For example, in a case where we cannot escalate privileges and maybe a vulnerable program installed in the target can help us in privilege escalation. The enum_applications module exactly does that. We can see in this specific case, there are only two programs installed.

Image explaining about windows post exploitation reconnaissance

The enum_logged_on_users module helps us in finding out the users logged in.  This may help us in knowing the usernames of the system. In our case, we go to know the username as “admin”.

The enum_shares module will list the shares of both configured and recently used shares on the compromised system. My target doesn’t have any shares.

The enum_snmp module will enumerate the SNMP service on the target, if installed. It will also enumerate its community strings.

In our case, there’s no SNMP service installed.

The hashdump module does exactly what it says. It dumps the password hashes from the target system as shown below. May I remind you that meterpreter already has this hashdump function.

The usb_history module retrieves the history of usb devices connected to the target system. In my case, no USB devices were connected to the target.

The enum_powershell_env module helps us to find out the version of PowerShell running on the target system. Windows PowerShell is a task automation and configuration management framework designed by Microsoft which consists of a command line shell and associated scripting language built on the .NET Framework and .NET Core.

PowerShell provides full access to COM and WMI, enabling administrators to perform administrative tasks on both local and remote Windows systems. Just like any Metasploit POST module, we need to have a valid meterpreter session to run this module. Background the current meterpreter session and load the PowerShell environment enumeration module as shown below. Type command “info” to view the information about this module as shown below.

Type command “show options” to view the options to be configured. Set the session ID of the meterpreter session we just sent to background and execute the module using command “run”.

powershell enumeration

As you can see in the image above, PowerShell version 2.0 is installed on our target system an there are no PowerShell snap-ins are installed.

The most interesting of all these is the lester script. The lester script suggests local exploits for the target system. This script automatically searches and lists exploits for the targeted system. Now you may question why do we need exploits for the system we already hacked. Well maybe to escalate privileges or find an exploit which gives us more power on the system.

That’s all for today folks. I will be back soon.

Posted on 6 Comments

Beginners guide to hash cracking

Hello aspiring ethical hackers. In our previous blogpost on cryptography, apart from learning the uses of encryption in cybersecurity, you learnt about various encryption techniques. One such method is hashing. In this article, you will learn about hash cracking.

The process of cracking a password hash is known as hash cracking. In ethical hacking, you will definitely encounter password hashes. You will have to learn how to crack these hashes to be able to move forward in pen testing or Red teaming. For example, let’s say you encounter NewsP Free News Script 1.4.7 software in the target network. This particular version of software had a credential disclosure vulnerability as shown below. The only thing that stops me from accessing the website is the password in encrypted format.

Image explaining how to crack hash es with kali linux

The first step in cracking hashes is to identify the type of hash we are trying to crack. We can identify a hash type using a tool named hash-identifier. This tool is installed by default on Kali. Open a terminal and type command given below.

hash-identifier

Enter the hash we need to identify as shown above and hit ENTER. It will show the possible hash type as shown below. In our case, it is MD5 hash or a variant of it.

We can also use another tool “hashid” for hash identification. It’s syntax is as shown below.

hashid <hash>

Since now we know that the hash type is Md5, it’s time to crack the hash. We will use a tool called ‘findmyhash’. This tool tries to crack the hash by using various online hash crackers available. To use this tool, we need to specify the hash type ( which we already know ) and hash after it as shown below.

findmyhash <hash type> -h <hash>

After successfully cracking the hash, it will display us the password as shown below. In our case, the password is admin.

Posted on 3 Comments

Webshell attack with msfvenom

Hello aspiring hackers. In our previous howtos, we saw about different shells like the infamous c99 shell,  web shells in Kali Linux and Weevely. In this howto, we will see how to perform webshell attack with Metasploit. We will be getting a meterpreter shell on the website.

One of the wonderful features of Metasploit is creating payloads as per requirement. Using msfvenom, we can create binaries for Windows, MAC and Linux.  We can also create shell payloads for websites in different formats like php, asp , javascript and asp. In future howto’s we will definitely learn more about msfvenom but for this howto, we will create a php payload.

As you can see below, I have created a php payload named “shell.php” with the metasploit payload option “php/meterpreter_reverse_tcp”. This gives us a reverse php meterpreter shell. The “lhost” option is our attacker system’s IP address and “lport” the port on which we want php meterpreter shell back.

Image explaining webshell attack with metasploit

After the shell is successfully created, let’s start a listener with Metasploit as shown below. Remember to set the same payload we set while creating the payload.

Set the lhost and lport as shown below. They should match with the values in the shell we created. Type command “run” to start the listener.

Now you need to find a site vulnerable to file upload. For this howto, I’m using my own vulnerable webapp “Vulnerawa”. To know more about Vulnerawa go here. Vulnerawa has a file upload vulnerability in its careers page.

Go to its file upload page and upload the shell. That shouldn’t be a big problem.

Now go to the shell we just uploaded through the website. Normally its located in the uploads directory ( In real websites, you need to locate it ). The shell will look like below.

In the listener we started an the attacker system, we should have already got the meterpreter shell. Happy hacking.

That is how we perform webshell attack with Metasploit.