Posted on

Linux Privilege Escalation : Cron Jobs

Hello aspiring Ethical hackers. In this article you will learn how to exploit Cron jobs for Linux Privilege Escalation. If you are familiar with Windows Task Scheduler you will readily understand what cron is. Yes, it is used to schedule jobs or commands in Linux.
For example you have a Linux server and want to clean cache regularly once a day. You can do this manually everyday or schedule a job to do this daily without your intervention. Here’s where cron jobs assist you. You can assign a job in cron. Sometimes these jobs are assigned with root privileges and these can be exploited to gain root privileges. Let’s see it practically.

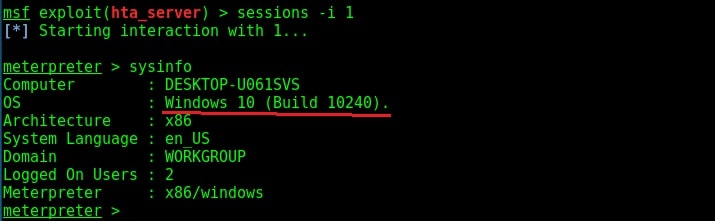
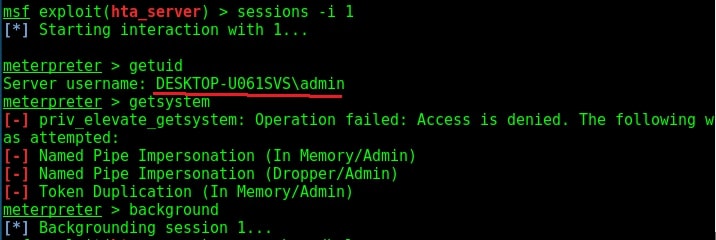
For this article, we have a target on which we already gained a shell. Then I ran the PE.sh privilege escalation script on the target to find ways to elevate privileges on the target.

As I scroll down the output of our PE.sh file, we can see our target has some cron jobs set.

linux privilege escalation with cron jobs

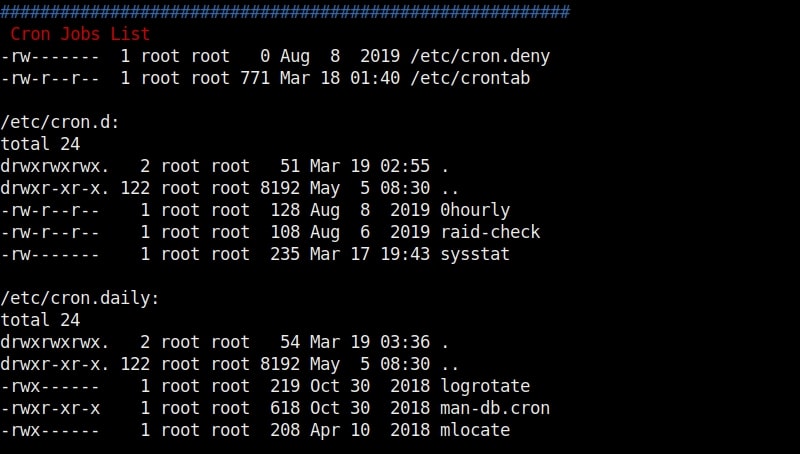
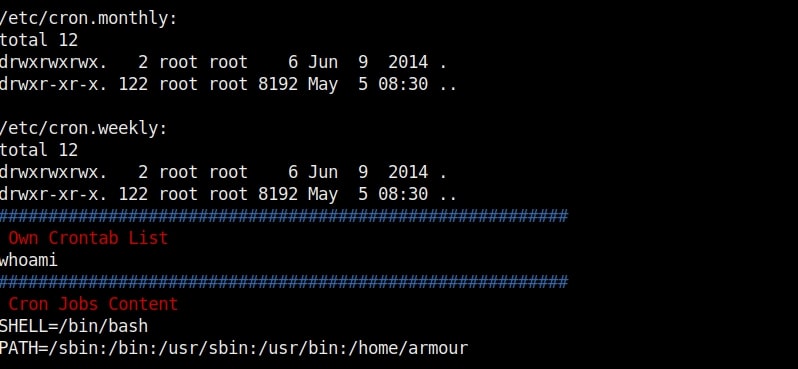
As you can see in the above images, we can set cron jobs monthly, daily or hourly. But our job here is to not schedule cron jobs. It is to exploit them. As we scroll down further, we can see the format of a cron job.

In the above image, you can see the exact format of a cron job. It is minutes first, hours, day of month, month and day of week. We can see a cron job named /opt/new_year.sh that is scheduled to run at the 00:00 time of first day of the first month of every year. That is the occasion of New Year.

But what does * * * * * mean? It means these cron jobs are scheduled to run every minute of every hour of every day of the week (i.e daily) , every month. That typically means these jobs run each and every minute. The important thing to notice here is that all these jobs are running as user “root”.

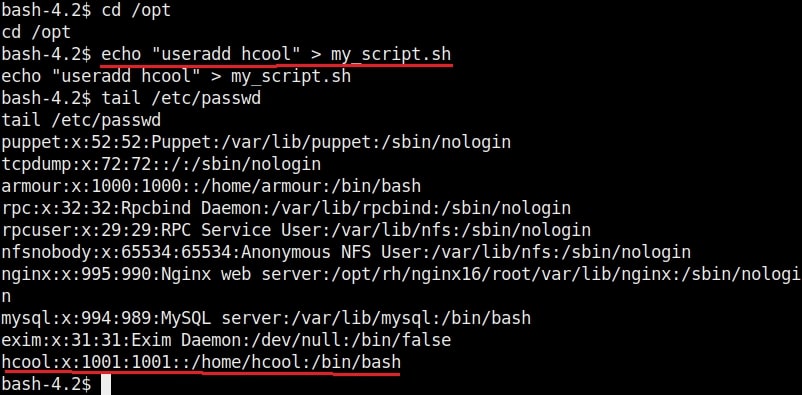
Let’s manipulate one the these scripts, let’s say /opt/my_script.sh. We have a SETUID bit set on “dash” shell, one of the shells installed on the target system.(We will see in a short while what SETUID is). This can be seen in the image below.

We are editing the my_script.sh file with a command “chmod u-s /bin/dash”. This will remove the SETUID bit. Wait for one minute and check the /bin/dash command.

The SETUID bit is removed. Not just that, we can add new users on the target system as shown below.

That’s how cron jobs can be exploited for linux privilege escalation.

Posted on

PrintNightmare, Privilege Escalation in Powershell

PrintNightmare is a critical vulnerability affecting the Microsoft Windows operating systems. The recently disclosed vulnerability is present in the print spooler service of Microsoft Windows. The printer spooler service is used for printing services and is turned on by default. The versions of Windows vulnerable to PrintNightmare include Windows 7 to Windows 10 and windows Server 2008 to the latest version of Windows Servers.

The PrintNightmare vulnerability has two variants : one is enabling remote code execution (CVE-2021-34527) and the other privilege escalation (CVE-2021-1675). In this article, readers will see a demonstration of exploiting the privilege escalation vulnerability in PrintNightmare.
For this demonstration, we will use Windows 10 version 1809. The Powershell Script we used in this demo can be downloaded from Github.

In this scenario, imagine I already have access to the target machine as a user with low privileges. Let me demonstrate it to you. The first thing I need to confirm is whether the printer spooler service is running on the target system or not. This can be done using powershell command “Get-Service -Name “spooler”“.

The print spooler service is running. Now I can exploit it. Before that let me show you that I am a user with limited privileges i.e as “user 1” with very limited privileges.

Next, I already downloaded the Powershell script I need to exploit the Printnightmare vulnerability .So I moved to the Downloads folder where the Powershell script is saved. Once I am inside that folder, I run the command

Import-Module .\ <script Name>“as shown below.

Once the Powershell module is imported, I can execute the script with command
Invoke-Nightmare -NewUser “<username to create >” -NewPassword <password for that new user> DriverName “PrintMe”
This command will create a new user with administrator privileges.

How to exploit printnightmare

In the image above, you can see the existence of new user named “hacker” which I created. Now, let’s check the privileges of this user.

As readers can see, the new user I created belongs to the local administrators group. I reboot the system and try to login as that user.

The exploitation is successful.

Posted on 1 Comment

Beginners guide to UAC bypass

Hello, aspiring ethical hackers. In our previous blogpost, you learnt about various techniques used for Windows privilege escalation. In this blogpost, you will learn about UAC bypass, one of the techniques used for privilege escalation in Windows. To understand UAC bypass, you need to first understand what is UAC.

What is UAC?

User Account Control (UAC) is a mandatory access control feature of Windows operating system that helps in improving the security of the operating system. It was introduced in Window Vista and Windows Server 2008 and has ben improved since then. User Account Control works by limiting a software or program to run with standard user privileges (low privileges) until and unless a user with administrator privileges authorizes it by giving permission. This way, only applications trusted by the user can be run on the system. This helps to prevent malware infection as malware and virus need administrator privileges to infect the system wholly.

How can UAC be bypassed?

Now, you have a question. How can UAC be bypassed. There are various UAC bypass methods. They are,

1. Registry key manipulation:

This technique works by hijacking the normal execution flow of an auto elevated application. What are auto-elevated applications? In Microsoft windows, if a binary is trusted (i.e. it has been signed with a MS certificate or the binary is in a trusted directory), the UAC prompt will not be presented. This can be exploited using a registry key.

The fodhelper privilege escalation method is an example of this.  Fodhelper.exe is a trusted binary in Windows operating systems that is used to manage features in Windows settings. We can exploit this binary by hijacking a special key in the Registry under the current user hive and inserting a custom command that will get invoked when the Windows fodhelper.exe application is launched.

Once the UAC flag is turned off, we will spawn a second shell with SYSTEM privileges. Metasploit has a module for this. Let’s see it practically using Metasploit. Imagine we have a scenario where we have gained access to a Windows system using any Windows hacking technique.

To use the fodhelper module to elevate privileges, we need to background the current session.

Search for fodhelper module using the search command.

Image explaining about Windows privilege escalation with fodhelper module

Load the module and set the session ID as shown below.

Run the module as shown below.

As you can see, we successfully got a meterpreter session. When I check privileges, its still user privileges but when I run “getsystem” command, I get system privileges on the target Windows system.

2. DLL hijacking:

In this method, the execution of an elevated program is hijacked using DLL Search order hijacking, DLL loading, redirection or other DLL vulnerability.

3. Elevated COM interface method:

COM stands for Component Object Model. It acts as a binary interface between various processes of different programming languages. In Windows, is is the basis for several other Microsoft technologies like OLE, OLE Automation, Browser Helper Object, ActiveX, COM+, DCOM, Windows shell, DirectX and Windows runtime. In this method, the COM handler is bypassed while it references registry when a high integrity process is being loaded. These DLLs contain the payloads that result in elevated sessions.

Let’s demonstrate this using Metasploit. As for every privilege escalation exploit, we need to already have a meterpreter session on target. This can be achieved using one of the Windows hacking techniques. Once we have it, search for the bypassuac_comhijack module as shown below.

Load the bypassuac_comhijack module and check its options by using the “show options” command as shown below.

Set the session id and execute the exploit using “run” command as shown below. If everything went right, we will have another meterpreter session as shown below.

Check the privileges using the “getuid” command. If you still don’t have system privileges, run command “getsystem” and even if it results in an error, check your privileges once again using command “getuid“. You should definitely have system privileges by now.