Posted on

How to install Parrot OS in VMware

Hello aspiring ethical hackers. In this article, you will learn how to install Parrot OS in VMware. Parrot OS is an operating system designed for pen testing similar to Kali Linux. It is free and open source GNU/Linux distribution based onDebiandesigned for security experts, developers and privacy aware people. It includes a full portable arsenal for IT security and digital forensics operations. It also includes everything you need to develop your own programs or protect your privacy while surfing the net.

There are two ways of installing Parrot OS in VMware. They are,

  1. Using a OVA file
  2. Using a ISO file

1.Installing Parrot OS using a OVA file

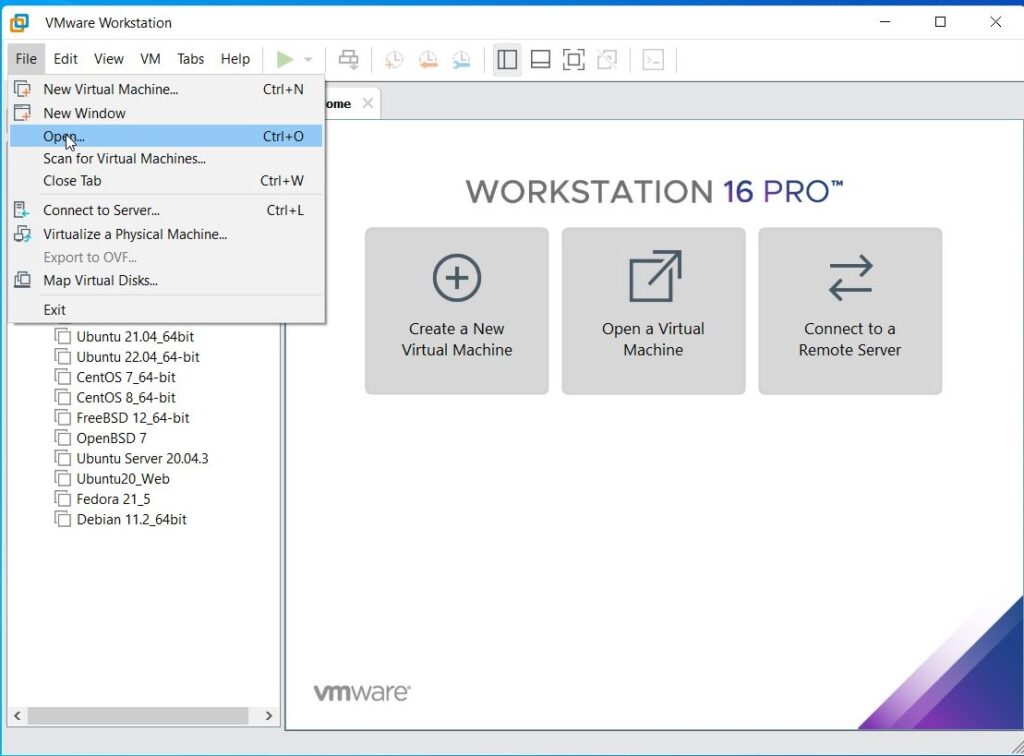
Let’s first see how to install Parrot OS in VMWare using the OVA file provided by the makers of Parrot OS. You can download the OVA file of Parrot Security OS from the “virtual” section here. Once the OVA file is finished downloading, Open VMWare and click on “Open”.

Parrot Ova Vmware 2 1024x756

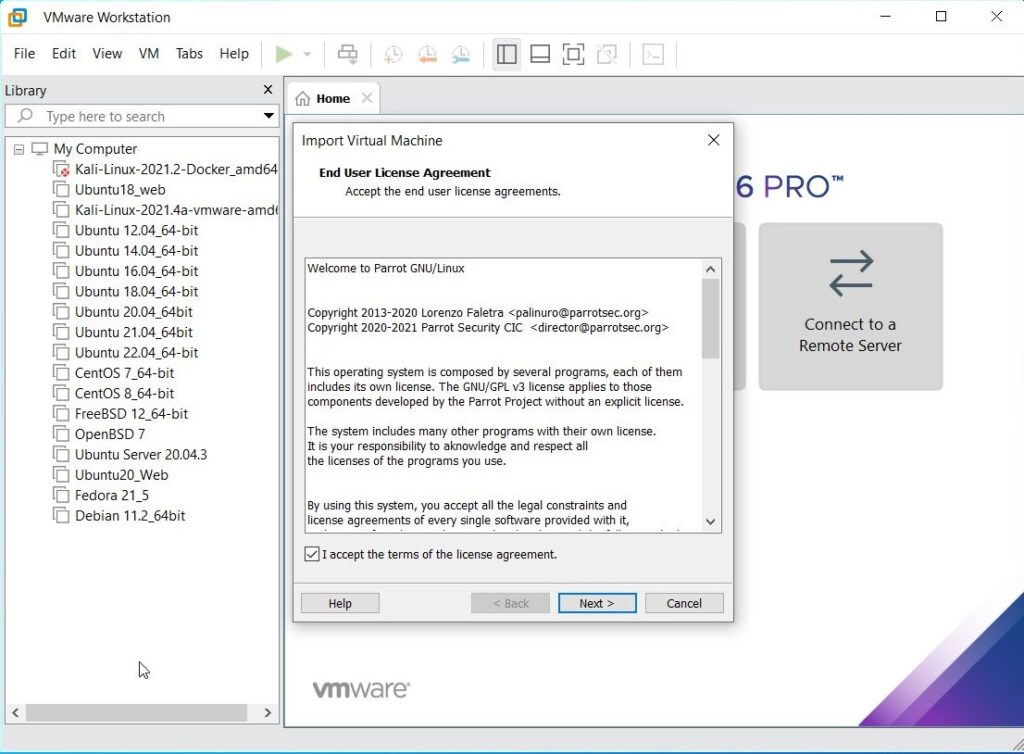
Enable the checkbox to accept the terms and conditions and click on “Next”.

Parrot Ova Vmware 3 1024x754

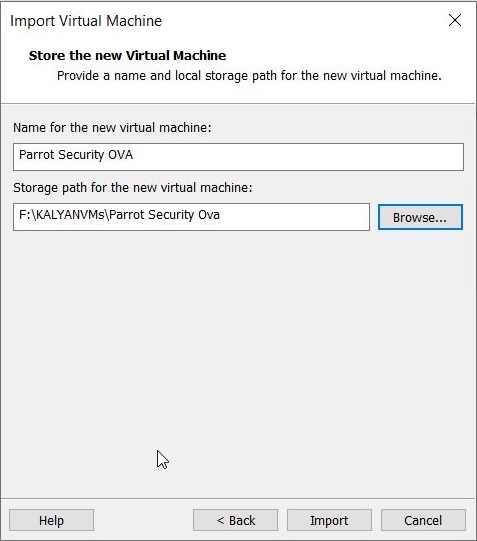
In the new window that opens, browse to the OVA file you downloaded and click on “Import”.

Parrot Ova Vmware 4

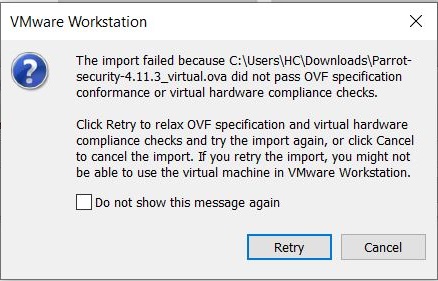
If you get an “import failed” error as shown below, click on “Retry”.

Parrot Ova Vmware 5

The import process should start as shown below.

Parrot Ova Vmware 6

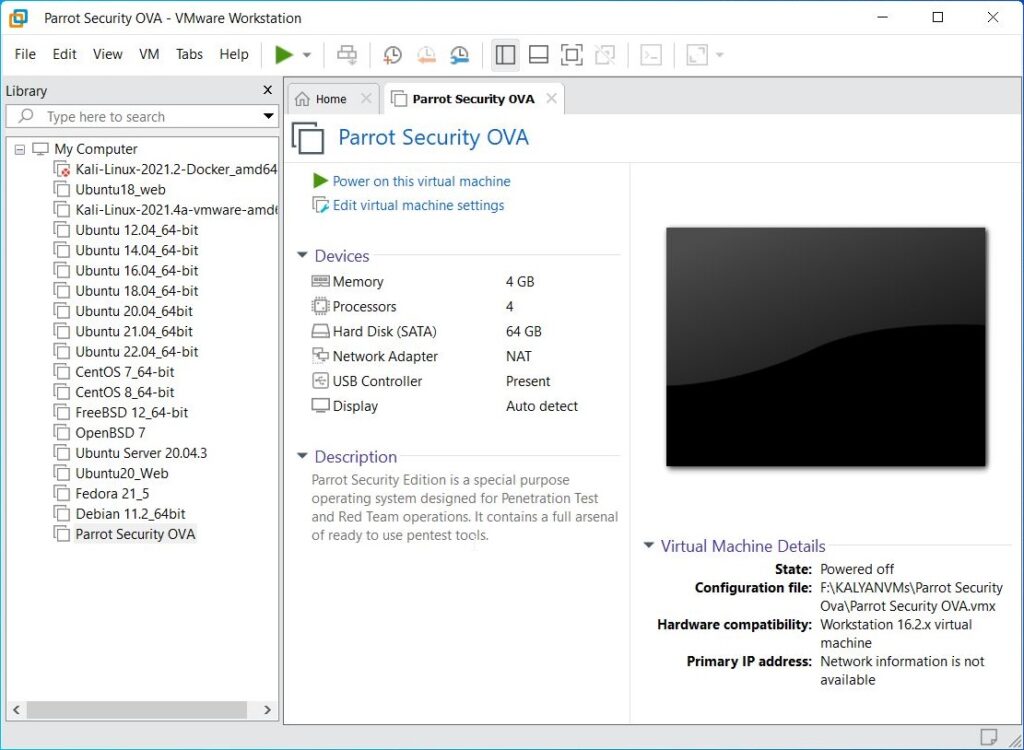
Once the importing process is finished, power on the virtual machine.

Parrot Ova Vmware 7 1 1024x750

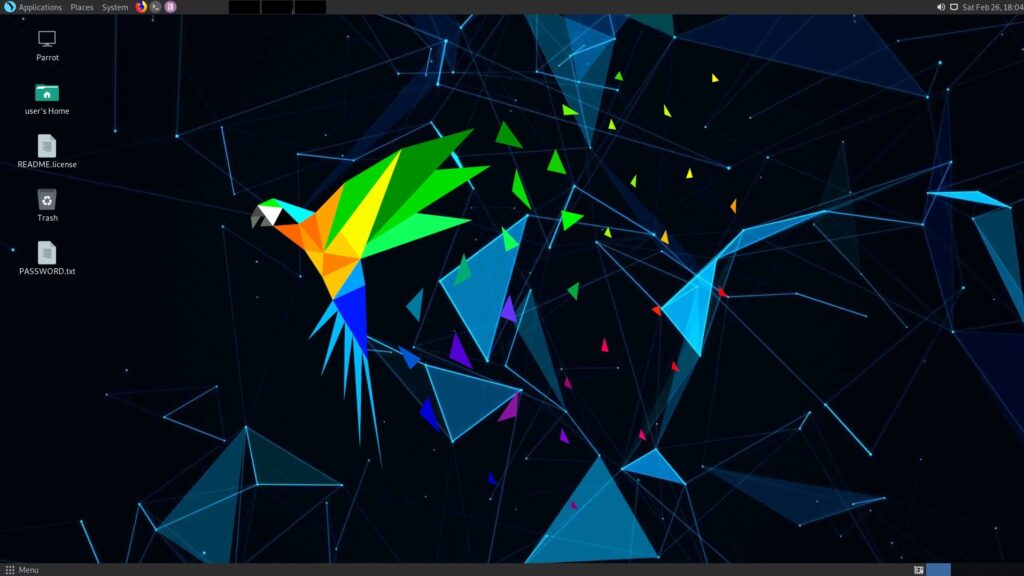
The installation is finished.

Parrot Ova Vmware 8 1024x576

2. Installing Parrot OS using a ISO file

Now, let’s see how to install Parrot OS using an ISO file. Download the LIVE image from the Parrot Security OS page. Once the download is finished, open VMware Workstation (Version 12 used for this article) and hit “CTRL+N”. The below window should open.

Parrotvm1

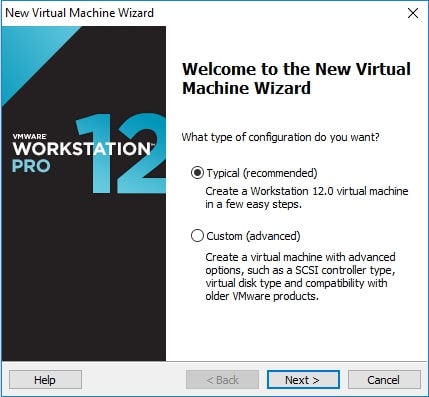
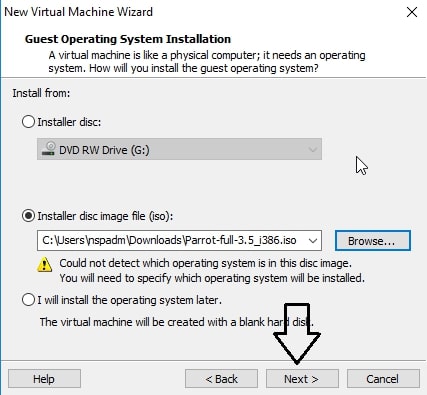
Make sure the “Typical” option is selected and click on “Next”. That takes us to the next window. Initially, the “installer disc image file” field should be empty. Click on “browse” and navigate to the location of the ISO file we just downloaded and select it. Now the window should look like below. Click on “Next”.

Parrotvm2

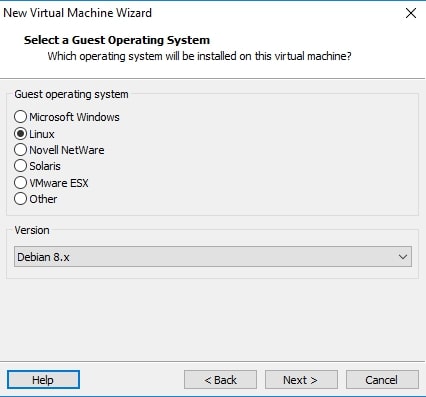
The guest operating system should be automatically selected for you. If not, select Linux as OS and version as Debian 8.x (since I am installing a 32bit OS, make it Debian 8.x64 if you are installing 64bit OS). Click on “Next”.

Parrotvm3

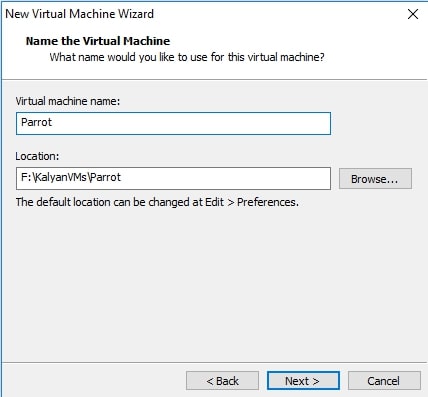
Choose the name of virtual machine and its location as you like. I named it “Parrot”. Click on “Next”.

Parrotvm4

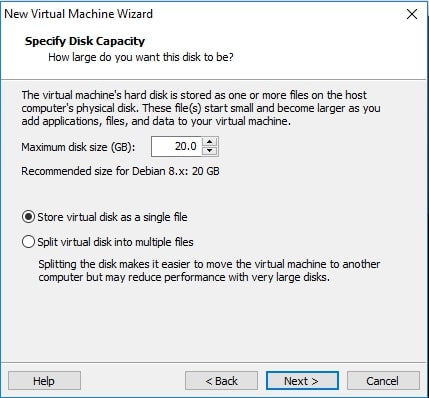
Allocate the hard disk memory for your virtual machine. Keep the minimum as 20GB. Click on Finish.

Parrotvm5

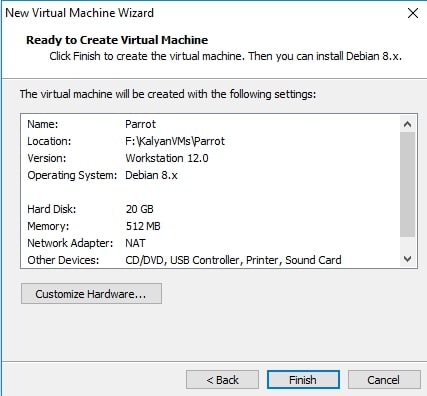
It will show you a summary of all the selections you made. If you want to make any changes, click on “Customize hardware” button. Otherwise, click on “Next”.

Parrotvm6

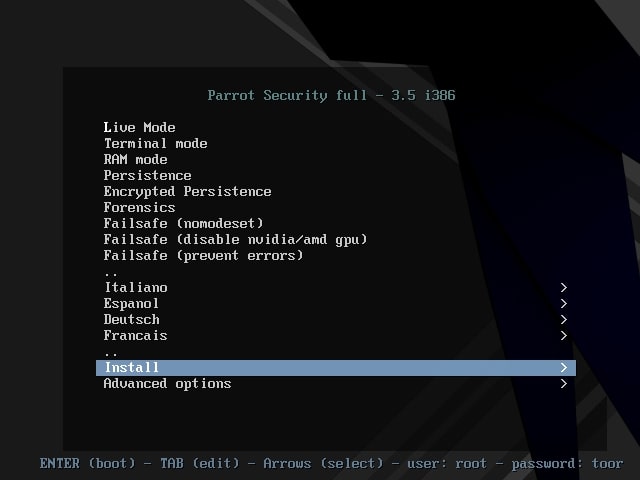
The virtual machine is created with the name you gave it. Power on the virtual machine. It will boot and take you to the interface shown below. Choose the “Install” option. In the next window select “Standard Installer”. You can select these options using “tab” button.

Parrotvm7

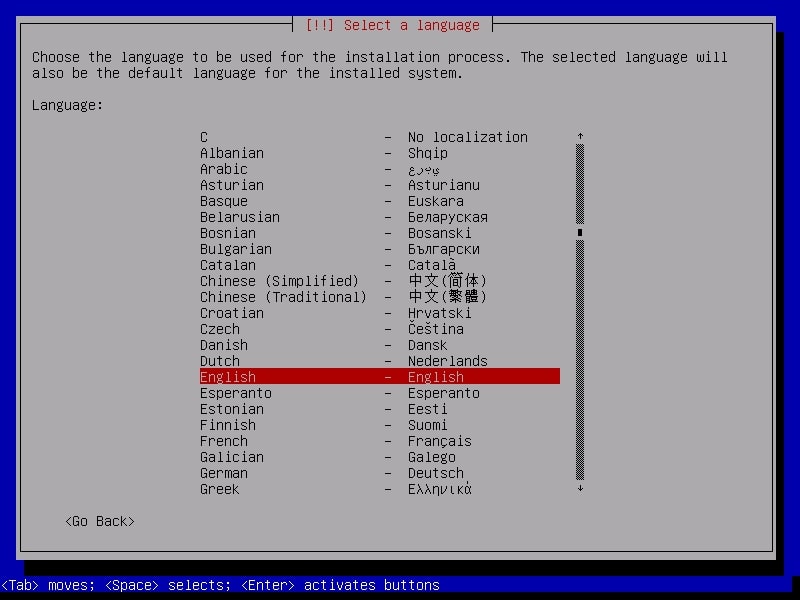
Select the language in which you want to continue the installation process. Here, I chose English.

Parrotvm9

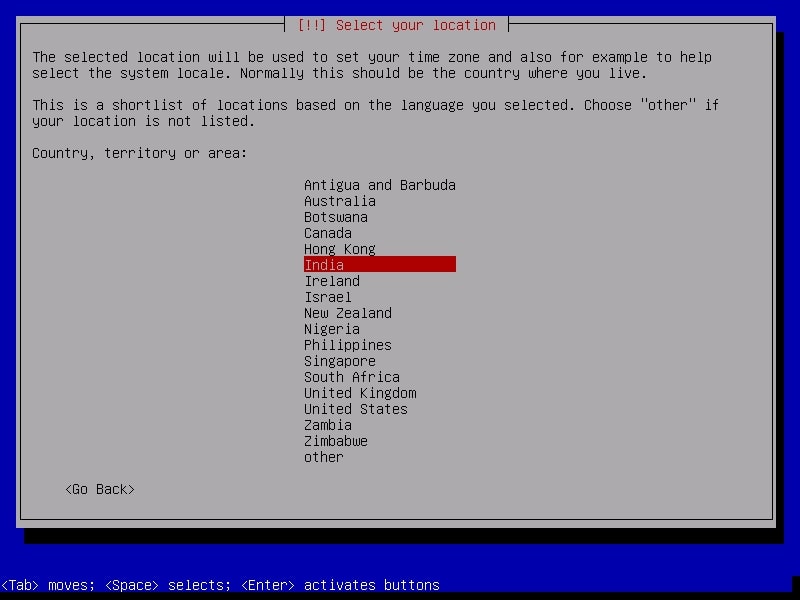
Select your country. I chose location as India.

Parrotvm10

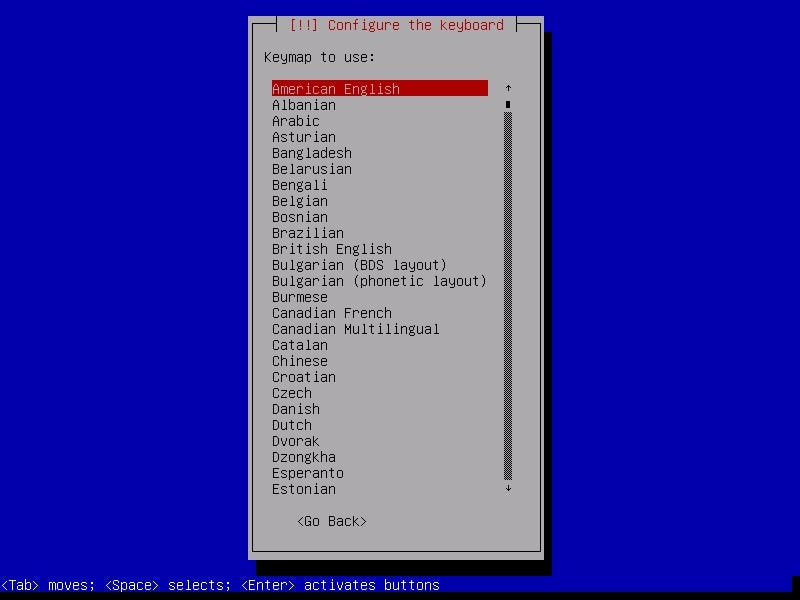
Select the keyboard configuration you want.

Parrotvm11

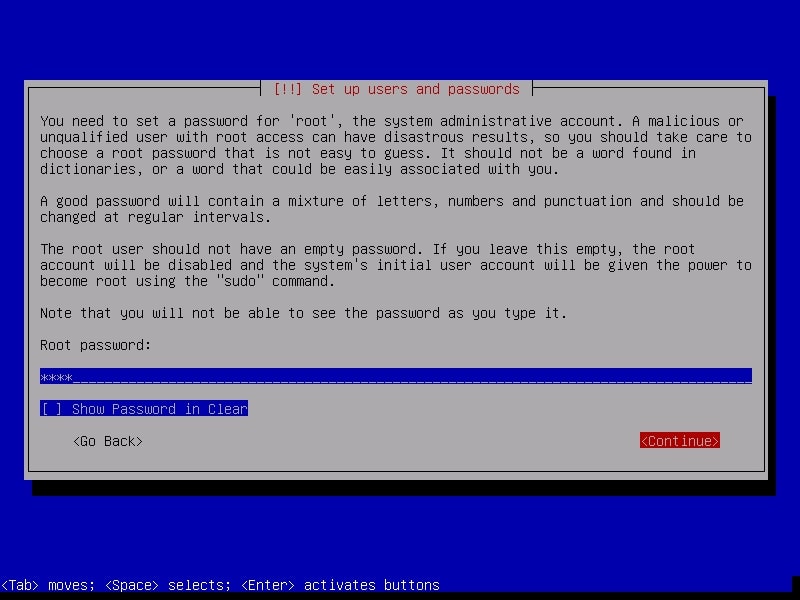
It is important to set the root password for the machine before we do anything. Set a complex password. Read the suggestions before you set the root password.

Parrotvm12

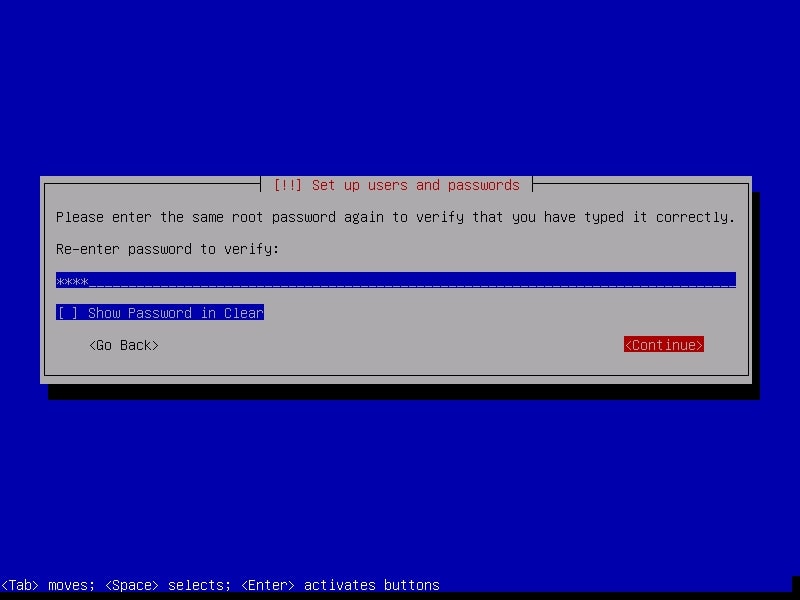
Re-enter the root password again to confirm it.

Parrotvm13

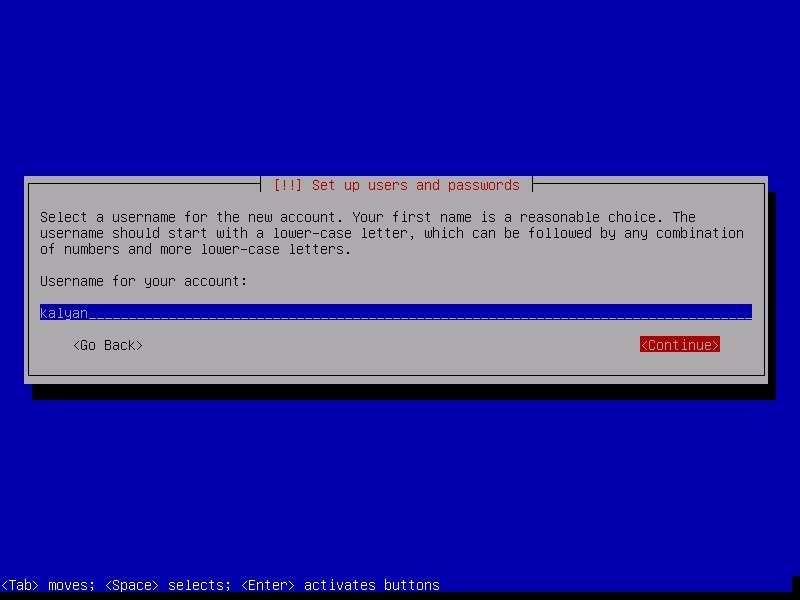
Although you have a root account, it is good practice to use the system as a non root user. The system will prompt you to create a new user account for non-administrative activities. I am creating a user with name “kalyan”. I am giving the same name as username.

Parrotvm15

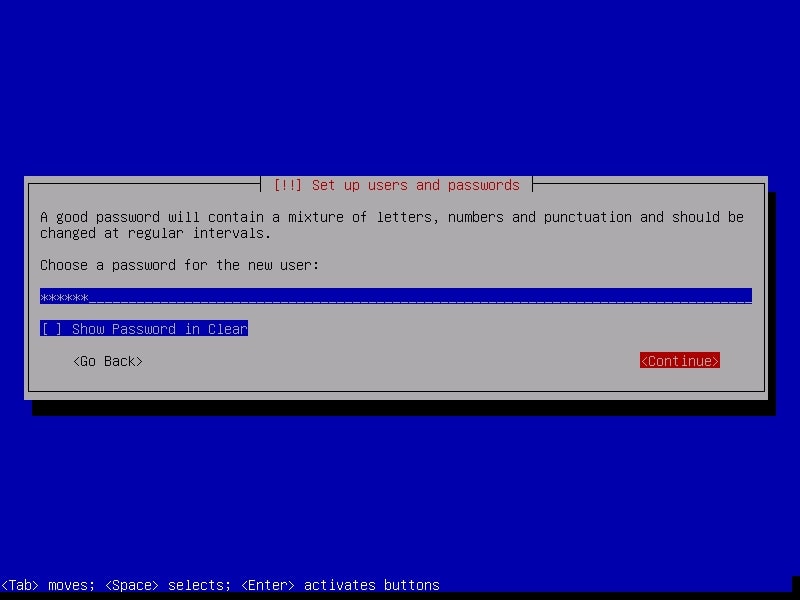
Create a password for the user account you just created (non-root user). Make it a good password for security reasons.

Parrotvm16

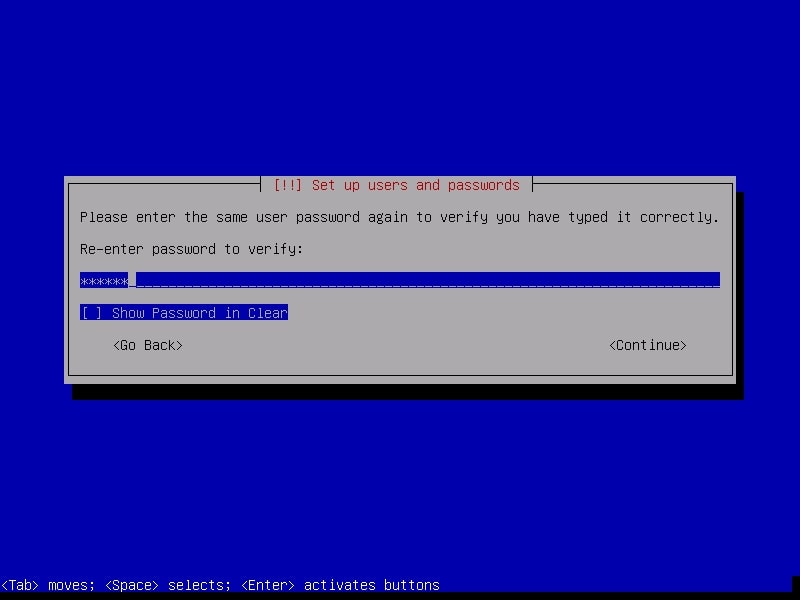
Re-type the password again to confirm the password you have assigned.

Parrotvm17

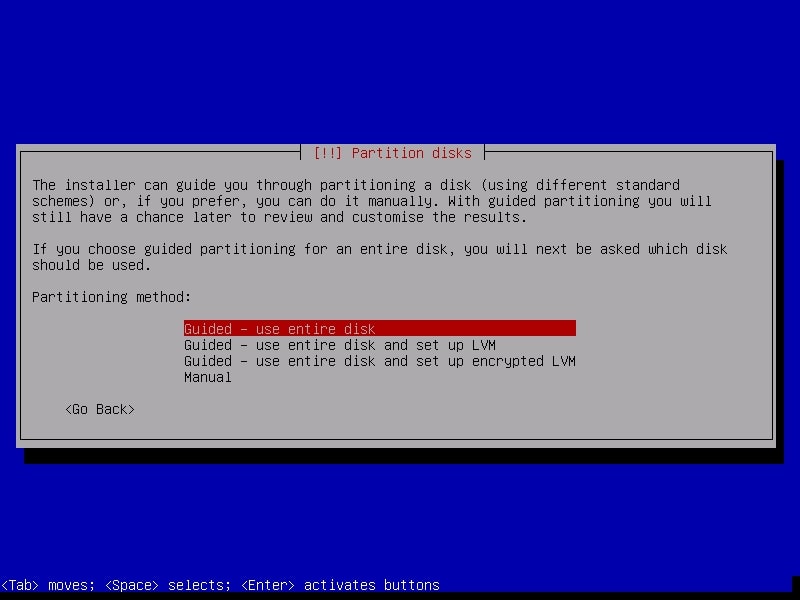
The next step is partitioning the hard disk. Unless you are an expert or want to try something different, use the entire disk.

Parrotvm18

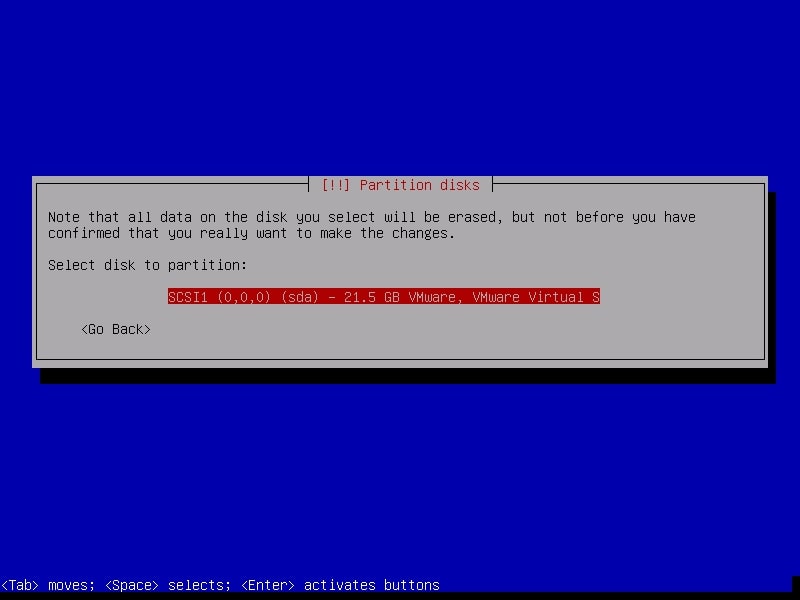
The system will warn you before partitioning. Select the disk for partitioning.

Parrotvm19

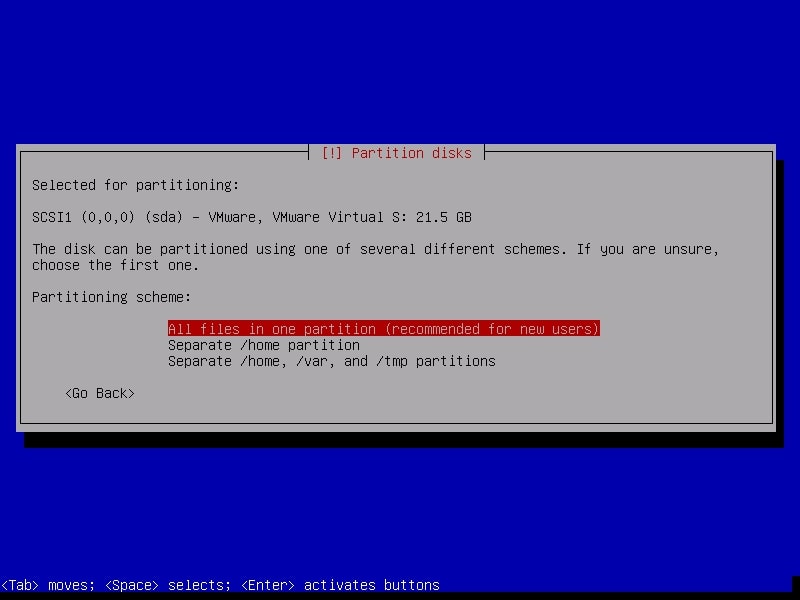
It will ask you to choose the partitioning scheme. Choose the first one. It is also recommended for new users.

Parrotvm20

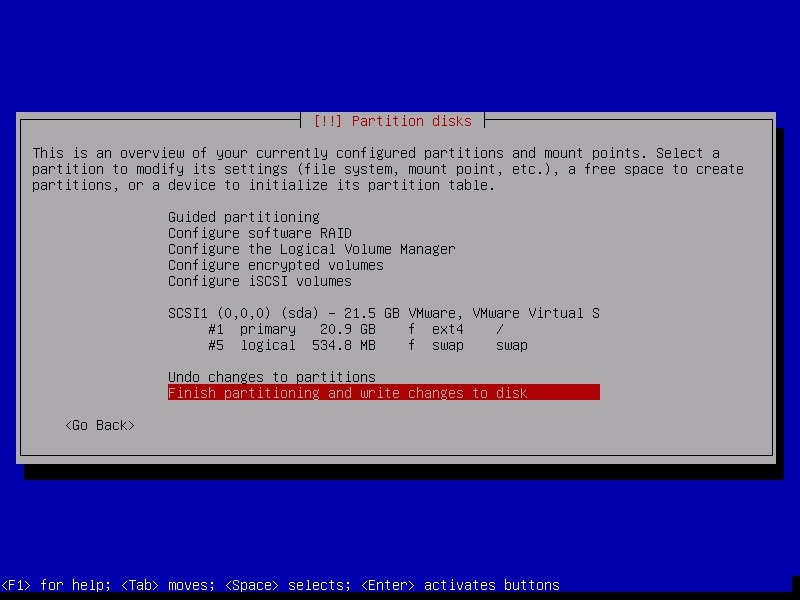
Next, it will show you changes you have configured before writing the changes to the disk. Select “Finish partitioning and write changes to the disk”.

Parrotvm21

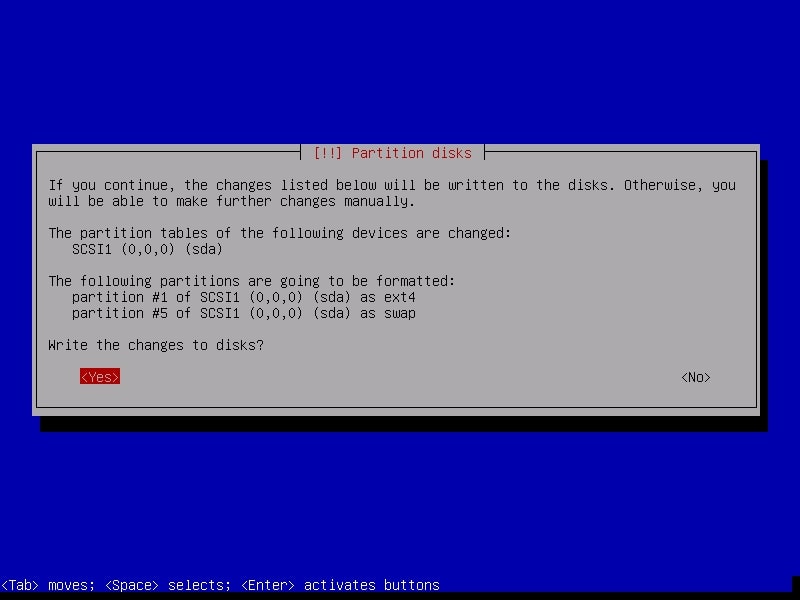
Confirm for one last time that you want to write changes to the disk by selecting “Yes”.

Parrotvm22

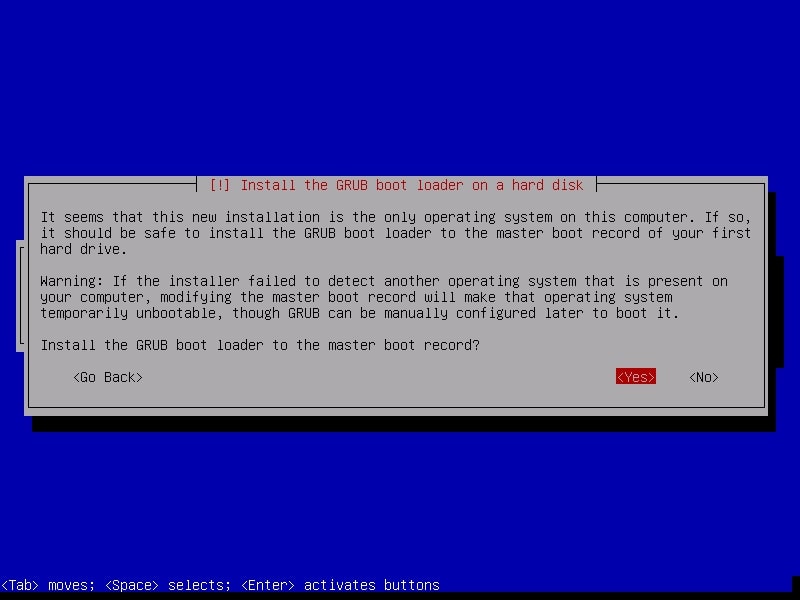
The installation process will start and may take some time. You can have snacks and come back. After installation finishes, it will prompt whether you want to install GRUB boot loader.

Parrotvm25

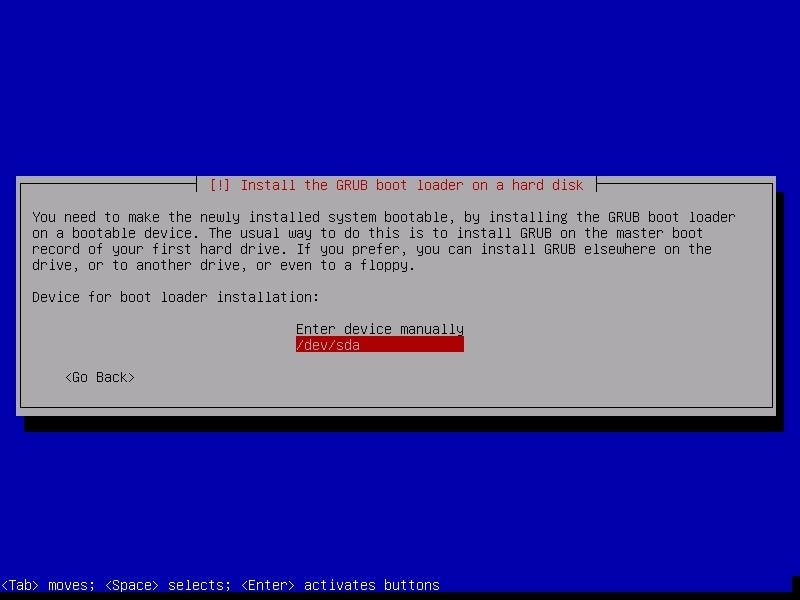
Select “Yes”. Then it will ask you where to install the boot loader. Select the /dev/sda disk.

Parrotvm26

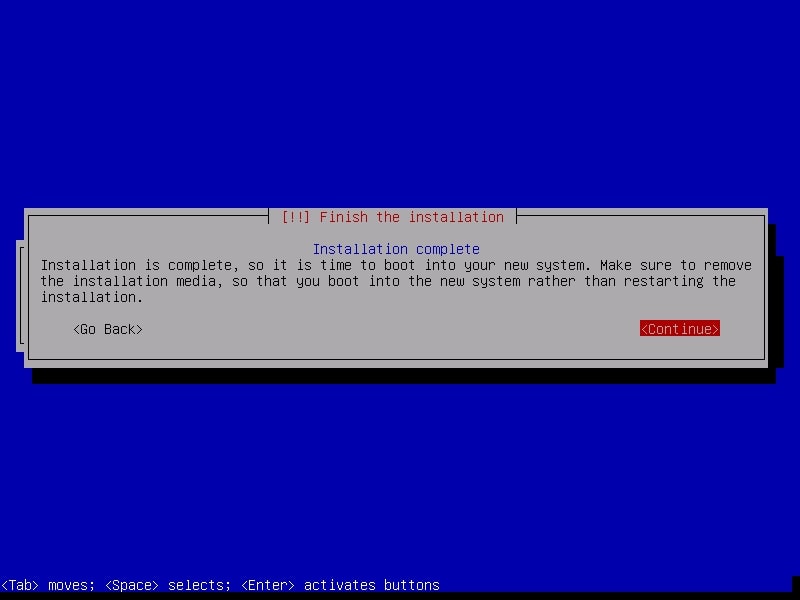
After the installation is finished, it will show you a message as shown below. It’s time to boot into your new system.

Parrotvm27

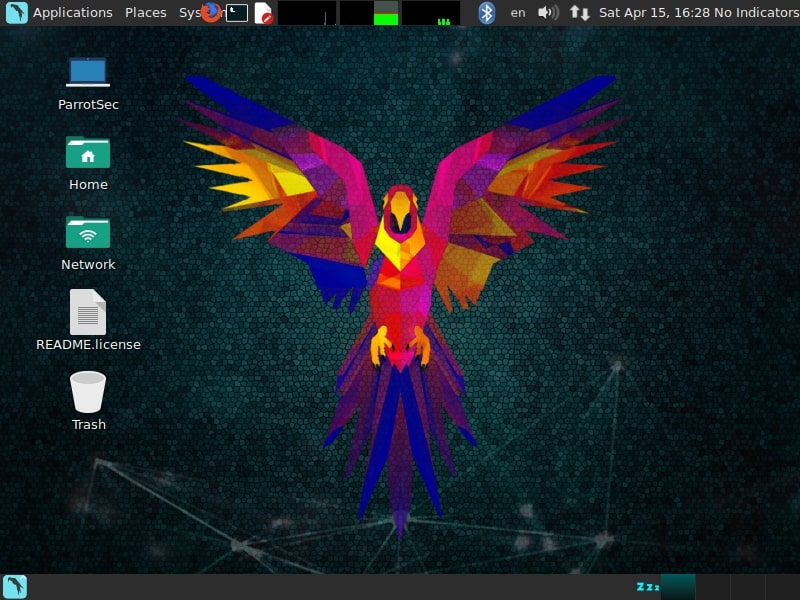
After the system boots, it will present you a login screen. You can login as either root or the non-root user you created . Once you login, your new pen testing distro should look as below.

Parrotvm29

See how to install Parrot OS in VirtualBox.

Posted on

How to install Parrot OS in VirtualBox

Hello aspiring Ethical Hackers. In this article, you will learn how to install Parrot OS in VirtualBox. Parrot OS is an operating system designed for pen testing similar to Kali Linux. It is a free and open source GNU/Linux distribution based onDebiandesigned for security experts, developers and privacy aware people. It includes a full portable arsenal for IT security and digital forensics operations.

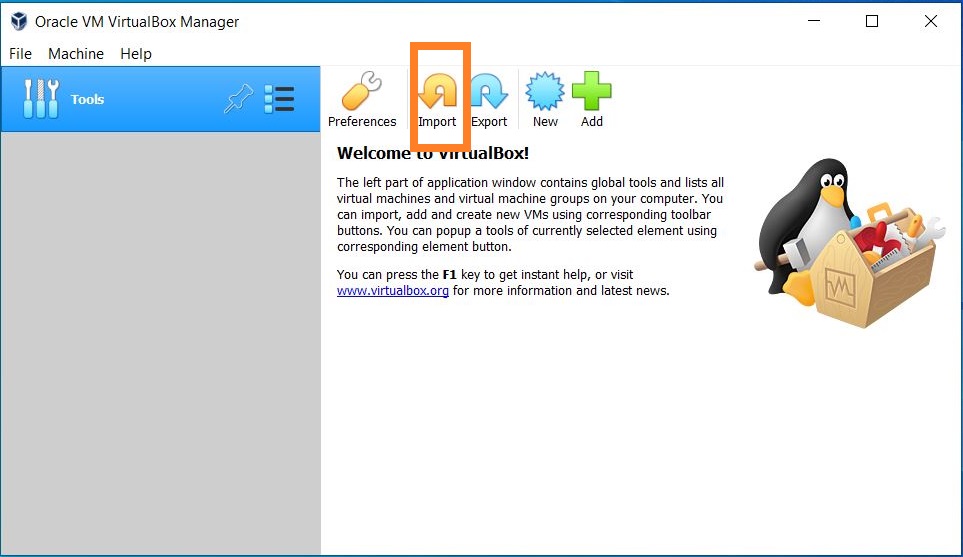
In this article, we will be installing Parrot Security OS in VirtualBox using the OVA file provided by the makers of Parrot OS (See how to install Parrot Security OS using the ISO file). You can download the OVA file of Parrot Security OS from here. Once the OVA file is finished downloading, Open VirtualBox and click on “Import”.

Parrot Ova Vb 1

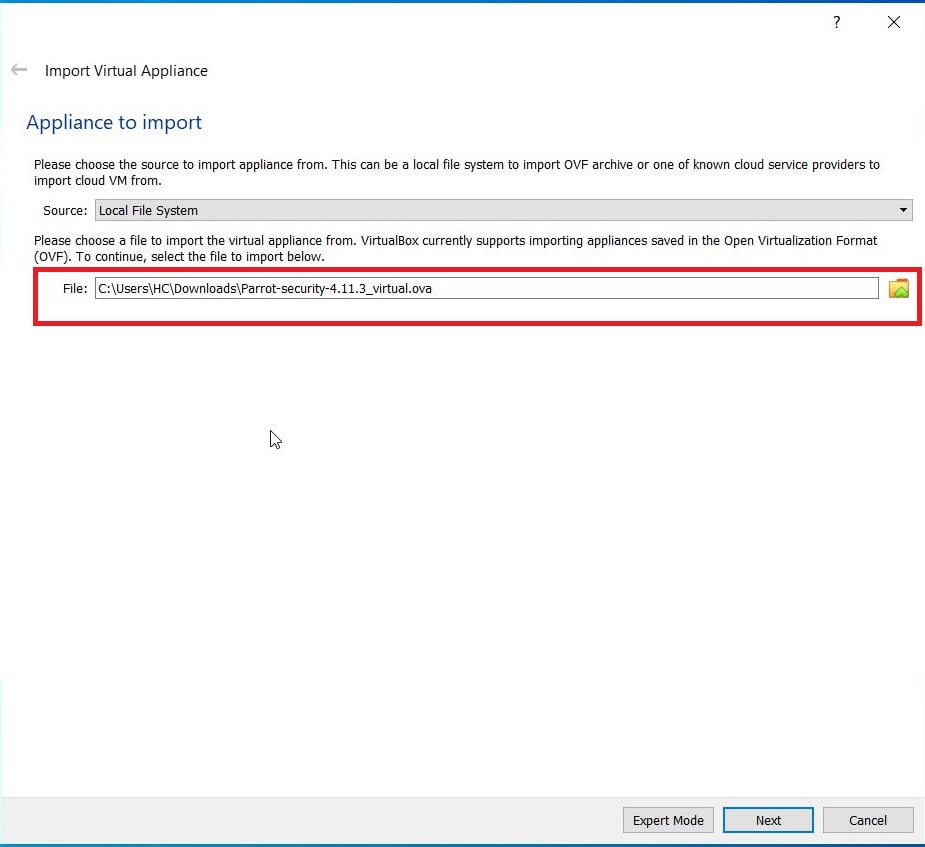
Browse to the OVA file we just downloaded and click on “Next”.

Parrot Ova Vb 2

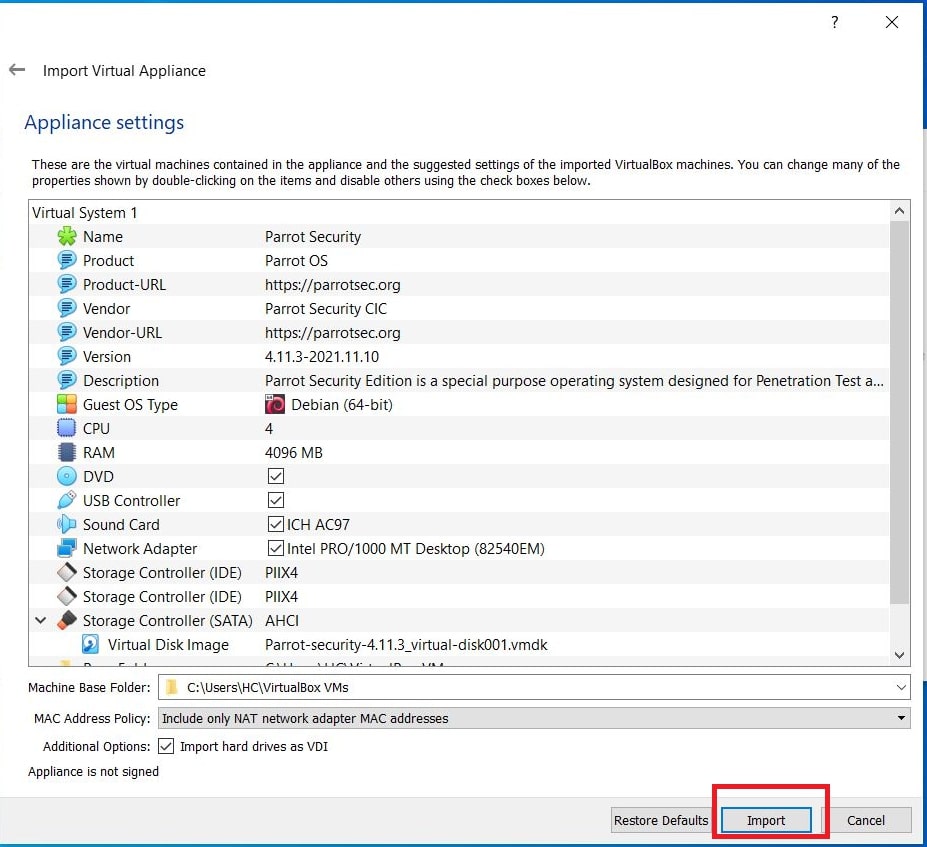
All the settings applied to the virtual machine are displayed. Change any settings if necessary and click on “Import”.

Parrot Ova Vb 3

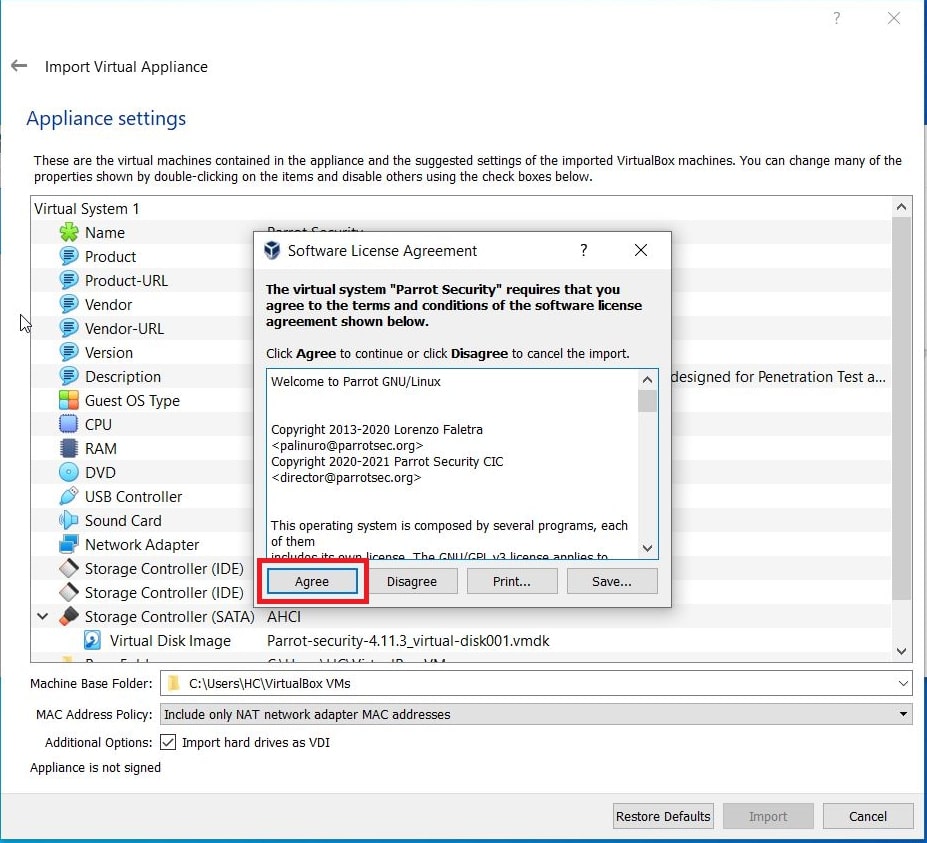
When Software License Agreement is displayed, Click on “Agree”.

Parrot Ova Vb 4

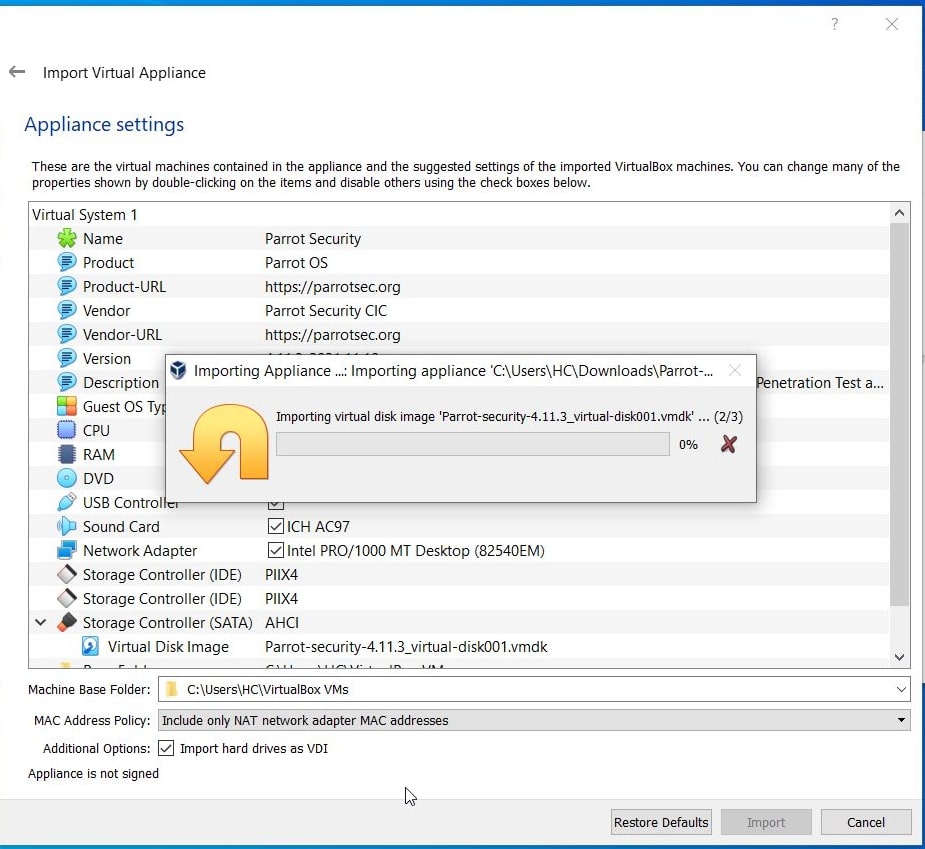
Virtual box will start importing the Parrot Security OS virtual appliance as shown below.

Parrot Ova Vb 5

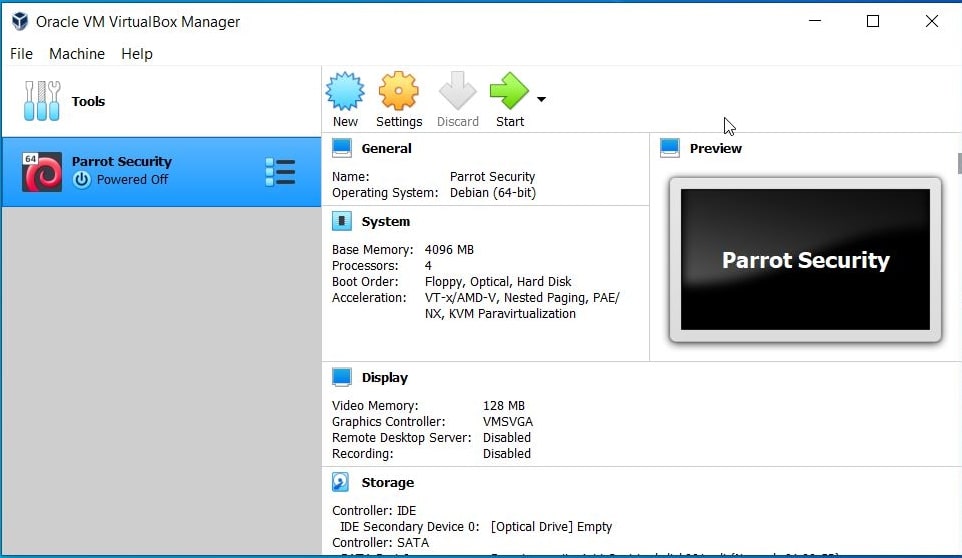
After the import is complete, it will be displayed in the list of virtual machines as shown below.

Parrot Ova Vb 6

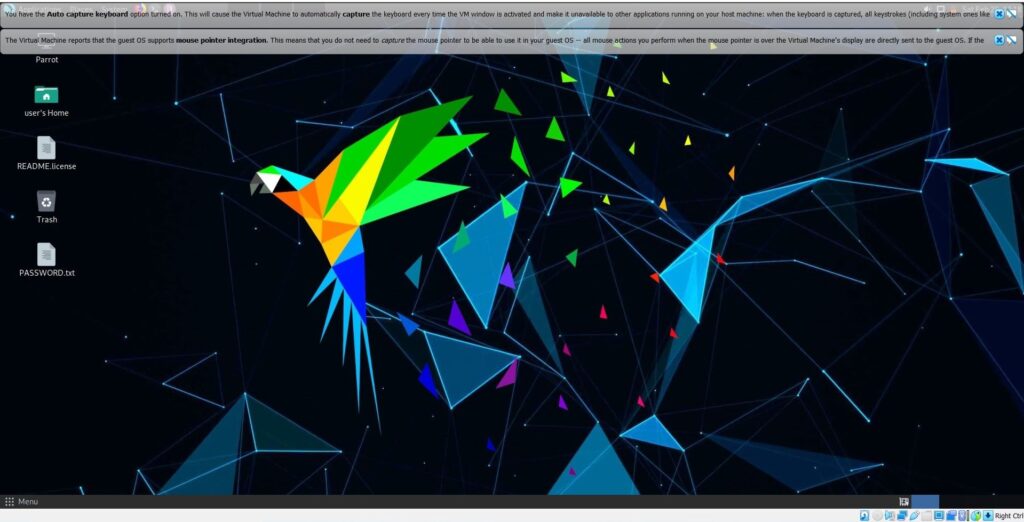
We just need to power it up and the attacker machine is ready.

Parrot Ova Vb 7 1024x522

Posted on

Parrot OS VirtualBox installation using ISO File

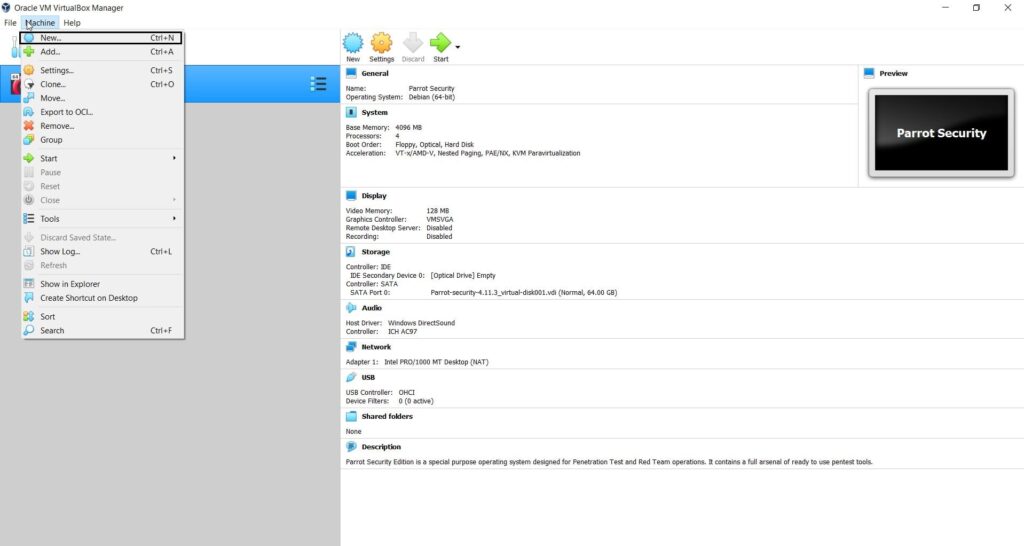
Hello aspiring ethical hackers. In this article, you will see how to install Parrot Security ISO in VirtualBox. In our previous article readers have seenhow to install Parrot Security OS in VirtualBox using OVA file (VirtualBox image file). In this article, readers will see how to install Parrot Security OS in VirtualBox using ISO file. Download the Parrot security ISO file from here. Once ISO file is finished downloading, open VirtualBox, go to Machine > New or hit CTRL+N as shown below.

Parrot Security Iso 1 1024x546

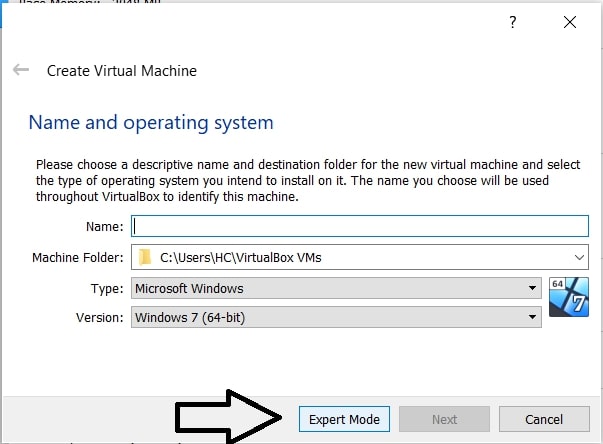
A new window will open as shown below.

Parrot Security Iso 1a

Click on “Expert mode”.

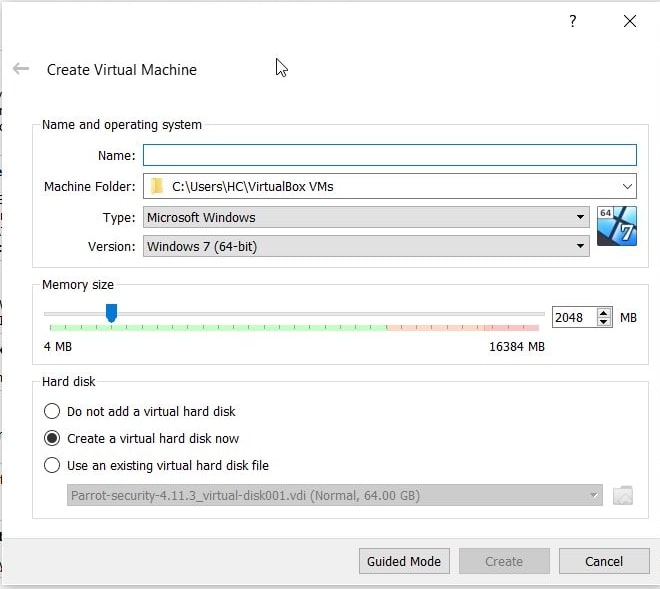
How to install parrot os virtualbox

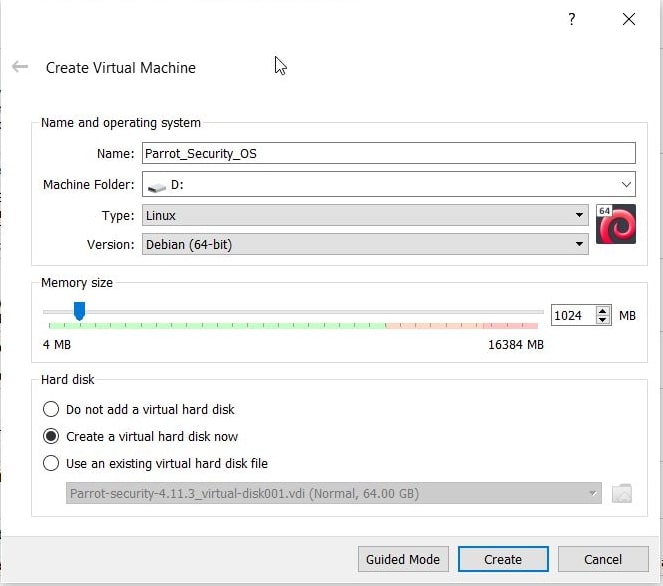
Fill up the details. Configure the machine folder, type of OS, version etc and allocate the RAM (RAM should be minimum 2GB). Once everything is configured, Click on “Create”.

Parrot Security Iso 3

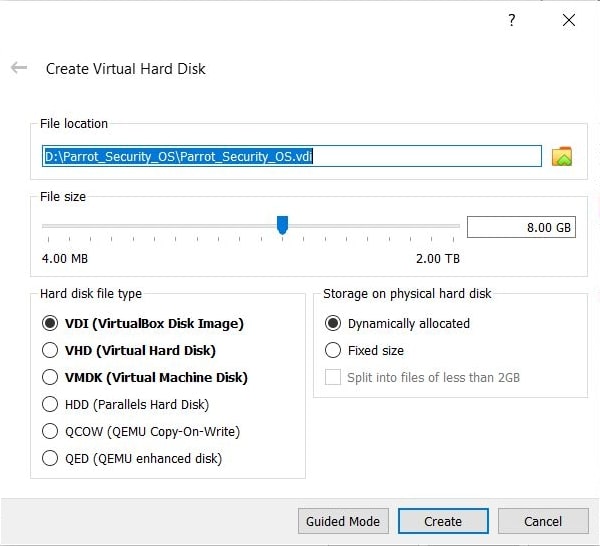
Allocate the hard-disk size (minimum 16 GB is the minimum requirement but keep it at least 20 GB). Set the other options as shown below. Click on “Create”.

Parrot Security Iso 4

The virtual machine is created. Start the newly created virtual machine. It should start as shown below.

Parrot Security Iso 5

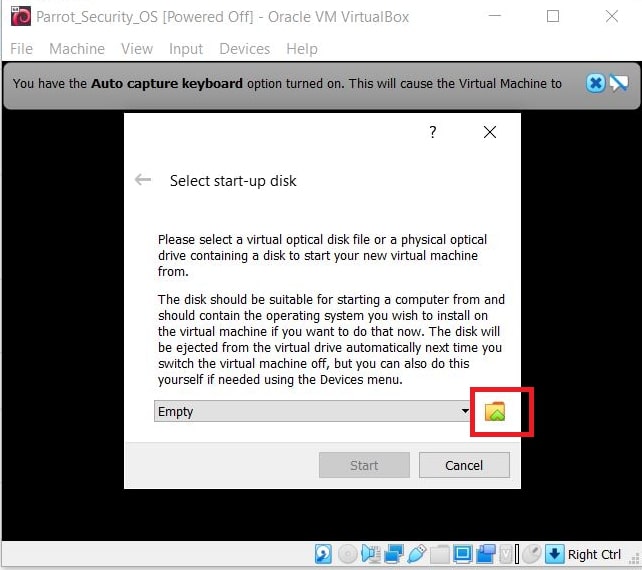
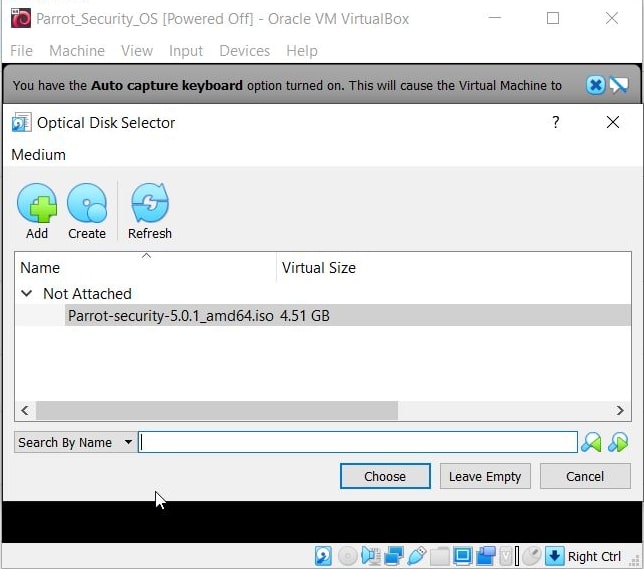
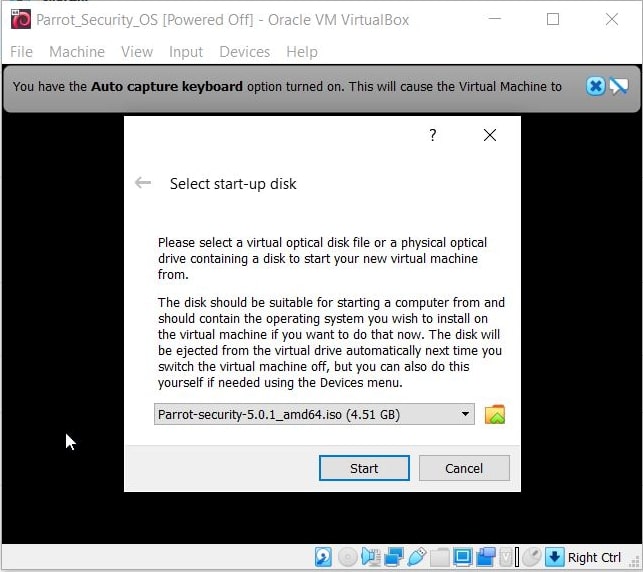
Browse to the ISO file we downloaded earlier and add it as shown below. Then, click on “Start”.

Parrot Security Iso 6
Parrot Security Iso 7

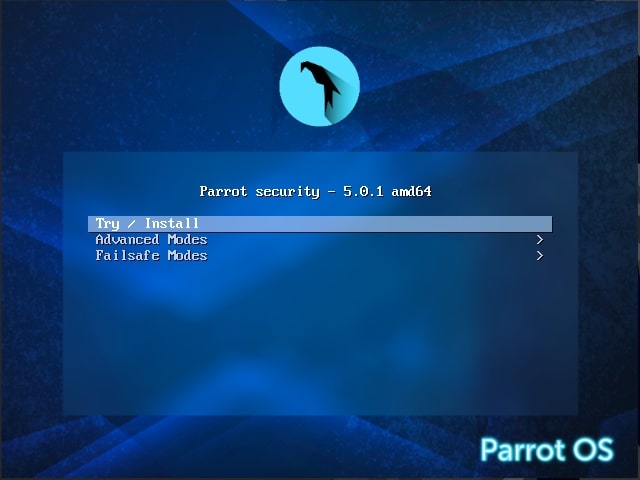
The interface changes as shown below. Click on “Install”.

Parrot Security Iso 8
Parrot Security Iso 9
Parrot Security Iso 10 1024x507

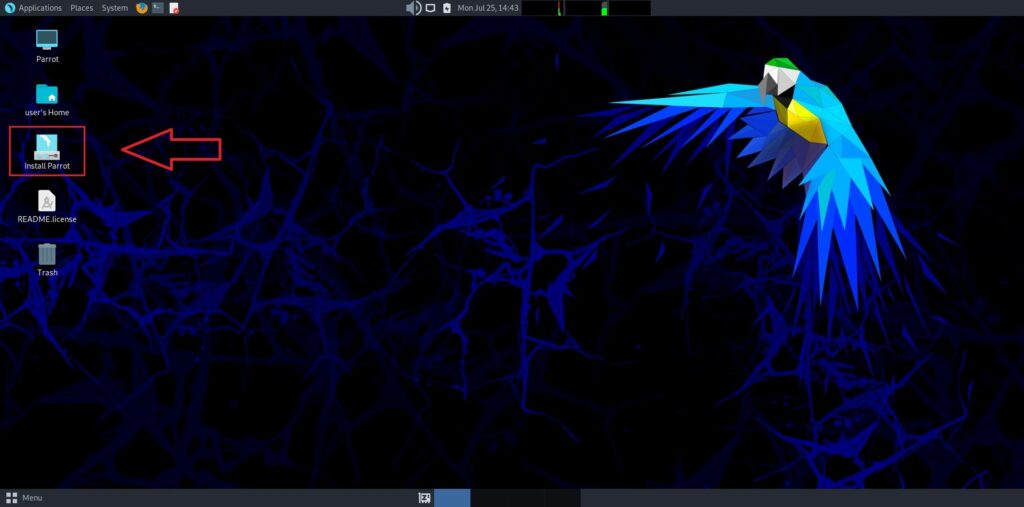
Once you are at the OS interface, click on “Install Parrot “. The Calamares Installer opens.

Parrot Security Iso 11 2 1024x507

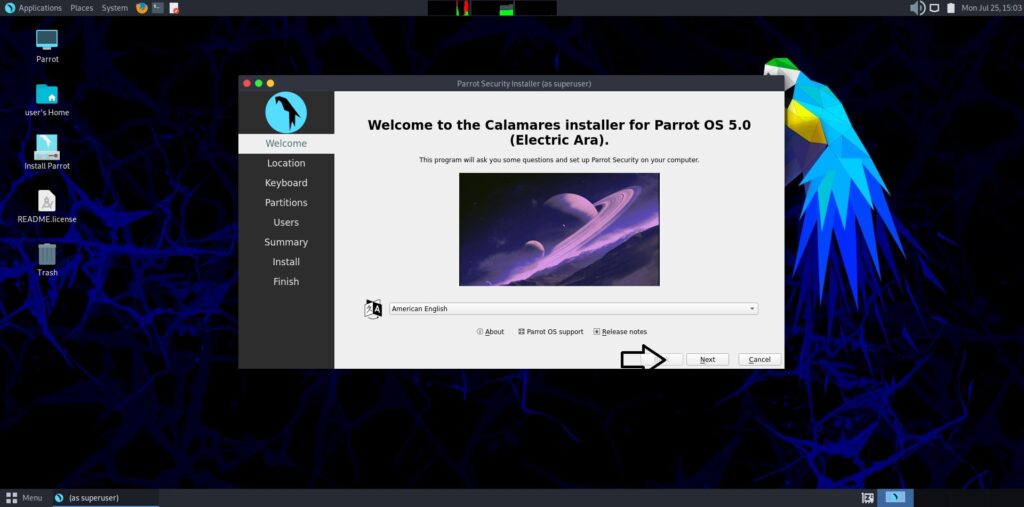
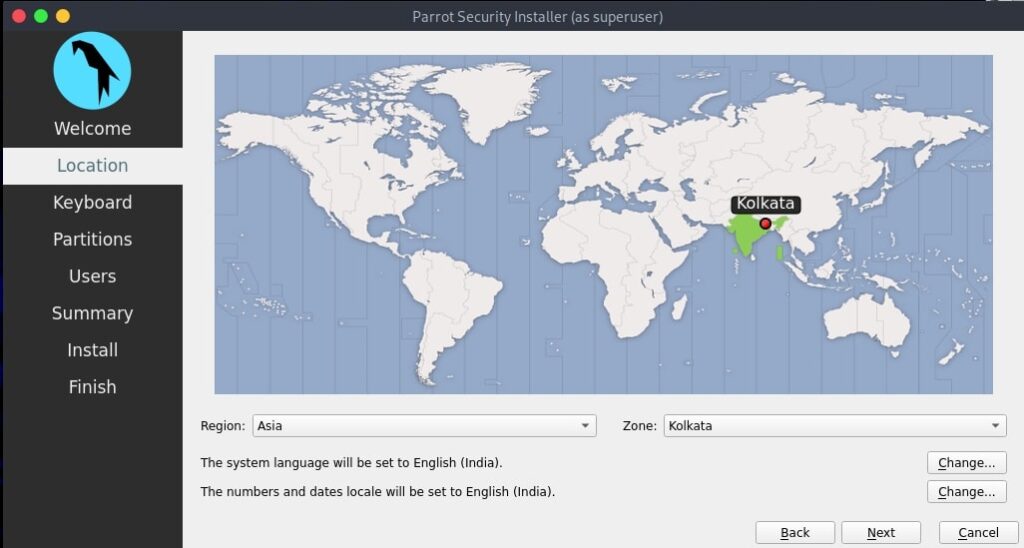
Click on “Next “. Select Location and click on “Next”.

Parrot Security Iso 12 1024x548

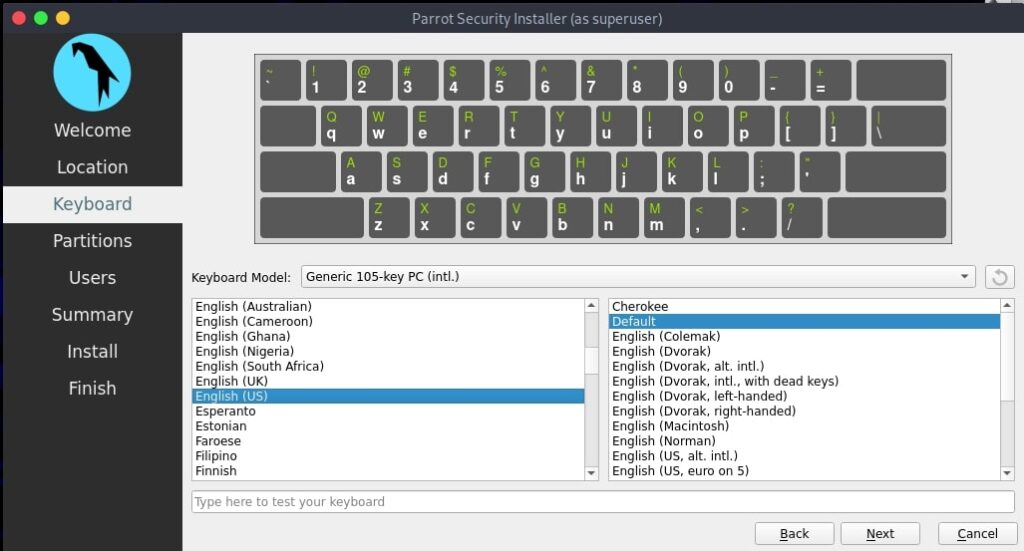
Select the keyboard mode and click on “Next”.

Parrot Security Iso 13 1024x551

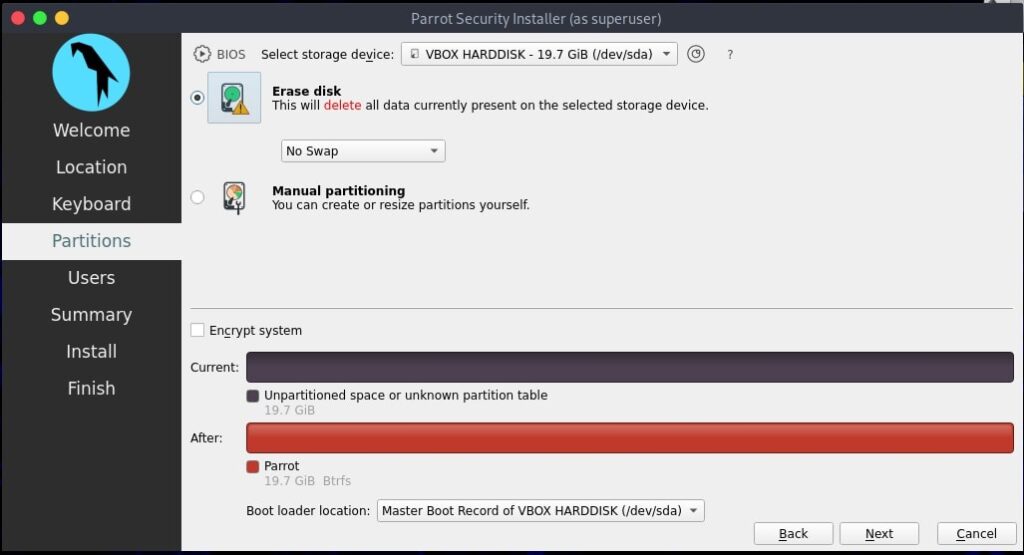
Set the partition. Select “Erase disk” and click on “Next”.

Parrot Security Iso 14 1024x555

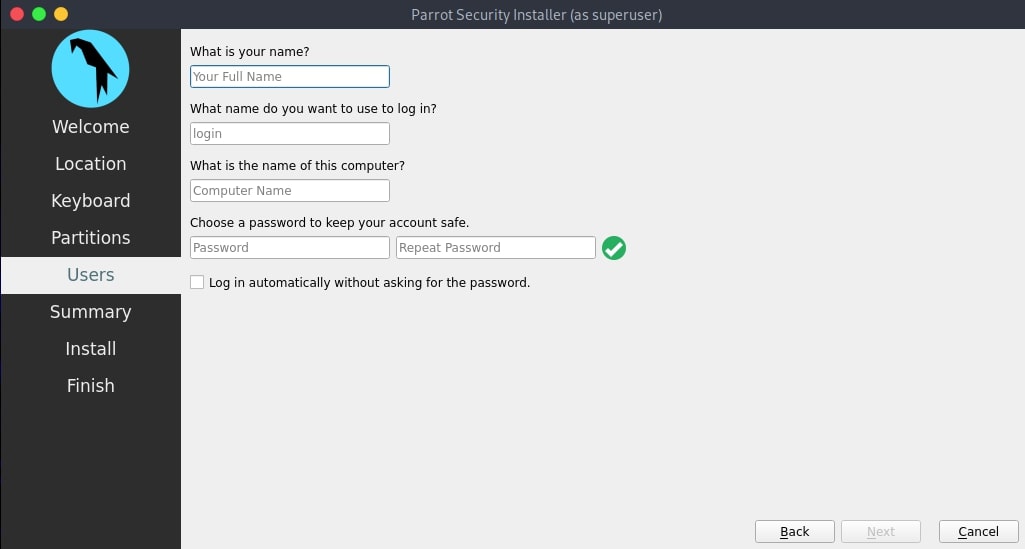
Create a user and set credentials to the newly created user.

Parrot Security Iso 15

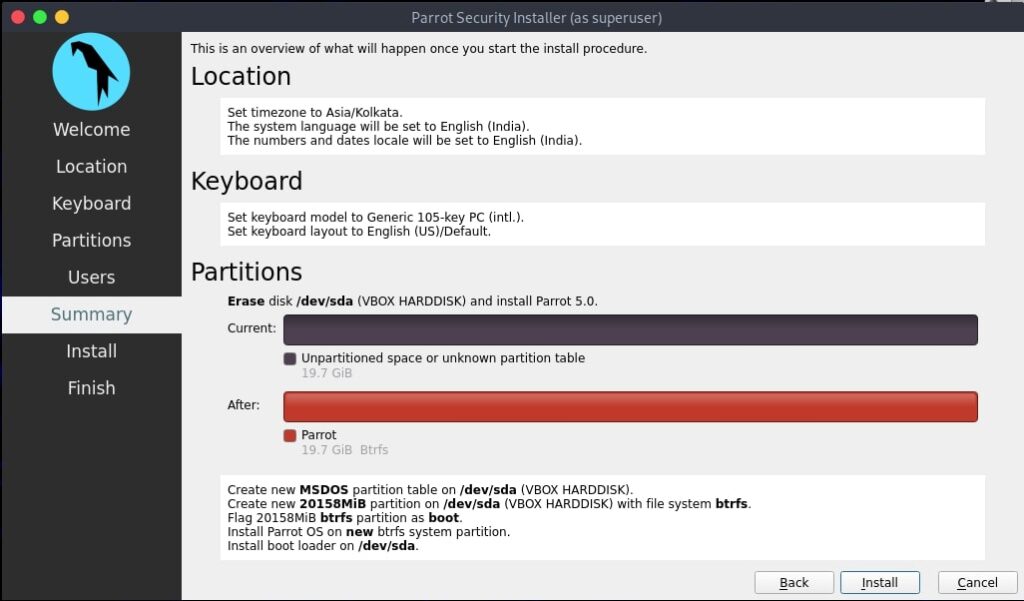
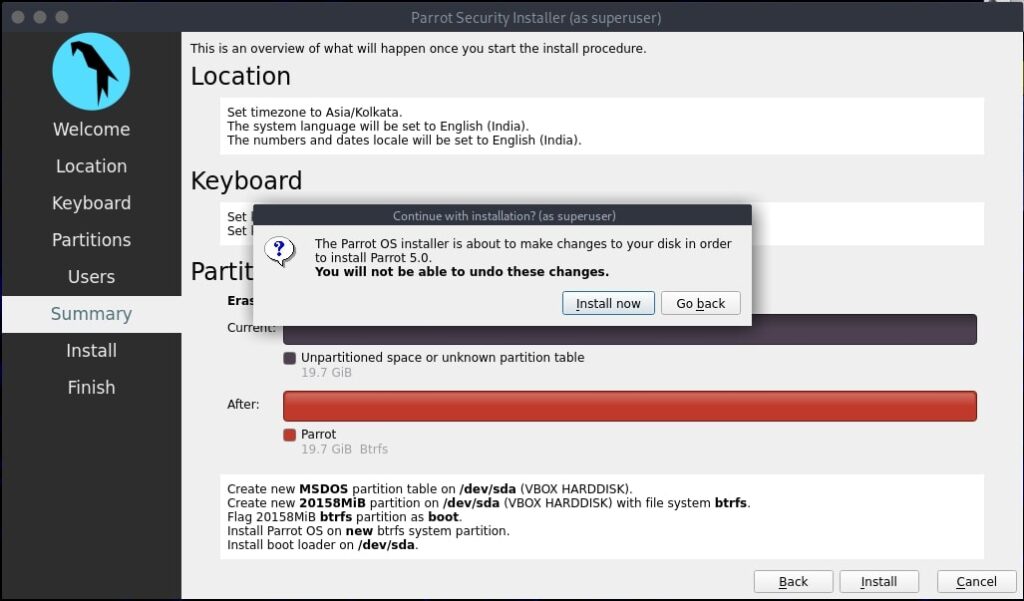
Review all the settings and click on “Install”.

Parrot Security Iso 16 1024x601

Click on “Install Now.”

Parrot Security Iso 17 1024x601

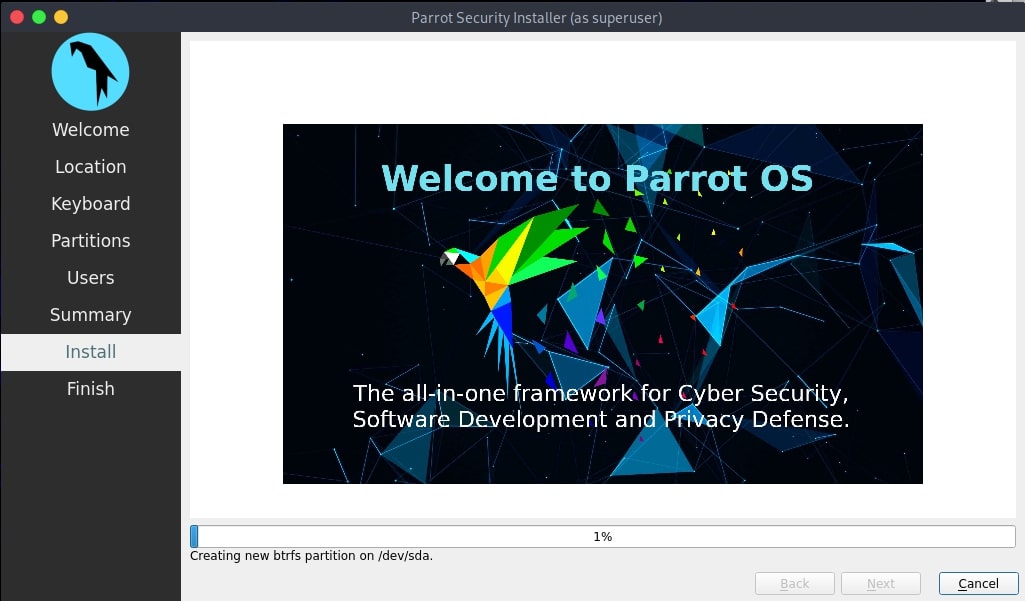
The system starts installing as shown below.

Parrot Security Iso 18

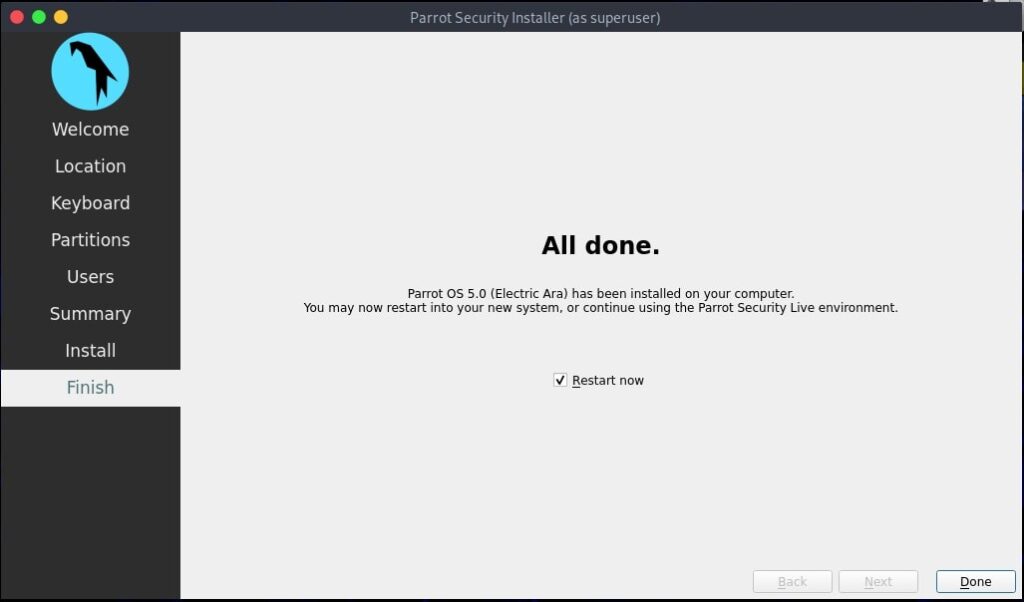
Once the system has finished installing as shown below, click on “Done” .

Parrot Security Iso 19 1024x602

This will restart the system and will take you to the Login screen. Login using credentials of the newly created user and you are good to go. Happy hacking.

Posted on

Installing MATE Desktop in Kali Linux

Hello readers. Today our readers will learn about installing mate desktop in Kali Linux. You all know the first release of Kali Linux this year, Kali Linux 2020.1 has been released in the month of January. The latest version brought many changes like not giving root user by default and some new tools. The most distinct change it brought is a single installer image for installation. Earlier we had different installation images for different desktop environments which include GNOME, KDE etc.
With 2020.1 release, there will be a single installation image for all these and users would have to select the desktop environment he/she needs while installing. The information about different desktop environments and their pros and cons can be seen here.

Today we will see a tutorial on how to install MATE Desktop environment in Kali Linux 2020.1. MATE Desktop although looks old fashioned is light and has a simple interface. Here’s how to install MATE desktop environment in Kali Linux 2020.1. We have performed this tutorial from a X11 terminal but all these commands can be run from any other desktop environment’s terminal. Power on the Kali 2020.1 virtual machine and login (since there is no root user you should login as a user you created or the default user:password i.e kali:kali).

Open a terminal and using nano open the file /etc/apt/sources.list. with sudo

Mate2

Add these two lines of code to the file and save it.
deb http://kali.download/kali kali-rolling main non-free contrib
deb-src http://kali.download/kali kali-rolling main non-free contrib

Mate3

To save the file hit CTRl+X and when it prompts select “Yes”.Run command sudo apt-get update

Mate4

Now everything is ready to install MATE desktop. Run the command given below.
sudo apt-get install mate-core mate-desktop-environment-extra mate-desktop-environment-extras

installing mate desktop in kali

When the system prompts you for permission to install MATE and its related software, type “Y”.

Mate5

The installation will take some time to finish. After the installation is finished, restart the system (the command is sudo reboot or reboot if you are doing it from terminal). Once the system reboots and takes you to the login screen, before logging in click on the “settings” icon beside the “Signin” button. There you will see all the desktop environments present on the system right now. Select MATE and then login.

Mate6 1024x575 1

Installing MATE desktop has been successfully finished with this.

Liked this article? Learn advanced ethical hacking tutorials in our Monthly Magazine. Enjoy Free for 3 months.

Posted on 1 Comment

Install Parrot OS in Vmware

Kali Linux is the most popular and also my favorite pen testing distro. Its regular updates and stability accord it the top spot. Apart from Kali Linux, there are many other pen testing distros available. One of them is Parrot Security distro. Parrot Security sports many more tools than Kali Linux which includes software for cryptography, cloud, anonymity, digital forensics and of course programming. One of our readers has requested us to make a guide on how to install Parrot Security OS in Vmware. So be it.

Download the Parrot Security OS . Unlike the makers of Kali Linux, Parrot Security have not yet provided a Vmware image to download. So we have to download a iso image (depending on your architecture yo- u can download a 32bit or 64 bit iso file). Once the download is finished, open Vmware Workstation (Version 12 used for this article). Hit “CTRL+N”. The below window should open.

Parrotvm1

Make sure the “Typical” option is selected, and click on “Next”. That takes us to the next window. Initially, the “installer disc image file” field should be empty. Click on “browse” and browse to location of the iso file we just downloaded and select it. Now the window should look like below. Click on “Next”.

Parrotvm2

The Guest operating system should be automatically selected for you, if not select Linux as OS and version as Debian 8.x (since I am installing a 32bit, make it Debian 8.x64 if installing 64bit). Click on Next.

Parrotvm3

Choose the name of virtual machine and its location as you like. I named it Parrot. Click on “Next”.

Parrotvm4

Allocate the hard disk memory for your virtual machine. Keep the minimum as 20GB. Click on Finish.

Parrotvm5

It will show you a summary of all the selections you made. If you want to make any changes, click on Customize hardware or else click on Next.

Parrotvm6

The virtual machine is created with the name you gave it. Power on the virtual machine. It will boot and take you to the interface shown below. Choose the “Install” option. In the next window select “Standard Installer”. You can select these options using “tab” button.

Parrotvm7

Select the language in which you want to continue the installation process.

Parrotvm9

Select your country. For this article, I chose location as India.

Parrotvm10

Select the keyboard configuration you want.

Parrotvm11

It is important to set the root password (no need to tell it is Linux’s most powerful account) for the machine before we do anything. Set a complex password. Read the suggestions before you set the root password.

Parrotvm12

Re-enter the root password again to confirm it.

Parrotvm13

It is a good practice to use the system as a no -n root user. The system will prompt you to create a new user account for non-administrative activities. I am creating a user with name kalyan. I am giving the same name as username.

Parrotvm15

Create a password for the user account you just created. Make it a good password for security reasons.

Parrotvm16

Re-type the password again to confirm the password you have assigned.

Parrotvm17

The next step is partitioning the hard disk. Unless you are an expert or want to try something different, use the entire disk.

Parrotvm18

The system will warn you before partitioning. Select the disk for partitioning.

Parrotvm19

It will ask you to choose the partitioning scheme. Choose the first one. It is also recommended for users.

Parrotvm20

Next, it will show you changes you have configured before writing the changes to the disk. Select “Finish partitioning and write changes to the disk”.

Parrotvm21

Confirm for one last time that you want to writ-e changes to the disk. Select “Yes”.

Parrotvm22

The installation process will start and may take some time. You can have snacks and come back. After installation finishes, it will prompt whether you want to install GRUB boot loader.

Parrotvm25

Select Yes. Then it will ask you where to install the boot loader. Select the /dev/sda disk.

Parrotvm26

After the installation is finished, it will show you a message as shown below. It’s time to boot into your new system.

Parrotvm27

As the system boots, it will ask present you a login screen. You can login as either root or the new user you created it. Once you login, your new pen testing distro should look as below.
Parrotvm29