Hello aspiring Ethical Hackers. In this blogpost, you will learn about Server Side Request Forgery. Server Side Request Forgery (SSRF) is a web application vulnerability that can allow attackers to send unauthorized requests from a server. This can lead to a wide range of security issues, such as unauthorized access to sensitive information, system compromise, and data exfiltration and it is one of the most common web application vulnerabilities.
In this article, we’ll discuss what SSRF is, how it works, types of SSRF attacks, examples of SSRF attacks, how to prevent and detect SSRF attacks, and case studies of notable SSRF attacks.
What is Server Side Request Forgery?
Server Side Request Forgery (SSRF) is a web application vulnerability that occurs when an attacker can manipulate a web application into sending unauthorized requests to other servers. In an SSRF attack, an attacker can exploit a web application to send requests to other internal or external servers, bypassing access controls and security mechanisms.

SSRF attacks differ from other web application vulnerabilities, such as Cross-Site Scripting (XSS) or SQL Injection (SQLi), in that they do not rely on injecting malicious code into a web page. Instead, SSRF attacks exploit the application’s ability to send requests to other servers.
How SSRF Attacks Work?
- The attacker sends a request to the vulnerable web application, often by manipulating a user-controlled input field such as a URL parameter.
- The web application processes the request and sends a request to another server, typically based on the user’s input.
- The attacker intercepts the request and modifies it to send a request to a different server, often an internal server that is not accessible from outside the network.
- The vulnerable web application sends the unauthorized request to the attacker’s desired server, bypassing access controls and security mechanisms.

Common use cases for SSRF attacks include accessing sensitive information on internal servers, bypassing authentication mechanisms, and sending requests to cloud infrastructure providers to obtain credentials or perform other malicious actions.
Types of SSRF attacks
SSRF attacks can be classified into three main categories:
- Basic SSRF attacks,
- Advanced SSRF attacks, and
- Blind SSRF attacks.
Basic SSRF Attacks:
Basic SSRF attacks are the simplest form of SSRF attacks and involve manipulating user-controlled input to send unauthorized requests to other servers. These attacks can be prevented by validating and sanitizing input, limiting the scope of the request, and restricting the types of URLs that can be accessed.
Advanced SSRF Attack:
Advanced SSRF attacks are more complex and involve chaining together multiple vulnerabilities to achieve the desired result. These attacks can involve exploiting logic flaws, race conditions, or other vulnerabilities to bypass security mechanisms and gain access to sensitive information.
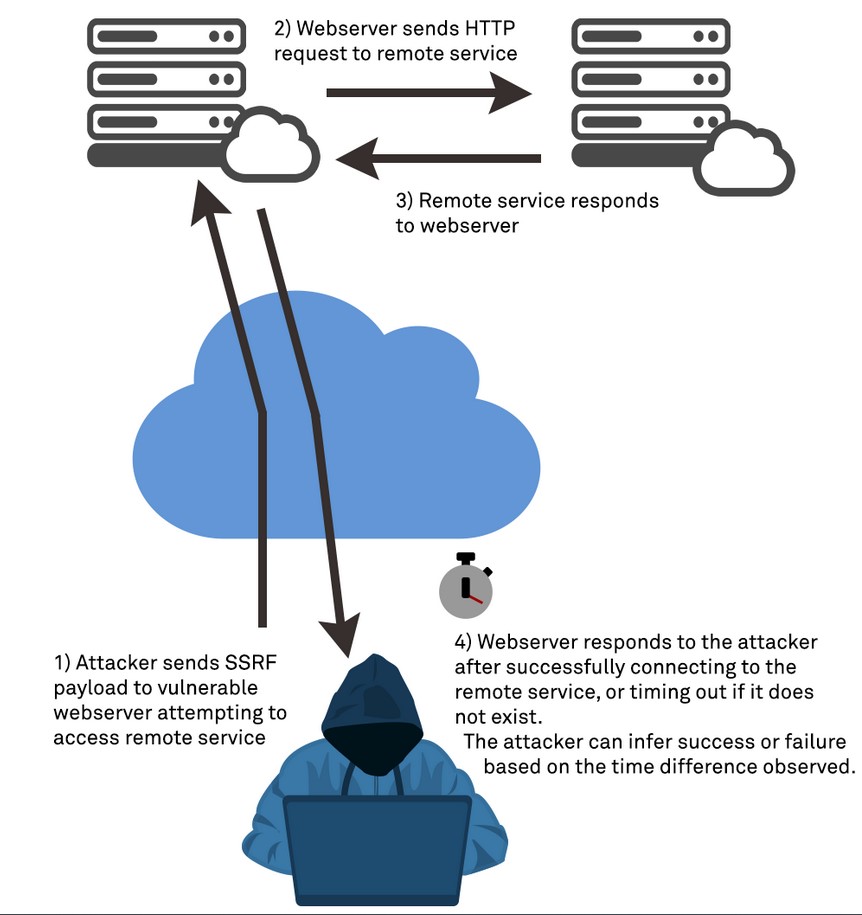
Blind SSRF Attack:
Blind SSRF attacks are a type of SSRF attack where the attacker does not receive a direct response from the target server. Instead, the attacker can use timing or error messages to determine whether the request was successful. Blind SSRF attacks can be more difficult to detect and prevent as the attacker is not receiving a direct response.
Real World Examples of SSRF Exploitation
SSRF attacks can have a wide range of consequences, from accessing sensitive information to system compromise and data exfiltration. Here are some examples of real-world SSRF attacks.
1. Yahoo Data Breach:
In 2016, Yahoo suffered a massive data breach that exposed the personal information of over 500 million users. The attack was carried out using an SSRF vulnerability that allowed the attacker to access Yahoo’s internal systems and steal the user data. The attacker used a common vulnerability in Yahoo’s image processing system that allowed users to submit URLs to be resized or cropped. By submitting a specially crafted URL that included instructions to access Yahoo’s internal systems, the attacker was able to gain access to sensitive information and cause widespread damage.
2. CapitalOne Data Breach:
In 2019, when Capital One suffered a massive data breach that exposed the personal information of over 100 million customers. The attack was carried out by exploiting an SSRF vulnerability in Capital One’s web application firewall, which allowed the attacker to access the company’s AWS server and steal sensitive information. The attacker was able to use the SSRF vulnerability to obtain AWS credentials and gain access to the server, which contained sensitive information such as names, addresses, credit scores, and Social Security numbers.
3. Shopify:
In 2018, a security researcher discovered an SSRF vulnerability in Shopify that allowed an attacker to obtain the API keys for the company’s payment gateway. By exploiting the vulnerability, the attacker was able to obtain sensitive information and perform unauthorized transactions.
4. Tesla Cloud Credential Theft:
In 2018, a researcher discovered an SSRF vulnerability in Tesla’s cloud infrastructure that allowed them to obtain access tokens for the company’s AWS account. The attacker was able to use the access tokens to launch instances in the company’s AWS account and perform other malicious actions.
5. Jenkins CI Server Compromise:
In 2017, a vulnerability in the Jenkins CI server allowed an attacker to compromise the server and gain access to sensitive information. The vulnerability was caused by an SSRF vulnerability that allowed the attacker to access internal servers.
Prevention and Detection
Preventing and detecting SSRF attacks requires a combination of secure coding practices, network security measures, and security testing. Here are some best practices for preventing and detecting SSRF attacks:
1. Secure Coding Practices
Using secure coding practices can help prevent SSRF vulnerabilities from being introduced into the application. Developers should validate and sanitize user input, limit the scope of requests, and restrict access to sensitive information and systems.
2. Restricting External Requests:
Restricting external requests can help prevent unauthorized requests from leaving the network. Applications should only be able to send requests to approved external servers, and any user input should be validated and sanitized before being used in a request.
3. Network Security Measures:
To prevent SSRF attacks, it’s essential to implement network security measures that restrict unauthorized requests from leaving the network. Best practices include using a Firewall and implementing access controls.
A firewall can help restrict incoming and outgoing traffic, preventing unauthorized requests from leaving the network. Firewalls can be configured to block requests to specific IP addresses or ranges, limiting the scope of potential SSRF attacks. Implementing access controls can help prevent unauthorized users from accessing sensitive information or systems. Access controls can be used to restrict access to internal servers and APIs, limiting the scope of potential SSRF attacks.