Posted on 1 Comment

Vulnerability assessment (VA) for beginners

Hello, aspiring ethical hackers. In our previous blogpost, you learnt about vulnerability scanning. In this article you will learn about vulnerability assessment.

What is vulnerability assessment?

Vulnerability assessment (VA) is sometimes interchangeably used with vulnerability scanning but is entirely different form vulnerability scanning. VA is a systematical review of vulnerabilities or weaknesses in a system or a network or even in an entire company. While vulnerability scanning is just scanning for vulnerabilities, Vulnerability assessment also assigns security levels to the vulnerabilities identified and suggests remediation or mitigation if needed.

Types of vulnerability assessments

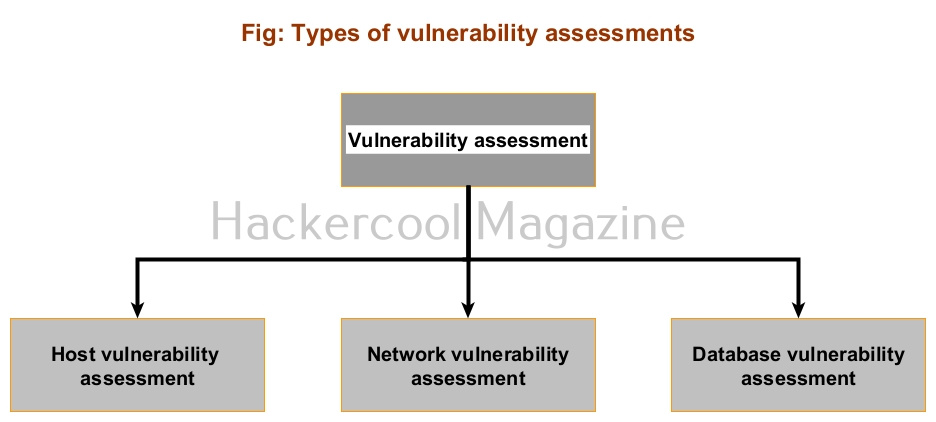
As vulnerability assessment has a larger scope, there are different types of vulnerability assessments. They are,

1. Host assessment:

When a single host or a system (which can include server or client) is assessed for vulnerabilities, it is called host assessment.

2. Network assessment:

When vulnerabilities in an entire network are assessed, it is known as network VA. This can include all the devices, gateways and servers in the entire network.

3. Database assessment:

When vulnerabilities of a database are assessed, it is known as a database assessment.

Stages of a vulnerability assessment

VA primarily consists of four stages. They are,

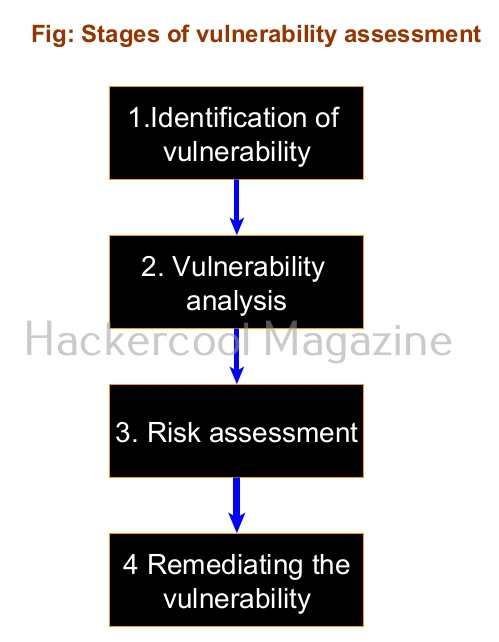
1. Vulnerability identification:

The first stage of the VA is to identify the vulnerabilities in a host network or any other resources. This involves scanning for vulnerabilities using automated tools.

2. Vulnerability analysis:

The second stage is to analyze the vulnerability identified. This includes identifying the source of and cause of the vulnerabilities.

3. Risk assessment:

The third stage in VA includes assessing the risk of the vulnerability. In this stage, a rank or security level is given to each vulnerability detected. This rank depends on the severity of the vulnerability, how simple it is to exploit this vulnerability, ease of access, and what a hacker can get if he is successful in exploiting it.

4. Remediation:

The final step of VA is to fix or remediate the vulnerability. This stage can include developers, operation teams and cybersecurity professionals.

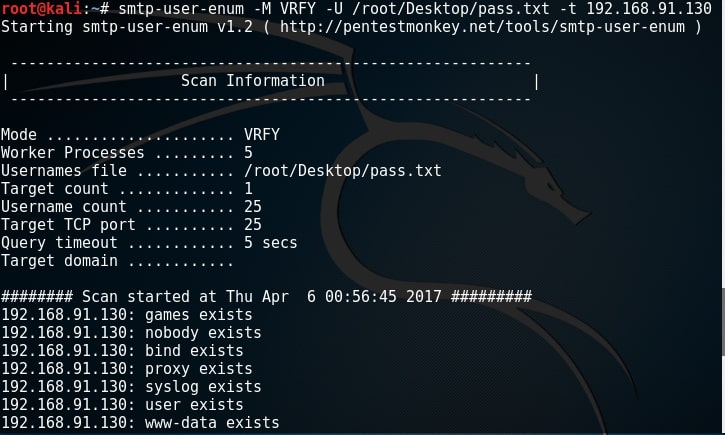
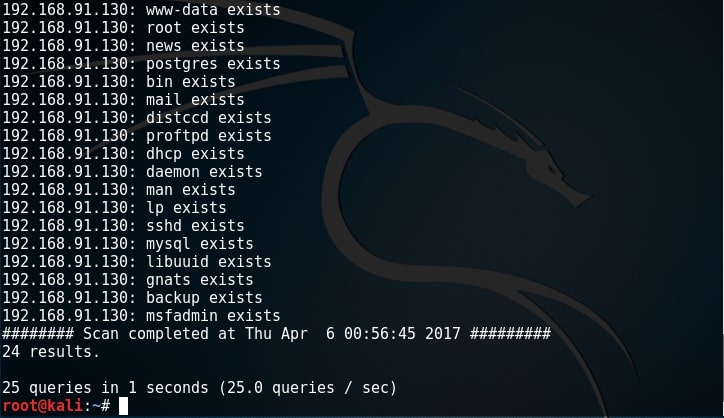
Some of the tools that can be used to perform vulnerability assessment are Nessus, OpenVAS, Burp suite, Nikto, Wireshark etc.

Posted on

Meterpreter archmigrate module

Hello aspiring ethical hackers. In our previous blogpost, you learnt all about the meterpreter payload. In this blogpost, you will learn about the archmigrate module of Metasploit. This module checks if the meterpreter architecture is the same as the Operating System architecture (OS) and if it’s incompatible it spawns a new process with the correct architecture and migrates into that process. It is a POST module.

What is architecture? As we all know there are two main system architectures 32bit and 64bit. Sometimes, we happen to select a 32bit meterpreter payload for a 64bit target system.

Sometimes there may be compatibility issues if we get a 32bit meterpreter session on a 64bit machine and vice versa. This is the exact scenario in which this module is helpful. To overcome the problems of incompatibility, we need to get a new 64bit meterpreter session or just use the archmigrate module to create a new process with the same architecture as the target OS and migrate to that process. Let’s see how this module works.

To use this module, we need to background the current meterpreter session using command “background”. Then load the archmigrate exploit as shown below. Type command “show options” to have a look at the options it requires.

meterpreter architecture migration from 32bit to 64bit and vice versa

We need to only set the session id of the meterpreter session we just sent to background and the exploit is good to go.

If you see in the above image, our exploit failed to run for the first time. This is because in the previous session we had system privileges and if we run this module we may lose the system privileges. But don’t worry, we can change the options to overcome this problem.

Set “ignore_system” option to true and you should be fine to go. This time the exploit ran successfully. As you can see in the above image, our target is a 64bit machine and our meterpreter migrated to a 64bit process successfully. Lets check by typing command “sessions -l” to see the available sessions. You can see we have a 64bit meterpreter session now. Job performed.

Posted on 1 Comment

Beginners guide to UAC bypass

Hello, aspiring ethical hackers. In our previous blogpost, you learnt about various techniques used for Windows privilege escalation. In this blogpost, you will learn about UAC bypass, one of the techniques used for privilege escalation in Windows. To understand UAC bypass, you need to first understand what is UAC.

What is UAC?

User Account Control (UAC) is a mandatory access control feature of Windows operating system that helps in improving the security of the operating system. It was introduced in Window Vista and Windows Server 2008 and has ben improved since then. User Account Control works by limiting a software or program to run with standard user privileges (low privileges) until and unless a user with administrator privileges authorizes it by giving permission. This way, only applications trusted by the user can be run on the system. This helps to prevent malware infection as malware and virus need administrator privileges to infect the system wholly.

How can UAC be bypassed?

Now, you have a question. How can UAC be bypassed. There are various UAC bypass methods. They are,

1. Registry key manipulation:

This technique works by hijacking the normal execution flow of an auto elevated application. What are auto-elevated applications? In Microsoft windows, if a binary is trusted (i.e. it has been signed with a MS certificate or the binary is in a trusted directory), the UAC prompt will not be presented. This can be exploited using a registry key.

The fodhelper privilege escalation method is an example of this.  Fodhelper.exe is a trusted binary in Windows operating systems that is used to manage features in Windows settings. We can exploit this binary by hijacking a special key in the Registry under the current user hive and inserting a custom command that will get invoked when the Windows fodhelper.exe application is launched.

Once the UAC flag is turned off, we will spawn a second shell with SYSTEM privileges. Metasploit has a module for this. Let’s see it practically using Metasploit. Imagine we have a scenario where we have gained access to a Windows system using any Windows hacking technique.

To use the fodhelper module to elevate privileges, we need to background the current session.

Search for fodhelper module using the search command.

Image explaining about Windows privilege escalation with fodhelper module

Load the module and set the session ID as shown below.

Run the module as shown below.

As you can see, we successfully got a meterpreter session. When I check privileges, its still user privileges but when I run “getsystem” command, I get system privileges on the target Windows system.

2. DLL hijacking:

In this method, the execution of an elevated program is hijacked using DLL Search order hijacking, DLL loading, redirection or other DLL vulnerability.

3. Elevated COM interface method:

COM stands for Component Object Model. It acts as a binary interface between various processes of different programming languages. In Windows, is is the basis for several other Microsoft technologies like OLE, OLE Automation, Browser Helper Object, ActiveX, COM+, DCOM, Windows shell, DirectX and Windows runtime. In this method, the COM handler is bypassed while it references registry when a high integrity process is being loaded. These DLLs contain the payloads that result in elevated sessions.

Let’s demonstrate this using Metasploit. As for every privilege escalation exploit, we need to already have a meterpreter session on target. This can be achieved using one of the Windows hacking techniques. Once we have it, search for the bypassuac_comhijack module as shown below.

Load the bypassuac_comhijack module and check its options by using the “show options” command as shown below.

Set the session id and execute the exploit using “run” command as shown below. If everything went right, we will have another meterpreter session as shown below.

Check the privileges using the “getuid” command. If you still don’t have system privileges, run command “getsystem” and even if it results in an error, check your privileges once again using command “getuid“. You should definitely have system privileges by now.

Posted on 1 Comment

Install Parrot OS in Vmware

Kali Linux is the most popular and also my favorite pen testing distro. Its regular updates and stability accord it the top spot. Apart from Kali Linux, there are many other pen testing distros available. One of them is Parrot Security distro. Parrot Security sports many more tools than Kali Linux which includes software for cryptography, cloud, anonymity, digital forensics and of course programming. One of our readers has requested us to make a guide on how to install Parrot Security OS in Vmware. So be it.

Download the Parrot Security OS . Unlike the makers of Kali Linux, Parrot Security have not yet provided a Vmware image to download. So we have to download a iso image (depending on your architecture yo- u can download a 32bit or 64 bit iso file). Once the download is finished, open Vmware Workstation (Version 12 used for this article). Hit “CTRL+N”. The below window should open.

Make sure the “Typical” option is selected, and click on “Next”. That takes us to the next window. Initially, the “installer disc image file” field should be empty. Click on “browse” and browse to location of the iso file we just downloaded and select it. Now the window should look like below. Click on “Next”.

The Guest operating system should be automatically selected for you, if not select Linux as OS and version as Debian 8.x (since I am installing a 32bit, make it Debian 8.x64 if installing 64bit). Click on Next.

Choose the name of virtual machine and its location as you like. I named it Parrot. Click on “Next”.

Allocate the hard disk memory for your virtual machine. Keep the minimum as 20GB. Click on Finish.

It will show you a summary of all the selections you made. If you want to make any changes, click on Customize hardware or else click on Next.

The virtual machine is created with the name you gave it. Power on the virtual machine. It will boot and take you to the interface shown below. Choose the “Install” option. In the next window select “Standard Installer”. You can select these options using “tab” button.

Select the language in which you want to continue the installation process.

Select your country. For this article, I chose location as India.

Select the keyboard configuration you want.

It is important to set the root password (no need to tell it is Linux’s most powerful account) for the machine before we do anything. Set a complex password. Read the suggestions before you set the root password.

Re-enter the root password again to confirm it.

It is a good practice to use the system as a no -n root user. The system will prompt you to create a new user account for non-administrative activities. I am creating a user with name kalyan. I am giving the same name as username.

Create a password for the user account you just created. Make it a good password for security reasons.

Re-type the password again to confirm the password you have assigned.

The next step is partitioning the hard disk. Unless you are an expert or want to try something different, use the entire disk.

The system will warn you before partitioning. Select the disk for partitioning.

It will ask you to choose the partitioning scheme. Choose the first one. It is also recommended for users.

Next, it will show you changes you have configured before writing the changes to the disk. Select “Finish partitioning and write changes to the disk”.

Confirm for one last time that you want to writ-e changes to the disk. Select “Yes”.

The installation process will start and may take some time. You can have snacks and come back. After installation finishes, it will prompt whether you want to install GRUB boot loader.

Select Yes. Then it will ask you where to install the boot loader. Select the /dev/sda disk.

After the installation is finished, it will show you a message as shown below. It’s time to boot into your new system.

As the system boots, it will ask present you a login screen. You can login as either root or the new user you created it. Once you login, your new pen testing distro should look as below.

Posted on

SMTP enumeration for beginners


Enumeration is the process of collecting information about user names, network resources, other machine names, shares and services running on the network. Although a little bit boring, it can play a major role in the success of the pentest. In the previous howto, we saw how to perform SMB enumeration and got some usernames on our target. So we don’t need to perform SMTP enumeration. But we may not be so lucky that SMB enumeration will be successful on every network. For networks like these, we may need to enumerate other services like SMTP.

First let me give you a basic introduction of SMTP. SMTP stands for Simple Mail Transfer Protocol. As the name implies, it is used to send email. It uses port 25 by default. If you ever sent an email, you have definitely used SMTP. SMTP servers talk with other SMTP servers to deliver the email to the intended recipient. Luckily this all happens behind the scenes and we don’t have to break our heads to understand this. But there are some things we have to understand about SMTP that will help us in enumeration.

As the term “simple” implies, SMTP server can only understand simple text commands. Sender of the mail communicates with a mail receiver by issuing these command strings and supplying necessary data. Some of the important commands are

1. HELO – sent by a client to introduce itself.

2. EHLO – another way of client introducing itself to server

3. HELP – used to see all commands.

4. RCPT – to identify message recipients.

5. DATA – sent by a client to initiate data transfer.

6. VRFY – verify if the mailbox exists.

7. QUIT – to end the session.

SMTP enumeration can be performed in many ways. The easiest way to do this is by connecting to the SMTP service port of the target with telnet (we have seen this in scanning and banner grabbing).

As you can see, we got successfully connected. From here, we can verify manually if each user exists or not. If you remember the article on SMB enumeration, we already have some usernames available. Lets use the VRFY command to check if users “user”, “msfadmin” and “root” exist in this system.

Image explaining about SMTP enumeration

Yes, they exist. Similarly, let us test if user kalyan exists. As you can see in the above image, the user kalyan doesn’t exist. Nmap also has a script to perform SMTP enumeration. We can use the script as shown below.

By default, Nmap uses RCPT method to check if a particular user exists. Unfortunately for me, it gave unhandled status code here. This Nmap script can be modified to use different methods. Here I changed it to use VRFY method to enumerate users. I have only scanned port 25 to remove the clutter. But still it gave me the same error.

There is another tool in the arsenal of Kali Linux which is built specifically for SMTP enumeration. Its called smtp-user-enum. Here let us test if a user called “root” exists on the target system as shown below.

Since user “root” exists, I’m assuming other users like “msfadmin” and “user” also exist. While performing SMB enumeration, we created a wordlist which can be users on the target system. Now let’s enumerate if all the users in that wordlist exist. It can be done as shown below.

All the users we got during SMB enumeration exist. That’s good. In this case, we already have the wordlist of usernames (we got during SMB enumeratin). What if we don’t have the exact wordlist. We can use different wordlists present in Kali Linux. These wordlists are present in /usr/share/dirb directory.

What We Achieved?

We got some usernames which may be useful to us while exploiting the system in future. All these usernames have a recipient email address to them.