Posted on

Cracking Wifi Passwords with Fern Wifi cracker

Hello aspiring ethical hackers. In one of our previous blogposts, you have learnt what is wifi hacking, types of WiFi hacking attacks etc. In this blogpost, you will learn how to crack WPA/ WPA2 password with a tool called Fern WiFi cracker.

Fern Wifi Crackeris a Wireless security auditing and attack software program written in Python. It can crack and recover WEP/WPA/WPS keys and also run other network based attacks on wireless or ethernet based networks.

As already explained, WPA stands for Wifi Protected Access. It is an encryption system to secure WLAN networks. It eliminates all known vulnerabilities in WEP(Wired Equivalent Privacy). WPA uses 128 bit key and 48 bit initialization vector while WEP uses 108 bit key with 24 bit initialization vector. WPA2 is the successor of WPA. Both WPA and WPA2 use temporal key integrity protocol(TKIP) for encryption and pre-shared key(PSK) authentication. The only difference between WPA and WPA2 is that they use Rivest Cipher(RC4) and Advanced Encryption Standard(AES) encryption algorithms respectively. Both can be configured to use counter cipher block chaining mode(CCM) though. They are by far considered most secure for Wifi networks.

So today we are learn cracking WPA/WPA2 passwords using a GUI tool also inbuilt in Kali Linux, Fern Wifi cracker. Open the tool, Fern Wifi cracker.

Fernwifi1

Select our wireless interface WLAN). Click on the tab “Scan for access points”. The tool will search for available access points as shown below.

Fernwifi2

Since we want to hack a WPA enabled wifi network, click on WPA tab. It will show all the available WPA enabled networks.

Fernwifi3

Click on the wifi network whose password we want to crack( in my case “shunya”). Browse to the dictionary file we want to choose as shown below.

Fernwifi4

Click on “Wifi attack” tab. The tool will automatically crack the password for you as shown below.

cracking wpa

Hope this was helpful. Learn how to crack WiFi passwords with aircrack.

Posted on 6 Comments

Crack WPS pin with Bully

Hello aspiring ethical hackers. In our previous posts, you have learnt how to crack WiFi passwords with aircrack and Fern WiFi cracker. have seen how to crack WPA2 password and WPA password using both aircrack and Fern Wifi Cracker. In this blogpost, you will learn how to crack wireless password using a tool named Bully. For this, we will crack WPS pin. WPS stands for Wifi Protected Setup. It is a standard for easy and secure wireless network set up and connections and the pin is encoded on the Wifi router. As always brute forcing password attack consumes lot of time. It took me 6 hours 37 mins to crack this pin. So please have lots and lots of patience. Let’s start.

First let’s see our wireless interfaces. Open Terminal and type command “iwconfig.

Wpacrack1

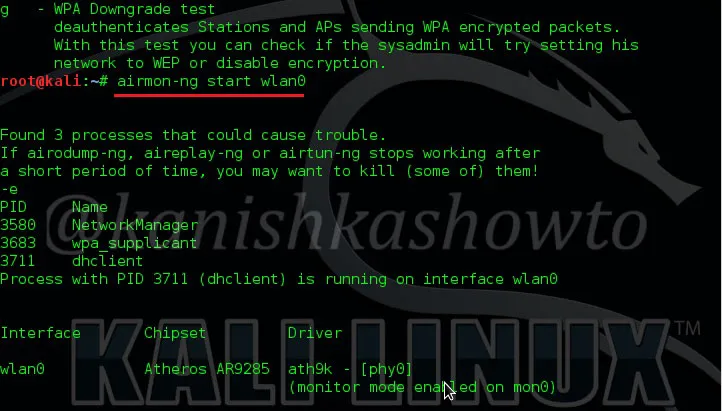
Let’s place our wireless interface in monitor mode. Monitor mode is same as promiscuous mode in wired sniffing. Type commandairmon-ng start wlan0″. We can see below that monitor mode has been enabled on “mon0″.

Wpacrack2

Open a new terminal and type command “airodump-ng mon0″ and hit Enter.

Wpacrack3

We can see all the wireless networks available as shown below. Look for a WPA/WPA2 enabled network.

crack wpa2

Copy the MAC address of the wifi network whose password you want to crack. For this howto I will crack the password of wifi network “shunya”. Open Terminal and type command “bully -b <MAC address> -c 13 -B mon0″ and hit Enter.

<MAC address> is the MAC address of the Wifi network.

-c is the channel our wifi network is running on,

-B = bruteforcing.

Bully5

We can see that the tool bully will try different pins to crack the password. After a long time( as I already told you) the tool will give out the current pin and the password of the wifi network as shown below.

Bully6

This is how we crack WPS with Bully.

Posted on

Wifi pentesting with Android

Securing your company’s wireless network is different and more challenging than securing the wired network. Many factors come into consideration when setting up and securing a wi fi network. Regular pen testing of your wifi network is also very important. Today we are going to see how to perform a pen test on a wifi network using android phone. WiFi pentesting with android simplifies the process of pen testing. For this we are going to use the tool Wifinspect tool available on google playstore. We need a rooted phone to install this application. Once you install this app on your android phone, connect to your wifi network. I am using a wifi network whose SSID is “shunya” for this howto.

Now click on your app.( I think “click” would be a misnomer here, so from here on I will use the word “touch”). We will get a display as below.

Wifinspect1

We see six options. Starting with the first option, we will see each and every option.

1. Network Info

Touch on network info. We will get a lot of information about the wifi network like the encryption used, frequency and the channel it is operating on and whether our access point is hidden or not as shown below.

Wifinspect2

2. UPnP Device Scanner

The second option as its name implies scans for universal plug and play devices in our network.

Wifinspect3

3. Host Discovery

The third option is for host discovery. This option is used to find out about OS and other information about devices in the wifi network. There are two options for host discovery, complete and partial scan. As shown below, compete scan option will scan the entire address space of your network while the partial scan option scans only your devices IP address/24. I am selecting complete scan option. Touch on “start scan” option.

Wifinspect4

The result will show all the devices and any information about them in the network as shown below.

Wifinspect5
wifi pentesting with android

If you want to further analyze any host, long click on it to see more sub options. For example, I am gonna further analyze the device with IP address 192.168.1.4 because it is the only one whose vendor has been shown.

Wifinspect7

First we will see the host information of 192.168.1.4. Touch on that option. The analysis of host information will take some time as shown below, so don’t lose patience.

Wifinspect8

After some time, the result will be shown

Wifinspect9

The same result for my gateway( the wifi router) is shown below.

Wifinspect10

The next option is port scan. Let’s do a port scan on the gateway(192.168.1.1) to see if any ports are open. We can see that some ports are open.

Wifinspect11

When I do a host vulnerability scan on the gateway i get the below message. It seems my gateway is vulnerable. We will see more about it later.

Wifinspect12

Below are the results for traceroute and ping respectively

Wifinspect13
Wifinspect14

4. Sniffer

The next option is sniffing. Start sniffing by touching on it. It will give you a warning as shown below.

Wifinspect15

Touch on “Start sniffing”. Sniffing will start. After it collects sufficient packets, touch on “stop sniffing”.

Wifinspect16

We have many options to analyze the pcap file as shown below.

Wifinspect17

Packet distribution analysis shows packets sent and received by the devices.

Wifinspect18
Wifinspect19
Wifinspect20

The bandwidth distribution analysis will show the bandwidth consumed by each host.

Wifinspect21

Communication hosts analysis show the packets and bandwidth exchanged between different hosts.

Wifinspect22

5. Pcap Analyzer

Our pcap files are stored in wi-fi probe folder on our phone. We can even analyze the pcap files later using the pcap analyzer.

Wifinspect23

6. PCI DSS Menu

PCI DSS stands for payment card industry data security standard. If you want to know more about PCI DSS go here. This option will check our wifi network’s compliance with PCI DSS.

Wifinspect24

Touch on the first option. Start the test. A brief description about this test is shown.

Wifinspect25

Touch on “start test”. This test checks if our wifi router is using default passwords for authentication.

Wifinspect26

I am not using any default password and i get the below result.

Wifinspect27
Wifinspect28

The “Access Point Security Tester” tests if our wifi network is using strong encryption. Touch on “start scan”.

Wifinspect29

The result will be as below. It says my access point is secure as it is using WPA i guess.

Wifinspect30

The “Access point Scanner” test tests the wifi network’s compliance with PCI DSS requirement 11.1 as shown below.

Wifinspect31
Wifinspect32

The “internal vulnerability scanner” test checks if there are any of the devices in our wifi network have any vulnerabilities. It turns out that my gateway has some vulnerabilities as shown below.

Wifinspect33

There is also a “external vulnerability scanner” option available to scan for external vulnerabilities.

Wifinspect34

Hope this was helpful.

Posted on 2 Comments

Complete guide to sqlmap

Hello, aspiring ethical hackers. In our previous blogpost, you learnt what SQL injection is, different types of sql injection attacks etc. In this blogpost, how to perform SQL injection with a tool named sqlmap. Sqlmap is an open source penetration testing tool that automates the process of detecting and exploiting SQL injection flaws and taking over of database servers. For this tutorial I am using Vulnerawa as target.

Sqlmap1

sqlmap is pre-installed in Kali Linux. Open sqlmap from the path as shown below.

Sqlmap8

Now copy the vulnerable url and type the following command the terminal. Here -u stands for url.

Sqlmap9

The result will be as shown below. It will reveal the website technology and the scripting language used.

SQL injection with sqlmap

1. Grab the banner of the target:

Now let’s grab the banner of the website. Type the following command and hit “Enter”.

Sqlmap11

You can see the banner as shown below.

Sqlmap12

2. Find the current user of the website:

To see the current user of the website, type the following command.

Sqlmap13

The current user can be seen as below.

Sqlmap14

3. List the current database:

Now let us see the current database used by the website. Type the following command.

Sqlmap15

We can see that the current database is “Vulneraw”.

Sqlmap16

4. List all the tables in a specific database:

Now let us see all the tables present in the database “Vulneraw” by using following command.

Sqlmap17

We see that we have only one table in the current database. The table is “users”.

Sqlmap18

5. List the number of columns in a specific table:

Now lets see the number of columns in the table “users”. Type the following command.

Sqlmap19

We see there are four columns in table “users”.

Sqlmap20

6. Dump the values of specific columns in a table:

Now let’s dump the values of two columns username and password by typing the following command.

Sqlmap21

The result is as below. we got the username and passwords.

Sqlmap22

7. Dump all values of a table:

If we want to dump all the entries of the table, type the following command.

Sqlmap23

Here are the entries.

Sqlmap24

8. Grab a shell on the target:

Now let’s see if we are lucky enough to get the shell of the target. Shell is the target machine’s command line or terminal. Type the following command.

Sqlmap25

It will prompt us to enter the application language being used by the website. We already know it is PHP. Enter its value. Next it will prompt you to enter the writable directory. You cam choose your option wisely. I chose the default root directory for Wamp server. Hit on “Enter”.

Sqlmap26

I successfully got the os-shell. Now let’s try some commands. Type “dir” to see the contents of the root directory. It works as shown below.

Sqlmap27

Let’s see how many users are there on the system. Type the command “net user” . We can see the users listed as below. Happy hacking practice.

Sqlmap28

To find sites vulnerable to this sql injection use google dork “site:.com inurl:id=1” or similar dorks. That’s all in this tutorial.

Posted on 4 Comments

How to spoof your IP address in Kali Linux

Kali Linux is the most advanced penetration testing distribution with a number of tools. While using these tools a measure of anonymity is required. Today we are going to see how to spoof your IP address in Kali Linux. First, check your IP address by visiting any website which shows your IP address (http://www.whatismyip.com). Then go to the site www.vpnbook.com.

Download the Euro1 Server OpenVPN certificate bundle as shown below. Note down the username and password given. We will need it in later steps.

Kalivpn1

When you click on the download link, the following window opens. Since it is a zip package, system will prompt whether to open it with unzip ( the default option ). Click on “OK”.

Kalivpn2

Open the terminal and navigate to the directory where the contents of the zip archive have been unzipped. Type the command “ls” to see the unzipped files. We are going to use the vpnbook-euro1-udp53.ovpn package.

Kalivpn3

OpenVPN has been installed by default in the Kali Linux distribution. Type the command “openvpn vpnbook-euro1-udp53.ovpn” to start the process.

spoof your ip address in kali linux

The installation starts. Enter the username and password we noted above when prompted.

Kalivpn5

After a short time, the process is completed. Check your IP address again. If everything goes well, your IP address will be changed.