Posted on

Hacking ProFTPd on port 2121 and hacking the services on port 1524

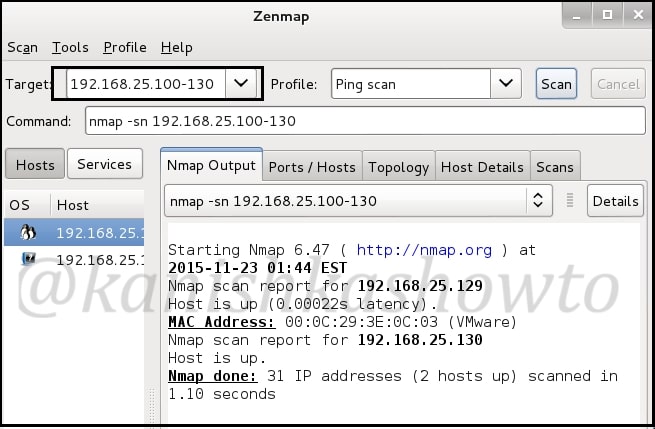
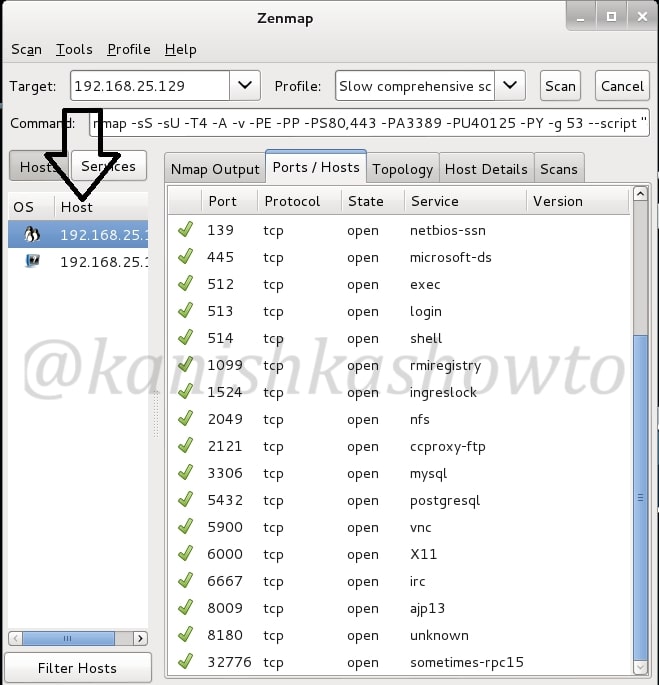
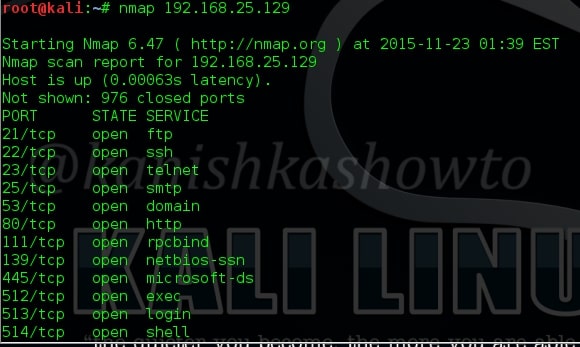
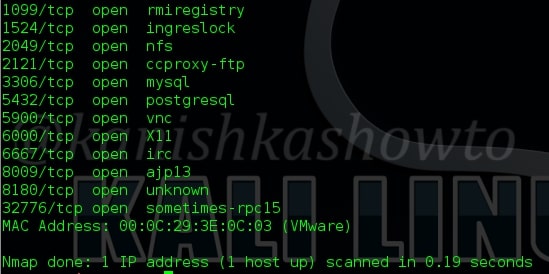
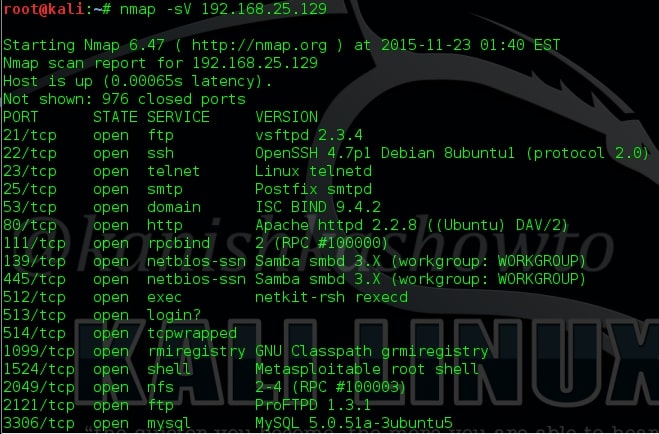
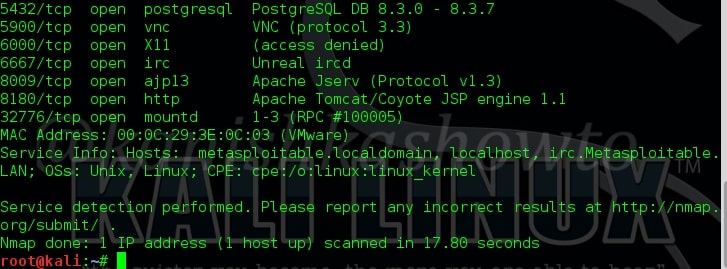
In our previous article, we have seen how to exploit the rexec and remotelogin services running on ports 512 and 513 of our target Metasploitable 2 system. In this article, we will be hacking proftpd on port 2121 and the service running on port 1524 which are next in the Nmap scan report as shown below. On running a verbose scan, we can see that the service running on port 1524 is Metasploitable Root shell.

hacking proftpd

What is this Root shell? In our Metasploitable Tutorials, we have seen a number of ways to gain a shell or meterpreter session on the target system. But those shells were obtained by hacking some software present on the system. This shell is deliberately left on the system. But why would someone leave a shell deliberately on a system?
In cyber security, there is a concept called trapdoors or backdoors. As soon as hackers gain access to a system by hacking something on it, they plant an easy and quick method to once again come back into the system. This is known as trapdoor or backdoor.

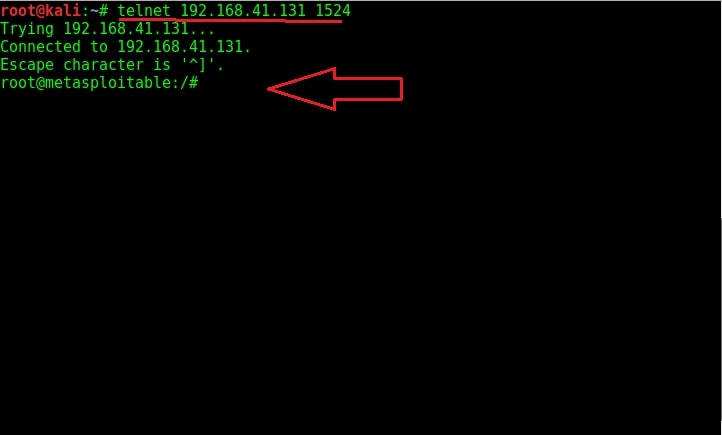
The shell on port 1524 is a shell like that. Usually to prevent other hackers from gaining access to the system through their backdoor they use protection like passwords etc. Here it seems the hacker forgot to secure it. Normally backdoors like these are enabled on some common ports which evoke less suspicion from cyber security personnel. But how do we gain access to this shell? Although there are a number of ways to do this, the easiest way is telnet.
Open telnet and telnet to the port 1524 as shown below. As you can see highlighted below, we got a shell with Root access without doing much.

Ingreslock1

Try out some linux commands to verify we got a shell with some interaction.

Ingreslock2

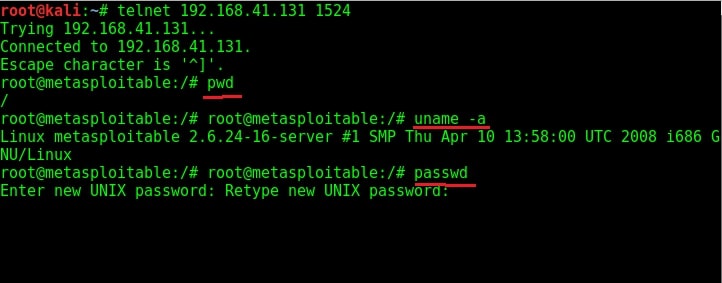
As you can see in the above image, we have shell with ROOT privileges. We can even change the target system’s password now. Now let’s move on to hacking ProFTPd.
Verbose scan has reported that a FTP server named ProFTPd server version 1.3.1 is running on port 2121. I googled for any vulnerabilities present in the particular version but got none. If you remember, we already hacked one FTP server running on port 21.
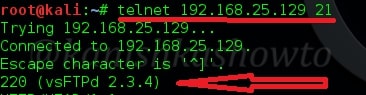
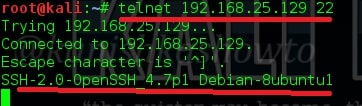
I used banner grabbing method of telnet (we showed you in detail about this method in of our Hackercool magazine) to see if the service will reveal any more information about itself. It gave nothing except the usual one.

Proftpd1

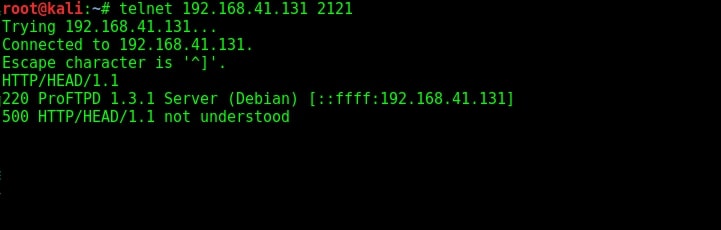
The usual banner grabbing was not working. But maybe we don’t require a banner.We already have it. So this time, I just tried to connect to the service using telnet (although you can also use FTP for this). When “Escape character is ‘^]’ ” message is displayed, I type command “help”. As expected, it gives me all the commands that can be used. So it seems we already have access to the target server.

Proftpd2

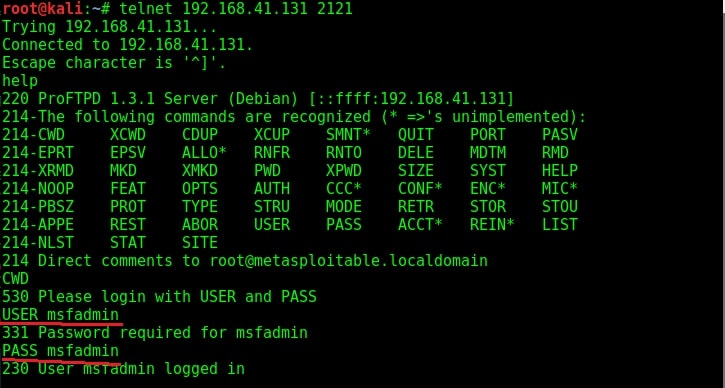
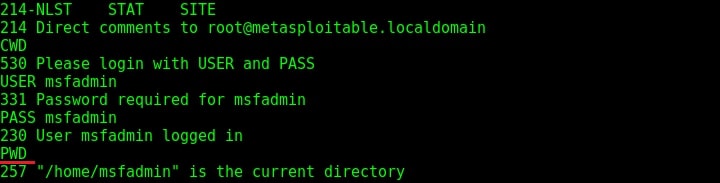
To confirm this, I tried one command. It prompted me for username and password. But thanks to an excellent phase of enumeration we performed, we already have the username and password. I decided to try the username/password msfadmin/msfadmin. Voila, it worked and we have access to the system now. Typing PWD command gives me the confirmation that I am inside the system. That’s all with hacking ProFTPd.

Proftpd3

Liked this article? Learn advanced ethical hacking tutorials in our Monthly Magazine. Enjoy Free for 3 months.

Posted on 3 Comments

Hacking Rlogin and Rexec Services

In this post, we will be hacking rlogin (remote login) , rexec and remote shell services running on ports 512, 513 and 514 of Metasploitable 2 respectively. Performing a verbose scan on the target gives me the result as shown in the image below.

Rsh1

Before we exploit these services, let me explain as to what these services are. Remote execution service popularly called Rexec is a service which allows users to execute non-interactive commands on another remote system. This remote system should be running a remote exec daemon or server (rexecd) as in the case of our Metasploitable 2 target here. By default, this service requires a valid user name and password for the target system.(For your information, we already have the credentials which we acquired during enumeration).
Rlogin or Remote Login service is a remote access service which allows an authorized user to login to UNIX machines (hosts). This service allows the logged user to operate the remote machine as if he is logged into the physical machine. This service is similar to other remote services like telnet and SSH. This service by default runs on port 513.
Rsh or Remote shell is a remote access service that allows users a shell on the target system. Authentication is not required for this service. By default it runs on port 514.

Although Rsh doesn’t require a password, it requires the username belonging to the remote system. As discussed above, we already have the credentials. In case we don’t have the credentials, we have to crack the passwords as explained in one of our previous posts.
Rsh daemon can be installed in the Kali Linux machine using the command apt-get install rsh-server. Once the installation is over, the below command can be used to get a shell on the target machine. I have tried this with the username root. As you can see, we successfully got a shell on the target system.

How to hack rlogin services

The next service we will target is Remote Login running on port 514. The command to get remote login is given in the image below.

Rlogin1

As you can see, we once again got a shell on the target system. Using Rexec is also almost similar to the methods shown above. That was about hacking rlogin, rexec and remote shell services. Learn how to hack ProFtpd service.

Liked this article? Learn advanced ethical hacking tutorials in our Monthly Magazine. Enjoy Free for 3 months.

Posted on

Hacking the SSH server, again

In the previous howto, we have seen how to research about a vulnerability in the FTP service running on our target system and exploit it to gain a shell on that system. In this howto, we will see hacking the SSH service running on port 22. It can be seen that the target is running OPenSSH 4.7p1 SSH server.

Mva1

I googled about the above mentioned version to find out if it had any vulnerabilities and exploits for those vulnerabilities. After an arduous search, I found one exploit but that seemed to be not working (Its not always a positive result in hacking).

Remember that we already gained a shell on the SSH server in one of our previous howtos. We did this using the credentials we obtained during enumeration of the target system. (This is why enumeration is so important). We used this credentials in a Metasploit SSH login module to get a shell on our target system.

This time we will see another way of gaining access to the SSH server using the same module. This SSH login module can also be used to brute force the credentials of the SSH server. Let’s see how it works. Load the module and check the required options.

Ssh1
Ssh2

In order to brute force the credentials, we need to specify a dictionary for cracking username- s and passwords in the similar fashion we set while using Hydra. We will use the same dictionary we have used while performing password cracking with Hydra.

I have set the same file for both username and passwords. To conserve time I have set the option “stop_on_success” to True. This option will stop the brute forcing if it finds even one login credential. I have set the “verbose” option also to TRUE. This module is normally used to brute force multiple SSH servers at once. That’s the reason it has “RHOSTS” option instead of “RHOST” option. Any how we can still set a single IP as target. All the options are shown as below.

Ssh3

After all the options are set, execute the exploit using the command “run”.

Ssh4

Once the password is cracked successfully, the module displays the credentials and automatically gives us a shell on the target system as shown in the above image. The available sessions can be viewed as shown below.

Ssh5

We can also login into the SSH server using the credentials we obtained prior as shown below.

Ssh6

Liked this article? Learn advanced ethical hacking tutorials in our Monthly Magazine. Enjoy Free for 3 months.

Posted on 1 Comment

Hacking Metasploitable 2: Port scan output

This howto is part of a series called Hacking Metasploitable. So it would be good if you follow this as part of that series. Today we will see scanning and banner grabbing of Metasploitable. Scanning is the second stage of hacking where we gather more information about our target. Imagine a scenario where we got the IP address range of our target and we want to check how many live systems are there. This is network scanning. There are many tools in our attacker system but we will use Zenmap. Open a terminal and type command “zenmap”. It would open a GUI tool as shown below. Give the IP address range as shown below. (192.168.25.100-130, it may differ for you ) and select “ping scan” . Then click on “scan”. It will show all the live systems. In our case, only Metasploitable.

Metasps1

Now let’s do port scanning of the live system. Now in target field, specify only the IP address of Metasploitable. In Profile, select “slow and comprehensive scan” and click on “scan”. It will show all the open ports as shown below.

Metasps2

But there is another tool which is widely used for port scanning. Enter nmap. Nmap is a versatile port scanner. (Zenmap is the GUI version of Nmap). The default way to use Nmap is shown below. It would list all the open ports.

Metasps3
Metasps4

Next we will see how to grab banners. Banners display information about the type of service running at the open ports of our target. This can reveal some important information about our target which can be used for hacking. The Nmap command for banner grabbing and its results are shown below. We got a lot of banners.

hacking metasploitable
Metasps6

Next we will use Nmap to find out the operating system of our target. The command is given below.

Metasps7

The OS details are given below.

Metasps8

There is another way of grabbing banners. It is telnetting to each port as shown below. The results can also be seen.

Metasps9
Metasps10

That’s all in Hacking Metasploitable : information Gathering stage.

Posted on 7 Comments

How to install Metasploitable 2 in VirtualBox

Hello aspiring Ethical Hackers. In this article, you will learn how to install Metasploitable 2 in VirtualBox. What is Metasploitable? Learning penetration testing or ethical hacking requires practical knowledge and good practice needs a vulnerable target. That is where Metasploitable comes into picture. It is an intentionally vulnerable operating system made by the makers of Metasploit themselves so that aspiring ethical hackers can practice and hone their hacking skills. As its name conveys Metasploitable is loaded with vulnerabilities that can be exploited with Metasploit modules.

This virtual machine can be used to conduct security training, test security tools, and practice common penetration testing techniques. For this i am going to use Metasploitable 2 which can be downloaded from here. After downloading the zip archive, extract the files into a folder. The file contents look like below.

Installing Metasploitable

Open VirtualBox and click on “New Virtual machine wizard”. Type the name of your choice. I am using ‘Metasploitable-2‘. Choose ‘Type’ as Linux and ‘version’ as Ubuntu. Click on “Next”.

Metasploitable2

Choose the memory size appropriate to the availability of RAM on your host machine although 512MB is more than enough. Click on “Next”.

Metasploitable3

In the hard drive creation window, select option “Use an existing virtual hard drive”, browse to the folder where we have extracted our zip files and select the ‘vmdk’ file available. Click on “Create”.

Metasploitable4

Then you are automatically booted into the metasploitable OS. The default username and password are “msfadmin”.

Metasploitable5

You learnt how to install Metasploitable 2 in VirtualBox. See how to create a penetration testing lab.