Posted on

Port scanning techniques for beginners

Hello aspiring Ethical Hackers. In our previous blogpost you learnt what is a port? what is port scanning etc. In this blogpost, you will learn about different port scanning techniques that are be used to determine if a port is open or not. Ethical Hackers and Penetration Testers use different port scanning techniques to determine if a port is open or not. Unless a port is open, you cannot enumerate the service running on it for further exploitation. So, using a wrong port scanning technique can give you a wrong result.

In order to understand the various port scanning techniques, readers need to first understand how TCP communication takes place between programs and applications. You have read in our article on OSI model that the Transport Layer is responsible for reliable data transfer between end systems. You have also read two protocols are used for data transfer between devices and applications. They are Transmission Control Protocol (TCP) and user Datagram Protocol (UDP).

Transmission Control Protocol is a reliable connection-oriented protocol that ensures that data is transmitted accurately and completely between programs and applications.

How TCP communication takes place?

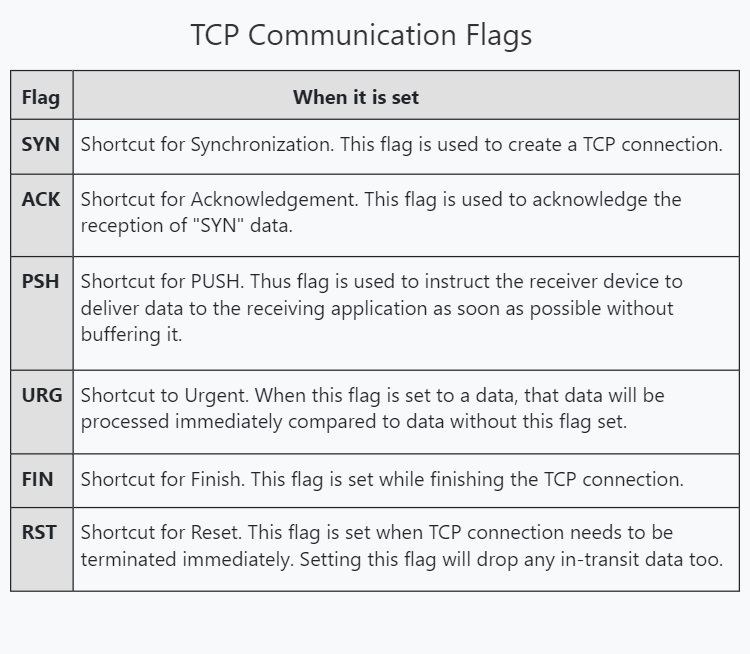
To make sure that data is transmitting correctly and completely, Transmission Control Protocol (TCP) uses various flags in the headers. These flags are given below.

Port Scanning Techniques 1

TCP Three-Way Handshake

Before sending data using TCP, two devices establish a connection using a Three-Way handshake which is shown below.

  1. A client sends a TCP packet to the Server with SYN flag set.
  2. The Server responds with a TCP packet with both SYN and ACK flags set.
  3. The client replies to the packet with a TCP packet with ACK flag set.
Port Scanning Techniques 2

After this 3-way handshake, both client and Server start sending and receiving data. Now, that you understood how a TCP communication works it’s time to see different port scanning techniques.

POrt Scanning Techniques 3

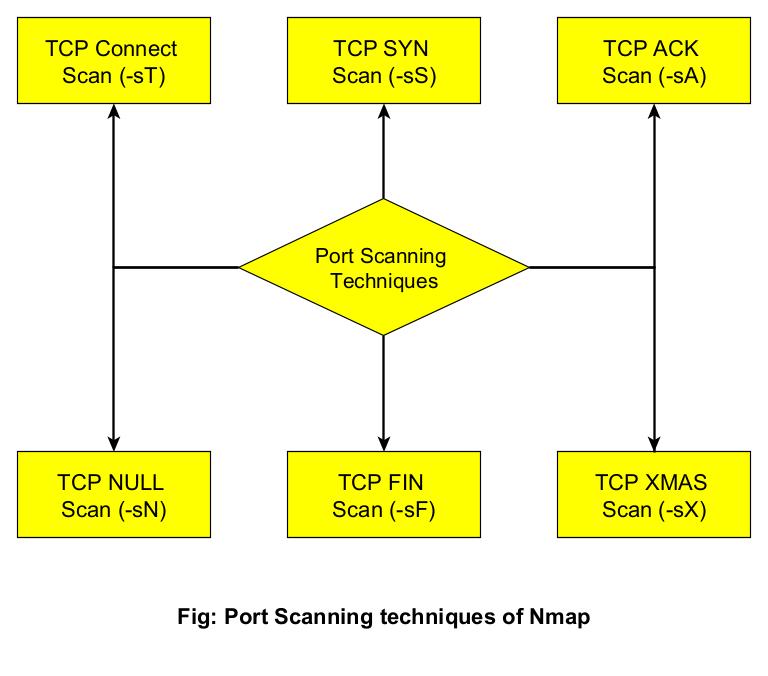
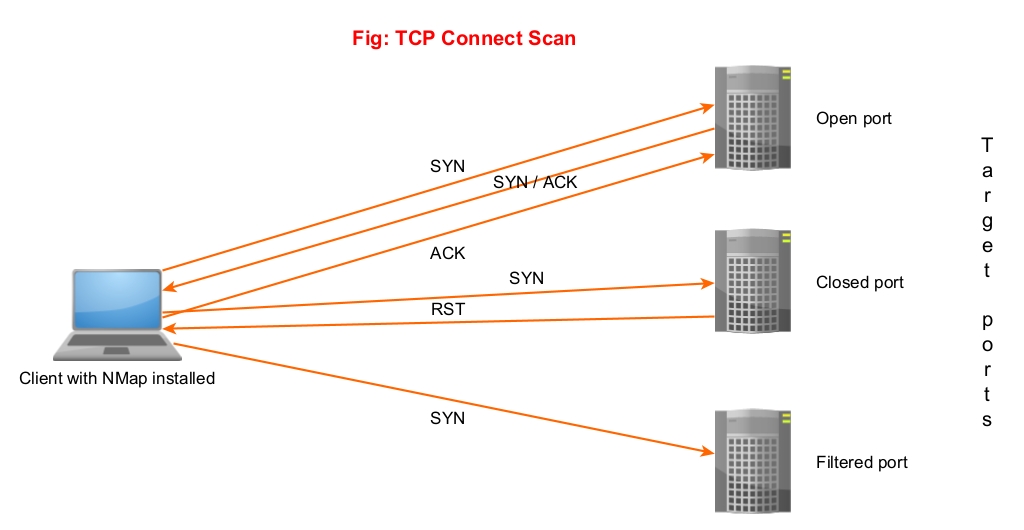
1. TCP Connect Scan (-sT)

In this type of scan, NMAP sends a TCP packet to a port with the SYN flags set. If the port is open, the target responds with a SYN/ACK flag set to packet. Then Nmap sends ACK packet. If the port is closed, the target sends a RST packet. If the target doesn’t respond, the port can be considered filtered.

TCP Connect Scan

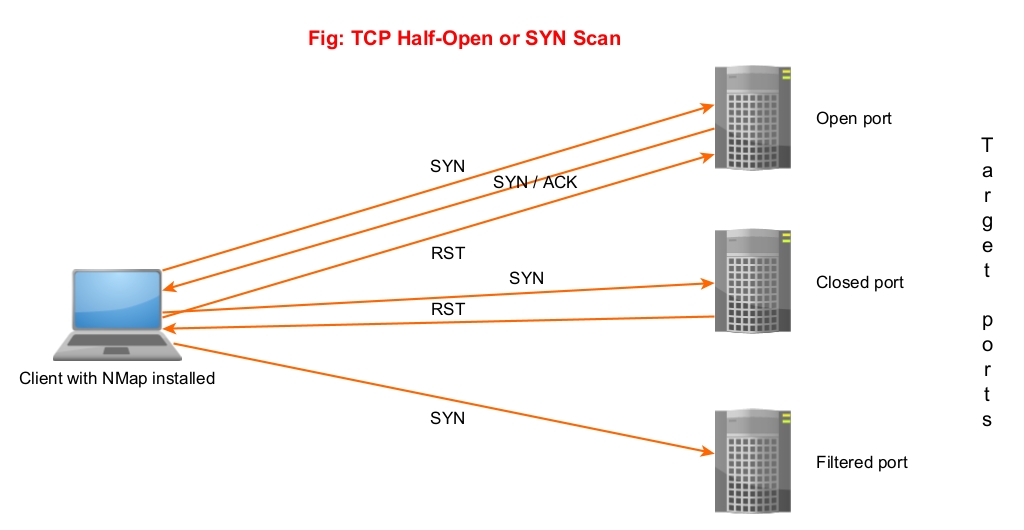
2. SYN or Half-Open Scan (-sS)

In a SYN scan, Nmap sends a SYN packet to the target port. If the port is open, the target sends a “SYN/ACK” set packet. Then Nmap instead of sending a packet with ACK flag set, sends a packet with RST flag set to terminate the connection. Since the Three-way handshake is not complete, it is known as “half-open” scan. Similarly, since the TCP connection is not complete it is not logged and hence considered a stealthy scan. Also, unlike TCP connect scan this scan is fast.

TCP SYN Scan

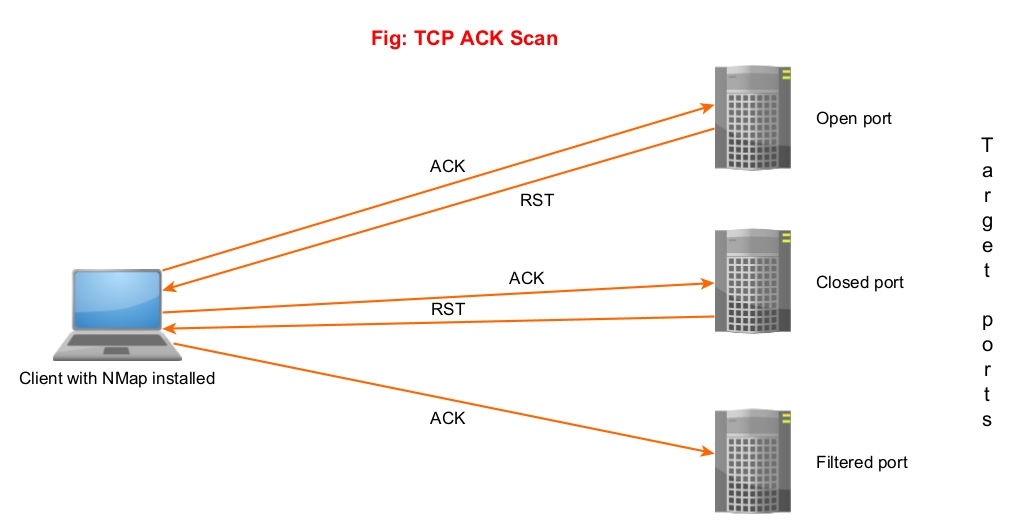
3. ACK Scan (-sA)

Unlike the above two scans, this scan is not used to determine if a port is open or not. In fact, it is used to determine firewall rulesets. In this scan, Nmap sends a packet with ACK flag set to the target port. Here, both open and closed ports send a packet with RST flag set. These ports are labelled as unfiltered. If the ACK packet is dropped, the port is labelled as filtered.

ACK Scan

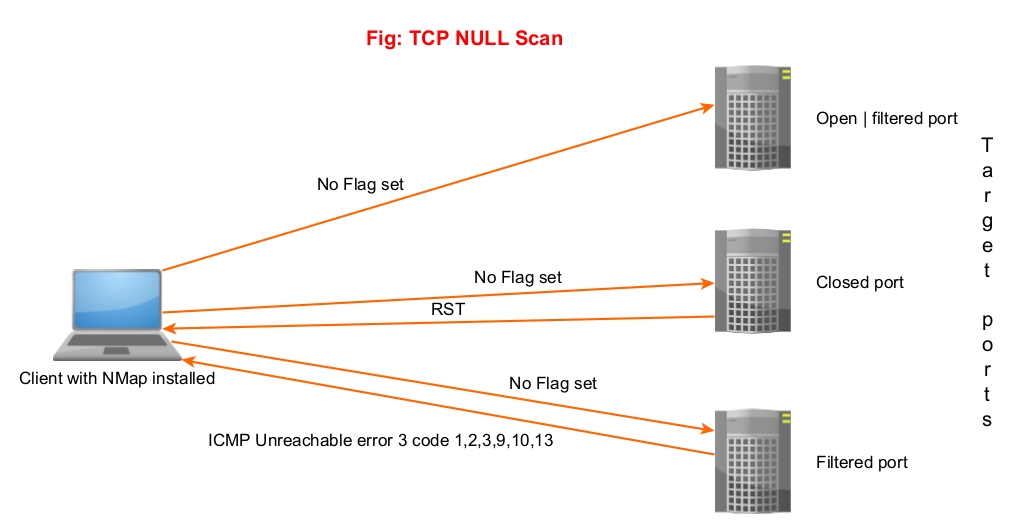
4. NULL Scan (-sN)

In this scan, Nmap doesn’t set any flags while sending a packet to the target. If no response is received, the port is assigned as open/filtered. If an RST flag is received from the target port, the port is considered closed and if any ICMP unreachable error 3, code,1,2, 9,10 or 13 is received, it is considered as filtered.

NULL Scan

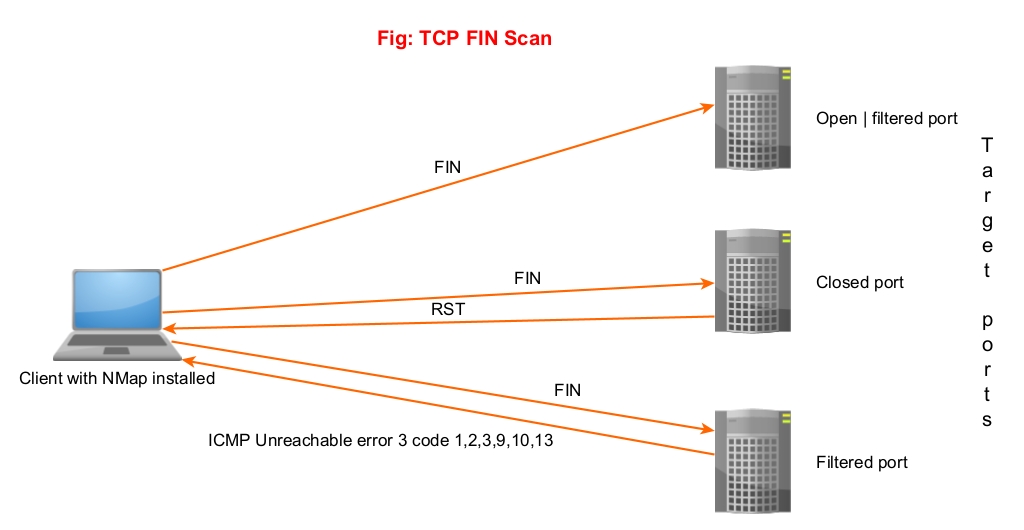
5. FIN Scan (-sF)

In this scan, Nmap sends a packet with FIN flag set to the target. The result is same as that of NULL scan.

FIN Scan

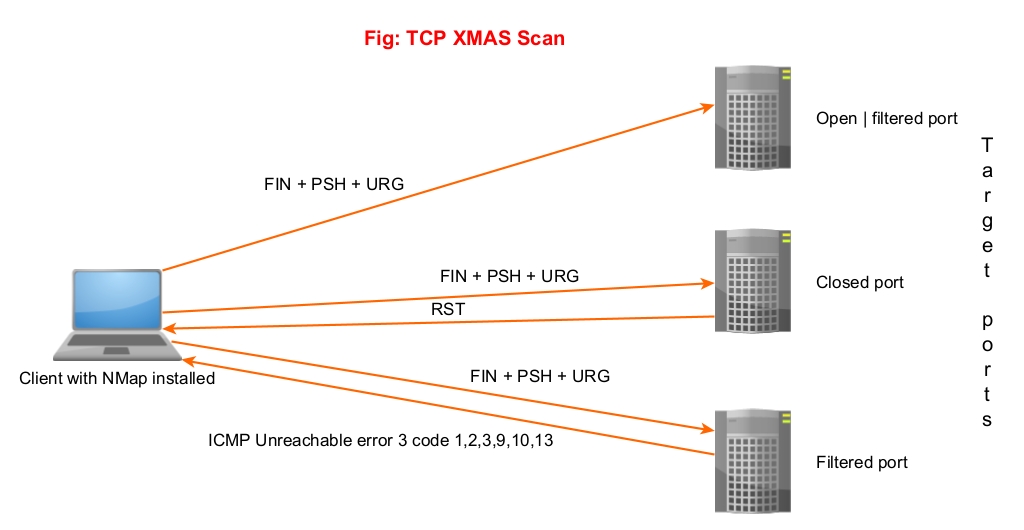
6. XMAS Scan (-sX)

In this type of scan, NMAP sets FIN, PSH and URG flags to the packet and sends it to target port. The result is same as that of Null scan & FIN scan.

XMAS Scan

Since the packet is lighted up like a Christmas tree when these 3 flags are set, it is known as XMAS scan. Learn about different port scan results.

Posted on 2 Comments

Complete guide to Nmap port scanner

Hello, aspiring ethical hackers. This blogpost is a complete guide for using Nmap (Network Mapper). It is a popular and open source utility used for port scanning and network discovery by network administrators and pen testers. It uses real IP packets in novel ways to determine the LIVE hosts on the networks, open ports, the services they are running, type of firewalls in use etc. It is available for all major operating systems like Linux, Windows and Mac OSX.

We are using it on Kali Linux where it is installed by default. Let’s begin with how to specify targets while scanning.

Target specification

1. Provide input through a list:

nmap -iL <input filename>

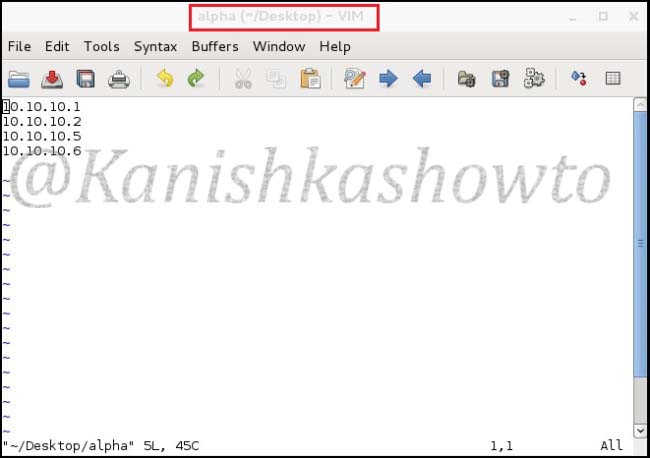
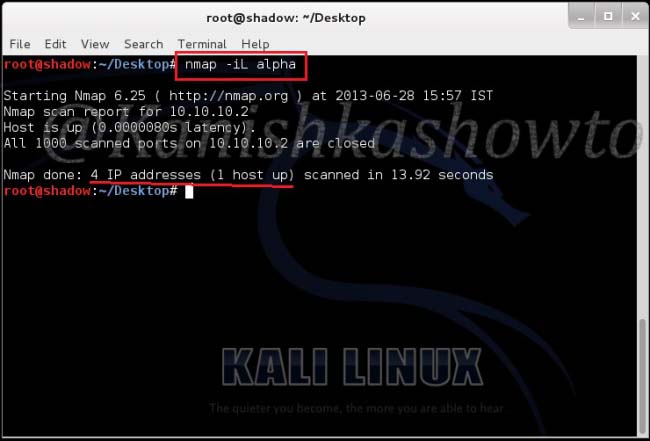
This option reads targets from a specific file. Let’s create a file named alpha with a few newline separated or tab-limited or space separated IP addresses using vi on Desktop.

Nt1

Then, move to Desktop directory and type the command as shown below. It scans the four IP addresses listed in our file.

Nts2

2. Specify random hosts to scan:

nmap -iR <number of hosts>

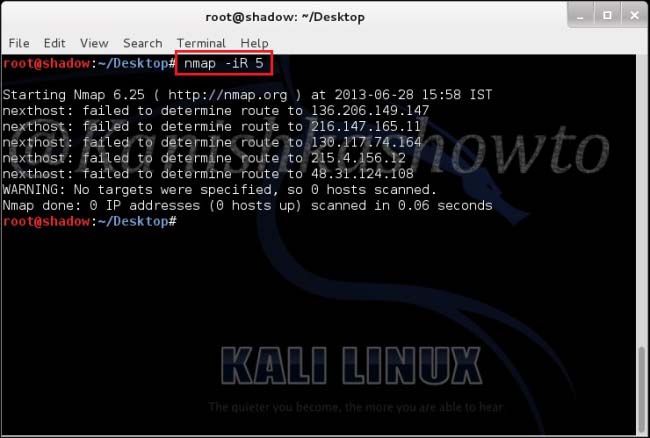
This option is used to specify random hosts to scan. Nmap generates its own targets to scan. The <number of hosts>argument tells nmap the number of IP’s to generate. Let’s type command as shown below.We can see that it generated five random targets to scan. The scan failed to determine route to the generated IP addresses because my system is not connected to Internet. Why didn’t it generate any internal IP addresses? Because in this scan private, multicast and unallocated address ranges are automatically skipped.

Nts3

3. Scan the entire subnet:

nmap <IP address/dir>

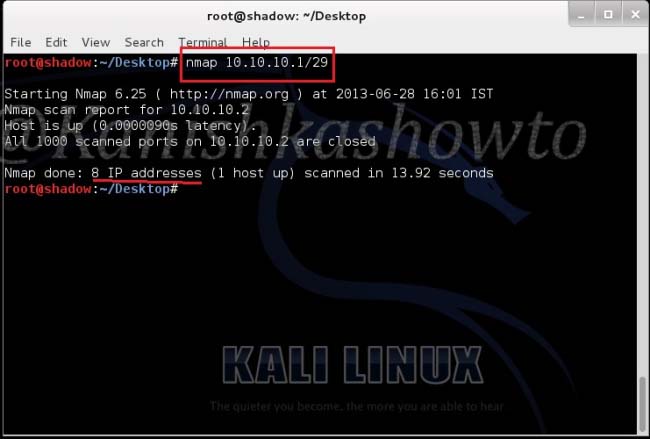
This option is used to scan the entire subnet. Assuming you know CIDR let’s type the command as shown below to scan eight IP addresses from 10.10.10.1 to 10.10.10.8 and see the result below.

Nts4

4. Exclude some hosts and networks:

nmap [targets] -exclude [targets]

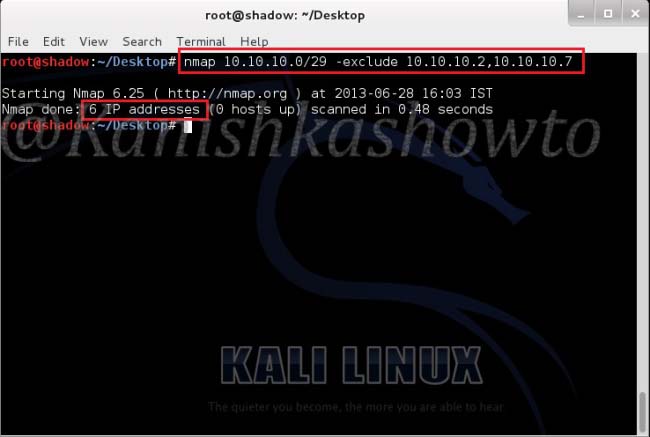
This option specifies a comma separated list of targets to be excluded from the scan even if they are part of overall network range we specify. For example, in our previous scan we saw that one host 10.10.10.2( which is the system I am working on) is alive. Now I decided to exclude that host and another host from the scan. So I type the command as shown in the image given below and press “Enter”. We can see that nmap has only scanned six IP addresses.

Nts5

5. Take the exclusion list from a file:

nmap [targets] -excludefile [file name]

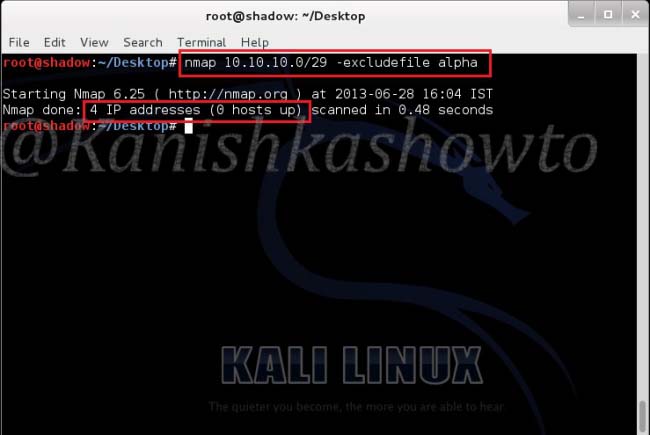
Now what if the subnet was very big and there are more number of hosts to be excluded from the scan. The above option helps us to achieve this. Remember the file “alpha”( with four IP addresses) we created. Now let’s specify nmap to quit scanning the hosts listed in the file. Type the command as shown below. We can see that it scanned only four hosts in the subnet.

Nts6

6. Scan specific targets:

nmap [target1 target2 target3]

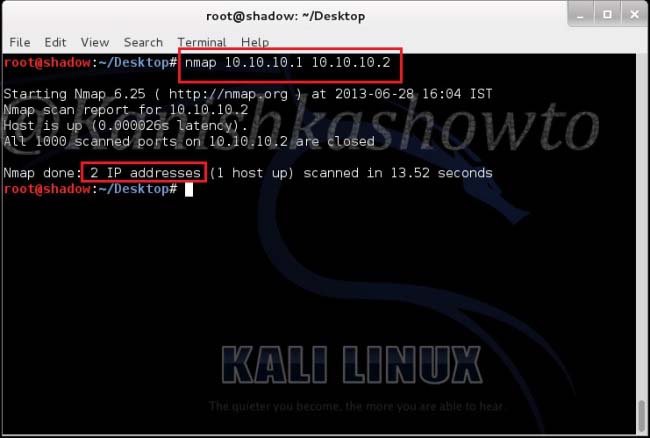
This option specifies nmap to scan multiple targets separated by space. Type the command shown below . We can see the result below.

Nts7

Scan types

Nmap is equipped with a variety of scans to detect open ports and services on the target system. Learn about Nmap’s various port scan techniques here.

Scan results

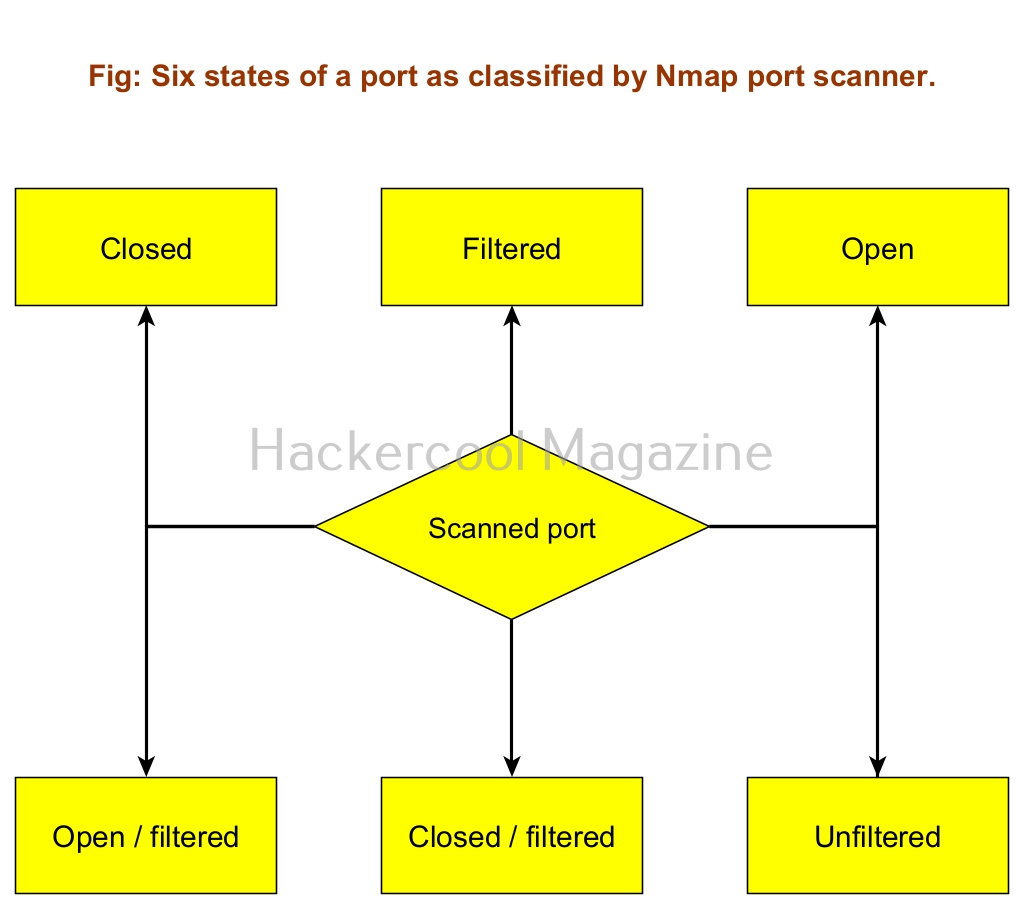
Nmap classifies the ports it scans into six categories. They are open, closed, filtered, unfiltered, open/filtered and closed/unfiltered. In which cases does Nmap classify a port as one of the above. Learn in port scan results of Nmap.

Posted on

Understanding port scanning results of Nmap

Hello aspiring Ethical Hackers. In this blogpost you will learn how to analyze port scanning results of Nmap. Scanning plays a very important role in hacking a system. Scanning is a phase in which we find out the ports which are open and the services listening on those ports. NMap is the most popular port scanner being used security guys nowadays. Read complete guide to Nmap. It is very important to understand results of Nmap port scan. Nmap classifies ports into six states. They are, open, closed, filtered, unfiltered, open | filtered and closed | filtered.

Port Scanning Results 0

Let us find out when Nmap classifies ports into specific states. To demonstrate the results of port scanning performed my Nmap, I use two virtual machines,

1. Kali Linux as attacker system.

2. Windows 10 as target system.

On the target system, I enable or install a SSH server. You can learn how to install a SSH server here. For this tutorial, I will be scanning this SSH port with Nmap.

1. Closed:

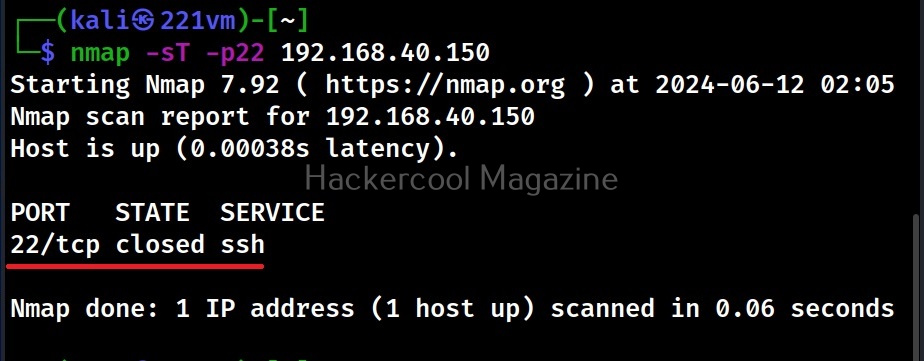
Nmap classifies a port as closed when the port is accessible but there is no application listening on it. When I perform a default Nmap scan from the Kali system of port 22 of the target machine, I get a “closed” result as shown below.

nmap -sT –p22 <target ip>

Port Scanning Results 1

Note that on our target machine, we have installed the SSH server but not yet started it.

2. Filtered:

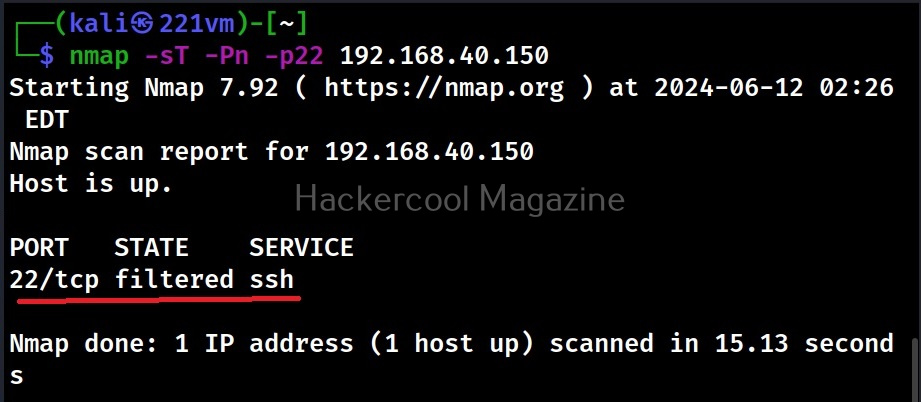
Nmap classifies a port as filtered when it can’t determine whether the port is open or closed because packet filtering prevents its probes from reaching the port. Let’s now start the SSH server and scan again. This time when we scan the same port again, we get a “filtered” result as shown below.

nmap -sT -Pn –p22 <target ip>

Port Scanning Results 2

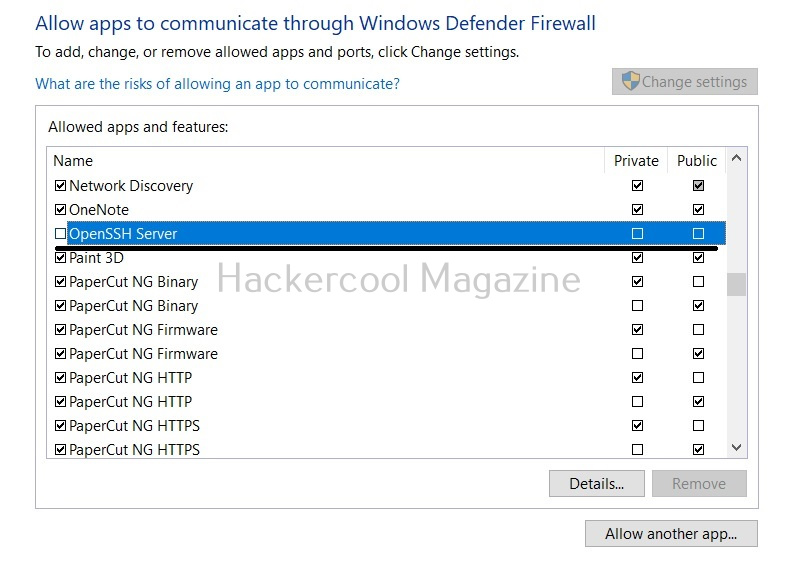
This is because although we have started the SSH service on the target system, Windows Defender Firewall, which is turned ON by default, is blocking our connection to the target port. When Nmap classifies a port as filtered, it is most likely that a firewall is blocking our probes.

3. Open:

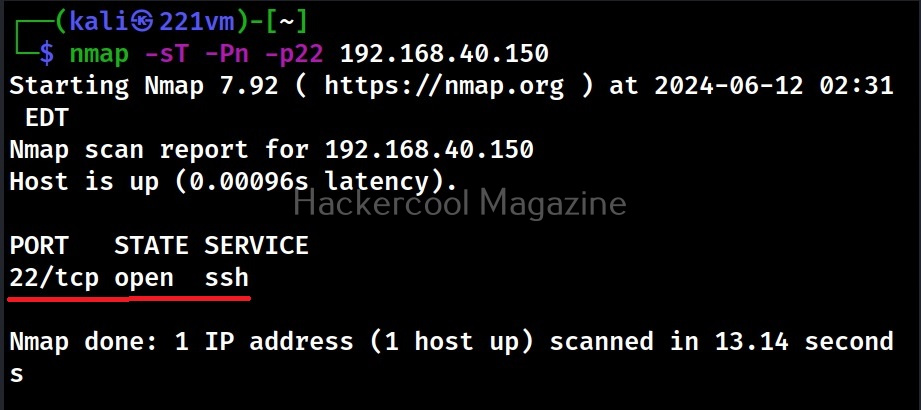
Nmap classifies a port as open when the port is accessible and if an application is actively accepting TCP connections, UDP datagrams or SCTP associations on this port. On our target system, let’s change the Windows Defender Firewall settings to allow the SSH service through the Firewall as shown below and scan the service again.

Port Scanning Results 3
Port Scanning Results 4

The result I get is “open”. This is because the SSH server is actively accepting connections.

4. Unfiltered:

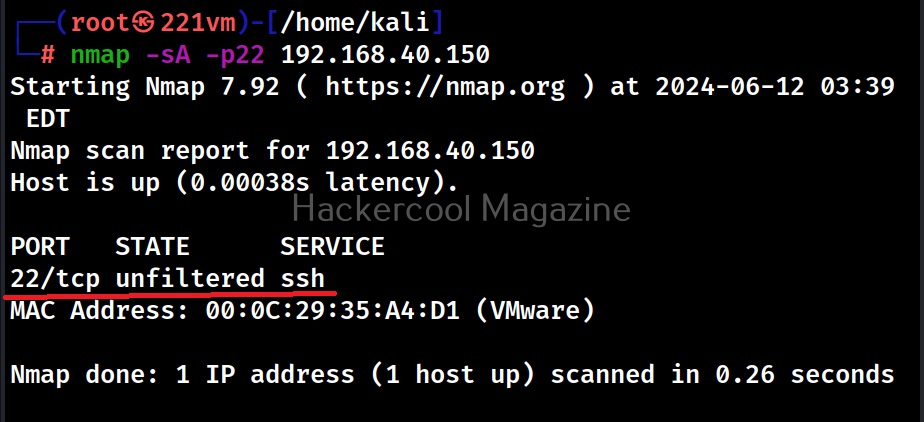
Nmap classifies a port as unfiltered when a port is accessible but it can’t determine whether it is open or closed. A port is classified as unfiltered only with the ACK scan. Learn about different scans that can be performed with Nmap.

nmap -sA –p22 <target ip>

Port Scanning Results 5

This scan cannot determine if the port is open or closed and is generally used to find out rules of the firewall.

5. Closed | filtered:

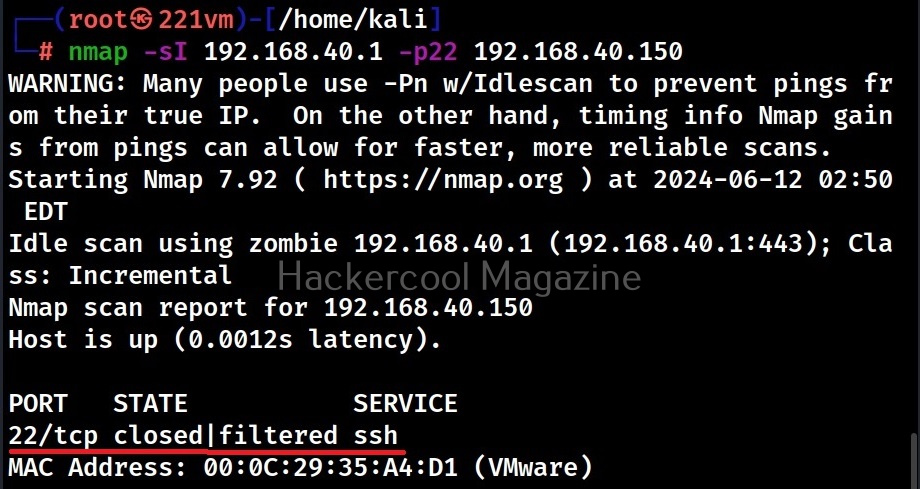
Nmap gives this result when it can’t find out whether a port is closed or filtered. A port is classified this way by Nmap only when we perform IDLE scan. Now what is IDLE scan? Idle scan is a scan in which we use a zombie host to scan the victim. In our example, we use another host with IP 192.168.40.1 as a zombie to perform IDLE scan on our victim.

nmap -sI <zombie_host> -p22 <target ip>

Port Scanning Results 6

6. Open | filtered:

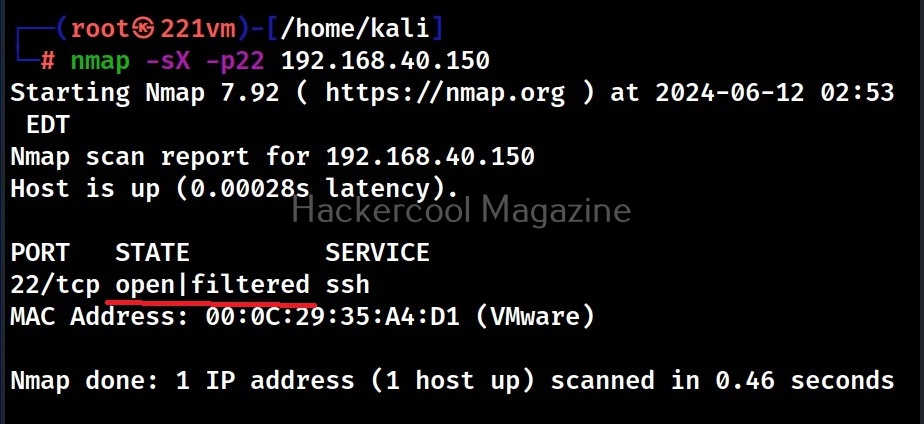
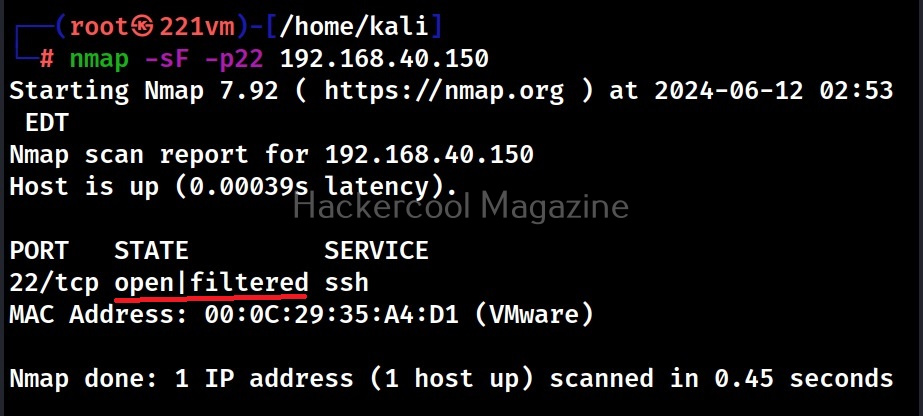
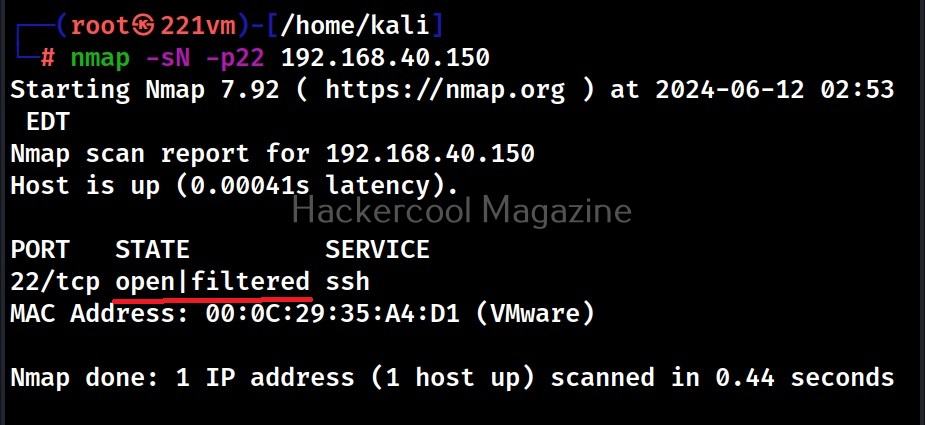
A port is classified as open | filtered when Nmap is unable to determine whether a port is open or filtered. This happens for scan types in which open ports give no response. The UDP, IP protocol, FIN, NULL and XMAS scans classify ports this way.

Port Scanning Results 8
XMAS scan
Port Scanning Results 9
FIN scan
Port Scanning Results 10
NULL scan

The port is classified as “open | filtered” in above cases because Nmap can’t determine whether the port is open or filtered.