Kali Linux is the most advanced penetration testing distribution with a number of tools. While using these tools a measure of anonymity is required. Today we are going to see how to spoof your IP address in Kali Linux. First, check your IP address by visiting any website which shows your IP address ( http://www.whatismyip.com ). Then go to the site www.vpnbook.com.
New to Ethical Hacking?
Start your journey with The Beginner Ethical Hacker Starter Kit (2026 Edition).
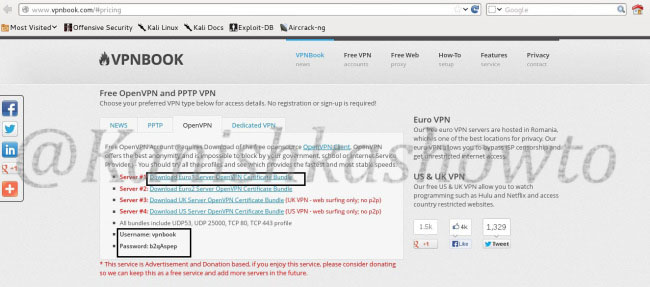
Download the Euro1 Server OpenVPN certificate bundle as shown below. Note down the username and password given. We will need it in later steps.
When you click on the download link, the following window opens. Since it is a zip package, system will prompt whether to open it with unzip ( the default option ). Click on “OK”.
Open the terminal and navigate to the directory where the contents of the zip archive have been unzipped. Type the command “ls” to see the unzipped files. We are going to use the vpnbook-euro1-udp53.ovpn package.
Want to Learn Ethical Hacking Step-by-Step?
If you’re serious about learning cybersecurity, a structured roadmap makes the journey much easier.
Download The Beginner Ethical Hacker Starter Kit (2026 Edition) and discover:
✔ The ethical hacking learning path ✔ Beginner-friendly security concepts ✔ Essential tools ethical hackers use ✔ The most common vulnerabilities explained
Hello, aspiring ethical hackers. In this blogpost, you will learn about banner grabbing. Banner grabbing plays a very important role in ethical hacking for penetration testers and hackers alike. To understand what is banner grabbing, you need to understand what is a banner first.
New to Ethical Hacking?
Start your journey with The Beginner Ethical Hacker Starter Kit (2026 Edition).
A banner is the information displayed by software or service running on a specific port. This information involves the type of software running, version of the software running etc. This information is displayed by default by every software running for marketing purposes.
What is Banner grabbing?
Banner grabbing as its name implies, is grabbing this banner. A banner when displayed to a common user may provide information to the user. In the same way, by grabbing this banner, hackers and penetration testers can get information about the software running on it and the version of the software running. This allows them to search or research for any vulnerabilities in the software.
Types of Banner grabbing
Banner grabbing can be performed in two ways: Active & passive.
Active banner grabbing: In active banner grabbing, a hacker or penetration tester interacts with the software & target services to grab the banner.
Passive banner grabbing: In passive banner grabbing, a hacker or penetration tester doesn’t interact with the target service while grabbing the banner. This can be done by packet sniffing on the network traffic of the network.
Although banner grabbing can be performed on almost all services running on all ports, the most common services that are used for banner grabbing are,
FTP-Port 21 SSH-Port 23 SMTP-Port 22 HTTP-Port 80
Tools used for Banner grabbing:
Telnet, wget, curl etc
Apache:
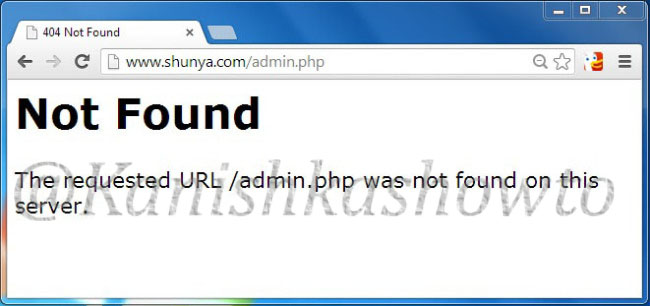
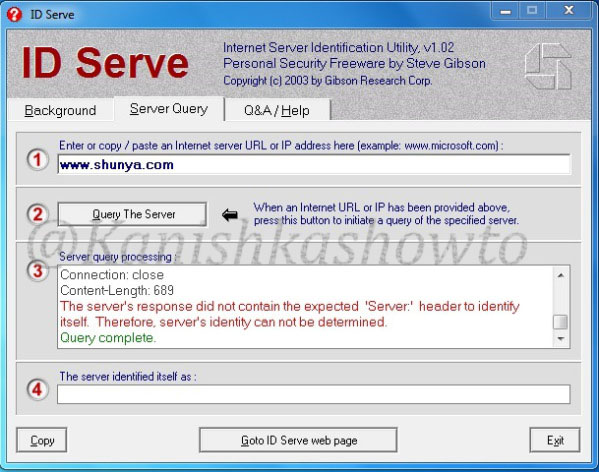
Imagine I have set up a website named www.shunya.com on an Apache server. A hacker can easily find Information about the web server in different ways. For example, a hacker can visit the website and and try to open a webpage which is not existent on my server, like below.
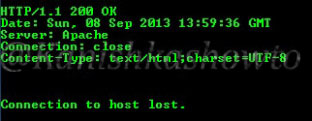
In the above example, hacker tried to open page named “admin.php” which was not available on my server and in turn the server responded with a type of web server, the target OS and the scripting language. This is giving out too much information.
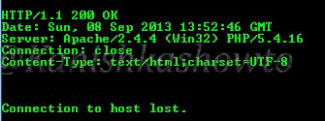
The traditional and popular way of fingerprinting is through telnet. A hacker opens command line or terminal. and types the command “telnetwww.shunya.com 80″. When the screen goes black, type “HEAD / HTTP/1.0″ and this will give the server information.
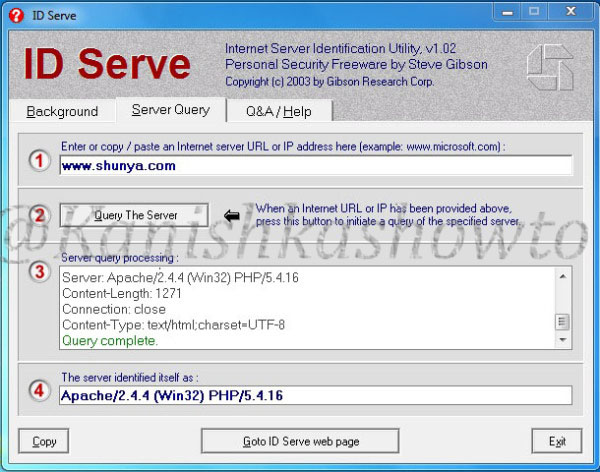
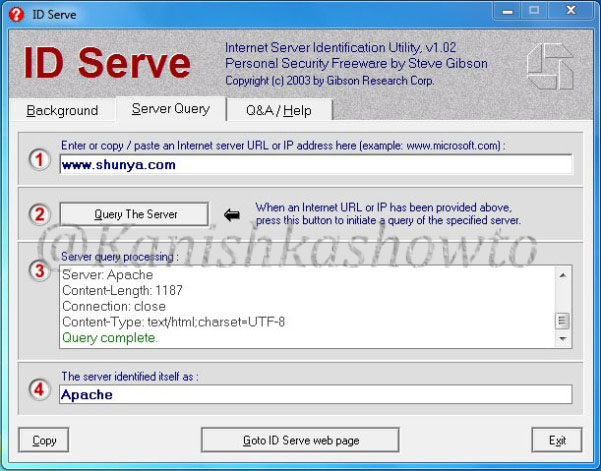
There are also many fingerprinting tools available. I am gonna show you only one, Id serve. Let’s see how to banner grab using Id serve.
Now what are the preventive measures we can take in Apache server to disable or atleast prevent fingerprinting to some extent. Apache web server has a configuration file called “httpd.conf” where we can make changes to fight fingerprinting. Go to httpd.conf and change the value of the option “Server Signature to off”. This will not display any information about server when an nonexistent page has been accessed.
In the httpd.conf file, changing the value of “Server Tokens” from “Full” to “Prod” will only show the minimum server information as shown below.
This still discloses that our web server is Apache but it doesn’t show the version. In Kautilya’s words this is delaying the march of enemy. Here are the options we set.
Want to Learn Ethical Hacking Step-by-Step?
If you’re serious about learning cybersecurity, a structured roadmap makes the journey much easier.
Download The Beginner Ethical Hacker Starter Kit (2026 Edition) and discover:
✔ The ethical hacking learning path ✔ Beginner-friendly security concepts ✔ Essential tools ethical hackers use ✔ The most common vulnerabilities explained
Now imagine we changed our www.shunya.com website from Apache server to the latest version of Microsoft web server, IIS 8. To prevent error pages form revealing any information in IIS server, we can set custom error pages. Now let’s use IDserve tool to fingerprint the IIS 8 server.
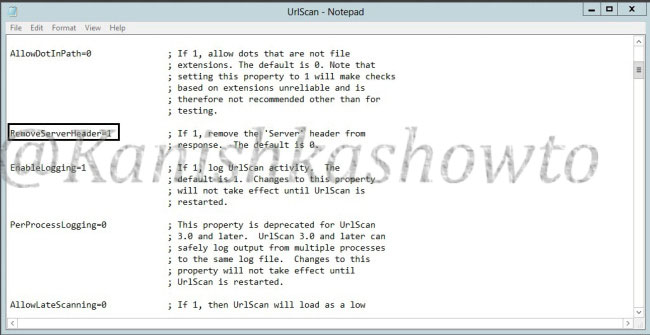
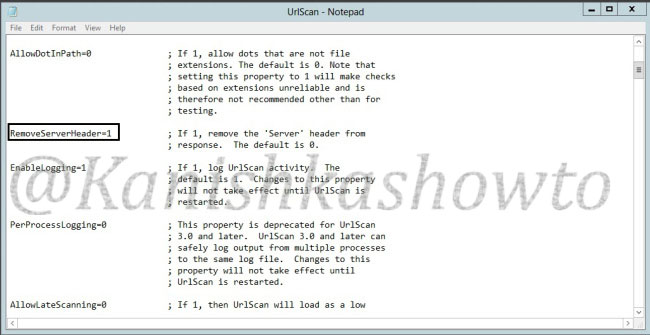
It shows the server version. Now how can we prevent this. Microsoft provides a tool named UrlScan freely available for download which can be used easily to process HTTP requests. Download this tool and install it. ( See how to configure Urlscan for IIS 7.5 and IIS 8 ). Then go to the configuration file of UrlScan, “UrlScan.ini” located at “C:WindowsSystem32inetservUrlscan” by default and change the value of “RemoveServerHeader’ from “0″ to “1″.
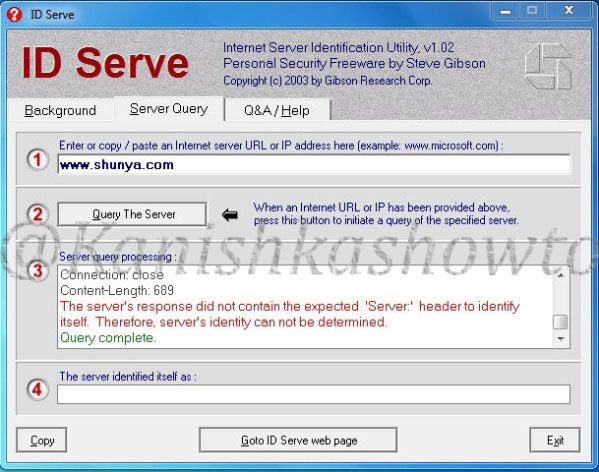
This will not reveal the server version information as shown below.
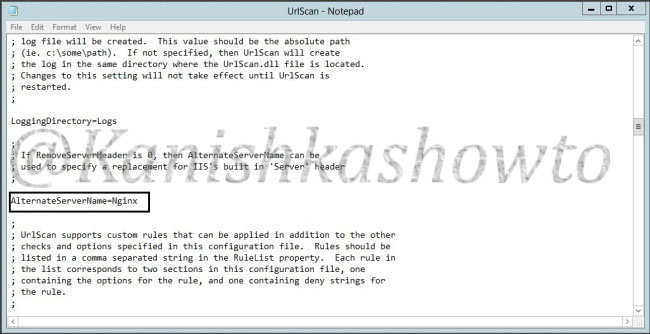
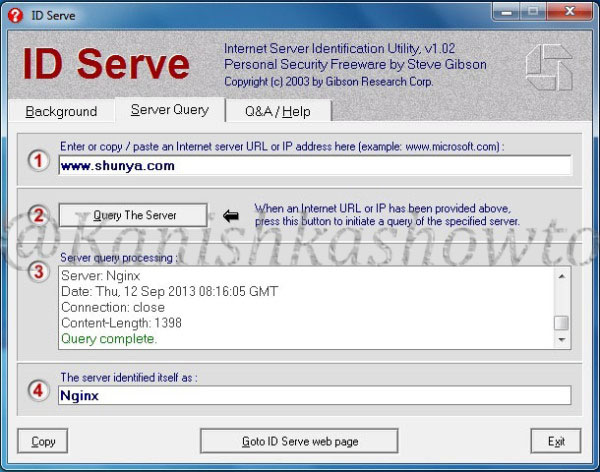
We can further mislead the attacker by setting our server name to some other value different than our original one. This can be done by setting the value of “RemoveServerHeader” to “0 “and changing the value of “AlternateServerName” to the value we want to specify ( in our example Nginx ).
So when the attacker tries to fingerprint our website, he will be misleaded.
Note: Taking this preventive measures will not stop a determined hacker to find out our server information.
That’s all in webserver banner grabbing and countermeasures.
Start Your Ethical Hacking Journey Today
Learning cybersecurity can feel overwhelming at first. The best way to start is with a clear roadmap and the right resources.
Download The Beginner Ethical Hacker Starter Kit (2026 Edition) and get instant access to:
✔ Ethical hacking fundamentals ✔ A beginner cybersecurity learning roadmap ✔ Essential hacking tools every beginner should know ✔ Common vulnerabilities explained simply
UrlScan is a security tool used to restrict types of HTTP requests that IIS will process. It is a simple tool which is very helpful in blocking harmful requests to the server. It seemingly supports only IIS 5.1, IIS 6.0, and IIS 7.0 on Windows Vista and Windows Server 2008. It has been deprecated since IIS 7.5 and IIS 8. It is said that Microsoft has included the features of UrlScan in request filtering option for IIS 7.5 and IIS 8. But it definitely is not a match for the simplicity of UrlScan. Today I am going to show you how to configure UrlScan in IIS 7.5 and IIS8. (IIS 7.5 is available in Windows server 2008 R2 and IIS 8 is available in Windows Server 2012 and Windows 8 ).
New to Ethical Hacking?
Start your journey with The Beginner Ethical Hacker Starter Kit (2026 Edition).
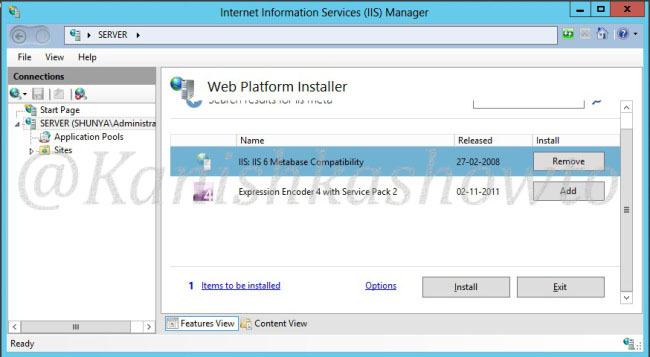
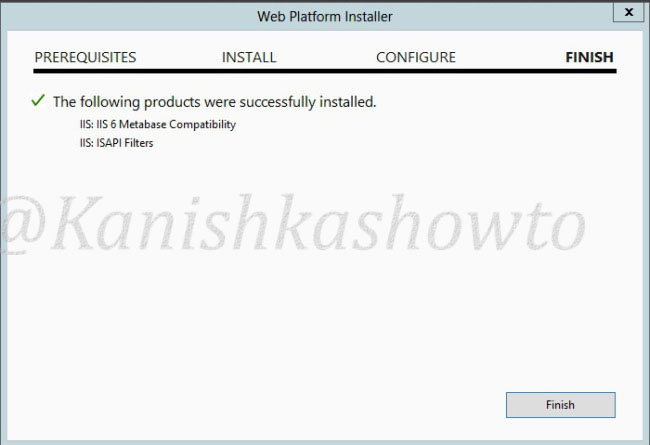
I am going to configure this in Windows server 2012 i.e IIS 8 but do not worry the configuration steps are similar in IIS 7.5. First and foremost install Web Platform Installer in your machine. This will help us to install all the components we require in simple steps. From web platform installer, select component IIS 6 metabase compatibility. This is compulsory to install URLscan.
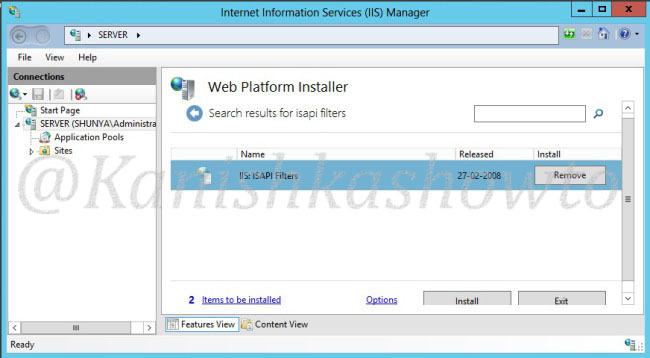
Then, select IIS ISAPI Filters. (ISAPI filters may already be installed in IIS 7.5 ).
Click on Install. You are shown a review of components you selected to install. Click on I accept.
The components are installed and will show you a Finish screen. Click on Finish.
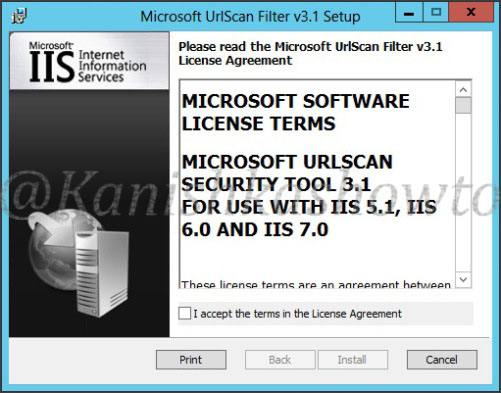
We are all set to install UrlScan. Download Urlscan and click on the msi package. On the window, select the option “I select the terms of license agreement” and click on “Install”.
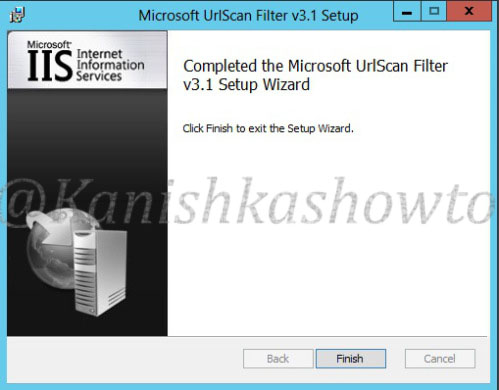
The installation is very quick. Once it finishes,click on “Finish”.
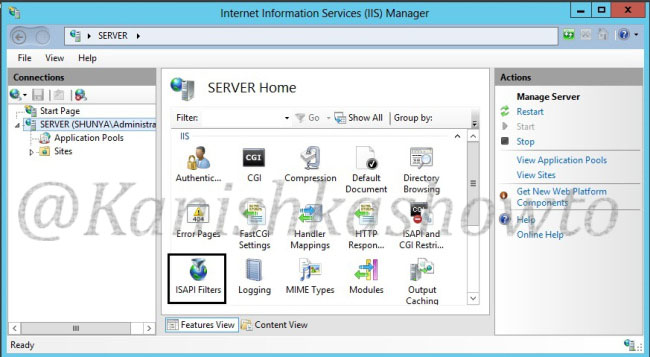
Now open IIS Manager. Click on ISAPI filters.
Want to Learn Ethical Hacking Step-by-Step?
If you’re serious about learning cybersecurity, a structured roadmap makes the journey much easier.
Download The Beginner Ethical Hacker Starter Kit (2026 Edition) and discover:
✔ The ethical hacking learning path ✔ Beginner-friendly security concepts ✔ Essential tools ethical hackers use ✔ The most common vulnerabilities explained
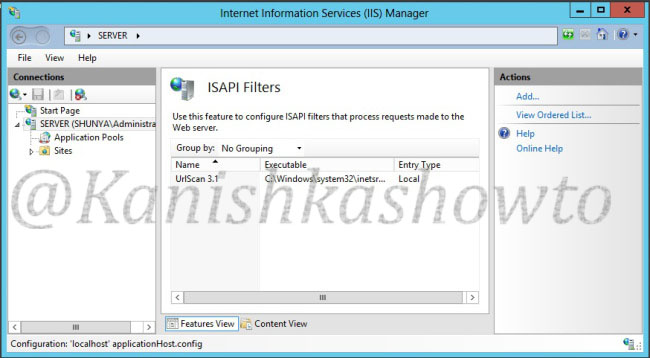
If everything went well, we should see a filter already set like below.
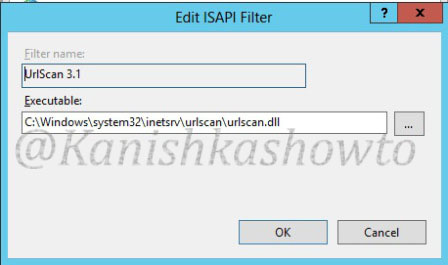
Click on it. We can see that there is already a filter named URLscan 3.1 linking to the executable urlscan.dll.
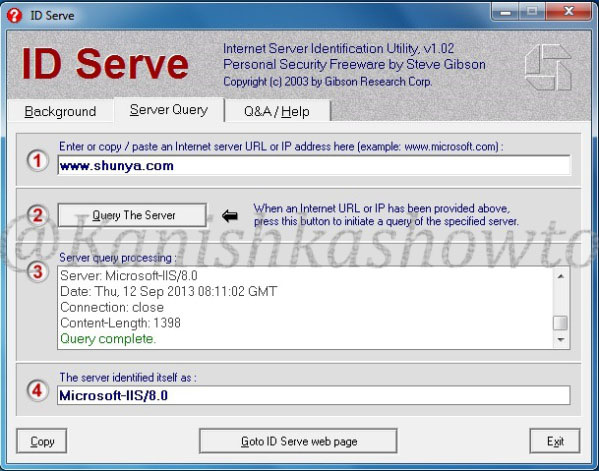
Before configuring UrlScan, let’s try a little banner grabbing to check whether UrlaScan is working or not. For this, we will use tool Idserve to fingerprint the server on which we have configured UrlScan. (www.shunya.com is fictional website i set on my server ).
We can see that the version is Microsoft-IIS/8.0. Now let’s go to the configuration file of urlscan (urlscan.ini) to make some changes to it. It is located by default at “C:WindowsSystem32inetservurlscan” and change the value of “RemoveServerHeader” to “1” from “0”. Save the file.
Now let’s again try to banner grab using Idserve. Restart the web server.
We can see that the server version has not been disclosed hence our UrlScan is working successfully. Hope it was helpful.
Start Your Ethical Hacking Journey Today
Learning cybersecurity can feel overwhelming at first. The best way to start is with a clear roadmap and the right resources.
Download The Beginner Ethical Hacker Starter Kit (2026 Edition) and get instant access to:
✔ Ethical hacking fundamentals ✔ A beginner cybersecurity learning roadmap ✔ Essential hacking tools every beginner should know ✔ Common vulnerabilities explained simply
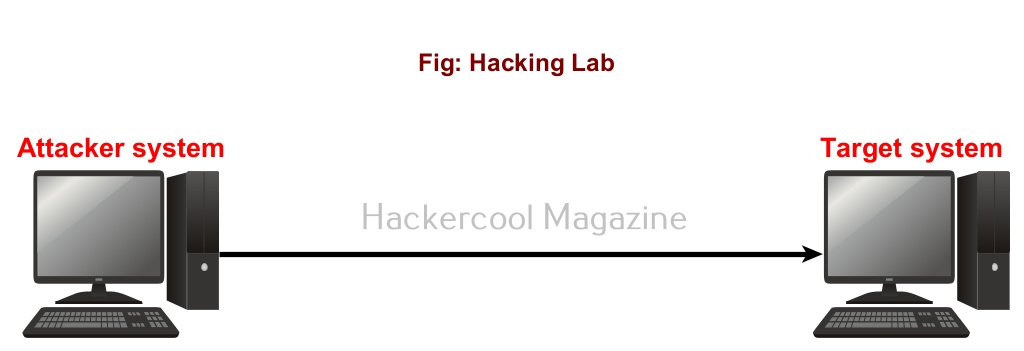
Hello, aspiring ethical hackers. In this blogpost, you will learn how to create virtual hacking labs for practicing hacking. No matter how many articles or blogposts you read or how many hacking courses you take, you cannot truly understand the concept of hacking until you perform those hacking tutorials practically. To practice hacking effectively, you need a secure environment without the risk of compromising the security of a safe network or systems and attract legal consequences due to your actions.
New to Ethical Hacking?
Start your journey with The Beginner Ethical Hacker Starter Kit (2026 Edition).
A hacking lab is a lab that provides a safe environment to practice hacking without the above-mentioned risks. The most basic hacking lab consists of two machines: attacker system (the system from which you hack) and target system (the system which you hack).
What is a virtual hacking lab?
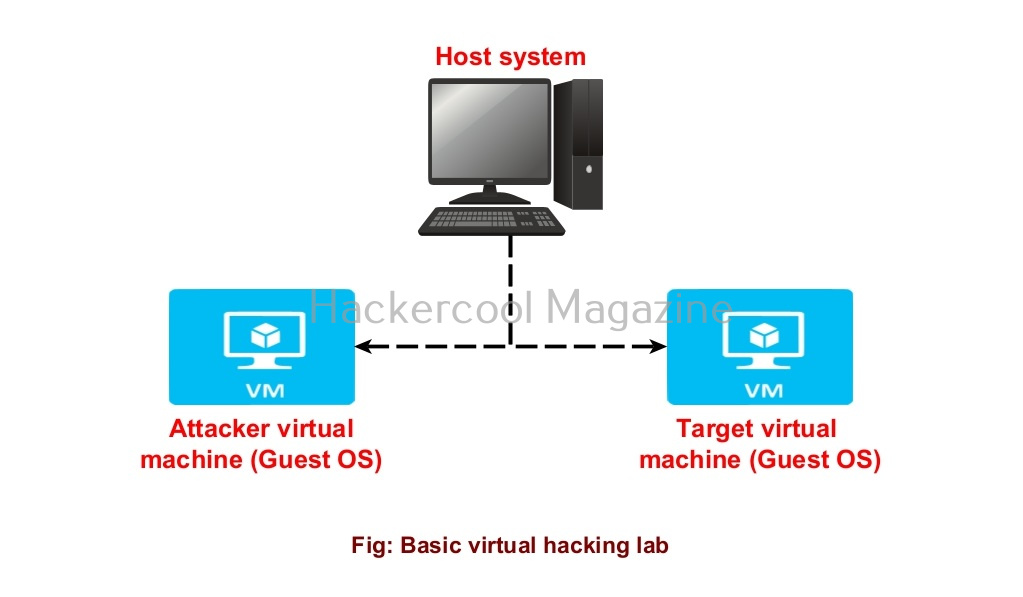
Just now, you have learnt that a basic hacking lab needs to have one attacker system and target system. They can be installed on separate hardware but this may prove expensive especially as you upgrade your hacking lab in future. Luckily, hacking labs can be created on a single system itself using virtualization solutions. Virtualization allows you to install multiple operating systems on a single machine. Some of the popular virtualization solution are Oracle VirtualBox, Parallels Desktop, VMware vSphere, Hyper-V, QEMU etc.
The hacking labs created using this method is called virtual hacking labs. They are inexpensive compared to the cybersecurity lab and easily adaptable. Of all the solutions mentioned above, I will be using VMware Workstation as its rich in features. VMware Workstation can be downloaded from here and installed on Windows, Linux, macOS, Solaris etc. Here, I have installed it on a Windows machine.
We will be creating various types of hacking labs. They are,
Let’s first see how to create a simple or basic hacking lab in VMware. A basic hacking lab just has an attacker system and target system on the same network. The operating system on which VMware workstation (or any another virtualization software) is installed is known as the Host machine. The operating systems that are installed in VMware are called as GUEST machines.
So here, in VMware, we will be installing two guest machines: one is Kali Linux (attacker system) and Metasploitable 2 (target system).
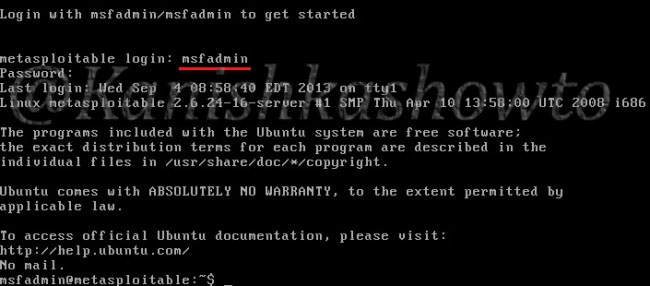
Once both the virtual machines are installed successfully, turn ON both the machines. Login into the Metasploitable 2 VM. Default username and password are “msfadmin / msfadmin”.
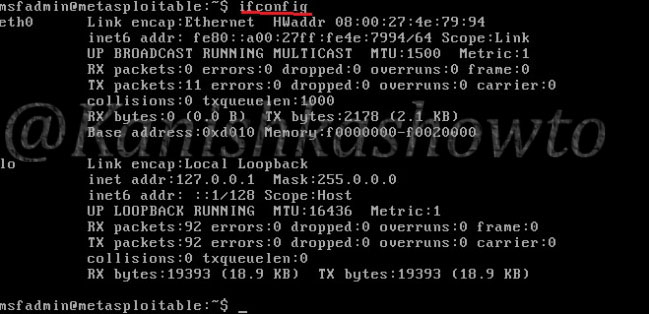
Type the command “ifconfig” to find out the IP address of your target system.
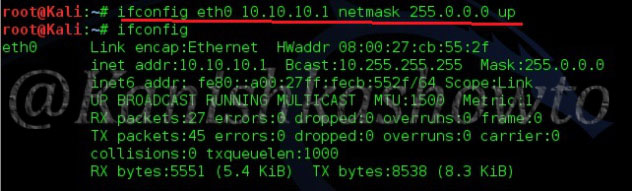
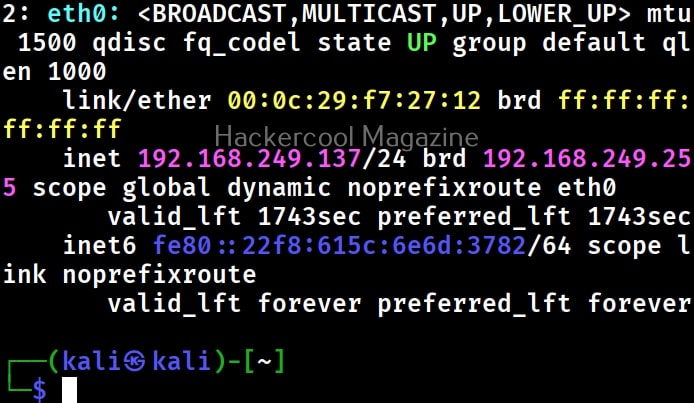
Similarly login into the Kali Linux machine and in the terminal, type command “ip a” to find out its IP address.
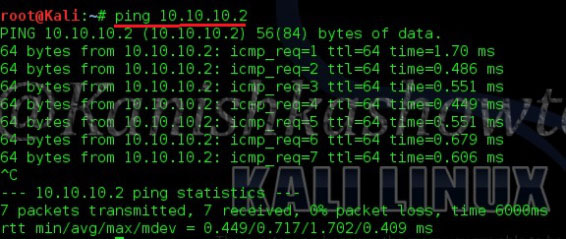
Test whether the attacker system can communicate with the target system by pinging the target system from the attacker system as shown below.
The connection is successful. Our virtual hacking lab is ready. Happy practicing hacking.
2. Firewall hacking lab
The above lab is a simple and easiest lab to practice ethical hacking. But if you notice one thing in the above lab, both attacker and target system are on the same network. But this is rarely the case in real-world. In real-world, target systems are in most cases behind a firewall.
So, the second lab we create is a Firewall Lab. In this lab 2, we will create a real-world ethical hacking lab where not only the attacker system and target system are on different networks but also the target system is behind a firewall. We will create this lab in VMware and we will be needing three operating systems for this hacking lab. They are,
Attacker system: Any pen testing distro like Kali Linux, Parrot security OS, Black Arch Linux etc. (We will be using Kali Linux). Target system: The system we want to target. It is your choice. We will be using Windows XP SP2 here. Network Firewall: This is a firewall that protects the target system. You can choose from various choices like PFSense, OPNsense, Untangle, IPfire, etc. We will be using PFSense.
Install all these machines in VMware. We already have installed Kali Linux on VMware. See how to install Windows XP SP2 in VMware. See how to install PFSense in VMware.
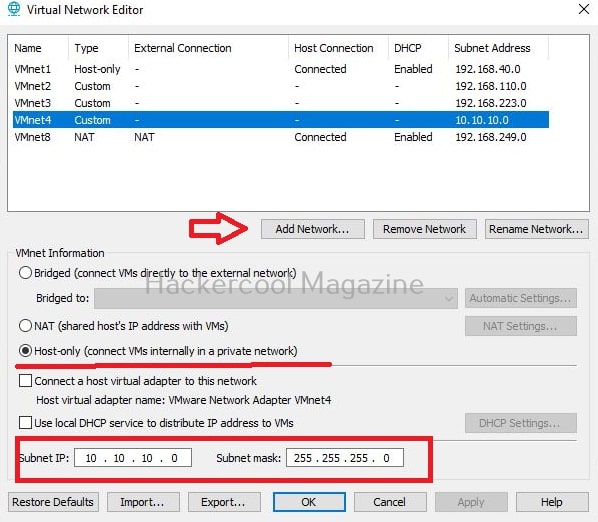
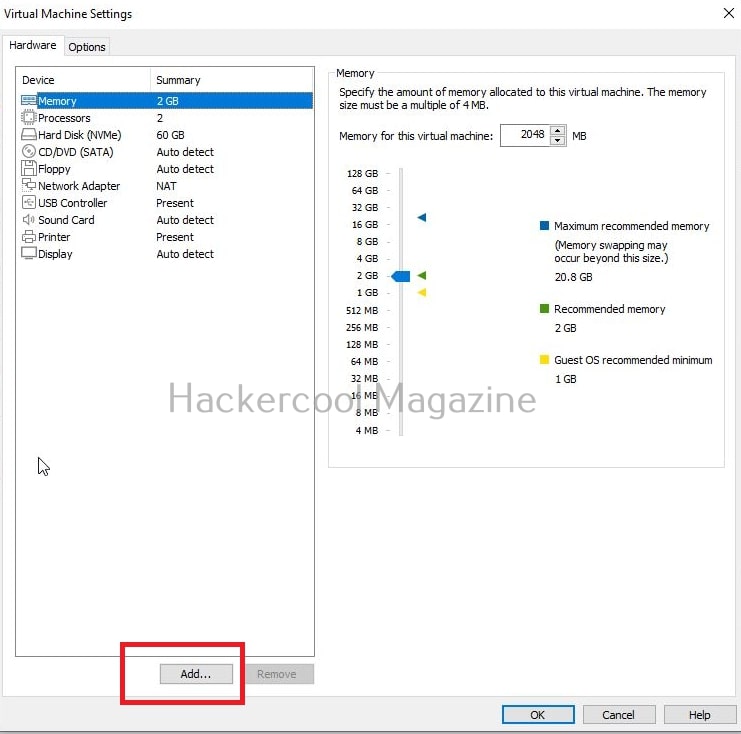
After all the three distros are installed successfully, open VMware Workstation. Go to Edit->Virtual Network Editor. The below window should open. Click on “Add network” to add a new network adapter.
Here we created a new network named ‘vmnet4’. Select the network we just crated to make the required changes. First and foremost, make it a Host-only network. Unselect the option “Use local DHCP service to distribute IP address to VMs”. That’s because we don’t want VMware to allocate IP addresses for this network. We want that job be performed by our network firewall “PFSense”. Choose subnet IP of 10.10.10.0 and subnet mask of 255.255.255.0. Click on “OK”.
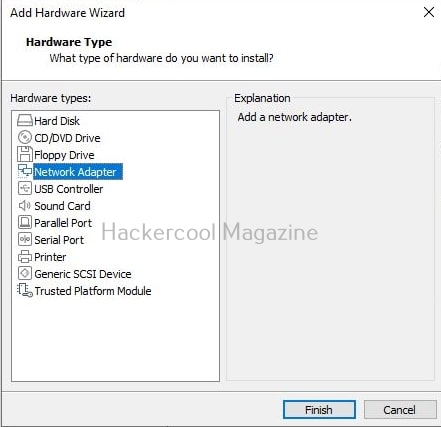
Then, go to virtual machine settings of “PFSense firewall”. The below window will open.
Want to Learn Ethical Hacking Step-by-Step?
If you’re serious about learning cybersecurity, a structured roadmap makes the journey much easier.
Download The Beginner Ethical Hacker Starter Kit (2026 Edition) and discover:
✔ The ethical hacking learning path ✔ Beginner-friendly security concepts ✔ Essential tools ethical hackers use ✔ The most common vulnerabilities explained
By default, any new virtual machine created in VMware will be assigned to NAT network which you can see in the above image. But note that our Firewall needs two network adapters as it will be connected to two networks. Click on “Add” and add a new network adapter.
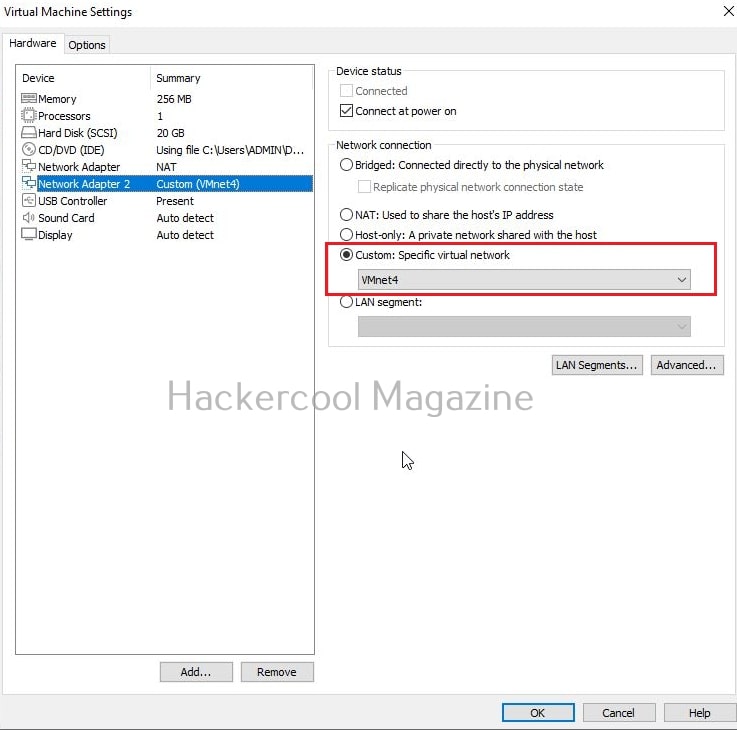
Then assign this adapter a network we just now created “VMnet4”.
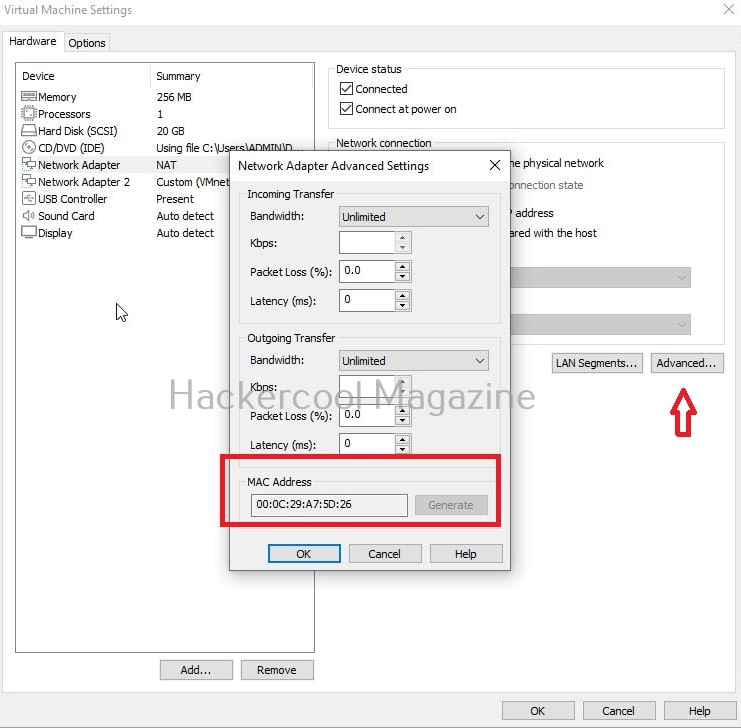
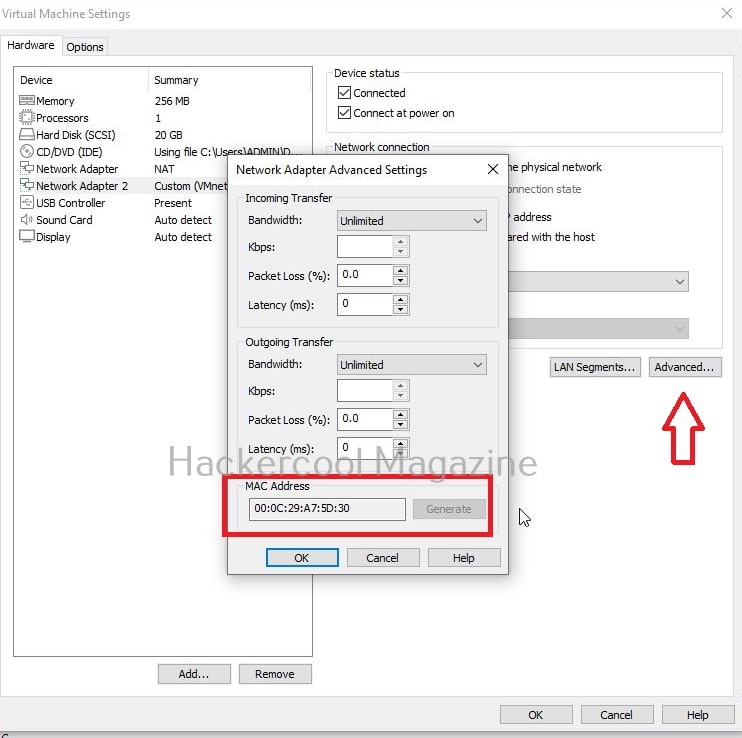
Click on “advanced” and note the MAC addresses of both the adapters. This is useful while assigning the network adapter as external and internal networks.
Why do we need two network adapters?
Any firewall or Router act as a wall between two networks. They are,
Public network (External or WAN network).
Private network (Internal or LAN network).
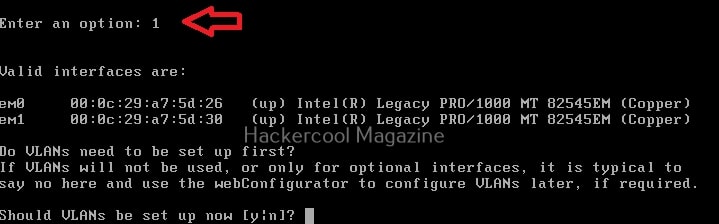
Now turn ON the “PFSense” machine. After it boots, you will see the menu shown below.
Let’s first classify the WAN and LAN interfaces. Select option ‘1’. Do you remember I told you to note the MAC addresses of the network adapters? Assign the NAT interface to WAN and “VMnet4” interface to LAN.
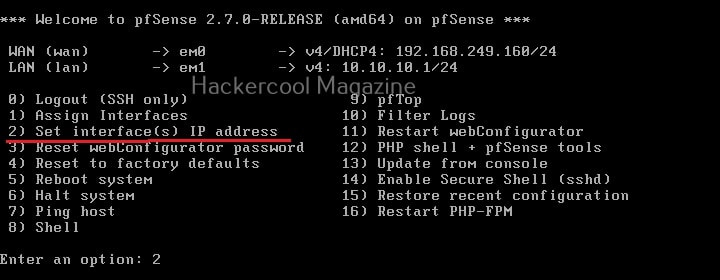
After the network adapters are assigned, we need to assign IP addresses to these interfaces. Select ‘2’ from the menu.
Then, select the number of the interface you want to configure. Make sure that WAN interface takes IP address via DHCP server of VMware (Since it is a NAT adapter).
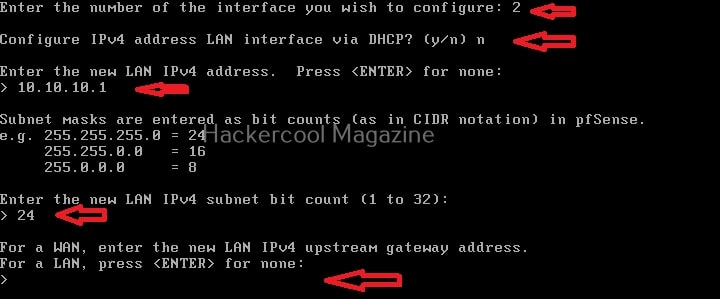
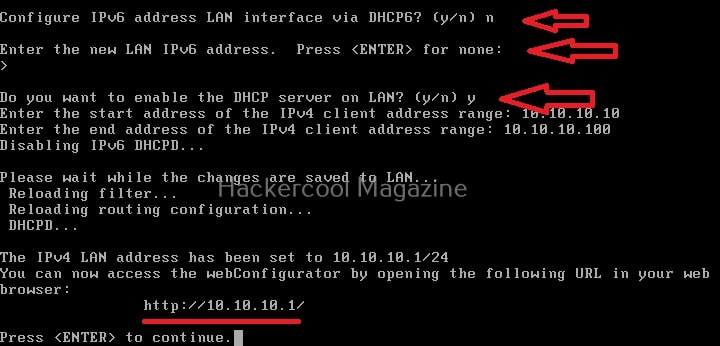
While configuring the LAN interface, select “NO” while it asks you to configure the interface via DHCP, Then, enter the IP address (intranet) for the LAN network as “10.10.10.1”. We selected a subnet bit count of 24. Press “ENTER” while you are asked to enter the new LAN IPV4 upstream gateway address.
While you are asked to configure IPV6 address, select ‘NO’.
When the system asks you if you want to enable DHCP server on this Firewall select “yes” and give the IPV4 addresses range it can assign to its clients. Here, we have chosen 10.10.10.10 to 10.10.10.100.
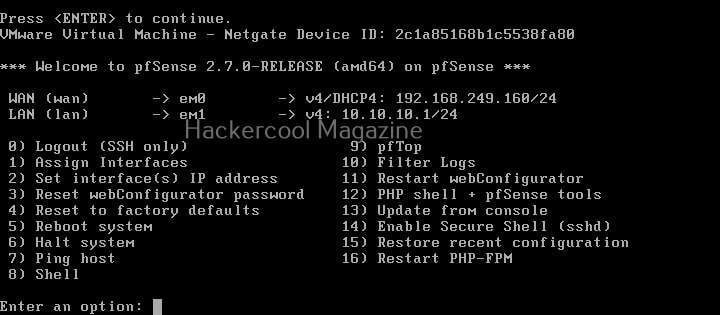
You can access this Firewall’s web interface from any machine connected to the local network using the IP address 10.10.10.1. This is how you configure the firewall. Firewall is all set and ready now.
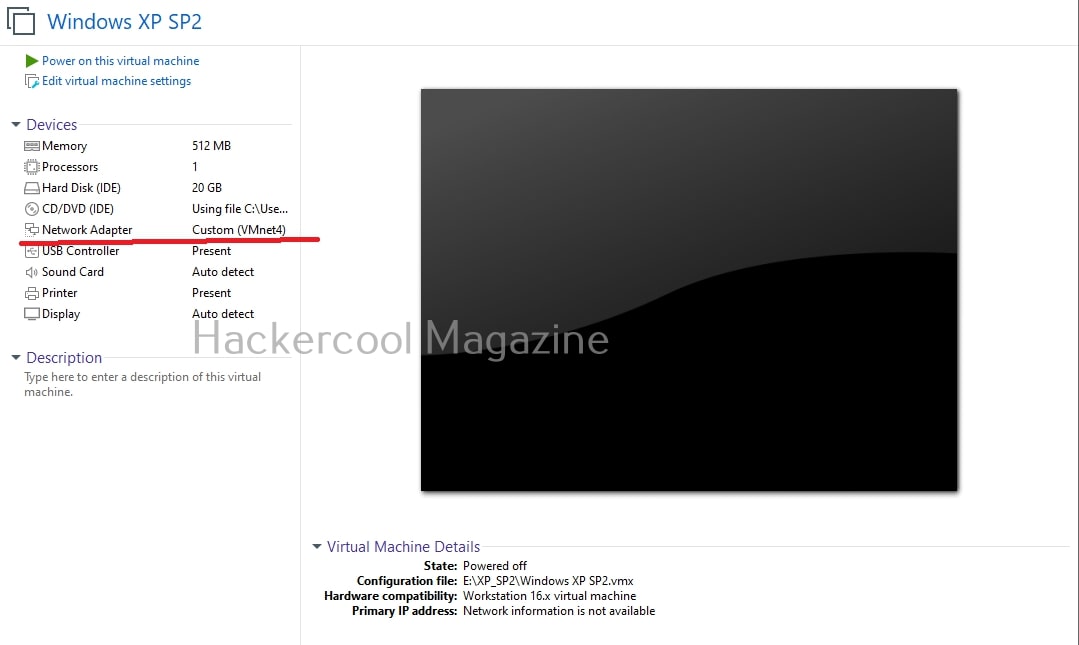
The external IP address of our PFSense firewall is 192.168.249.160 whereas internal IP address of the Firewall is 10.10.10.1. Connect the target system ,Windows XP SP2 to VMnet4 (the network adapter of LAN networks).
Turn ON the target system. After turning ON, check its IP address from command line.
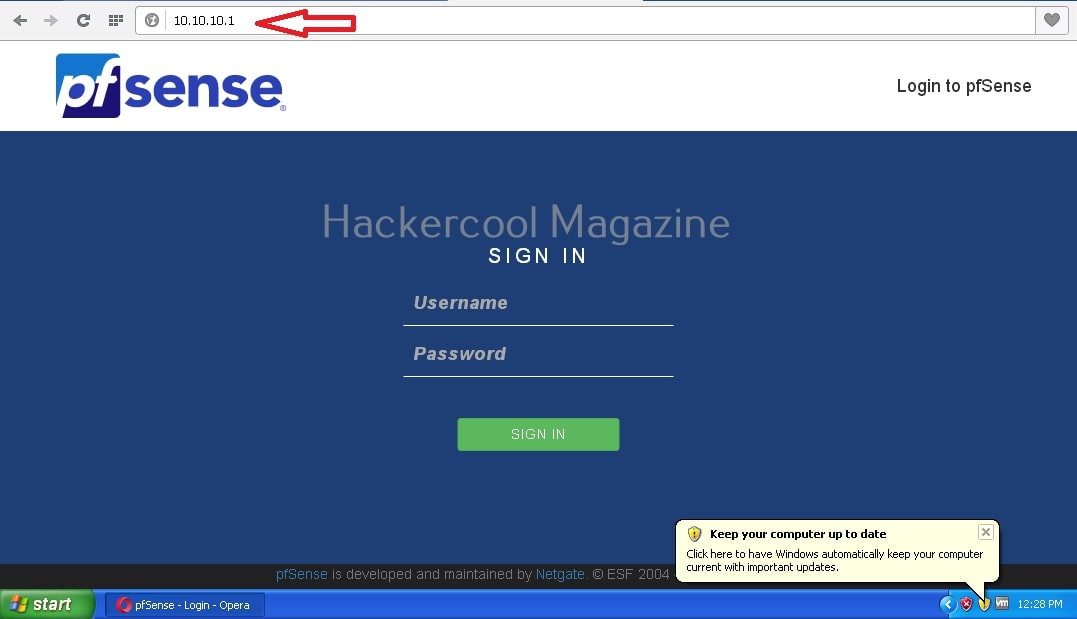
Since we selected the client IP address range from 10.10.10.10 to 10.10.10.100 and this is the first machine connected to the LAN it has been assigned IP address of 10.10.10.10. Let’s see if we can access the web interface of the Pfsense firewall from Windows XP. Open a browser and type 10.10.10.1.
As you can see, you can access web interface of firewall successfully. The default username and password of PFSense are “admin” and “Pfsense” respectively. Firewall and target systems are ready. Let’s ready the attacker system. Make sure the attacker system is connected to NAT network. Turn it ON.
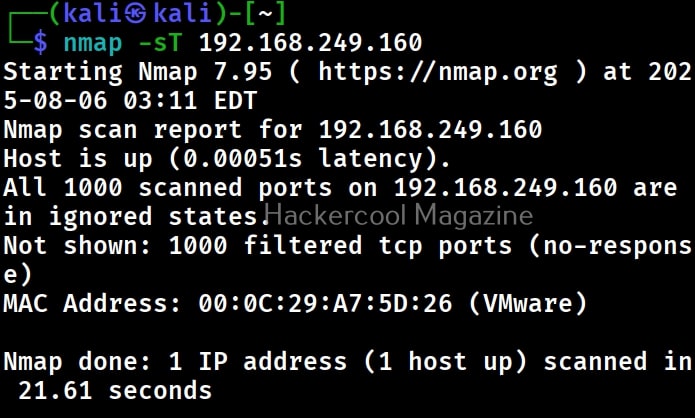
From the attacker system, perform a nmap scan of the firewall.
Your firewall lab is ready.
3. Vulhub lab
The next lab we will set up is “Vulhub lab”. To understand what is a vulhub lab, you need to first understand what vulhub is. Vulhub is a open-source GitHub repository that provides a collection of pre-built, ready-to-use vulnerable Docker environments. With just one command you can launch a vulnerable environment for security research, learning or demonstration. The best thing about Vulhub is that readers don’t need any pre-existing knowledge of dockers and their operation. The only requirement is Docker should already be installed on the system to be able to use Vulhub.
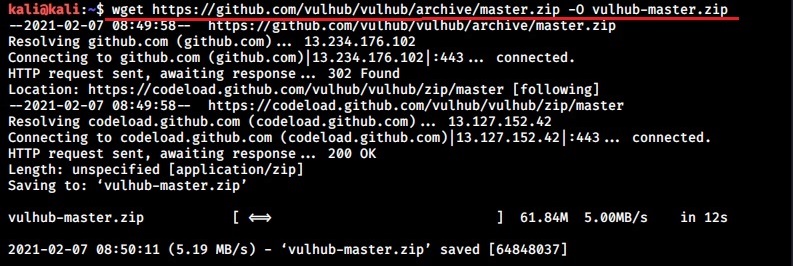
Let’s see how to setup Vulhub Lab for practising ethical hacking. We will do this in Kali Linux on which we already installed Docker earlier. In Kali Linux, open a terminal and use wget or Git to download the zip archive of Vulhub as shown below.
Once the download is finished, extract the contents of the archive “vulhub-master.zip” using unzip command.
This will create a new directory named vulhub-master.
Start the Docker service as shown below.
sudo systemctl start docker
Once the Docker service is started, navigate into the “vulhub-master” directory and you should see many docker images. All of these are vulnerable.
Let’s start the WordPress docker container for testing. Although this container is vulnerable with a particular vulnerability, we will use it for showing exploitation of a different vulnerability. Navigate into the WordPress directory and start the docker container as shown below.
docker-compose up -d
Once the container is started, use command “docker ps” to see all the docker processes running.
docker ps
Every docker container has a container ID. The one with container ID 2522cc4********* is our WordPress docker container. We can use command shown below to get more information about the particular Docker container.
docker inspect <container id>
The IP address of our WordPress docker container is 172.22.0.3. The gateway address is that of the Kali host machine (172.22.0.1). Enter the IP address of the docker container in the browser and you will be prompted to set the password for the WordPress instance.
Here is the WordPress website we just created (we wanted to set the site title as docker test but misspelled it to docket test).
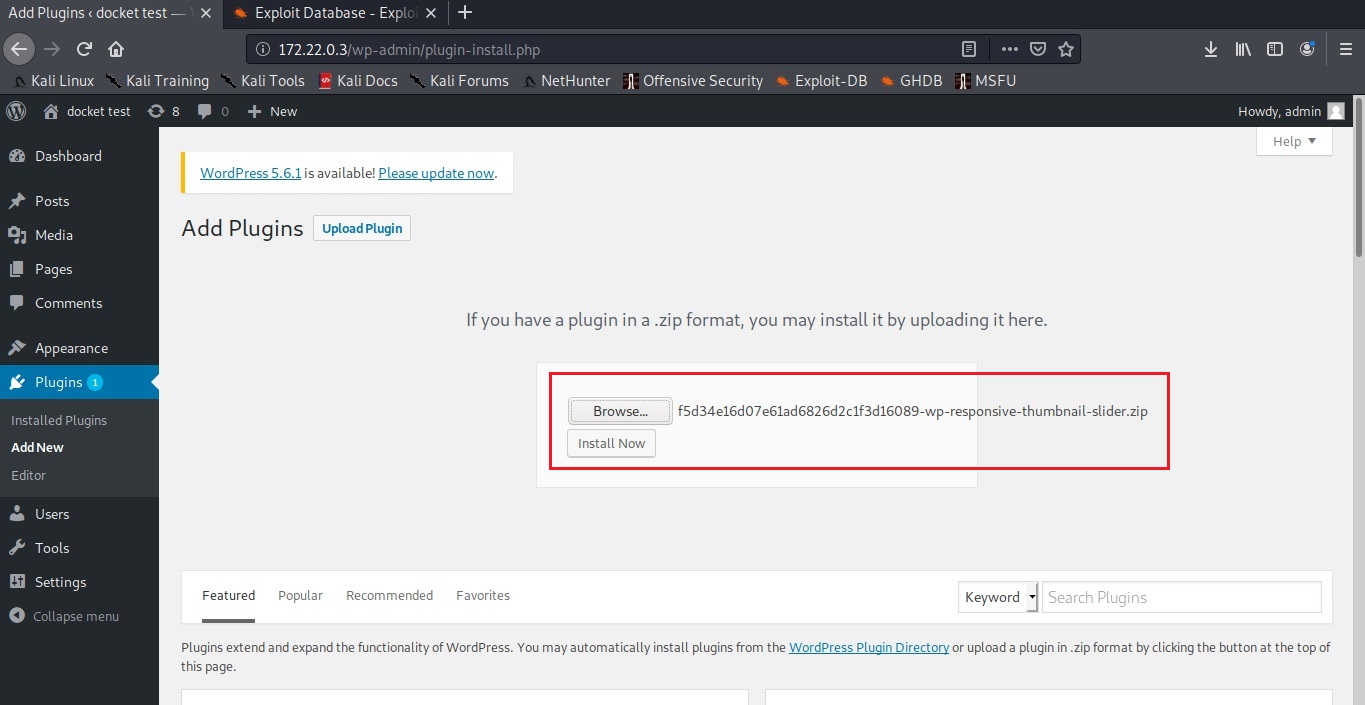
Go to Exploit Database and download the vulnerable wp-responsive-thumbnail-slider plugin. The plan is to install this vulnerable plugin in WordPress.
Login into the WordPress dashboard with the credentials you set up.
Upload the plugin and activate it.
Now, start Metasploit and load the wp_responsive_thumbnail_slider_upload module.
Set the docker container IP address (172.22.0.3) and check if the target is vulnerable.
The “check” command confirms that the target is indeed vulnerable. It’s time to exploit it. Set the LHOST option to the IP address of the gateway (172.22.0.1). Set the WPusername and WPpassword options to the credentials you have set in the beginning and then execute the module.
The target we set on docker is exploited successfully. The Vulhub Lab we set up is working successfully. Similarly you can start and test and vulnerable dicker container you want.
Start Your Ethical Hacking Journey Today
Learning cybersecurity can feel overwhelming at first. The best way to start is with a clear roadmap and the right resources.
Download The Beginner Ethical Hacker Starter Kit (2026 Edition) and get instant access to:
✔ Ethical hacking fundamentals ✔ A beginner cybersecurity learning roadmap ✔ Essential hacking tools every beginner should know ✔ Common vulnerabilities explained simply
Hello aspiring Ethical Hackers. In this article, you will learn how to install Metasploitable 2 in VirtualBox. What is Metasploitable? Learning penetration testing or ethical hacking requires practical knowledge and good practice needs a vulnerable target. That is where Metasploitable comes into picture. It is an intentionally vulnerable operating system made by the makers of Metasploit themselves so that aspiring ethical hackers can practice and hone their hacking skills. As its name conveys Metasploitable is loaded with vulnerabilities that can be exploited with Metasploit modules.
New to Ethical Hacking?
Start your journey with The Beginner Ethical Hacker Starter Kit (2026 Edition).
This virtual machine can be used to conduct security training, test security tools, and practice common penetration testing techniques. For this i am going to use Metasploitable 2 which can be downloaded from here. After downloading the zip archive, extract the files into a folder. The file contents look like below.
Open VirtualBox and click on “New Virtual machine wizard”. Type the name of your choice. I am using ‘Metasploitable-2‘. Choose ‘Type’ as Linux and ‘version’ as Ubuntu. Click on “Next”.
Choose the memory size appropriate to the availability of RAM on your host machine although 512MB is more than enough. Click on “Next”.
In the hard drive creation window, select option “Use an existing virtual hard drive”, browse to the folder where we have extracted our zip files and select the ‘vmdk’ file available. Click on “Create”.
Want to Learn Ethical Hacking Step-by-Step?
If you’re serious about learning cybersecurity, a structured roadmap makes the journey much easier.
Download The Beginner Ethical Hacker Starter Kit (2026 Edition) and discover:
✔ The ethical hacking learning path ✔ Beginner-friendly security concepts ✔ Essential tools ethical hackers use ✔ The most common vulnerabilities explained