Posted on

Beginners guide to Nuclei vulnerability scanner

Hello, aspiring ethical hackers. In our previous blogpost, you learnt about vulnerability scanning. In this article, you will learn about Nuclei, a high performance, fast and customizable vulnerability scanner that uses YAML based templates. Its features include,

  • Simple YAML format for creating and customizing vulnerability templates.
  • Contributions from thousands of security professionals to tackle trending vulnerabilities.
  • Reduced false positives by simulating real-world steps to verify a vulnerability.
  • Ultra-fast parallel scan processing and request clustering.
  • Integration into CI/CD pipelines for vulnerability detection and regression testing.
  • Supports multiple protocols like TCP, DNS, HTTP, SSL, WHOIS JavaScript, code and more.
  • Integration with Jira, Splunk, GitHub, Elastic, GitLab.

Let’s see how this tool works. For this, we will be using Kali Linux as attacker system as Nuclei is available by default in its repositories. As target, we will be using Metasploitable 2. Both these systems are part of our Simple Hacking Lab. Nuclei can be installed on Kali as shown below.

Scanning (-u, -t)

Nuclei can be specified with a target URL or IP to scan as shown below.

Here’s how its output looks like.

See all available templates (-tl)

While studying about its features, you have read that Nuclei uses lot of vulnerability templates for performing a vulnerability scan. At the time of scan initialization, Nuclei installs and uses these templates. Templates form a very important part of Nuclei. You can see all the available templates of Nuclei using command shown below.

nuclei -tl

As already mentioned, these templates are in YAML format.

Run a particular template (-t)

If you want to run a specific template instead of all the templates, you can do so with this option. For example, let’s just run phpmyadmin-misconfiguration template as shown below.

List all tags (-tgl)

The templates of Nuclei are also divided based on tags. A tag can be all the templates belonging to a specific software or technology. For example, let’s say WordPress, SSH etc. All the tags in Nuclei can be searched using command shown below.

nuclei -tgl

Run templates belonging to a specific tag (-tags)

This option can be used to run all templates belonging to a specific tag. For example, let’s say we want to run all templates belonging to tag “ftp” on our target, we can do it as shown below.

Here’s its output.

Run code based templates (-Code)

This option can be used to run all “Code” protocol based templates.

Here’s its output.

Run file based templates (-file)

Just like code related templates, Nuclei has file based templates. This option can be used to run them.

Run templates based on severity (-s)

We can also run Nuclei templates based on the severity of vulnerabilities. The possible values it can take is info, low, medium, high and unknown. You have seen in the above scan results of Nuclei that vulnerabilities are being classified from info to critical etc.

For example, let’s just run templates with severity “critical”.

As you can see in the above image, it is only running templates with critical severity.

Silent mode (-silent)

Silent mode of Nuclei just displays results.

Scan multiple targets at once (-L)

Nuclei can also be used to scan multiple targets. For this, all you have to do is save all targets in a text file and use the command shown below.

nuclei -l <target_file>

Saving output (-o)

The output of Nuclei’s vulnerability scan can be saved to a file using the option as shown below.

Next, learn about Nessus vulnerability scanner.

Posted on

Beginners guide to netdiscover

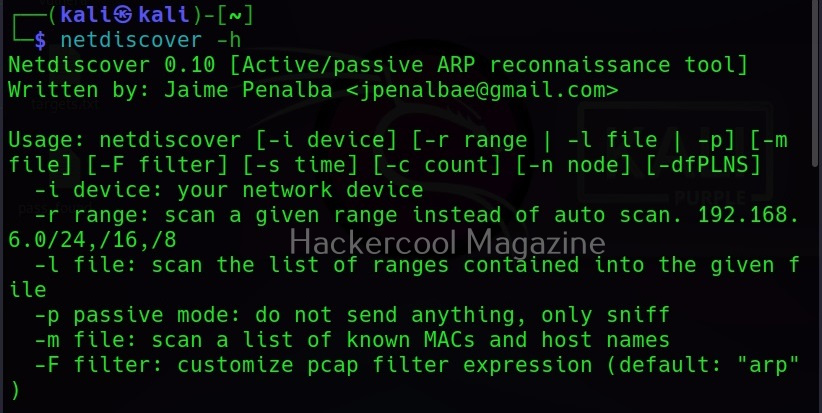
Hello, aspiring ethical hackers. In one of our previous blogposts, you learnt about network scanning. In this blogpost, you will learn about netdiscover tool. It is an active/passive network address discovering tool that was actually developed to discover wireless networks during wardriving but can also detect addresses on switched networks. It used ARP packets to detect network addresses.

It is mostly used to find the target IP address in hack the box challenges. But it can also be used to scan for network addresses of a network in real-world pen testing. It is installed by default in Kali Linux and we are going to use same for this tutorial.

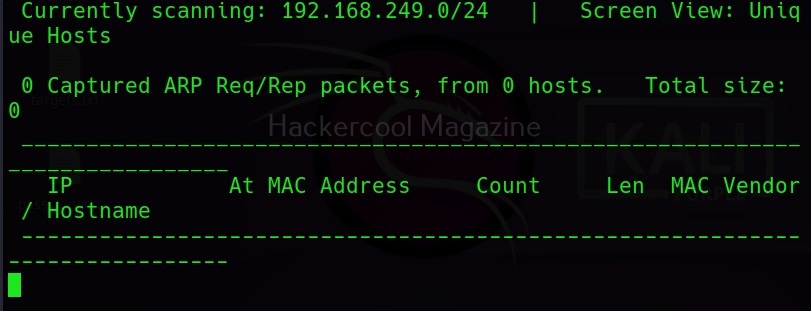
The simplest way of using netdiscover to find out network addresses is to simply type the command “netdiscover” in the terminal as shown below.

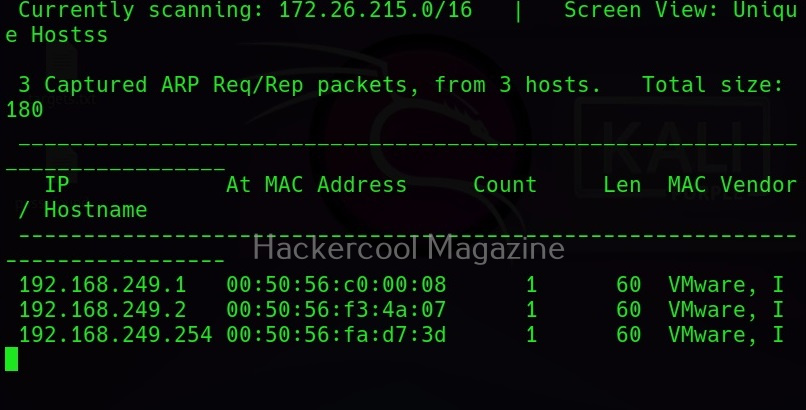
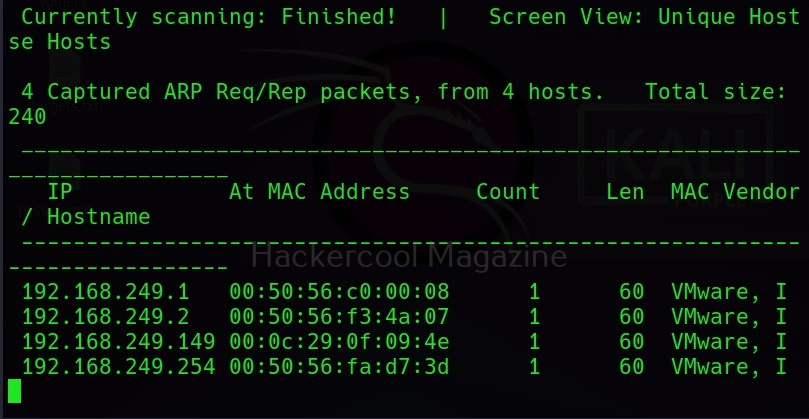
Then it slowly scans for network addresses as shown below. This is how most people use it.

Fast mode

However, you don’t have to wait for netdiscover to finish scanning as long as it takes. You can scan faster with netdiscover too using the “-f” option.

Interface mode

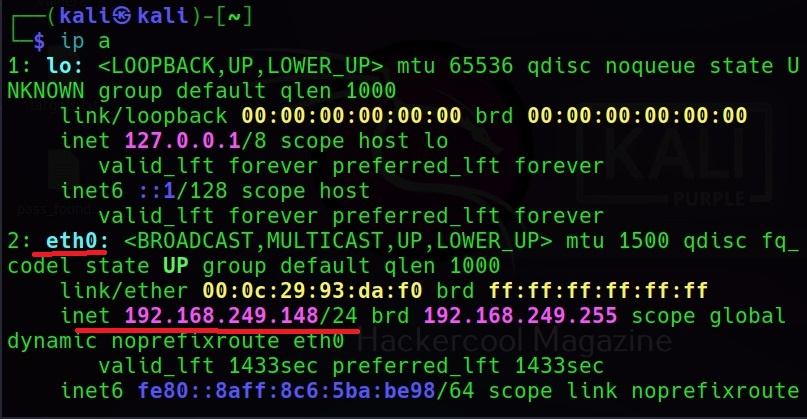
Netdiscover can be set to scan network addresses on a specific network interface you want. For example, on Kali Linux, let’s use the command “ip a” to view all the network interfaces connected to it.

Interface mode can be set with the “-i” option. For example, let’s scan the interface “eth0” as shown below.

Scan a specific range

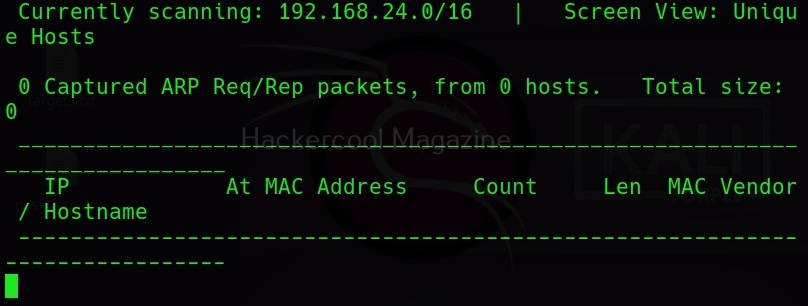
Similarly, netdiscover can be used to scan a specific range as shown below. For example, let’s scan the range 192.168.248.0/24.

Printable form (-p)

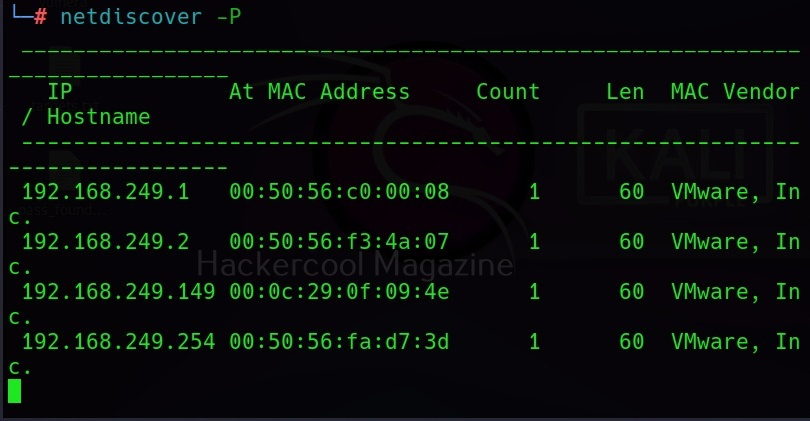
Netdiscover can also display its output in a way easy for printing using the “-p” option.

Posted on

Vulnerability scanning for beginners

Hello aspiring Ethical Hackers. In this blogpost, you will learn about vulnerability scanning. Before you learn what a vulnerability scan is, you need to know what a vulnerability is? A vulnerability is a weakness, flaw, error or a misconfiguration in a software or network that allows hackers to gain unauthorized access to the organization by exploiting it.

What is vulnerability scanning?

Now that you have understood what is a vulnerability, let’s see what is scanning. Vulnerability scanning is the process of identifying the security vulnerabilities in a software or a network of the organization. Vulnerability scanning is usually performed to protect the organization from hackers although it is also performed by hackers to gain access to the organization.

Types of vulnerability scans

Vulnerability scanning can be categorized into different types. They are,

  1. External Vulnerability Scan
  2. Internal vulnerability scan
  3. Environmental scans
  4. Intrusive Scans
  5. Non-Intrusive scan.
  6. Credentialed scan
  7. Non-credentialed scan

1. External vulnerability scan:

In an external vulnerability scan, the external facing resources of an organization are scanned. These include, websites, systems, ports and services.

2. Internal vulnerability scan:

In this type of scan, the vulnerability scan is performed on the internal network of the organization or on resources to which the users or employees of the organization have access to. This scan is performed to get information about the vulnerabilities which employees or malware which gained access to the network can exploit.

3. Environmental scan:

Environmental vulnerability scans are performed based on the target environment. For example, target environment can be cloud based, IOT, mobile devise, websites etc.

Vulnerability scans can also be classified as either Intrusive or Non-Intrusive.

4. Non- Intrusive scan:

In a non-intrusive vulnerability scan, vulnerabilities are just identified and reported.

5. Intrusive scan:

In an intrusive vulnerability scan, vulnerability is not just identified but also exploited.

Apart from these categorizations, vulnerability scan is also classified as credentialed scans and non-credentialed scans.

6. Credentialed scan:

Also known as authenticated scan, this vulnerability scan in performed using a set of credentials. This type of scan gives the trusted users view of the organization.

7. Non-credentialed scan:

Also known as non-authenticated scan, this vulnerability scan gives the external user’s view of the network or revenue of organization.

Uses of vulnerability scans

Vulnerability scanning can help cyber security personnel of the organization to get an idea about the vulnerabilities in the organization beforehand and to prevent them from being exploited by attackers. As hackers also perform vulnerability scans, vulnerability scanning gives an idea to the organization as to what hackers can see.

How are vulnerability scans performed?

Vulnerability scans can be performed manually or using tools (vulnerability scanner). See how to perform vulnerability scanning with Nikto and Nessus.

Vulnerability scan vs Vulnerability assessment

In vulnerability scanning, vulnerabilities are scanned and reported whereas in vulnerability assessment, apart from identifying vulnerabilities the impact of the vulnerabilities when exploited is also assessed. Learn more about vulnerability assessment.

Posted on

OS Fingerprinting for Beginners

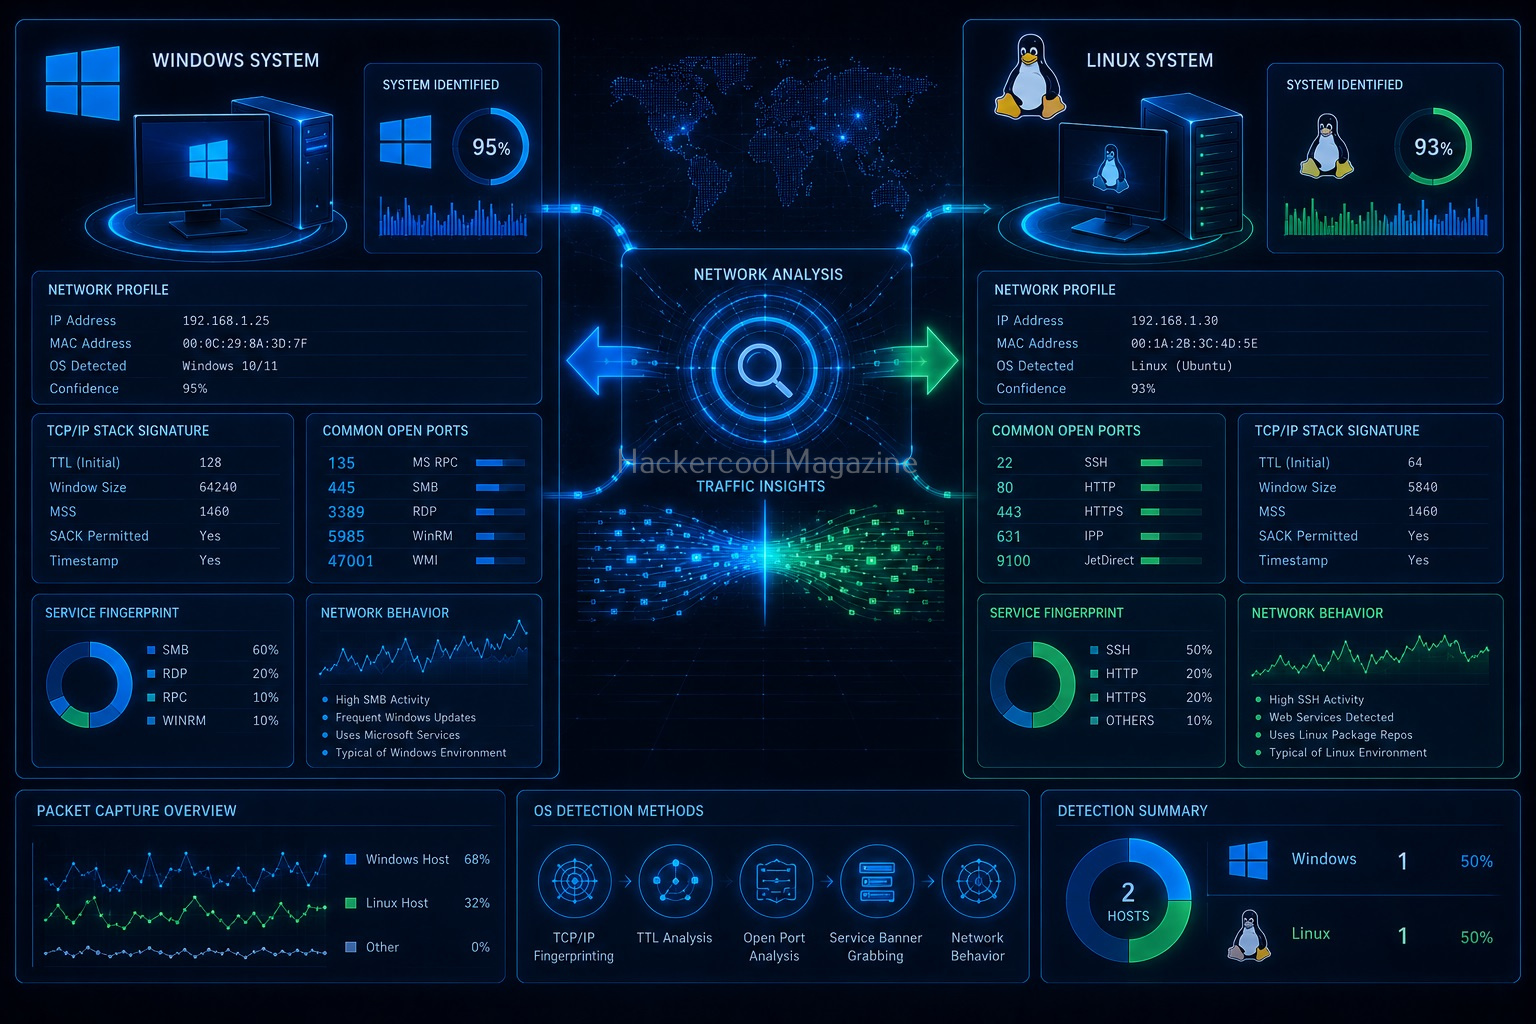
If you’re learning ethical hacking, penetration testing or cybersecurity, you’ll eventually come across the term OS fingerprinting. One of the first goals during network reconnaissance is understanding what systems are connected to a network. Knowing whether a device is running Windows, Linux or another operating system can help security professionals better understand the environment they are assessing.

This process of identifying an operating system is known as OS fingerprinting.

Think of it like being a detective. You may not see the operating system directly, but by observing how a device behaves and responds to network communication, you can often make an educated guess about what it’s running.

In this beginner-friendly guide, you’ll learn:

  • What OS fingerprinting is
  • Why it’s important
  • How it works
  • Types of OS fingerprinting
  • Information it can reveal
  • Common beginner mistakes
  • Safe ways to practice

What is OS Fingerprinting?

OS fingerprinting is the process of identifying the operating system running on a device by analyzing its network behavior and characteristics. The goal is to determine whether a system is running:

  • Windows
  • Linux
  • Unix
  • macOS
  • Network appliance software
  • Embedded operating systems

OS fingerprinting helps build a technical profile of a system without directly logging into it.

In simple terms:

OS fingerprinting is the process of identifying a device’s operating system based on how it responds to network communication.

Why is OS Fingerprinting Important?

Understanding operating systems provides valuable context during security assessments.

Better Understanding of the Environment:

Knowing the operating system helps security professionals understand what type of system they are dealing with.

Improved Asset Identification:

Organizations often have many different devices connected to their networks. OS fingerprinting helps identify them.

Security Assessment Preparation:

Different operating systems may have different security considerations. Understanding the platform helps guide further analysis.

Network Visibility:

OS fingerprinting contributes to building a complete picture of a network environment.

If a hacker or pen tester can find out the operating system of the target system, he/she can know which vulnerabilities to exploit or which payloads to design to gain access to the target system (For example, Windows need EXE payloads whereas Linux systems require .sh payloads).

Why Operating Systems Matter?

Every operating system has unique characteristics. Examples include:

  • Network behavior
  • Default configurations
  • Service implementations
  • Communication patterns

These differences create clues that can be observed remotely. Just like handwriting can help identify a person, network behavior can help identify an operating system.

How OS Fingerprinting Works

When devices communicate over a network, they exchange information using protocols. Different operating systems often implement these protocols slightly differently.

Examples include:

  • Packet structure
  • Response timing
  • Protocol settings
  • Network characteristics

By analyzing these differences, security professionals can estimate what operating system is running.

Active vs Passive OS Fingerprinting

There are two main approaches to determine a operating system. They are Active and Passive OS fingerprinting.

1. Active OS Fingerprinting:

In Active OS fingerprinting, we directly interact with the target system to determine its operating system. The scanner sends network requests and analyzes the responses.

How It Works

The system is queried. Responses are then compared against known operating system characteristics.

Advantages

  • Can provide detailed information
  • Often produces accurate results

Disadvantages

  • Generates network activity
  • Easier to detect

Example

In Active OS Fingerprinting, specially crafted packets are sent to the target system and its responses are analyzed to determine the operating system of target computers. This interaction can be as simple as a ping or a scanner like Nmap. Using ping, we can detect a target operating system by observing the Time To Live (TTL) values as shown below.

Time To Live (TTL) is the amount of time or “hops” that is set to a packet to exist inside a network before discarded by a router. In simple words, it is the period of time that a packet or data should exist on a network before being discarded. This value differs from operating system to operating system. Here are the default TTL values of some operating systems.

Another way to perform Active Foot printing is by sending specially crafted packets to the target system.

2. Passive OS Fingerprinting:

In Passive OS fingerprinting, network traffic is observed without directly interacting with the target. Instead of sending requests, it analyzes existing communication.

How It Works

Traffic is monitored and patterns are examined. No direct probing is required.

Advantages

  • Less intrusive
  • Harder to detect

Disadvantages

  • Requires existing traffic
  • May provide less information

In passive OS fingerprinting, a sample of packets coming from the target we are interested in are analyzed. For this purpose, we use a Packet Capture API. It relies on guessing the target OS by observing their TCP/IP implementation. Apart from TTL, this type of fingerprinting will observe window size, Don’t Fragment (DF) bit and Type Of Service (TOS).

Common Clues Used in OS Fingerprinting

Operating systems often reveal subtle differences. Examples include:

1. Network Packet Characteristics:

Different systems may structure network packets differently.

2. Time-to-Live (TTL) Values:

As you have already seen, Operating systems often use different default TTL values. These values can provide useful clues.

3. TCP Behavior:

Systems may implement TCP differently. Small differences can help identify the platform.

4. Service Responses:

Applications running on the system may provide hints about the underlying operating system.

5. Network Configuration Patterns:

Configuration behavior sometimes reveals operating system characteristics.

What Information Can OS Fingerprinting Reveal?

OS fingerprinting does not always provide exact answers. Instead, it often provides estimates.

Examples:

  • Likely operating system family
  • Possible operating system version
  • Device type
  • Network appliance identification

This information contributes to a broader understanding of the environment.

OS Fingerprinting and Ethical Hacking

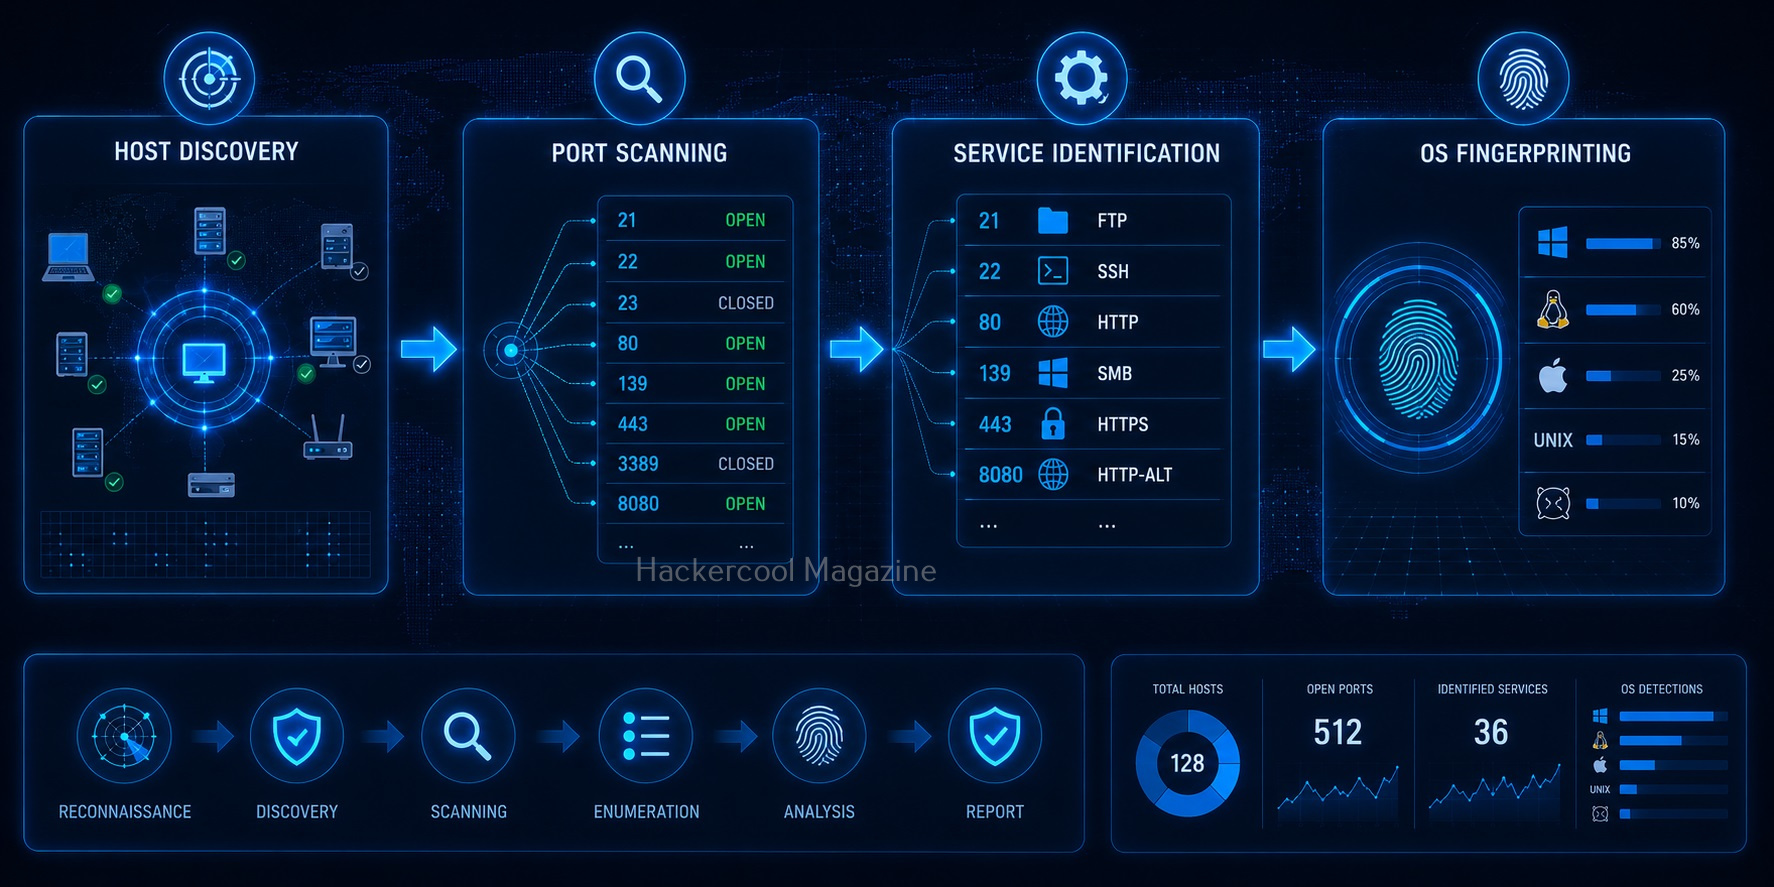
OS fingerprinting is commonly performed during reconnaissance and enumeration. A typical workflow might be as shown below:

  1. Information Gathering
  2. Host Discovery
  3. Port Scanning
  4. Service Identification
  5. OS Fingerprinting
  6. Analysis
  7. Reporting

OS fingerprinting helps security professionals understand what systems they are analyzing.

Real-World Example

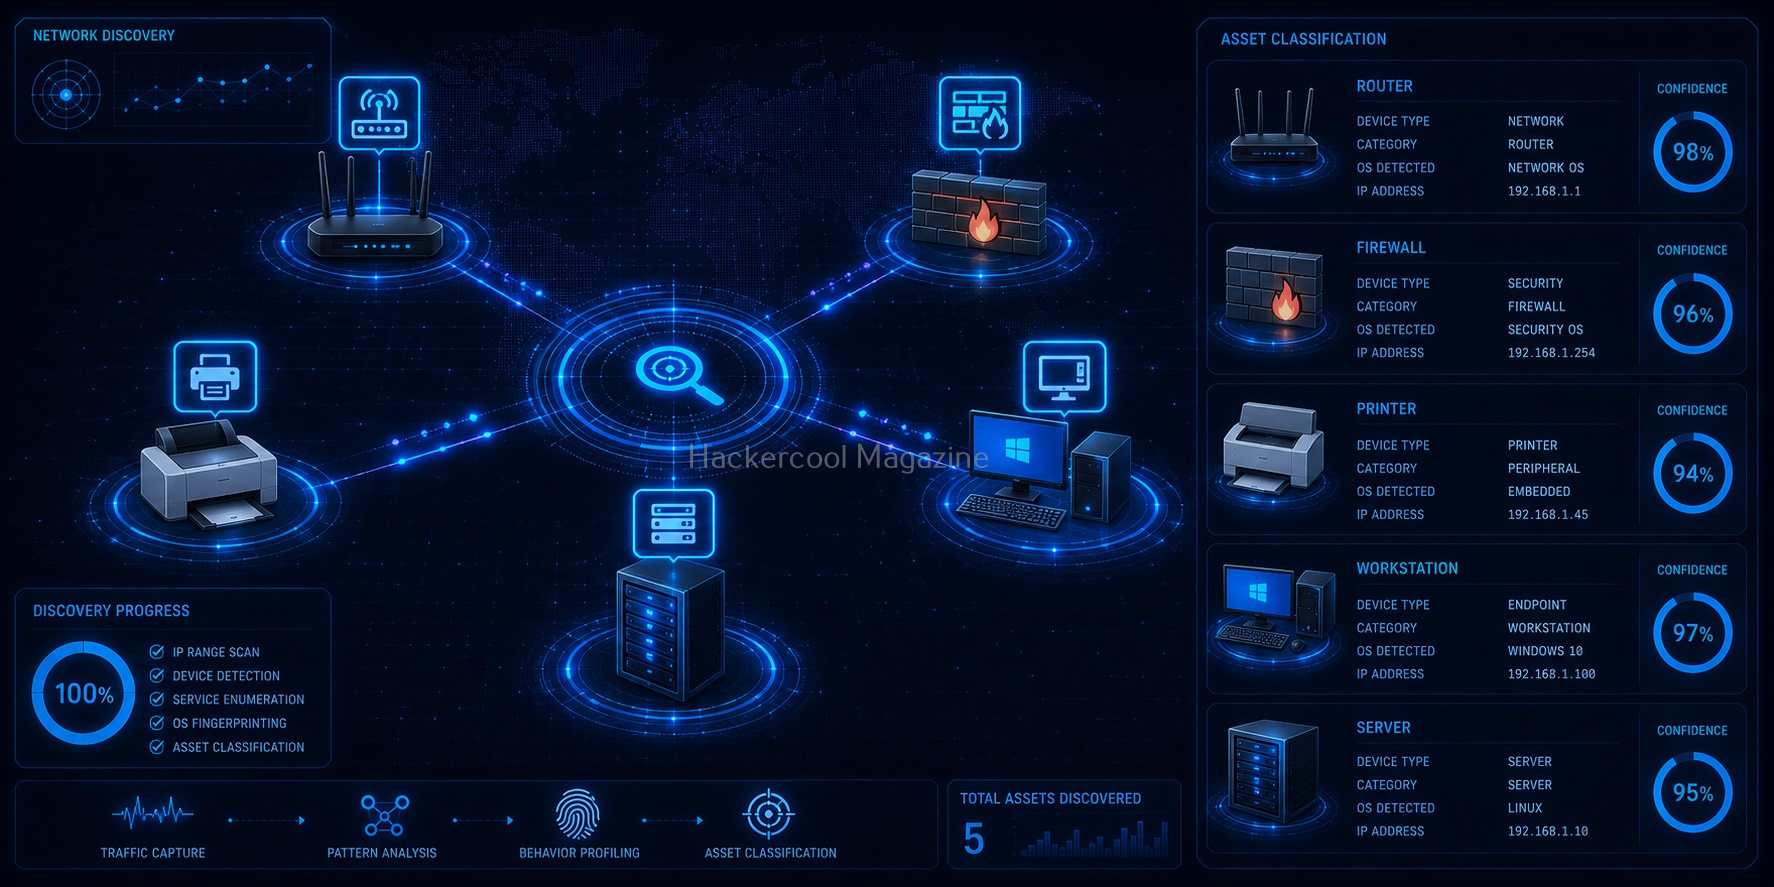
Imagine a network contains:

  • A Windows workstation
  • A Linux web server
  • A router
  • A printer

At first glance, all you may see are IP addresses. OS fingerprinting helps determine what type of devices are behind those addresses. This makes the network much easier to understand.

Why OS Fingerprinting Isn’t Always Perfect

Many beginners assume OS fingerprinting provides exact answers. In reality, results are often estimates. Several factors can affect accuracy.

Firewalls:

Security controls may alter network behavior.

Network Devices:

Routers and security appliances may modify traffic.

Custom Configurations:

Administrators can change default operating system settings.

Similar Implementations:

Different operating systems sometimes behave similarly.

Because of this, OS fingerprinting should be viewed as one piece of evidence—not absolute proof.

Common Beginner Mistakes

Many beginners make these mistakes when learning OS fingerprinting. Please avoid doing them yourself.

Trusting Results Blindly:

Always remember that fingerprinting results are estimates. Verification is important before taking any action based on them.

Ignoring Networking Fundamentals:

Without understanding networking basics, fingerprinting results may seem confusing. Learn:

  • IP addresses
  • TCP/IP
  • Ports
  • Routing

These concepts make fingerprinting easier to understand.

Focusing Only on Tools:

Tools provide information. Your job is to interpret it. Understanding the underlying concepts is more important than memorizing commands.

Forgetting Documentation:

Document observations and findings. Good documentation improves learning and professionalism.

Scanning Unauthorized Systems:

Always practice ethically. Only analyze:

  • Your own systems
  • Home labs
  • Educational environments
  • Authorized networks

Permission matters.

Safe Ways to Practice

You don’t need access to large networks to be able to practice OS fingerprinting. Beginner-friendly practice options include:

Home Networks:

Observe devices you own.

Virtual Machines:

Create multiple operating systems in a lab environment.

Educational Cybersecurity Platforms:

Many learning environments provide safe practice opportunities.

Local Test Environments:

Build small practice networks and compare system behavior.

Skills Developed Through OS Fingerprinting

Learning OS fingerprinting improves several important cybersecurity skills. They are,

Observation:

Learning to notice subtle clues.

Analysis:

Interpreting technical information.

Investigation:

Connecting multiple pieces of evidence.

Documentation:

Recording findings clearly.

Network Understanding:

Developing deeper networking knowledge.

OS Fingerprinting and Cybersecurity Careers

OS fingerprinting is useful in many cybersecurity roles such as:

Understanding how systems identify themselves is a valuable skill across multiple disciplines.

Conclusion

OS fingerprinting is one of the most interesting aspects of network reconnaissance. It demonstrates how much information can be learned simply by observing network behavior. For beginners, OS fingerprinting teaches an important lesson:

Every system leaves clues.

By learning how to recognize those clues, you become better at understanding networks, analyzing systems and conducting security assessments.

Remember:

✔ OS fingerprinting identifies operating systems through network behavior
✔ Active and passive techniques gather information differently
✔ Results are often estimates rather than guarantees
✔ Networking fundamentals improve understanding
✔ Practice should always occur in authorized environments

As you continue learning cybersecurity, OS fingerprinting will become another useful tool in your investigative toolkit.

Posted on

Port Scanning for Beginners: A Complete Guide

Hello, aspiring Ethical Hackers. In our previous blogpost on network scanning, you learnt briefly about port scanning. In this article, you will learn about port scanning in detail and different port scanning techniques.

If you’re learning ethical hacking, cybersecurity or network security, you’ve probably come across the term port scanning. Port scanning is one of the most fundamental skills in network reconnaissance and security assessments. That’s because before security professionals can understand the risks facing a system, they first need to know what services are exposed to the network.
That’s where port scanning comes in. Think of a computer like a building. The IP address identifies the building itself, while ports represent individual doors. Some doors may be open, some closed and others may be restricted. Port scanning helps identify which doors are available and what services might be running behind them.

In this beginner-friendly guide, you’ll learn:

  • What port scanning is
  • Why it’s important
  • Common port scanning techniques
  • What information port scans reveal
  • Common mistakes beginners make
  • Safe ways to practice

What is Port Scanning?

Port scanning is the process of checking network ports on a device to determine their status and identify available services. A port scan helps answer questions such as:

  • Is the device online?
  • Which ports are open?
  • Which services are running?
  • What systems are exposed to the network?

Port scanning is commonly used during:

  • Network assessments
  • Security audits
  • Troubleshooting
  • Asset discovery
  • Ethical hacking engagements

In simple terms:

Port scanning helps you discover what services a system is making available to the network.

Understanding Ports

Before learning scanning techniques, it’s important to understand what ports are. A port is a communication endpoint used by network services. Examples of network services include:

  • Websites
  • Email services
  • File transfer services
  • Remote administration services

Each service typically listens on one or more ports. Think of it like this:

IP Address:

The building.

Port:

A specific door within the building.

Service:

The activity happening behind that door. Port scanning helps identify which doors are open.

Why is Port Scanning Important?

Port scanning provides visibility into systems. Security professionals use it to:

1. Discover Services:

Identify what services are available.

2. Identify Exposure:

Determine what is accessible from the network.

3. Support Security Assessments:

Understand potential attack surfaces.

4. Troubleshoot Connectivity Issues:

Verify whether services are reachable.

5. Create Asset Inventories:

Build a picture of network resources.

Port States Explained

While scanning ports, The state of the port may be shown as being in one of the six categories given below.

1. Open Ports:

An open port means a service is actively listening for connections. Examples of such services include:

  • Web services
  • Mail services
  • File sharing services

Open ports are often the primary focus of security assessments.

2. Closed Ports:

A closed port is reachable but has no service actively listening. The system is online but the specific port is unavailable.

3. Filtered Ports:

A filtered port means network controls prevent a clear response. This often occurs because of:

  • Firewalls
  • Filtering devices
  • Security controls

Filtered ports can make analysis more difficult.

4. Unfiltered Ports:

An unfiltered port is a port that is accessible but cannot be determined whether it is open or closed. You will see this state only while performing the ACK scan.

5. Closed | filtered Ports:

A port is classified to this state when it can’t be founnd out whether a port is closed or filtered. You will see this result only while performing IDLE scan. 

6. Open | filtered Ports:

A port is classified as open | filtered when it can’t be determined whether a port is open or filtered. This happens for scan types in which open ports give no response. The UDP, IP protocol, FIN, NULL and XMAS scans classify ports this way.

How TCP communication takes place?

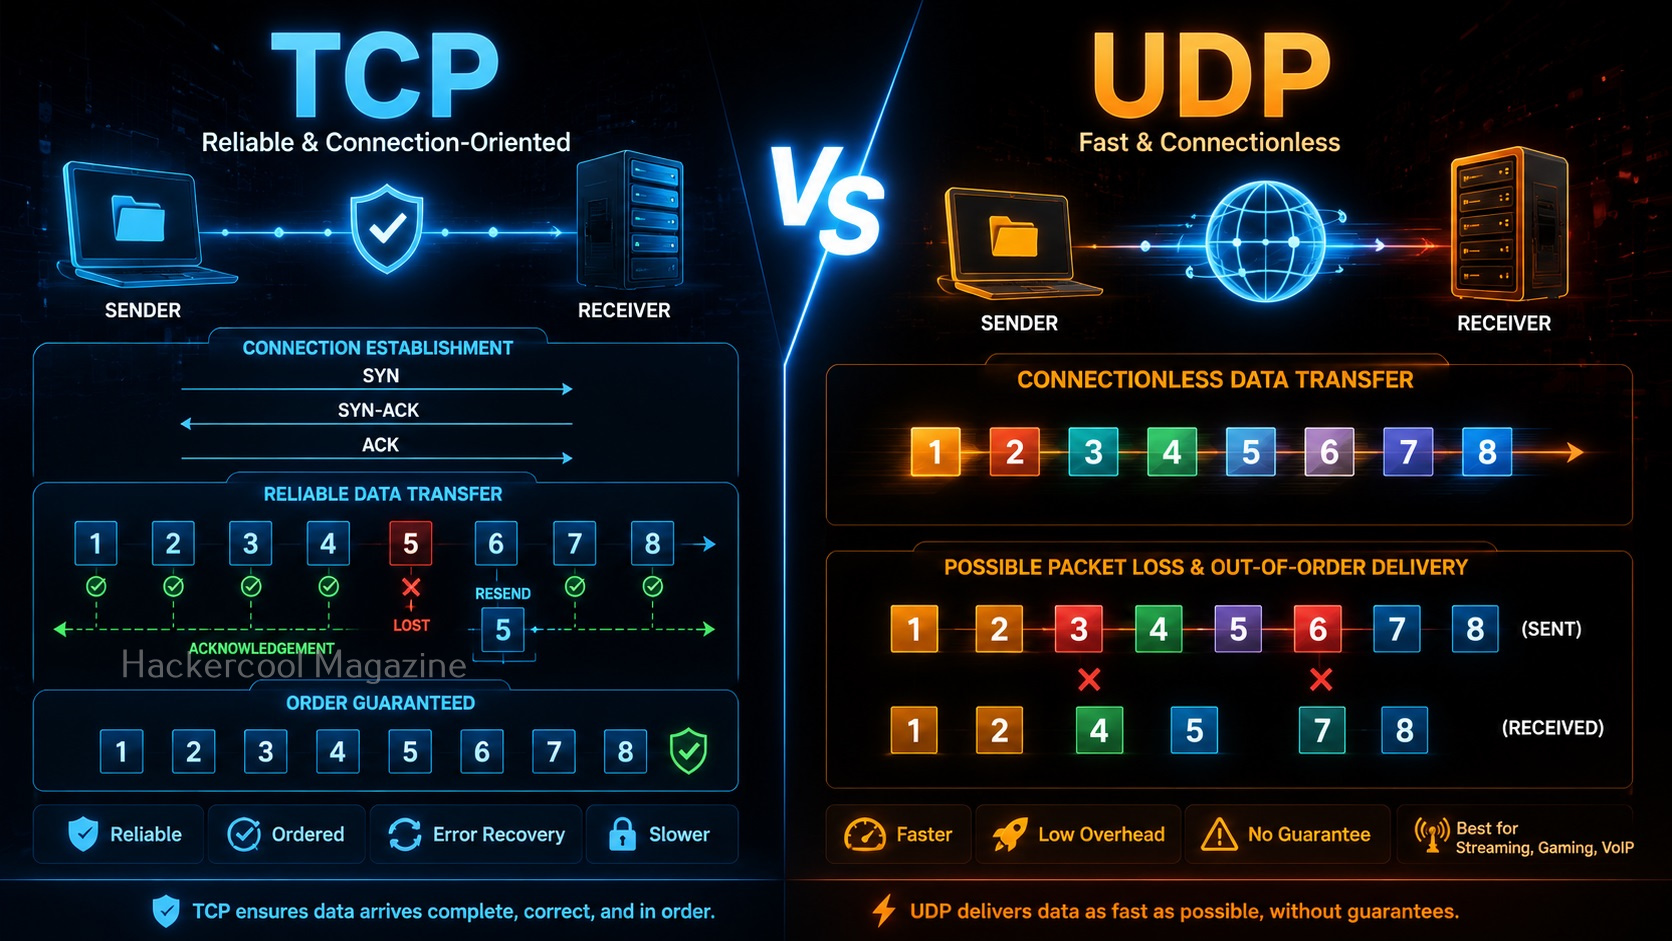
In order to better understand the various port scanning techniques, readers need to first understand how comunicaton takes place between programs and applications on internet. You have read in our article on OSI model that the Transport Layer is responsible for reliable data transfer between end systems. Two protocols are mainly used for data transfer between devices and applications. They are:

  • Transmission Control Protocol (TCP)
  • User Datagram Protocol (UDP)

TCP is used when data accuracy, completeness and flawless delivery of data are important while UDP is used when speed and low latency are more important. Since data accuracy is important in most of the data transfers nowadays, TCP is preferred for most aplications.

To make sure that data is transmitting correctly and completely, Transmission Control Protocol (TCP) uses various flags in the headers. These flags are given below.

TCP Three-Way Handshake

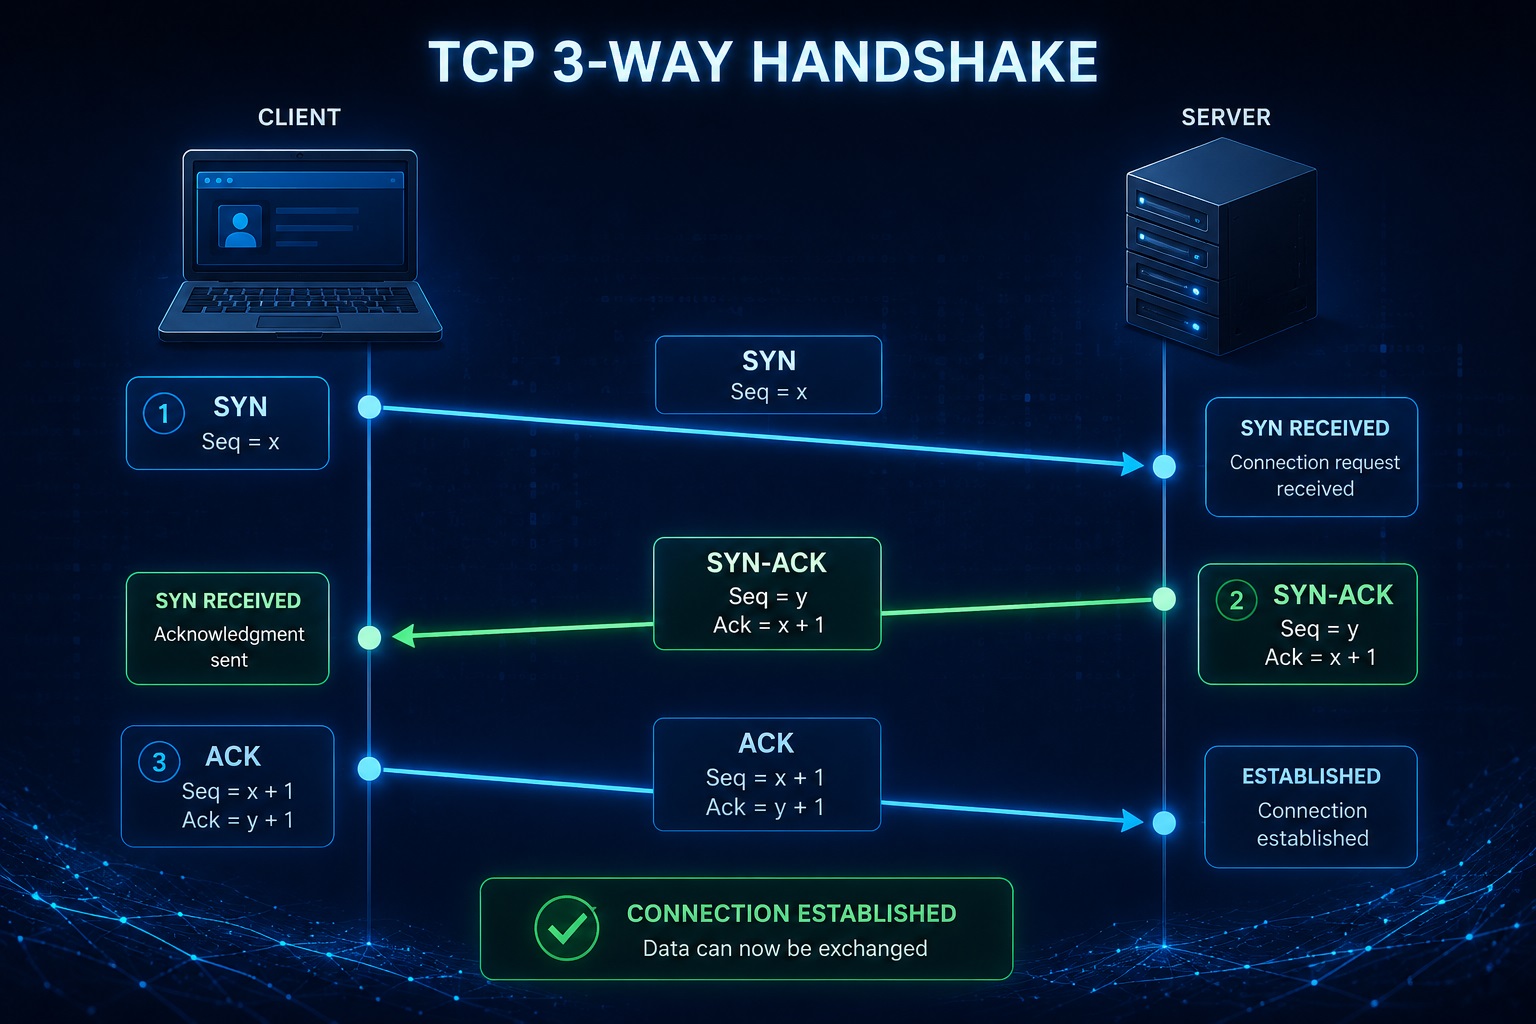
For secure data transmission, TCP uses a technique called the Three-Way Handshake. In this, two devices establish a connection using a Three-Way handshake which is shown below.

  1. A client sends a TCP packet to the Server with SYN flag set.
  2. The Server responds with a TCP packet with both SYN and ACK flags set.
  3. The client replies to the packet with a TCP packet with ACK flag set.

After this 3-way handshake, both client and Server start sending and receiving data. Now, that you understood how TCP communication works, it’s time to see different port scanning techniques.

Common Port Scanning Techniques

There are multiple methods used to determine port status. Beginners should focus on understanding the concepts rather than memorizing technical details.

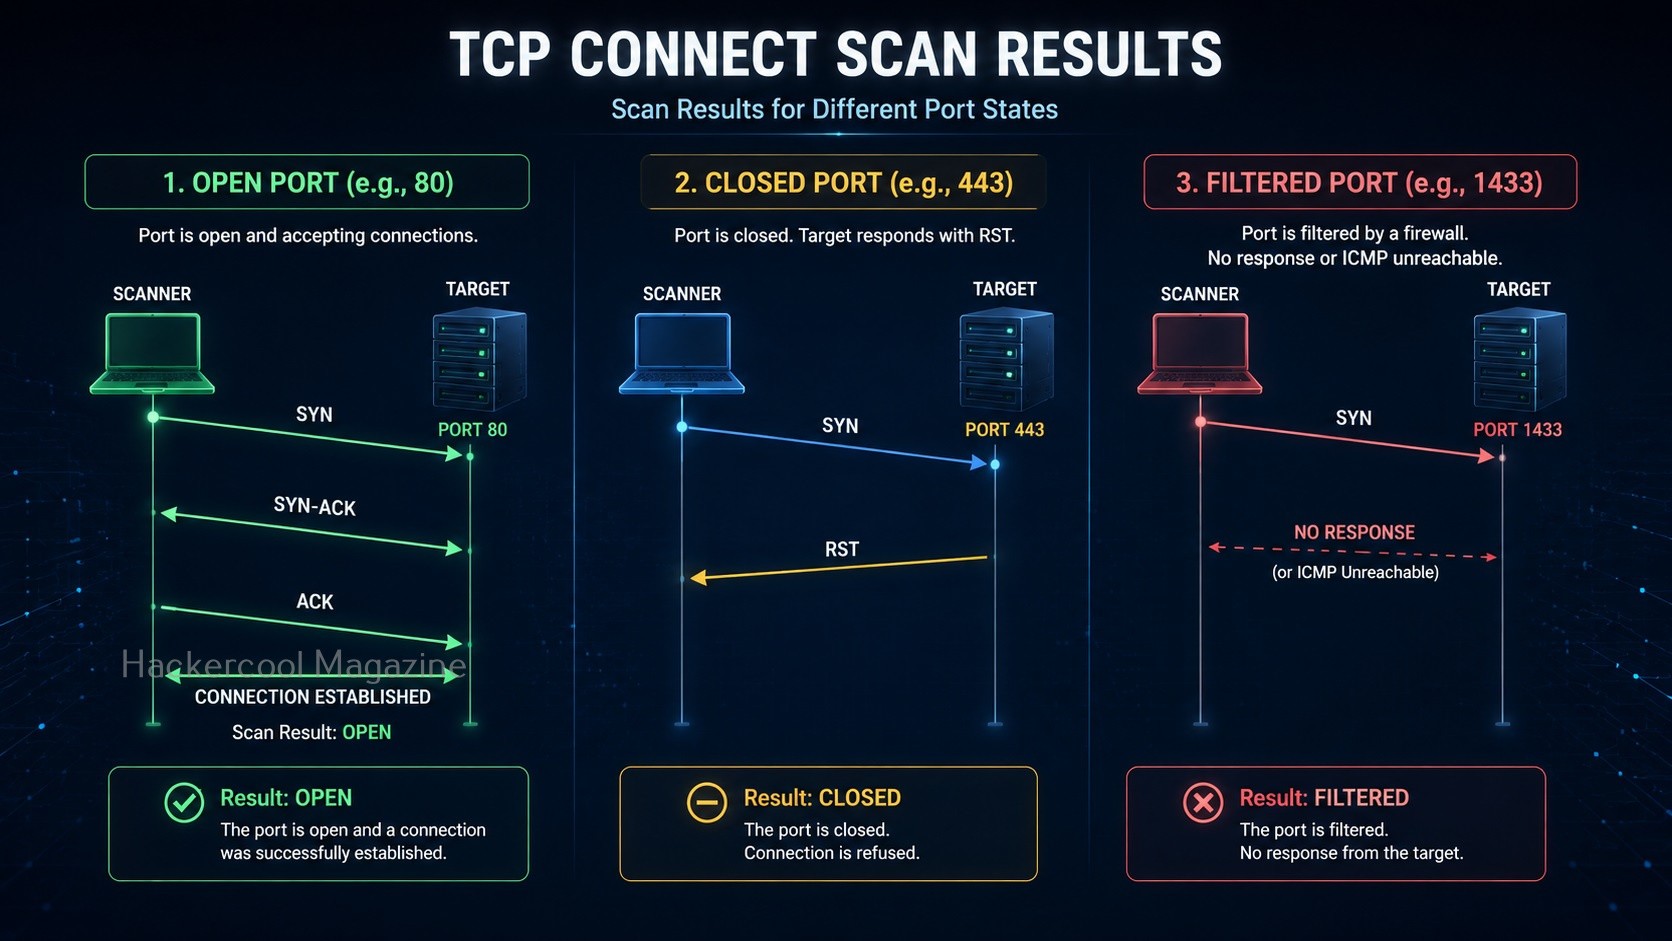
1. TCP Connect Scan:

One of the simplest scanning techniques. This method attempts to establish a complete network connection with the target service.

How It Works?

The scanner requests a connection. If the connection succeeds, the port is likely open. If it fails, the port is likely closed.

In this scan, port scanner like NMAP sends a TCP packet to a port with the SYN flag set. If the port is open, the target responds with a SYN/ACK flag set to packet. Then Nmap sends ACK packet. If the port is closed, the target sends a RST packet. If the target doesn’t respond, the port can be considered filtered.

Advantages:

  • Easy to understand
  • Reliable results
  • Beginner friendly

Limitations:

  • Creates more network activity
  • Easier to detect

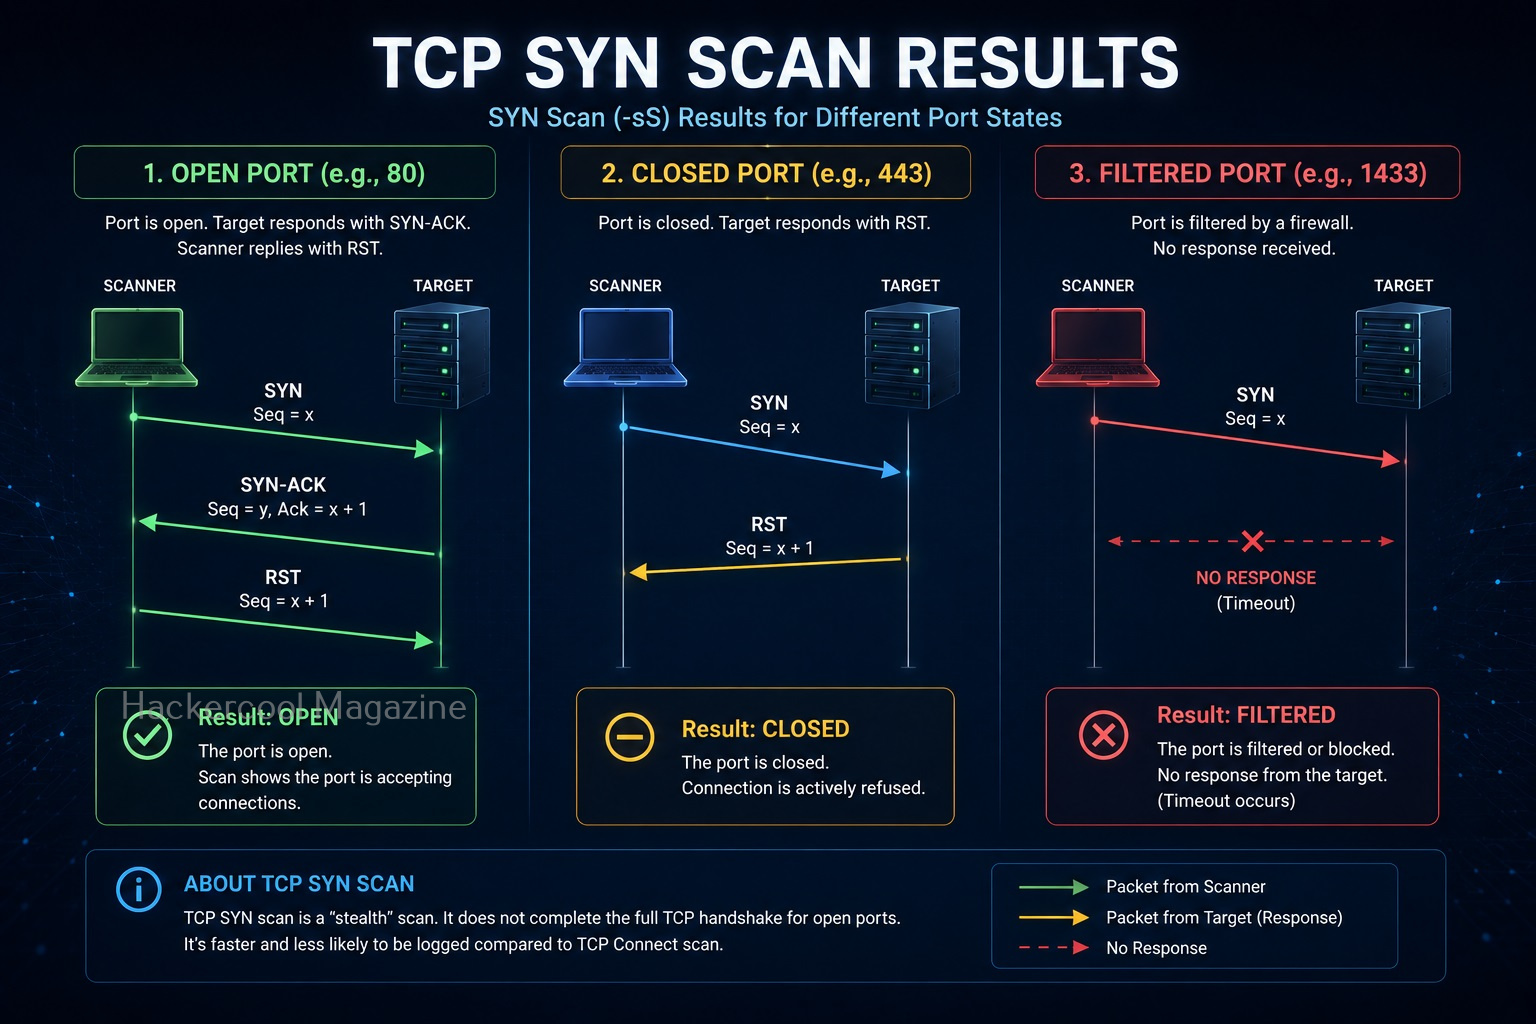
2. SYN Scan:

A commonly discussed scanning method. Rather than completing a full connection, the scanner checks how the target responds during the initial stages of communication.

In a SYN scan, a port scanner sends a SYN packet to the target port. If the port is open, the target sends a “SYN/ACK” set packet. Then, instead of sending a packet with ACK flag set, the port scanner sends a packet with RST flag set to terminate the connection. Since the Three-way handshake is not complete, it is also known as “half-open” scan. Similarly, since the TCP connection is not complete it is not logged and hence considered a stealthy scan. Also, unlike TCP connect scan, this scan is fast.

Why It’s Popular?

It can provide information efficiently while generating less activity than a full connection.

Beginner Takeaway:

The goal is still the same:

Determine whether a port is open. The difference lies in how the information is gathered.

3. ACK Scan:

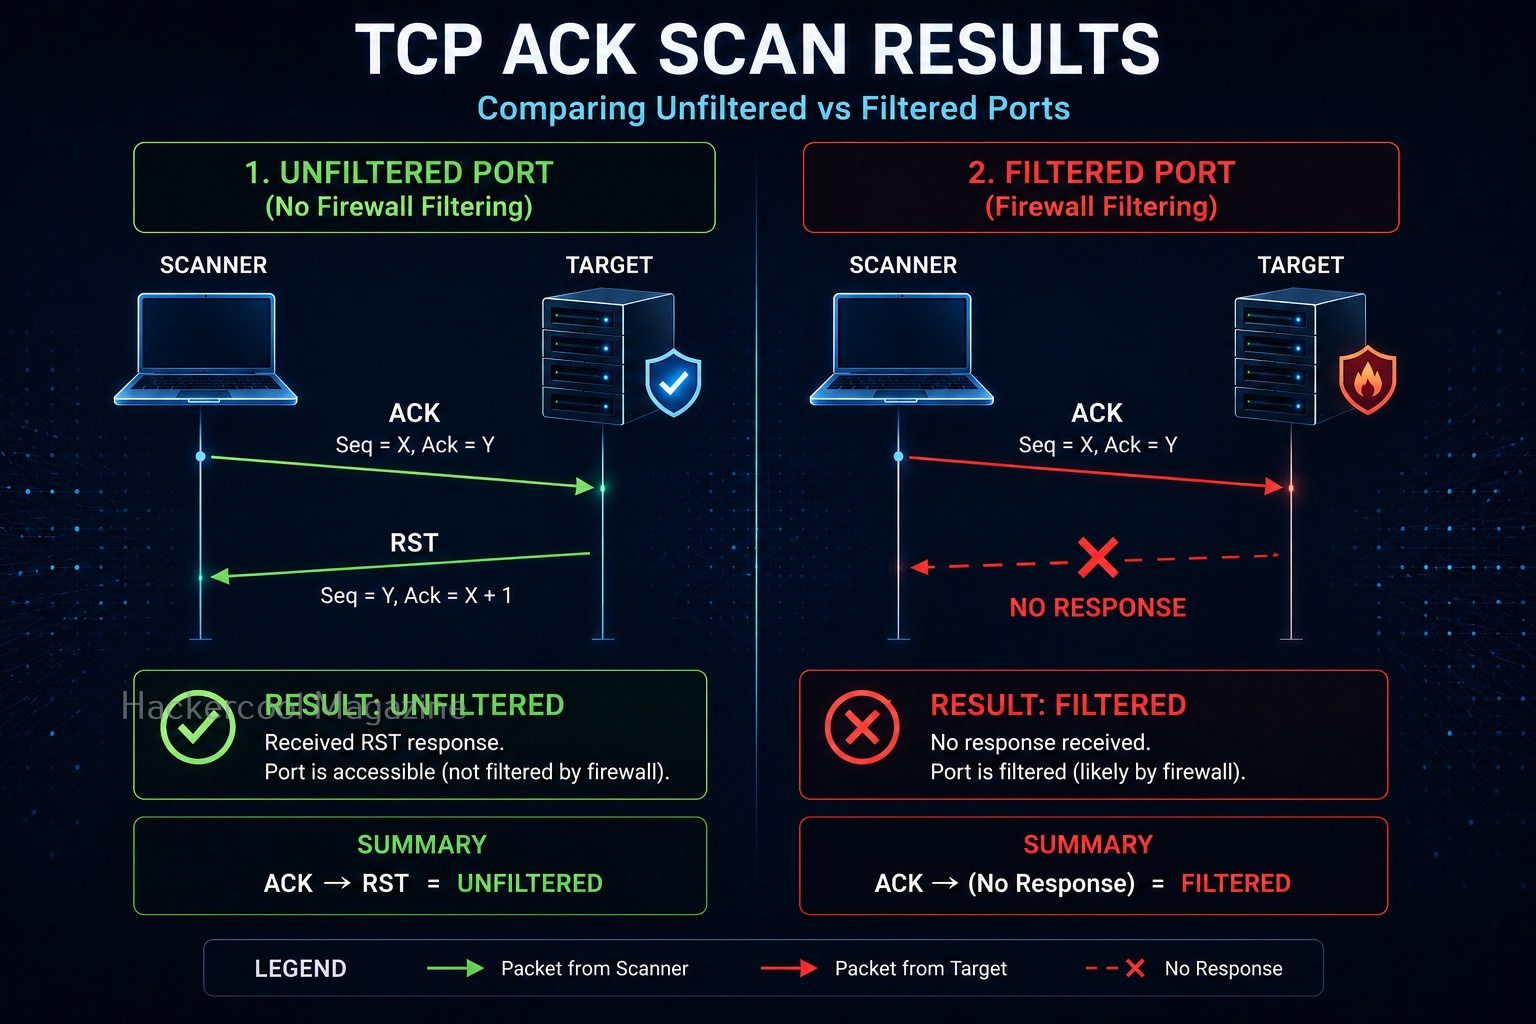
Unlike the above two scans, this scan is not used to determine if a port is open or not. In fact, it is used to determine firewall rulesets.  In this scan, a packet with ACK flag set is sent to the target port. Here, both open and closed ports send a packet with RST flag set. These ports are labelled as unfiltered. If the ACK packet is dropped, the port is labelled as filtered.

4. NULL Scan:

In this scan, no flags are set while sending a packet to the target. If no response is received, the port is assigned as open/filtered. If an RST flag is received from the target port, the port is considered closed and if any ICMP unreachable error 3, code,1,2, 9,10 or 13 is received, it is considered as filtered.

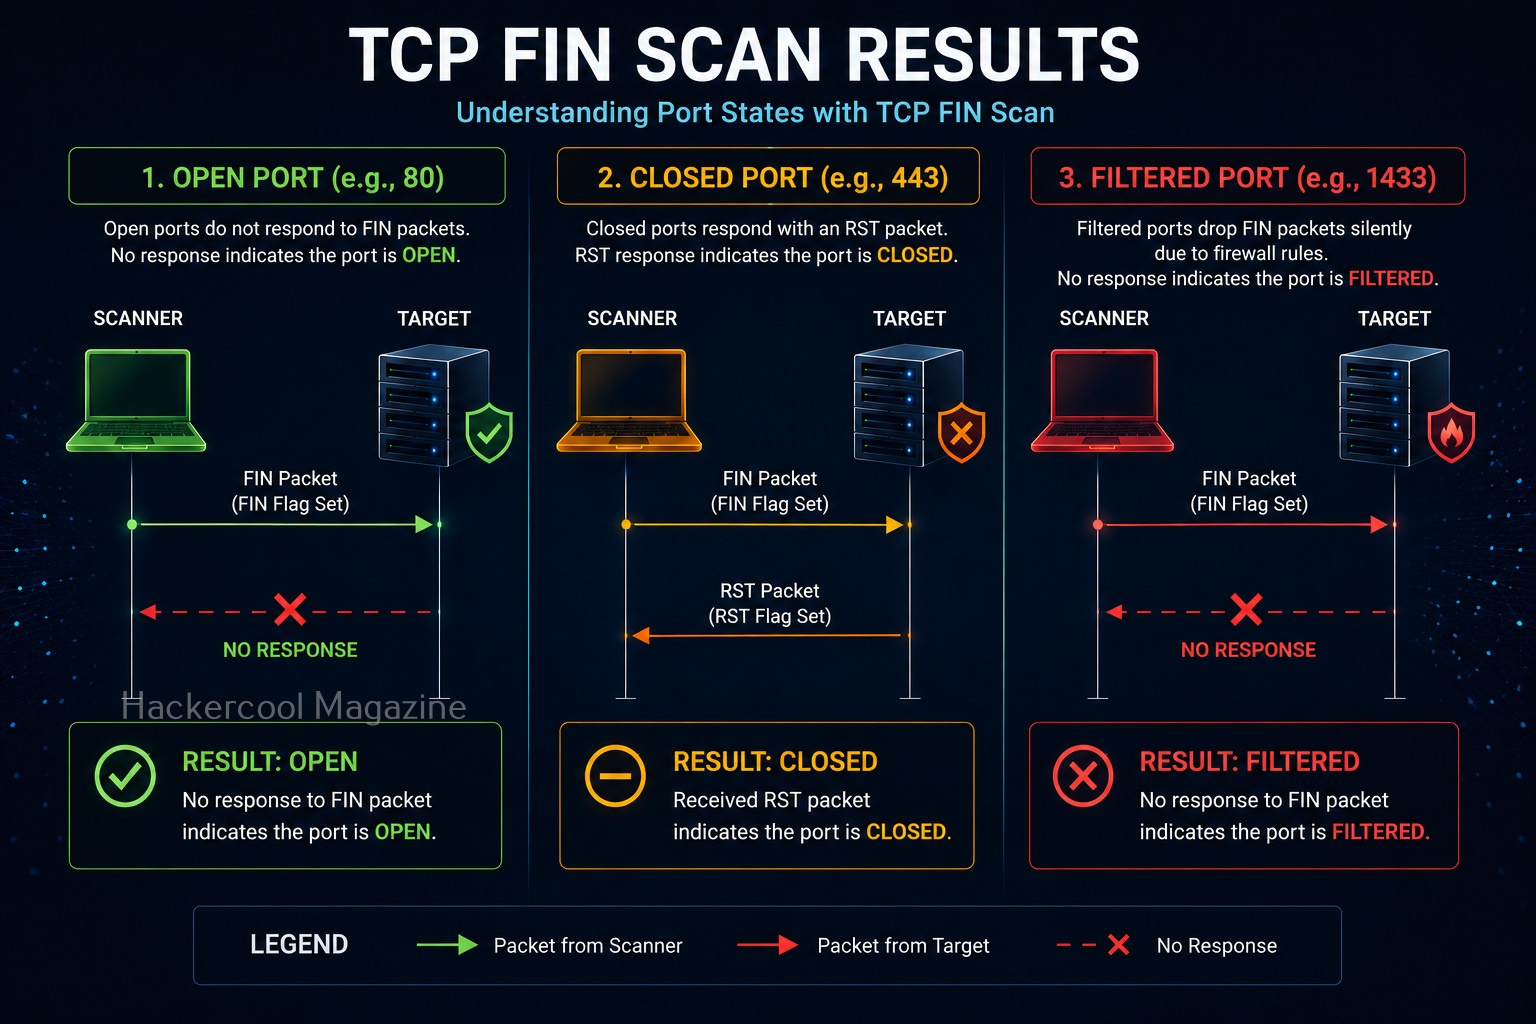
5. FIN Scan:

In this scan, a packet with FIN flag set is sent to the target. The result is same as that of NULL scan.

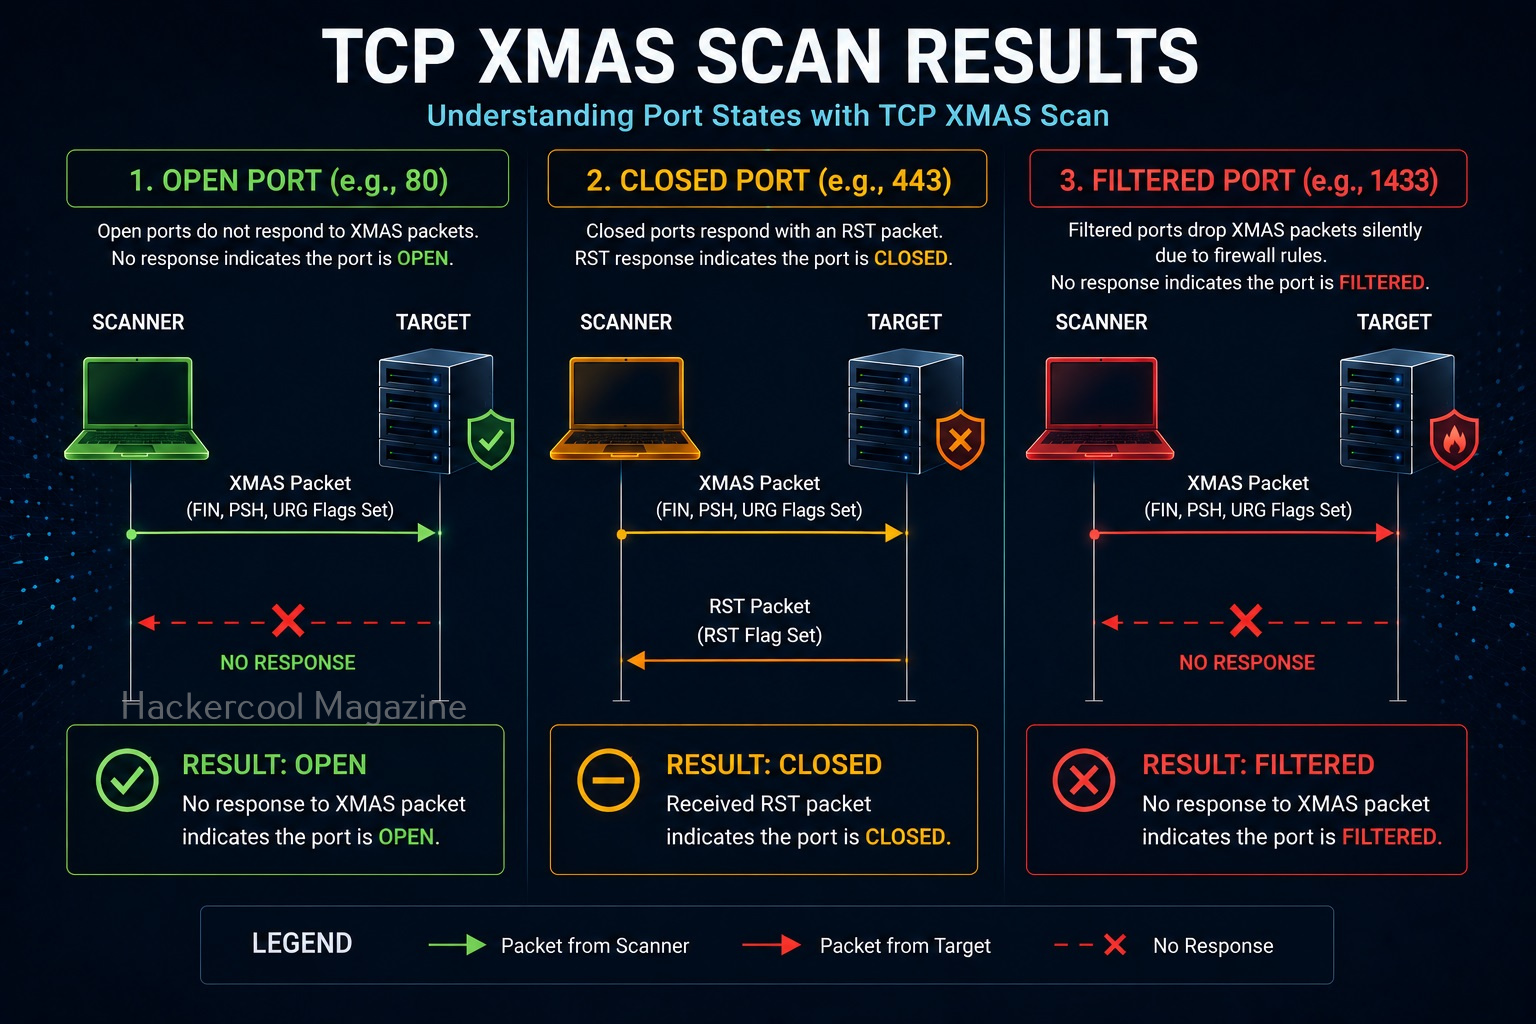
6. XMAS Scan:

In this scan, flags FIN, PSH and URG flags are set to the packet and sent to the target port. The result is same as that of Null scan & FIN scan. Since the packet is lighted up like a Christmas tree when these 3 flags are set, it is known as XMAS scan. Learn about different port scan results.

7. UDP Scanning:

Not all services use the same communication methods. Some services use UDP instead of TCP.

Why UDP Matters?

Certain applications rely on UDP for communication. Examples include:

  • DNS services
  • Streaming services
  • Various network protocols

Challenges:

UDP scans can be slower and harder to interpret. For beginners, understanding that TCP and UDP exist is more important than mastering advanced techniques immediately.

8. Service Detection:

After identifying open ports, the next step is understanding what services are running. Examples include:

  • Web applications
  • Email systems
  • File transfer services

This process helps build a more complete picture of the target system.

9. Version Identification:

Sometimes security professionals attempt to determine:

  • Software versions
  • Service information
  • Configuration details

Understanding software versions helps assess potential risks and maintenance needs.

What Information Can Port Scanning Reveal?

Port scanning can reveal a surprising amount of information. Examples include:

1. Active Hosts:

It reveals which devices are online.

2. Open Services:

It reveals what applications are exposed.

3. Service Types:

The role of different systems.

4. Infrastructure Information:

How systems may be configured.

5. Potential Security Risks:

Exposed services often require further review.

Port Scanning and Ethical Hacking

Port scanning is often part of the reconnaissance and enumeration phases of an assessment. A simplified workflow may look like:

  1. Information Gathering
  2. Host Discovery
  3. Port Scanning
  4. Service Identification
  5. Vulnerability Analysis
  6. Reporting

Port scanning helps bridge the gap between discovering systems and understanding their security posture.

Common Beginner Mistakes

Many beginners make the same mistakes when learning port scanning. You should avoid these.

1. Focusing Only on Open Ports:

Finding an open port is only the beginning. The real value comes from understanding what it means.

2. Ignoring Networking Fundamentals:

Without understanding networking concepts, scan results can seem confusing. Learn:

  • IP addresses
  • DNS
  • TCP
  • UDP
  • Routing basics

3. Becoming Tool Dependent:

Tools help collect information. Understanding the information is what matters.

4. Not Documenting Results:

Always record:

  • Findings
  • Observations
  • Questions

Documentation is a professional habit worth developing early.

5. Scanning Unauthorized Systems:

This is extremely important. Only perform scans on:

  • Systems you own
  • Home labs
  • Authorized environments
  • Educational platforms

Always remain within legal and ethical boundaries.

Safe Ways to Practice

You don’t need a corporate network to learn port scanning.

1. Home Lab Environments:

Create a small network using your own devices.

2. Virtual Machines:

Build isolated practice systems.

3. Training Platforms:

Use environments designed for cybersecurity learning.

4. Personal Systems:

Observe services running on your own devices.

Skills Developed Through Port Scanning

Port scanning helps build valuable cybersecurity skills.

1. Observation:

Learning to identify patterns.

2. Analysis:

Understanding network behavior.

3. Documentation:

Recording technical findings.

4. Troubleshooting:

Investigating unexpected results.

5. Network Awareness:

Developing a deeper understanding of system communication.

Why Every Ethical Hacker Learns Port Scanning

Port scanning remains one of the most fundamental reconnaissance skills because it helps answer a critical question:

What is exposed?

Before assessing security, you need visibility. Port scanning provides that visibility.

Whether you’re pursuing a career in:

Understanding port scanning will continue to be valuable throughout your cybersecurity journey.

Conclusion

Port scanning is one of the first practical skills many ethical hackers learn. It teaches you how systems communicate, how services are exposed and how security professionals gather information about networked devices.

Remember:

✔ Port scanning identifies exposed services
✔ Open ports often indicate active applications
✔ Different scanning techniques gather information in different ways
✔ Understanding results matters more than running tools
✔ Practice should always occur in authorized environments

For beginners, port scanning is an excellent introduction to the world of network reconnaissance and cybersecurity analysis. The concepts you learn here will provide a strong foundation for more advanced security topics in the future.