Posted on

Crunch wordlist generator: Complete guide

Hello, aspiring ethical hackers. In this blogpost, you will learn about a tool named Crunch which is a wordlist generator. A wordlist or a dictionary is a file containing credentials that is useful while using any password cracking tool like Brutus, Hydra, Medusa or John The Ripper usually when you are using Dictionary attack.

A good wordlist goes a long way in the success of a password cracking attack and Crunch is one of the best wordlist generator tools there. Let’s see how to use Crunch to generate wordlist we want. Crunch is installed by default in Kali Linux and it can be started using command “crunch”. The syntax of crunch is given below.

crunch <min> <max> <options>

where “min” stands for minimum length of the password you want and “max” stands for the maximum length of the password string you want. To generate a wordlist containing random passwords with minimum and a maximum length 1 and 2 respectively, this is the command we have to use.

If you want a wordlist with characters you specify, you can also specify them as shown below.

Crunch already has a collection of character sets stored in “charset.lst” file located in /use/share/crunch/ directory. Here is the list of character sets it has.

For example, if you want to create the wordlist with only uppercase alphabets, you can use the command shown below.

What’s a wordlist without a saved file? (o)

Really, what is a wordlist without a saved file. To save the output, use the “-o” option as shown below.

Be careful with the size of the wordlist (b and c)

Sometimes while making a huge wordlist, the size of the wordlist may become too large in size, usually adding up to Giga bytes (GB). This can put a lot of pressure on memory and resource of the computer or may be even difficult to open. Don’t worry though. Crunch has a feature to overcome this problem using the “b” option. The “b” option can be used to set the size you want for the wordlist.

Once the size of the file reaches this limit, it saves the output to a new file with the same size. Let me show you practically. For example, here we create a wordlist and is size in 2620200 bytes as shown below.

Now, let’s create the wordlist size of just IMB as shown. While using the ‘-b’ option, ‘-o’ option and “START” are compulsory.

When we do this, instead of creating a single wordlist, crunch will create three wordlists as shown below.

Add up the size of the first three files and that should add up to the size of the “wordlist.txt” dictionary. Also note that while we use the “-b” option, the name of the wordlist is the first and last string in the wordlist.

Crunch can also create a wordlist with a specified number of lines. For example, the wordlist we created here has 3,75,922 lines.

Now, if you want your wordlist to have just 100 lines, you can use the ‘-c’ option to achieve this as shown below.

Let’s check the number of lines in each wordlist.

Remove duplication (d)

Using the ‘-d’ option, we can remove the duplicate characters from the values in the wordlist.

In the above wordlist, you can see duplicate characters like aa, bbb, ccc etc. Let’s say you want to limit the duplicate characters to two alphabets. This can be done by setting ‘2@’ value to -d option.

You can see that “bbb” and “ccc” are gone from the wordlist. The format to give value to the “-d” option is the number and the symbol. In ‘2@’, 2 is the maximum number of consecutive characters to be allowed and @ in the symbol of the characters we want to limit. The symbol for different character sets for crunch are given below.

Exit after a specific study is created (e)

You just don’t have to wait for the entire wordlist to be created with crunch. You can exit wordlist generation after a specific string is generated. Let’s see an example.

Now, you want to exit crunch after creation of string ‘ab’ in the above wordlist, you can do so as shown below.

Invert the strings (i)

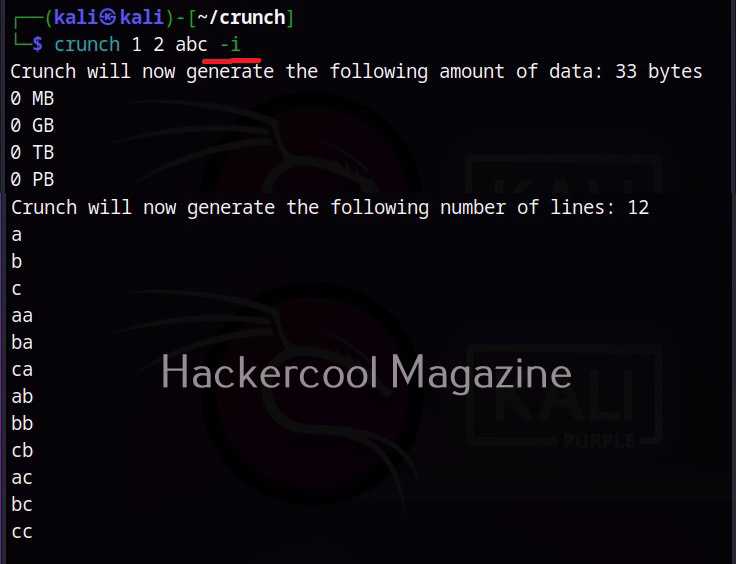
Using this option (-i), we can insert the strings generated in Crunch. In the above wordlist, instead of aa, ab, ac, ba, it will be aa, ba, ca, ab.
Start with a specific string (s)

While creating a wordlist, you may have a feeling to try a specific string as password but not sure. But you want to try it first in your wordlist. You can set a starting string to the wordlist you are creating using the ‘-s’ option.

Don’t you want repeating characters (p)

Crunch can generate words that don’t have repeating characters using the ‘-p” option. Setting this option will generate factorial of characters in charset. For example, if there are 3 character in charset, setting this option will generate 3x2x1=6 words. While by default, crunch generates a wordlist the size of “characters in charset” to the power of maximum length specifically.

This option cannot be used along with ‘-s’ option and must be the last option to be specified. Also, this option ignores the maximum and minimum length specified but still needs two numbers to the specified.

You want to specify a pattern (t)

This option helps you to specify a pattern. The character set can be specified using symbol as shown below.

What if you want symbols to be treated literally (l)

Setting a specific pattern is very helpful while creating wordlists but what if we have to include @, % ^ character in the string. Don’t worry. Crunch has that option too. Using -l option asks crunch to treat the specified characters as literals instead of symbols pointed to other characters.

Save the wordlist as archive: (z)

Sometimes, need arises to save the generated wordlist as a compressed archive. With the “-z” option you can save generated wordlist as gzip, bzip, lzma and 7zip archives.

Resume whenever you want (r)

You may face some unexpected interruption while generating wordlists with crunch. This may be power cut or unexpected shutdown or some other problem which forces crunch to abort generating wordlists. Don’t you worry. Crunch has the resume (-r) option to restart from where it stopped or got aborted.

Disabling print percentage thread (u)

Its very nice to see crunch displaying the print percentage thread at the bottom while generating wordlist. But it you don’t like it, you can just disable this print percentage thread with the -u option.

That’s all about Crunch wordlist generator. Leave comments below.

Posted on

Brutus Password Cracker: Complete guide

Hello aspiring Ethical Hackers. In our previous blogpost, you learnt what is password cracking and various techniques of cracking passwords. In this blogpost, you will learn about Brutus password cracker, one of the popular tools that is used for cracking passwords.

Brutus is a password cracking tool that was actually designed to test for default credentials for routers . It was made public way back in October 1998 but it is still popular in present time. It is a portable password cracking tool and there is no need of installing it. It can be downloaded from here. It works only on Windows and supports cracking passwords of various protocols. They are,

  • HTTP (Basic authentication)
  • HTTP (HTML form/CGI)
  • POP3
  • FTP
  • SMB
  • Telnet

After downloading, we just need to extract the contents of the archive.

To run Brutus, click on the BrutusA2 application file.

It has three modes of operation. They are, wordlist, brute force and combo list where credentials are given as username/password pairs.

Brutus password cracker

For the purpose of demonstration, let’s try to crack FTP password of Metasploitable 2. I will be using the wordlist mode of attack for this. This wordlist was created while performing SMB enumeration of the target. Wordlists can also be generated using tools like Crunch, Cewl etc. After specifying the wordlist, I just need to click on “Start” to begin cracking passwords.

As the tool continues to crack credentials, any positive authentication results will be displayed as soon as they are found. In our current example, Brutus successfully extracted three credentials. They are,

  • user:user
  • postgres:postgres
  • msfadmin:masfadmin

Let’s use them to login into our target.

Successful. Similarly Brutus password cracker can be used to brute force credentials too.

Posted on

Nikto vulnerability scanner: Complete guide

Hello, aspiring ethical Hackers. This blogpost is a complete guide to Nikto vulnerability scanner. Nikto is a free command line web vulnerability scanner that scans web servers and detects over 6700 potentially dangerous files/CGIs, outdated server software, other vulnerabilities and misconfigurations. Nikto can also detect the installed software on the target web server. We will be running Nikto on Kali Linux as it is installed by default in Kali Linux. So let’s start.

Let’s start with a version check (-Version)

The “version” option of Nikto checks for the version of the software, plugins and database versions.

Checking Database (-dbcheck)

It’s always a good thing to check for any errors in the scan database before scanning. The “-dbcheck” option of Nikto checks the scan databases for any errors.

The Host option (–host) (-h)

To scan a target using Nikto, first we need to specify a target. To set the target, we need to use the “host” option. This is shown below.

The target can be IP address of the webserver or URL of the website. This scan took 45 seconds to finish.

The Host option (–ssl)

To scan a website with HTTPS enabled with nikto, we can use the “SSL” option.

The Port option (–port)

By default, Nikto scans the default HTTP and HTTPS ports when specified. However, if the target web server is running on a custom port you can set Nikto to scan a different port by using the “port” option.

Scanning for CGI directories (–Cgidirs)

To scan for the presence of all CGI directories on the target webserver, the “cgidirs” option can be used.

You can specify a specific CGI directory to search or you can use “all” value to scan for all CGI directories on the target.

What output you want Nikto to show? (–Display)

To control the type and amount of output Nikto shows after finishing the scan, we can use the “Display” option. Here are the values that can be set for the Display option.

How much time you want Nikto to spend on a scan? (–maxtime)

Using the “maxtime” option, we can specify the maximum time to spend for scanning a target. This time can be specified in seconds.

As you can see, the scan ended in 2 seconds while earlier the same scan took 45 seconds.

Don’t look for names (-nolookup)

The “nolookup” option specifies Nikto to not query for names when an IP address is specified.

Don’t look for pages that are not there (–no404)

The “no404” option specifies Nikto to disable “file not found” checking. This will reduce the total number of requests made to the target.

Just discover the ports (–findonly)

If you want to just find the HTTP(S) ports of a target without performing any security scan, you can use the “–findonly” option. Specifying this option allows Nikto to connect to HTTPS or HTTP ports and report the server header.

The Timeout option (–timeout)

The “–timeout” option specifies time to wait before timing out a request. The default timeout of Nikto is 10 seconds.

The Pause option (–Pause)

By using “–Pause” option of Nikto, we can specify delay between each test Nikto performs.

What if we have to authenticate? (–id)

With the “-id” option you can use Nikto to perform basic authentication to the target.

The tuning option (–tuning)

With the “-Tuning” option, we can control the test that Nikto will use against a target. It can take the following values.

For example, this is how we test for misconfigured files on the target.

See all Nikto plugins (–list-plugins)

Nikto has lot of plugins that can be used against various targets. To view all these plugins, we can use the “–list-plugins” option.

Use a particular plugin (–Plugins)

To use a particular plugin, we can use the “Plugins” option. For example, let’s use the robots plugin as shown below.

Can Nikto evade detection? (–evasion)

While scanning, Nikto can use various techniques to evade Intrusion Detection System (IDS). The evasion techniques of Nikto are given below.

Saving output (-o)

Nikto can save the output of the scan in a file with the “output(-o)” as shown below.

Formats in which you can save output (-Format)

You can save in different formats you like using the “-Format” option. Valid formats are csv, htm, txt and xml.

That is the complete guide for Nikto vulnerability scanner. If you have any questions bring them in the comments section.

Posted on

Nessus vulnerability scanner: Beginner’s guide

Hello aspiring ethical hackers. In this blogpost, you will learn about Nessus vulnerability scanner. Nessus is an open-source network vulnerability scanner that uses Common Vulnerabilities and Exposures (CVE) architecture. It is widely used for vulnerability assessment and penetration testing.

Nessus server can be installed on Unix, Linux and FreeBSD whereas Nessus client is available for Unix and Windows based operating systems. For this tutorial, we will be installing Nessus on Kali Linux. Nessus can be downloaded from here. It can also be downloaded using curl as shown below (version may change).

Once the latest version of Nessus is downloaded, it can be installed as shown below.

Once the installation is finished, enable nessus as shown below.

Then start nessus as shown below.

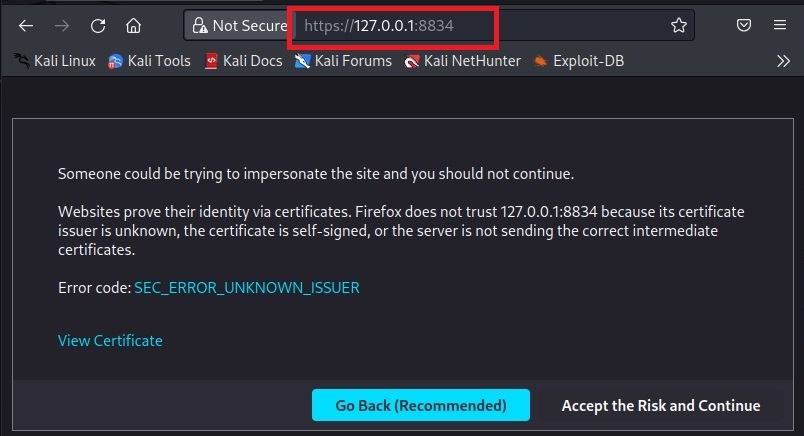
Nessus runs on port 8834 by default. It can be viewed in browser.

Click on “Accept the risk and continue”.

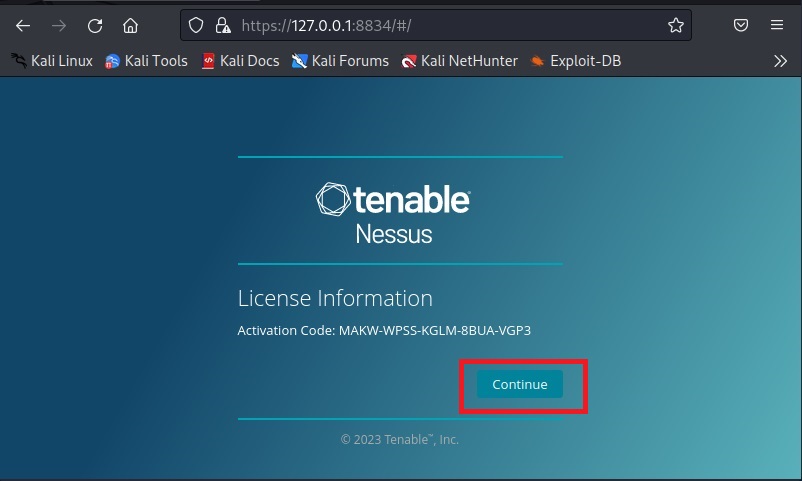
Click on “Continue”. Select the type of Nessus install you want. Since we are using a Free version of Nessus for this tutorial we select “Register for Nessus Essentials”. Click on “continue”.

To run Nessus Essentials, you need an activation code. Get the activation code by entering the following details.

You need a user account to login into Nessus. Create an account and most importantly remember the user account information.

Then, Nessus will download all the required plugins. This may take some time (a bit long time sometimes).

Once all the plugins are finished downloading, you should see this.

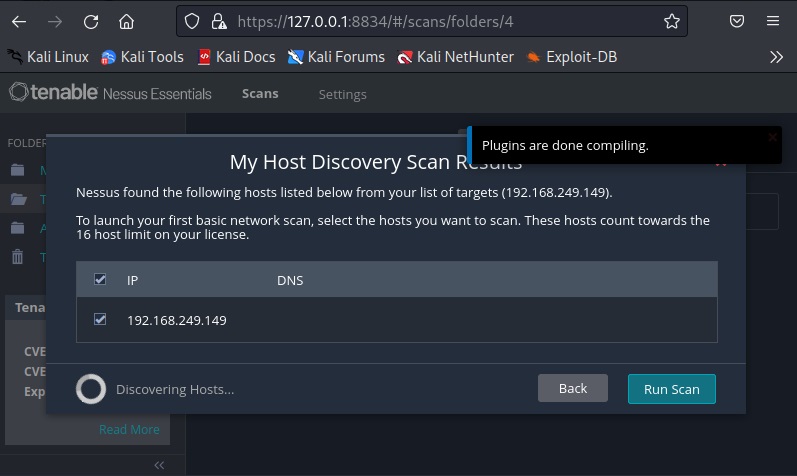
The installation is finished. Now, it’s time to start scanning with Nessus. Click on “New scan”. A new popup opens. Assign a target.

Click on “Run scan”.

The scan will start and take some time to finish. For this tutorial, we are using “Metasploitable 2” as target. See how to install Metasploitable 2 in VirtualBox.

The vulnerabilities are classified into five categories by Nessus. They are Critical, High, Medium, Low and Information. You can view detailed information about the detected vulnerabilities by clicking on them.

All the scans you perform are located in “My scans” section.

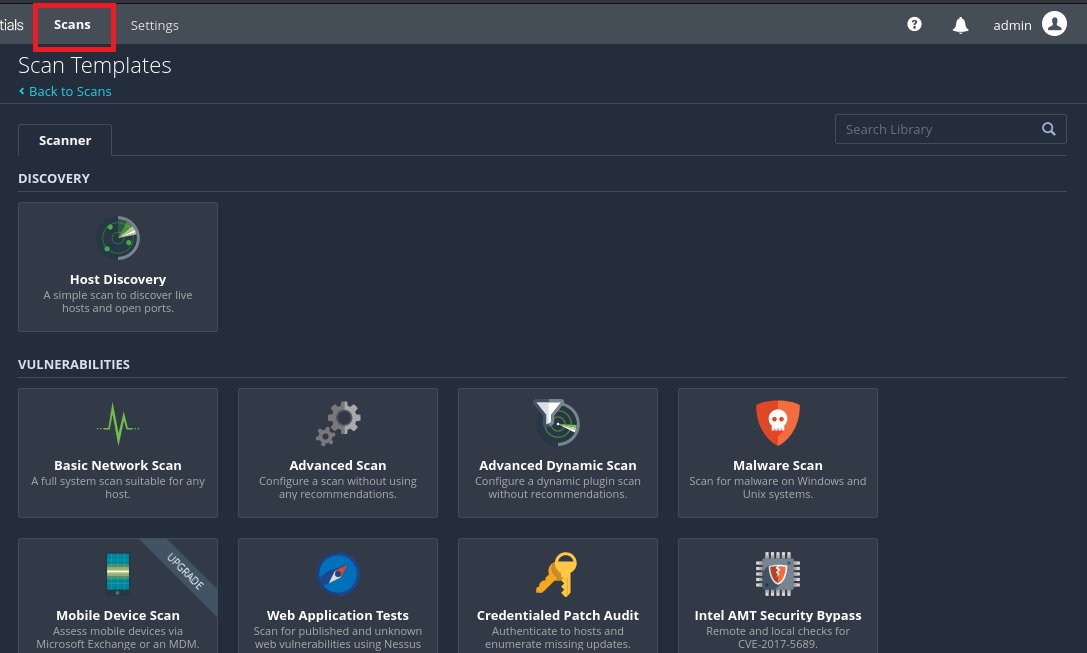
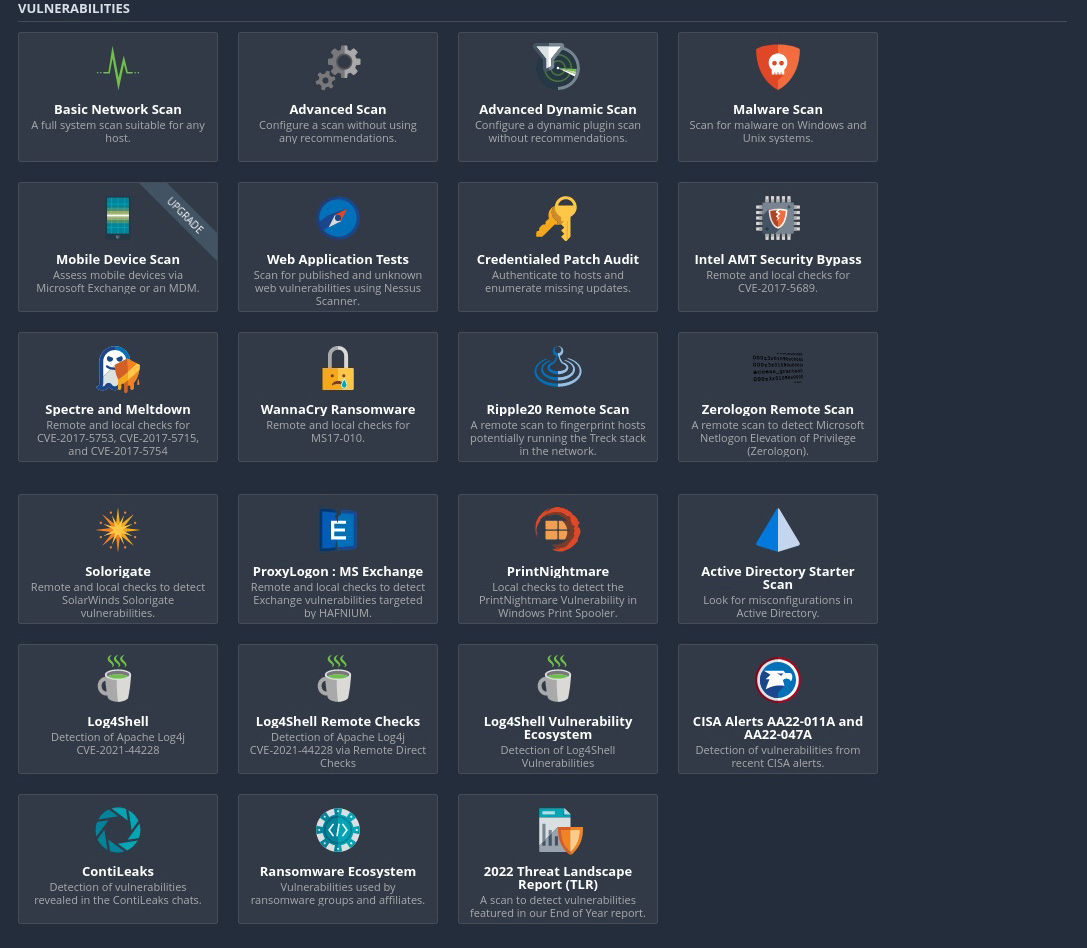
Nessus allows different types of scans. All the scans that can be performed using Nessus can be viewed from “All scans” section.

Posted on

Vulnerability scanning for beginners

Hello aspiring Ethical Hackers. In this blogpost, you will learn about vulnerability scanning. Before you learn what a vulnerability scan is, you need to know what a vulnerability is? A vulnerability is a weakness, flaw, error or a misconfiguration in a software or network that allows hackers to gain unauthorized access to the organization by exploiting it.

What is vulnerability scanning?

Now that you have understood what is a vulnerability, let’s see what is scanning. Vulnerability scanning is the process of identifying the security vulnerabilities in a software or a network of the organization. Vulnerability scanning is usually performed to protect the organization from hackers although it is also performed by hackers to gain access to the organization.

Types of vulnerability scans

Vulnerability scanning can be categorized into different types. They are,

  1. External Vulnerability Scan
  2. Internal vulnerability scan
  3. Environmental scans
  4. Intrusive Scans
  5. Non-Intrusive scan.
  6. Credentialed scan
  7. Non-credentialed scan

1. External vulnerability scan:

In an external vulnerability scan, the external facing resources of an organization are scanned. These include, websites, systems, ports and services.

2. Internal vulnerability scan:

In this type of scan, the vulnerability scan is performed on the internal network of the organization or on resources to which the users or employees of the organization have access to. This scan is performed to get information about the vulnerabilities which employees or malware which gained access to the network can exploit.

3. Environmental scan:

Environmental vulnerability scans are performed based on the target environment. For example, target environment can be cloud based, IOT, mobile devise, websites etc.

Vulnerability scans can also be classified as either Intrusive or Non-Intrusive.

4. Non- Intrusive scan:

In a non-intrusive vulnerability scan, vulnerabilities are just identified and reported.

5. Intrusive scan:

In an intrusive vulnerability scan, vulnerability is not just identified but also exploited.

Apart from these categorizations, vulnerability scan is also classified as credentialed scans and non-credentialed scans.

6. Credentialed scan:

Also known as authenticated scan, this vulnerability scan in performed using a set of credentials. This type of scan gives the trusted users view of the organization.

7. Non-credentialed scan:

Also known as non-authenticated scan, this vulnerability scan gives the external user’s view of the network or revenue of organization.

Uses of vulnerability scans

Vulnerability scanning can help cyber security personnel of the organization to get an idea about the vulnerabilities in the organization beforehand and to prevent them from being exploited by attackers. As hackers also perform vulnerability scans, vulnerability scanning gives an idea to the organization as to what hackers can see.

How are vulnerability scans performed?

Vulnerability scans can be performed manually or using tools (vulnerability scanner). See how to perform vulnerability scanning with Nikto and Nessus.

Vulnerability scan vs Vulnerability assessment

In vulnerability scanning, vulnerabilities are scanned and reported whereas in vulnerability assessment, apart from identifying vulnerabilities the impact of the vulnerabilities when exploited is also assessed. Learn more about vulnerability assessment.