Posted on

Digital Forensics with Autopsy (Beginners guide)

Hello aspiring Cyber Forensic Investigators. In our previous blogpost, you learnt in detail about Computer Forensics. In this article, you will learn about one of the tools mentioned in that article, Autopsy. In the world of digital forensics, investigators rely on powerful tools to uncover hidden evidence, reconstruct user activity and understand what really happened on a device. While many enterprise-grade forensics suites come with hefty price tags, one tool stands out as both free and incredibly capable: Autopsy. Built on top of The Sleuth Kit (TSK), Autopsy delivers a graphical and user-friendly interface that transforms complex forensic tasks into something really simple, even for beginners.

What exactly is Autopsy?

Autopsy is an open-source digital forensics platform designed to examine hard drives, memory cards, mobile phones and disk images. It takes the raw power of TSK which is an industry-standard command-line forensics engine and wraps it in a clean graphical interface with modules, dashboards, timelines and reporting features. The result is a forensic workbench that feels modern, intuitive and surprisingly powerful for a free tool. Law enforcement agencies, cybersecurity teams and researchers around the world use Autopsy for investigations ranging from cybercrimes and fraud to incident response and breach analysis. But its ease of use also makes it perfect for students and cybersecurity beginners.

Why Autopsy is so popular?

Autopsy gained massive popularity in computer forensic investigations because it strikes a rare balance: it’s completely free yet rivals the functionality of expensive commercial tools. Here’s why investigators and analysts love it:

1. A User-Friendly GUI for Sleuth Kit

TSK is excellent but it’s all command-line. Autopsy brings visual clarity with:

  • A clear file explorer
  • Tabs for artifacts and timelines
  • Keyword search windows
  • Convenient reporting options

For beginners, this alone is a game-changer.

2. Built-In Forensics Modules

Autopsy includes modules for:

  • File recovery
  • Web browser artifact extraction
  • Email parsing
  • Registry analysis
  • Keyword indexing
  • Hash set matching
  • EXIF and image metadata

You simply check the modules you want to enable for each case.

3. Enterprise-Level Features Without the Cost

Autopsy supports:

  • Case management
  • Multi-user collaboration
  • Timeline analysis
  • Hash databases (like NSRL)
  • Custom ingest modules

These features make it scalable from classroom use to real-world investigations.

How Autopsy works?

Autopsy uses a workflow which is same in professional forensic processes.

Step 1: Create a Case

You start by giving a name to your investigation, setting a folder for output and adding case details.

Step 2: Add Data Sources

Next step is to add the forensic image on which you want to perform your investigation. Autopsy can ingest:

  • Disk images in various formats (.dd, .img, .E01)
  • Physical drives
  • Memory dumps
  • Logical folders
  • Mobile phone extractions (via modules)

Step 3: Enable required modules

This determines what Autopsy scans for. For example:

  • File Analysis: lists, categorizes and recovers files
  • Web Artifacts: extracts browsing histories and cookies
  • Keyword Search: finds specific words or patterns
  • Hash Lookup: matches known-good or known-bad files

Step 4: Review Findings

Results appear in categories such as:

  • Recent documents
  • Web activity
  • Installed programs
  • User accounts
  • Images and media
  • Deleted items

You can pivot into deeper analysis, open files in viewers, inspect metadata and even bookmark evidence.

Step 5: Generate a Report

Autopsy exports clean reports in various formats like HTML, CSV and Excel, perfect for documenting conclusions in a professional investigation.

A Beginners Lab

Let’s now see the working of Autopsy practically. For this, we need a forensic image and we will use an Encase Image provided by CFReDS, a portal that provides documented digital forensic images and datasets for use in the digital forensics community. The image we are using Autopsy is of a Dell Latitude laptop named “Hacking Case” that can be downloaded from here. You need to download two Encase Images. The two images we are looking for are,

https://cfreds-archive.nist.gov/images/4Dell%20Latitude%20CPi.E01
https://cfreds-archive.nist.gov/images/4Dell%20Latitude%20CPi.E02

Here is a feel real back story about this forensic image.

“On 09/20/04, a Dell CPi notebook computer, serial # VLQLW, was found abandoned along with a wireless PCMCIA card and an external homemade 802.11b antennae. It is suspected that this computer was used for hacking purposes, although cannot be tied to a hacking suspect, G=r=e=g S=c=h=a=r=d=t. (The equal signs are just to prevent web crawlers from indexing this name; there are no equal signs in the image files.) Schardt also goes by the online nickname of “Mr. Evil” and some of his associates have said that he would park his vehicle within range of Wireless Access Points (like Starbucks and other T-Mobile Hotspots) where he would then intercept internet traffic, attempting to get credit card numbers, usernames & passwords. Find any hacking software, evidence of their use, and any data that might have been generated. Attempt to tie the computer to the suspect, G=r=e=g S=c=h=a=r=d=t. A DD image and a EnCase image of the abandoned computer have already been made.”

The mission for us is to analyze this Encase Image and answer around 20 questions that solve this case. The questions are also provided by the same people who provided this “Hacking Case” to us. Let’s start analyzing this image and solve the case. Once the program is installed, open it and click on “New Case”.

autopsy

Give a name to the case. We have named it “Hacking_Case”.

Assign a number to the case and provide the name of the Forensic investigator. Our case number is 00 and the investigator is Luke_Reckah.

Next, select the type of source. Select “Disk Image”.

Select the Data Source. Select the first part of the Encase image downloaded.

Next, select all the ingest modules you want to run. Ingest modules are all the tests that can be run on the image to gather information about it. These ingest modules include tests like hash lookup, email parsing etc. We selected all for this.

Autopsy will start analyzing the image. It may take some time to completely analyze the image. However, it will start displaying findings as soon as it finds them. Let the image analysis finish.

After the image analysis is finished, all the extracted information can be found on the left side of the program window.

It’s time to start answering questions related to the case now.

1. What is the image hash? Does the acquisition and verification hash match?

In Digital Forensics, as soon as a image is acquired to perform analysis on it, a hash is calculated to check if the file integrity is intact and not compromised. If the acquisition and verification hash do not match, it means our forensic analysis has changed the image which is not at all intended. The image hash is “AEE4FCD9301C03B3B054623CA261959A”. It is found in the File Meta data section.

2. What operating system was used on the computer?

The operating system information can be found in the “Operating System Information” of the extracted content.

The operating system being used by this laptop is Windows XP.

3. Who is the registered owner?

The information about the registered owner of the computer is found in the same operating system info section in extracted content.

The name of the owner of this computer is “Greg Schardt”.

4. When was the install date?

The installation date can be found in the same operating system info section just below the OS information.

The OS on the computer was installed on 19-08-2004 22:48:27.

5. What is the computer account name?

The computer account name on this computer is found in the same section.

The computer account name is N-1A9ODN6ZXK4LQ.

6. How many user accounts are recorded?

The information about the user accounts is found in the “Operating System User Account” section.

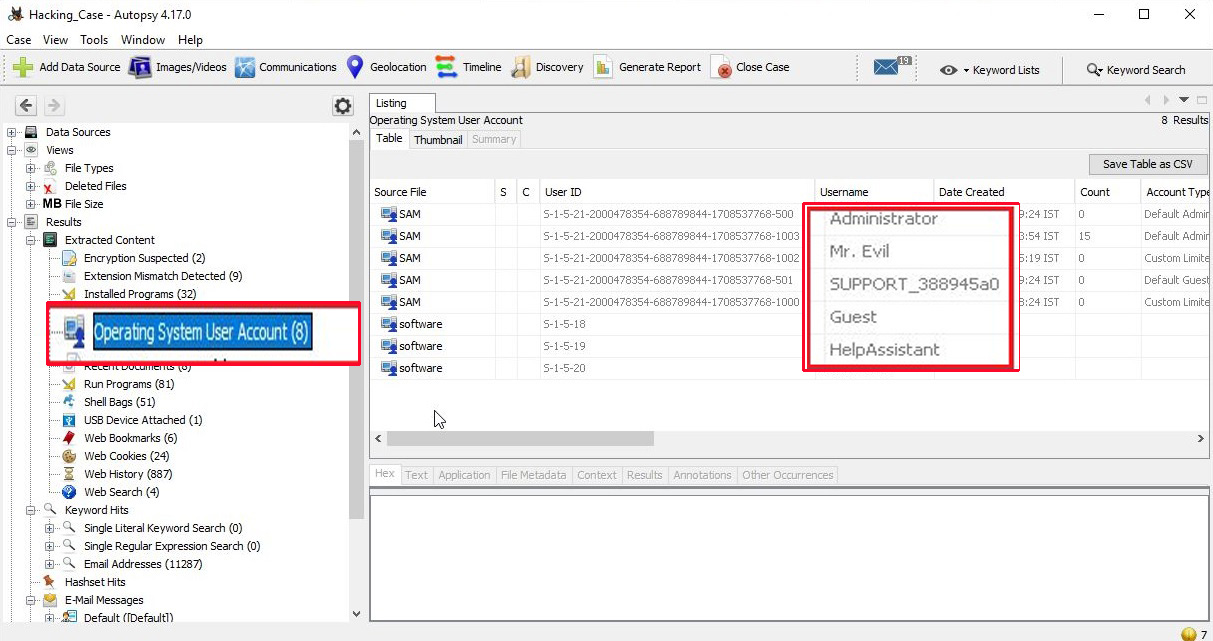
There are total five user accounts on the target computer. They are Administrator, Mr. Evil, SUPPORT_388945a0, Guest and HelpAssistant.

7. What is the account name of the user who mostly uses the computer?

 In the same section as above, the count section shows how many times the user logged in.

The user Mr. Evil has logged in 15 times while the others didn’t even log in once. So, Mr. Evil is the user who mostly uses the computer.

8. Who was the last user to logon to the computer?

The information about the last user to logon to this computer can be found from the Date accessed column of the user account.

The last user to logon to this computer is Mr. Evil.

9. Find 6 installed programs that may be used for hacking?

The programs installed on the computer system can be found out from the “Installed programs” section of the extracted content.

There are total 32 programs installed on the computer and from them, there are seven programs that can be used for hacking. They are Ethereal 0.10.6 v.0.10.6, Network Stumbler 0.4.0, Look@LAN 2.50 Build 29, 123 Write All Stored Passwords, CuteFTP, Cain & Abel v2.5 beta45 and Anonymizer Bar 2.0.

10. Perform a Anti-Virus check. Are there any viruses on the computer?

Malicious files (if any), are found in the “Interesting Items” section of the extracted content.

There is one malware file present on the computer system. It is a zip bomb.

11. When was the last recorded computer shutdown date/time?

The last recorded shutdown date and time can be found out in the following file in Windows. 

“C:\WINDOWS\system32\config\software\Microsoft\WindowNT\CurrentVersion\Prefetcher\ExitTime”

digital forensics

The shutdown date and time is 2004/08/27 10:46:27.

12. List the network cards used by this computer?

The information about the network cards on this computer can be found in the Windows file   “C:\WINDOWS\system32\config\software\Microsoft\WindowNT\CurrentVersion\NetworkCards”

There are two network cards on this system. One is a Compaq WL 110 Wireless LAN PC Card and another is Xircom CardBus Ethernet 100 + Modem 56 (Ethernet Interface).

13. A search for the name of “G=r=e=g S=c=h=a=r=d=t” (The equal signs are just to prevent web crawlers from indexing this name; there are no equal signs in the image files) reveals multiple hits. One of these proves that G=r=e=g S=c=h=a=r=d=t is Mr. Evil and is also the administrator of this computer. What file is it? What software program does this file relate to?

The file that reveals all this information is “C:\Program Files\Look@LAN\irunin.ini”

This file belongs to the program Look@LAN.

14. This time file reports the IP address and MAC address of the computer. What are they?

The IP address of this machine is 192.168.1.111 and the MAC address is 0010a4933e09. The LAN user is Mr. Evil. This confirms that Mr. Evil and Greg Schardt are one and the same.

15. An internet search for vendor name/model of NIC cards by MAC address can be used to find out which network interface was used. In the above answer, the first 3 hex characters of the MAC address report the vendor of the card. Which NIC card was used during the installation and set-up for LOOK@LAN?

Media Access Control (MAC) address or the physical address is a 12 digit hexadecimal number hardcoded to the NIC card. The first 3 hexadecimal characters reveal the vendor of the NIC card. There are many websites which offer this service of knowing the vendor of the NIC card. Pasting the MAC address of the computer reveals the vendor.

The Vendor of this NIC card is XIRCOM.

16. What is the SMTP email address for Mr.Evil?

SMTP or Simple Mail Transfer Protocol is a protocol used to send emails. The SMTP email address if present on the system can be found in “C:\Program Files\Agent\Data\AGENT.INI file“.

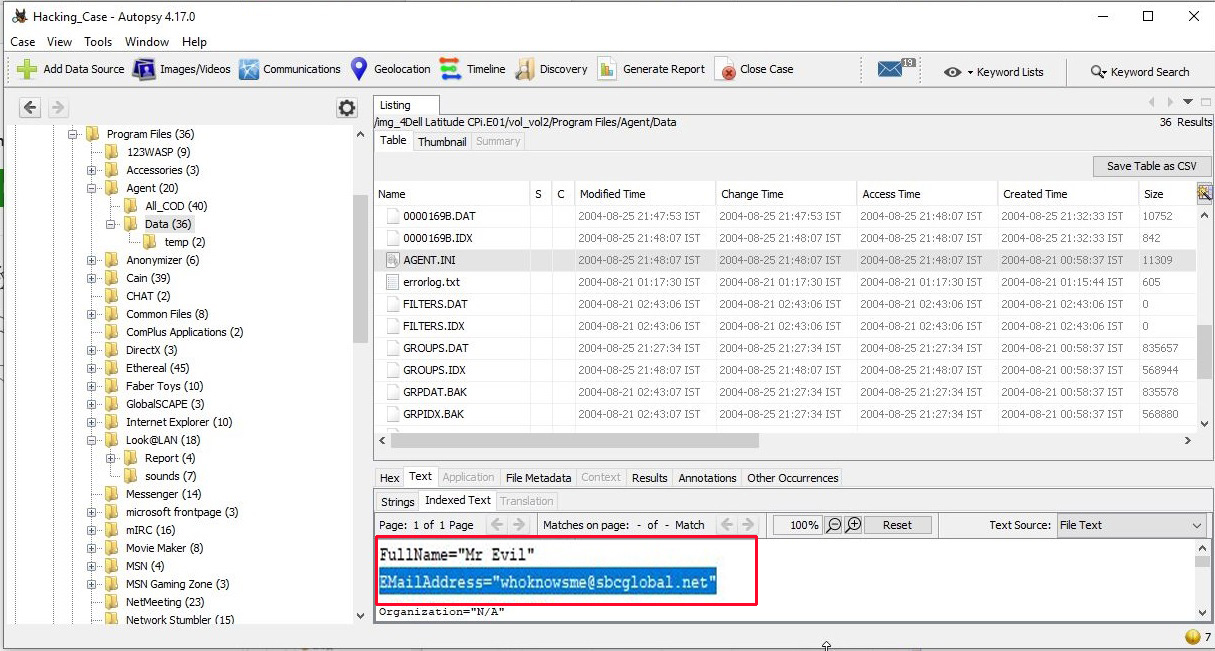
The SMTP email address is “whoknowsme@sbcglobal.net”.

17. What are the NNTP (News Server) settings for Mr.Evil?

This information can be found in the same file as above.

The news server being used is “news.dallas.sbcglobal.net”.

18. What two installed programs show this information?

We searched for local settings of all programs and found the information about this news server in the local settings of Outlook Express.

We found this information in the “Documents and settings” file (and above shown path) of user Mr. Evil.

19. List 5 newsgroups that Mr.Evil has subscribed to?

We can find this information in the same file as above.

User Mr. Evil subscribed to over 23 news groups. The news groups subscribed by the user Mr. Evil are,

  1. Alt.2600.phreakz  2. Alt.2600  3. Alt.2600.cardz    4. Alt.2600codez  5. Alt.2600.crackz   6. Alt.2600.moderated  7. Alt.binaries.hacking.utilities 8. Alt.stupidity.hackers.malicious   9. Free.binaries.hackers.malicious   10. alt.nl.binaries.hack   11. Free.binaries.hacking.talentless.troll_haven   12. alt.hacking 13. free.binaries.hacking.beginner  14. alt.2600.programz   15. Free.binaries.hacking.talentless.troll-haven   16. alt.dss.hack   17. free.binaries.hacking.computers   18. free.binaries.hacking.utilities 19. alt.binaries.hacking.websites   20. alt.binaries.hacking.computers   21. alt.binaries.hacking.websites  22.           alt.binaries.hacking.beginner   23. alt.2600.hackerz

20. A popular IRC (Internet Relay Chat) program called MIRC was installed. What are the user settings that were shown when the user was online in a chat channel?

We can find this information in the .ini file of the installed program MIRC. The path to this program is in “C:\Program Files\mIRC\mirc.ini”

The user settings that were shown when the user was online and in a chat channel are                        
user = Mini Me                        
email = none@of.ya                        
nick = Mr                         
anick = mrevilrulez

21. This IRC program has the capability to log chat sessions. List 3 IRC channels that the user of this computer accessed?

This information can be accessed from C:\Program Files\mIRC\logs file.

The IRC channels that this user accessed are          
Ushells.undernet.log                                             
Elite.hackers.undernet.log          
Mp3xserv.undernet.log                                         
Chataholics.undernet.log          
Cybercafé.undernet.log                                         
M5tar.undernet.log          
Thedarktower.afternet.log                                     
Funny.undernet.log          
Luxshell.undernet.log                                            
Evilfork.efnet.log          
Iso-warez.efnet.log                                                
Houston.undernet.log

22. Ethereal, a popular “sniffing” program that can be used to intercept wired and wireless internet packets was also found to be installed. When TCP packets are collected and re-assembled, the default save directory is that users\My Documents directory. What is the name of the file that contains the intercepted data?

After going through the Documents folder, we found the file that contains the intercepted data. It’s name is “interception”.

23. Viewing the file in a text format reveals much information about who and what was intercepted. What type of wireless computer was the victim (person who had his internet surfing recorded) using?

Viewing the file “interception” in text format revealed that the victim was using Windows CE Pocket PC wireless computer.

24. What websites was the victim accessing?

Even this information can be obtained from the same file “interception” which is a packet capture file. We found two websites the victim was accessing, Mobile.msn.com and MSN Hotmail Email.

25. Yahoo mail, a popular web based email service, saves copies of the email under what file name?

Yahoo mail saves copies of email under the file name “ShowLetter[1].htm” which is in the temporary internet files folder of the user’s “Documents and Settings”.

26. Search for the main user’s web based email address. What is it?

This information can be found out in the same file. The main user’s web based email address is “mreveilrulez@yahoo.com”.

27. How many executable files are in the recycle bin?

The contents in the Recycle bin can be found in the RECYCLER folder.

There are in total four executable files in the Recycle bin.

28. Are these files really deleted?

As most of our readers already know, the files that go to the Recycle Bin are not permanently deleted. They are only deleted temporarily and can be restored easily to their actual location in Windows.

29. How many files are actually reported to be deleted by the file system?

This information can be found out from the INFO2 file.

The actual files deleted are three.

On being asked to find out any evidence that this laptop was used for hacking, we found in our forensic investigation that this laptop belonged to Greg Schardt who also has a online persona “Mr. Evil”. We found his operating system as Windows XP and he was running Ethereal, a packet interception program to capture network traffic. Apart from Ethereal, his system had six other programs which were used for hacking. He was active among many hacking related IRC channels and NEWS groups. Corroborating this evidence with what his associates said about him, we can come to a conclusion that this laptop belonged to Greg Schardt and he was involved in hacking activities. This case can be closed now. Read how to perform forensics on a PDF File.

Posted on

Beginners guide to Evil Twin Attack

Hello aspiring Ethical Hackers. In our previous blogpost, you learnt about WiFi Hacking. In this article, you will learn about a different kind of wireless attack called Evil Twin attack. Have you ever used Public Wi-Fi?

Nowadays Public Wi-Fi is everywhere. It’s in airports, cafés, coworking spaces, malls, railway stations and hotels. We love it because it’s convenient. Attackers love it because it’s vulnerable. Among the most effective and least-detected wireless attacks today is the Evil Twin Attack, a method where a hacker clones a trusted Wi-Fi network to lure users into connecting. Once connected, victims unknowingly hand over passwords, messages, corporate accounts and even entire session cookies. In this blog post, you’ll learn what an Evil Twin is, how the attack works, the tools used and most importantly how to stay safe from this attack.

What is an Evil Twin Attack?

An Evil Twin is a rogue Wi-Fi access point created by an attacker to impersonate a legitimate wireless network. It uses the same network name (SSID), similar configuration and stronger signal strength to trick users into connecting .

To the victim, it looks like this:

  • He visits a cafe, orders a coffee and searches for Wi-Fi.
  • He sees a wireless network with SSID “Café_Free_WiFi.”
  • He connects to it.
  • But unknown to him, he connected to the hacker’s hotspot, not the café’s router.

Now, the hacker can eavesdrop, redirect, modify or steal his data.

How an Evil Twin Attack works?

The Evil Twin attack typically follows a simple lifecycle as shown below.

1. Reconnaissance:

The attacker scans for nearby Wi-Fi networks using tools like:

They identify the target SSID, network channel they are broadcasting on , MAC address and encryption type they are using. For example, let’s say our target SSID is “Shunya”.

2. Creating the Clone:

Next, the attacker sets up a fake access point (Evil Twin) using tools such as:

The Evil Twin broadcasts the same SSID (Shunya) and often uses a stronger signal so the victim’s device automatically prefers it over the original AP.

3. Forcing Disconnections:

Until now, all the new users connectng to original “shunya” may connect to evil twin “shunya”. In some cases, attackers perform deauthentication attacks to disconnect the users already connected to the original “shunya” network. This involves sending deauth packets to connected users, forcing them offline. When victims or his devices try to reconnect, their devices usually choose the Evil Twin because:

  • It has a stronger signal.
  • It appears identical.
  • Devices prefer previously “trusted” SSIDs.

4. Capturing Data:

Once connected to the Evil Twin, the attacker intercepts traffic. Depending on the attacker’s goal, they may:

  • Launch a captive portal phishing page to steal passwords.
  • Collect WPA/WPA2 handshakes for cracking.
  • Perform man-in-the-middle (MITM) interception.
  • Steal session tokens (e.g., Gmail, Facebook).
  • Redirect to malicious downloads or malware sites.

5. Credential Harvesting:

The most common goal is credential theft. Hackers display fake login pages resembling:

  • Office 365
  • Google login
  • Café Wi-Fi login
  • Hotel portals

Once the user enters their password, the attacker immediately receives it. Let’ s see it practically using a tool called Wifiphisher because it’s the simplest one. Our Attacker system is Kali Linux. Wifiphisher can be installed on Kali Linux as shown below.

sudo apt install wifiphisher

Once installation is finished, Wifiphisher can be started using command shown below.

sudo wifiphisher

Wifiphisher starts scanning for nearby wifi networks. Then the tool will prompt you to select the Wi-Fi Access Point of which you want to create an Evil twin as shown below.

For this tutorial as always (OK, most of the time) I will select the Wi-Fi network “Hack_Me_If_You_Can” as my target.

The tool will prompt you the available phishing scenarios available. For this case, OAuth Login Page attack is available.

The OAuth Login Page attack creates a fake login page asking for credentials of the users who want to connect. Note that while creating a fake access point, it is created as an open network unlike the one we are targeting. I select the OAuth Login Page attack and the attack starts. Our Evil Twin is ready.

So just imagine while we are running this Fake access point, some mobile user is looking for available Wi-Fi networks to connect to. He will see two networks with the same name and gets confused. Once he selects our Evil Twin to connect to, he will be prompted with a login page as shown below.

evil twin attack

Here, he is being asked to submit his Facebook credentials of course by dangling the carrot of free internet. The login page is so believable even to me. And if the user falls for the trick (or carrot) and submits his credentials as shown below.

On Kali Linux, the activity is recorded as shown below.

and the credentials are captured successfully.

Why Evil Twin Attacks are so effective?

Evil Twin attacks work because people trust Wi-Fi more than they should. Some reasons include:

Auto-connect Behavior:

Wireless devices automatically connect to familiar wireless network names without verifying legitimacy.

Public Wi-Fi Culture:

Rise of Public Wi-Fi and its usage increases the chances of this attack.

Lack of HTTPS Everywhere:

Although HTTPS is secure and is widely used now, attackers can still:

  • Downgrade HTTPS connections
  • Redirect traffic
  • Harvest non-encrypted requests
  • Steal session cookies.

HTTPS Everywhere is not implemented in all cases.

Low Detection by Victims:

Most people cannot differentiate between a real Access Point and its Evil Twin.

Although any Access Point can be targeted with Evil Twin attack, there are a few locations where they are highly probable. These are,

  • Airport Wi-Fi: Travelers connect without thinking.
  • Corporate Lobbies: Attackers clone the office guest Wi-Fi.
  • Coffee Shops: High foot traffic + distracted users.
  • Hotels: Many floors, inconsistent signal — perfect for rogue AP placement.
  • Tech Conferences: Thousands of users looking for free Wi-Fi.

In several red team assessments, companies discovered that employees connected to rogue Wi-Fi inside their own office buildings — highlighting how devastatingly effective this technique remains.

How to Protect Yourself

1. Avoid Public Wi-Fi for Sensitive of Confidential Tasks:

Never log into banking, email, corporate or other sensitive portals while using a public Wi-Fi.

2. Use a VPN:

A VPN encrypts traffic even over malicious access points like Evil Twins.

3. Turn Off Auto-Connect:

Disable auto-connect for public networks on phones and laptops.

4. Check for HTTPS:

While visiting any website, ensure your browser shows:

  • Lock icon
  • Valid certificate
  • HTTPS

5. Prefer Mobile Hotspots:

Your phone’s hotspot is far safer than unknown public Wi-Fi.

For Companies:

6. Enforce WPA2 Enterprise:

WPA2-Enterprise with certificate-based authentication makes Evil Twin attacks significantly harder.

7. Use a Wireless Intrusion Detection system (WIDS) :

A Wireless Intrusion Detection System (WIDS) detects:

  • Rogue Access Points
  • Deauth attacks
  • SSID spoofing

Evil Twin attacks are simple for attackers to execute but extremely difficult for average users to notice. As long as public Wi-Fi remains popular, this attack vector will continue to be one of the easiest ways for hackers to steal credentials and perform MITM attacks. Security-conscious users and especially cybersecurity professionals must understand how this attack works and adopt strong defensive measures.

Posted on

Process Ghosting Explained

Hello aspiring ethical hackers. In this article, you will learn about Process Ghosting, a technique used by hackers to bypass AV/EDR. As soon as an executable file lands on a Windows system, the endpoint Anti Malware opens the file for analysis. After the analysis is complete, the executable starts a process. The Anti Malware routinely detects malicious executables in this manner.

However, there is a small gap of time between the executable launching and the starting of a process. What if the executable is in delete pending state during this time gap? The Anti Malware cannot scan it as the file is in delete-pending state and its later attempts to scan it also fail as the file is already deleted. However, the malicious payload gets executed without being detected. Process Ghosting is a technique used by hackers when creating malware for Windows Operating Systems to avoid detection by Antivirus software including the Windows Defender. This technique takes advantage of a gap between process creation and when Antivirus software is notified of the process creation. This gap allows the malware developers a chance to alter the executable before it is scanned by the antivirus software.   
Process Ghosting is built on three major techniques (used to evade Antivirus software detection) used by malware developers; They are,

1. Process Herpaderping

In Process herpaderping, an existing file handle is used in order to overwrite executable with decoy PE. Hence it leaves a camouflaged malware on the disk which is different from the actual process which is running.

2. Process Re-Imaging

Process Re-imaging takes advantage of a cache synchronization problem found in the Windows OS kernel. It causes a mismatch between executable file’s path and the reported path for image sections created from the executable. It loads a DLL at a camouflaged malware path, unloads it and then loads it from a new path.

2. Process Doppel-ganging

In this antivirus detection evasion technique, a malware takes advantage of the Windows Transactional NTFS mechanism. The mechanism allows applications to carry file system operations as a single transaction which if rolled back is not visible to the underlying file system.

Now, let us see step by step how to perform process ghosting. In this tutorial, we will use Process Ghosting to make the executable file of mimikatz undetectable by AV /EDR. Mimikatz can be downloaded from here. To perform process ghosting, we will use a tool called KingHamlet tool designed by IkerSaint. It can be downloaded from here.

This is how the process of process ghosting works with any tool.

1. Download the executable file. In this case, mimikatz.exe.
2. Put file to a delete-pending state using NtSetInformationFile(FileDispositionInformation).
3. Write the payload executable to the file. The content isn’t persisted because the file is already delete-pending. The delete-pending state also blocks external file-open attempts.
4. Create an image section for the file.  
5. Close the delete-pending handle, deleting the file.  
6. Create a process using the image section.  
7. Assign process arguments and environment variables.  
8. Create a thread to execute in the process.

As you all know, mimikatz is easily detected by Windows Defender as malware. Let’s see the above steps practically. We fire up the King Hamlet tool in Windows to encrypt the executable file. We use the below commands.

kinghamlet.exe  <payload.exe> <encryption key>

This will create the encrypted payload named mimikatz.exe.khe as show below.

Then we run another command to run the encrypted payload as a legitimate process.

kinghamlet.exe <encrypted.exe.khe> <encrypt key> <targetfile.exe>

This is to make sure the process runs as a legitimate executable.

This will run mimikatz.exe on the system as shown below.

process ghosting

Now, open Task Manager and see what process is running with ID 336.

In this case, we ran mimikatz.exe as Bandicam.exe. So our payload decoys itself as a Windows Problem Reporting process which is a Windows core process in the Windows Operating System. When we run the encrypted executable using King Hamlet tool, the Windows Defender detects no current malicious activity as shown below.

Posted on

ProxyLogon vulnerability for beginners

Hello aspiring ethical hackers. In this article, you will learn about the ProxyLogon, a critical vulnerability that affected the Microsoft Exchange Server.  Back when it was discovered late 2020, there were over 2,50,000 vulnerable Microsoft Exchange Servers.

About the vulnerabilit(ies)y


ProxyLogon is a name given to four zero day vulnerabilities that were detected in the Exchange Server in December 2020. On December 10, 2020, Orange Tsai, security researcher working in DEVCORE, discovered that attackers can combine some vulnerabilities in the Exchange Server to achieve remote code execution on the target and upload a webshell to it. The four vulnerabilities are,

1. CVE-2021-26885:

This is a Server-Side Request Forgery (SSRF) vulnerability in the Exchange Server that allows remote attackers to gain admin access once exploited. This can be exploited by sending a specially crafted web request to a vulnerable Exchange Server. The web request contains an XML SOAP payload directed at the Exchange Web Services (EWS) API endpoint.  This request bypasses authentication using specially crafted cookies. This vulnerability, combined with the knowledge of a victim’s email address, means the attacker can exfiltrate all emails from the target’s Exchange mailbox.

2. CVE-2021-26857:

This is a POST-authentication insecure deserialization vulnerability in the Unified Messaging service of an Exchange Server that allows commands to be run with SYSTEM privileges. The SYSTEM account is used by the operating system and services that run under Windows. A SYSTEM account in Windows has full permissions by default. A hacker can either steal credentials or use the above mentioned vulnerability to execute arbitrary commands on a vulnerable Exchange Server in the security context of SYSTEM.

3. CVE-2021-26858 and CVE-2021-27065

These two vulnerabilities are POST-authentication arbitrary file write vulnerabilities that allow attackers to write files to any path on a vulnerable Exchange Server. A malicious hacker can also exploit the previously mentioned SSRF vulnerability to achieve admin access and then exploit this vulnerability to write web shells to virtual directories (VDirs). These virtual directories are published to the internet by the server’s Internet Information Server (IIS).
IIS is Microsoft’s web server and a dependency that is installed with Exchange Server and provides services for Outlook on the web, previously known as Outlook Web Access (OWA), Outlook Anywhere, ActiveSync, Exchange Web Services, Exchange Control Panel (ECP), the Offline Address Book (OAB) and AutoDiscover.
According to Microsoft, these vulnerabilities were first exploited by HAFNIUM, a Chinese government sponsored APT (Advanced Persistent Threat) but operating out of China. This group is known to install the web shell named China Chopper. As of 12th March 2021, at least 9 other hacker groups exploited these vulnerabilities apart from HAFNIUM.  The versions of Exchange Servers vulnerable to these vulnerabilities are,                   

Exchange Server 2019 < 15.02.0792.010                   
Exchange Server 2019 < 15.02.0721.013                   
Exchange Server 2016 < 15.01.2106.013                   
Exchange Server 2013 < 15.00.1497.012

The exploit is named Proxy Logon as it exploits the proxy architecture and login mechanism in the Exchange Server.

Mitigation and Patches

Microsoft has released a security update on March 2021 to patch these vulnerabilities in Exchange Server versions mentioned above. Applying these patches will fix these vulnerabilities. As soon as Microsoft released these security updates, hacker groups around the world went on a scanning spree to hunt for unpatched Exchange Servers.

As there was a delay in applying patches, Microsoft also released a one-click mitigation tool that fixed these vulnerabilities in Exchange Servers. Microsoft has also noted that this tool named Microsoft Exchange On-Premises Mitigation Tool (EOMT) is helpful for those organizations that don’t have a dedicated IT security staff. This tool also includes the Microsoft Safety Scanner and an URL Rewrite mitigation for CVE-2021-26855. However, it stressed that this tool was not an alternative for applying the released security patches.

Proof Of Concept

Metasploit has some modules related to these vulnerabilities. Let’s have a look at these modules.

The auxiliary/gather/exchange_proxylogon_collector module exploits the CVE-2021-26855 vulnerability and dumps all the contents of the mailboxes.

The exploit/windows/http/exchange_proxylogon_rce module exploits the CVE-2021-26855 vulnerability to bypass authentication and gain admin access and then writes a arbitrary file to the target using CVE-2021-27065 to achieve remote code execution.  All the above mentioned versions are vulnerable by default.

The auxiliary/scanner/http/exchange_proxylogon module checks for the CVE-2021-26855 vulnerability that makes Exchange Servers vulnerable.

Posted on

Understanding Wireless Security : Part 2

Hello aspiring ethical hackers. Welcome to the second part of understanding Wireless security. In Part 1, readers have learnt about the history of WiFi, terminology used in WiFi and WEP security and its weakness. So, let’s continue from there. Responding to the serious weaknesses in WEP encryption security, the Wi-Fi Alliance introduced Wi-Fi Protected Access (WPA) to secure wireless networks. However, the Wi-Fi Alliance intended WPA as an interim measure to take the place of WEP before they bring in Wi-Fi Protected Access 2 (WPA 2).

Wi – Fi Protected Access (WPA)

Also known as Temporal Key Integrity Protocol (TKIP) standard, WPA implements the TKIP encryption method and was introduced in 2003. TKIP introduced three new methods to overcome weaknesses in Wired Equivalent Privacy (WEP) standard.

1. TKIP implements a key mixing function that combines the secret root key with the initialization vector before passing it to the RC4 cipher initialization. WEP on the other hand merely concatenated the initialization vectors to the root key and passed this value to the RC4 cipher.

2. A sequence counter is implemented to protect against replay attacks. Hence, packets received out of order will be rejected by the Access point.

3.TKIP implements a 64-bit Message Integrity Check (MIC) replacing Cyclic Redundancy Check (CRC) used in WEP. This re-initializes the sequence number each time when a new key (Temporal Key) is used.

Wi – Fi Protected Access (WPA) 2

WPA 2 was introduced in 2004 to replace WPA. It implemented the mandatory elements of IEEE 802.11i. 802.11i makes use of the Advanced Encryption Standard (AES) block cipher instead of RC4 stream cipher used by both WEP and WPA. It also uses Counter Mode Cipher Block Chaining Message Authentication Code Protocol (CCMP) encryption protocol. It provides the following security services.

1. Data Confidentiality: It ensures only authorized parties can access the information

2. Authentication: provides proof of genuineness of the user

3. Access control in conjunction with layer management.

Wi – Fi Protected Access 3 (WPA 3)

The Wi-Fi Alliance announced WPA3 as a replacement to WPA2 in 2018. The new standard uses an equivalent 192-bit cryptographic strength in WPA3-Enterprise mode (AES-256 in GCM mode with SHA-384 as HMAC) and still mandates the use of CCMP-128 (AES-128 in CCM mode) as the minimum encryption algorithm in WPA3-Personal mode.
The WPA3 standard also replaces the pre-shared key (PSK) exchange with Simultaneous authentication of Equals (SAE) exchange, a method originally introduced with IEEE 802.11s. This results in a more secure initial key exchange in personal mode and forward secrecy.

WPA – Versions

There are two versions of WPA. They are,

  • A. WPA- Personal  
  • B. WPA – Enterprise

WPA – Personal

Wi-Fi Protected Access (WPA) – Personal is designed for home and small office networks. This version uses Pre- Shared Key (PSK) and hence it is also referred as WPA-PSK (pre-shared key) mode. The network traffic is encrypted using a 128-bit encryption key derived from a 256-bit shared key.  WPA-Personal mode is available on all three WPA versions.

WPA – Enterprise

As its name implies, this is designed for enterprise networks and requires a RADIUS authentication server. This requires a more complicated setup but provides additional security like protection against dictionary attacks on short passwords. Various kinds of the Extensible Authentication Protocol (EAP) are used for authentication. WPA-Enterprise mode is available on all three WPA versions.

Weakness Of WPA/WPA2

1. Pre-shared key WPA and WPA2 remain vulnerable to password cracking attacks if users rely on a weak password or passphrase.  

2. WPA passphrase hashes are seeded from the SSID name and its length; rainbow tables exist for the top 1,000 network SSIDs and a multitude of common passwords, requiring only a quick lookup to speed up cracking WPA-PSK

Brute forcing of simple passwords can be attempted using the Aircrack Suite starting from the four-way authentication handshake exchanged during association or periodic re-authentication. In this article, readers have seen how WPA password was cracked. One important feature of cracking WPA /WPA2 is that we don’t need a lot of traffic to crack it. We just need one client connected to the Wi-Fi Access point. Then we de authenticate it from the Wi-Fi Access point. The client automatically tries to connect to the Wi-Fi access point again.              

It is at this stage, we try to capture the WPA handshake. If you have noticed, while using aircrack, to crack the password, we supplied a dictionary or wordlist. While cracking WEP we didn’t.

So what is a weak password? Any password that is part of a dictionary or wordlist can be called a weak password in WPA. Otherwise, WPA /WPA2 is considered secure. WPA3 replaces cryptographic protocols susceptible to off-line analysis with protocols that require interaction with the infrastructure for each guessed password, supposedly placing temporal limits on the number of guesses. However, design flaws in WPA3 enable attackers to plausibly launch brute-force attacks.

Wi-Fi Protected Setup (WPS)

In year 2007, the Wi-Fi Alliance introduced Wi-Fi Protected Setup (WPS). The main feature of this protocol is to allow home users who have little knowledge about wireless security to set up Wi-Fi Protected Access (For some users, accessing the router dashboard and setting passwords can be too complex). It also makes it easy to add new devices to an existing Wireless network without entering long passphrases. WPS also allows the owner of Wi-Fi privileges to block other users from using their household Wi-Fi. There are two common methods to use WPS.

  • PIN Method.
  • Push Button Method.

PIN Method

Every Wireless Router with WPS enabled has a PIN on the Wi-Fi Router (which is usually printed on a sticker). This PIN must then be entered into any new device that wants to connect to this Wireless network. No need of memorizing any password.

Push Button Method

In this method, the user has to PUSH a WPS button on both the Access point and the new wireless client device. On most devices, this discovery mode turns itself off as soon as a connection is established or after a delay (typically 2 minutes or less), whichever comes first, thereby minimizing its vulnerability.
          Although WPS was introduced to simplify Wi-Fi Connection issues, it suffers from a major vulnerability. Any remote attacker can recover the WPS pin in a few hours by using brute force attack. Once he does this, he can easily recover WPA/WPA2 key also. Nowadays, all recent models of Wireless Routers have WPS enabled by default. It is wise to turn off WPS PIN feature although this is not possible on many routers.
WPS is widely understood to have added insecurity to otherwise secure WPA/WPA2. WPS pin is a 8 digit PIN that is required by clients to connect to the Wireless Router. The Wireless Router instead of checking the entire 8 digit PIN at once, checks the first four digits initially and then checks the last four digits. This makes brute forcing WPS PINs very easy.
This is because there are only 11,000 possible 4 digit pins and once the brute force software gets the first 4 digit pin right, the attacker can move on to cracking the latter 4 digit pin.
Tools Bully and Reaver are first to come to mind when we want to crack WPS pin. However, in our latest tests, both the tools are presenting some problems. You can read our previous articles on Bully and Wifite.

That was a complete guide to understanding wireless security. Hope our readers now have a better understanding of Wireless security. You can read Part 1 of Understanding Wireless security here. Happy hacking.