Posted on

Beginner’s Guide to Heartbleed Vulnerability (Simple & Practical)

Hello, aspiring Ethical Hackers. In this blogpost, you will learn about Heartbleed vulnerability. If you’re learning cybersecurity or ethical hacking, you’ll often hear about famous vulnerabilities that changed how the internet works.

One of the most important and dangerous was the Heartbleed vulnerability. Don’t worry if it sounds complicated. In this beginner-friendly guide, you’ll learn:

  • What Heartbleed is
  • How it works
  • Why it was so serious
  • What should we learn from it

What is the Heartbleed Vulnerability?

The Heartbleed vulnerability was a major security flaw discovered in 2014 in a widely used software called OpenSSL. OpenSSL is responsible for securing internet communications using encryption (like HTTPS). Heartbleed allowed attackers to read sensitive data from a server’s memory.

Why Was Heartbleed So Dangerous?

Heartbleed was not just another bug. It was a critical vulnerability. Here’s why:

It Exposed Sensitive Data:

Using this vulnerability, attackers could steal:

  • Passwords
  • Private keys
  • User data
  • Session cookies

It Left No Trace:

One of the scariest parts:

Attacks didn’t leave logs or evidence.

It Affected Millions of Websites:

Since OpenSSL was widely used, many major websites were vulnerable.

It Could Be Repeated:

Attackers could exploit it multiple times to gather more data.

How Heartbleed Works?

Let’s break HeartBleed down in a way that’s easy to understand.

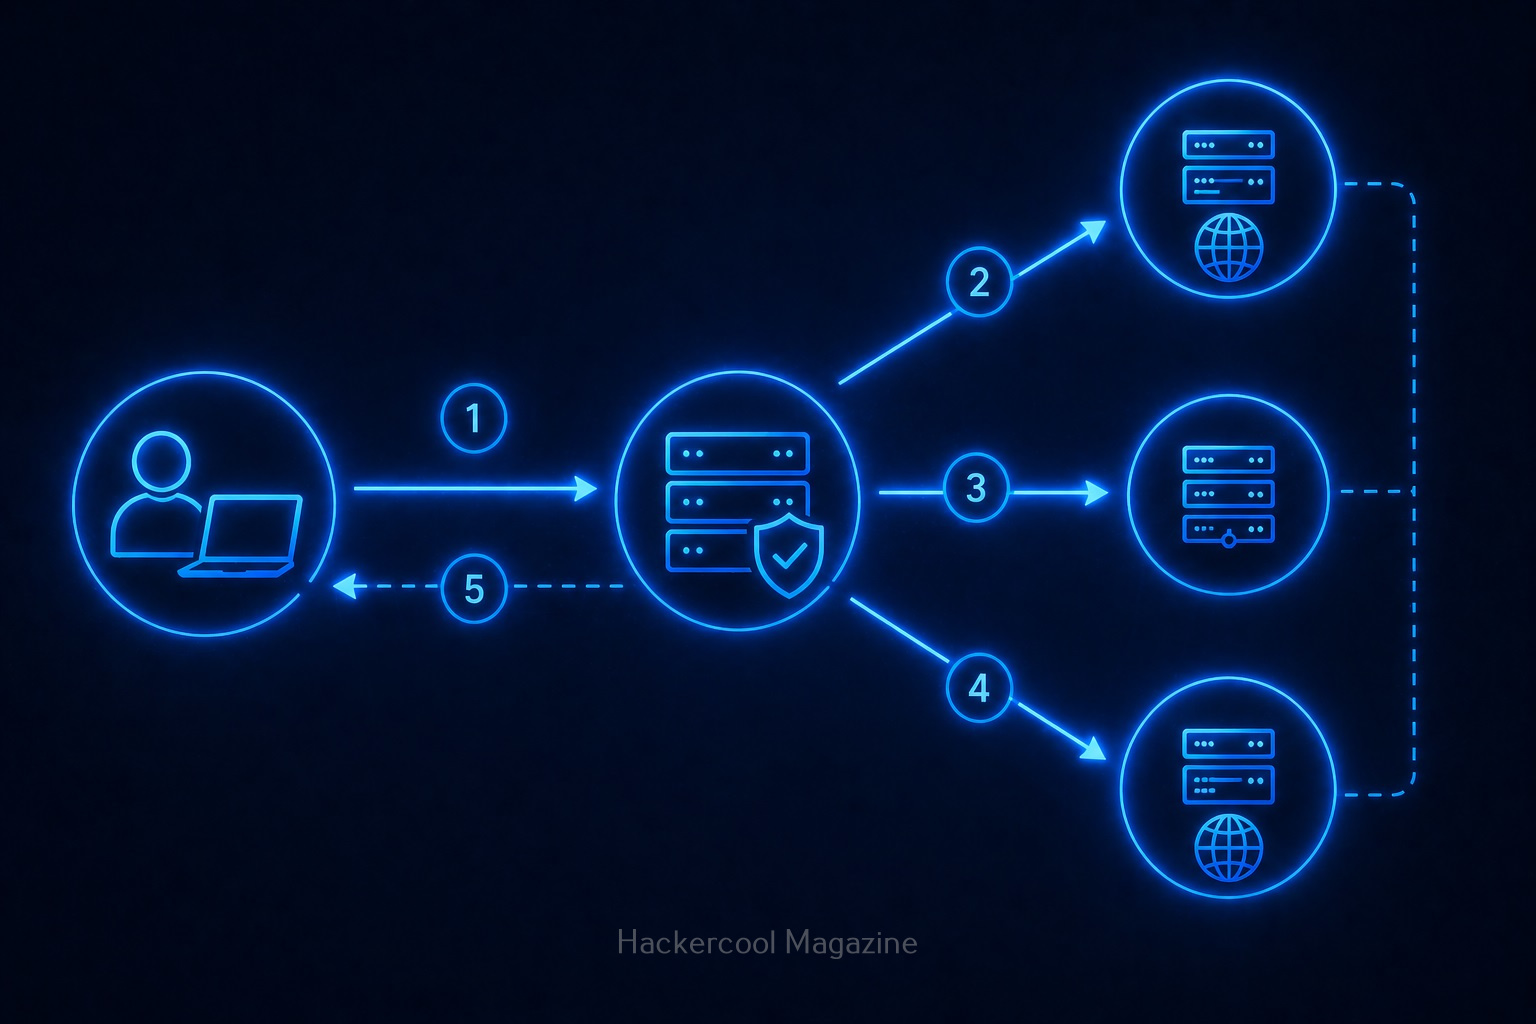
The Idea Behind “Heartbeat”:

OpenSSL has a feature called heartbeat. It works like this:

  • A client sends a small message
  • The server replies with the same message

This is used to check if the connection is still alive.

The Bug:

The problem was that the server trusted the size of the message sent by the client.

So if an attacker:

  • Sent a small message
  • But claimed it was larger

The server would respond with:

  • The message
  • PLUS extra data from memory

The Result:

This extra memory could include:

  • Private keys
  • Passwords
  • Sensitive information

In simple terms, the server accidentally leaked its own secrets.

Practical Walkthrough

Let’s see how this works practically. For demonstrating this, I will be using a Vulhub lab shown in our Hacking Labs to setup a vulnerable instance of Heartbleed as shown below.

Once the vulnerable instance is ready, I start Metasploit & load the Heartbleed module.

I set the IP address and execute the module.

The module is by default set to scan for the vulnerability and it does exactly that. Apart from this action, this module has other actions.

For example, the “dump” action dumps the content of the memory.

When we set the action to “key”, the private key of the SSL server gets dumped as shown below.

Real-World Analogy

If that was too technical for you to understand, let me give you a non -technical example. Imagine this scenario: You ask a shopkeeper:

“Give me this 5-page document.”

But the document only has 1 page.

Due to a mistake, the shopkeeper gives:

  • That 1 page
  • PLUS 4 random pages from confidential files

That’s exactly how Heartbleed worked.

Real-world Exploitation Examples

At the time of public disclosure of this vulnerability, almost 17% of total web servers were found vulnerable to heartbleed, including those belonging to Google, Yahoo, DropBox, Facebook etc. Here are some Real-world explaoitation examples of the heartbleed bug.

Mumsnet:

Mumsnet is a parenting site in United Kingdom. Cyber thieves have obtained passwords and personal messages from Mumsnet by exploiting heatbleed in 2014. Mumsnet has over 1.5 million registered members and there is no idea how many details got hacked.

Canada Revenue Agency:

Social Insurance members of over 900 taxpayers were stolen from Canada Revenue Agency by exploiting heartbleed bug within a 6 hours period on 8 April 2014.

What Systems Were Affected?

Any system using vulnerable versions of OpenSSL are vulnerable to this bug. This included:

  • Websites
  • Email servers
  • VPNs
  • APIs

That’s why the impact was massive.

What Data Could Be Stolen?

Heartbleed exposed:

  • Private encryption keys
  • User passwords
  • Session cookies
  • Emails
  • Confidential data

With private keys, attackers could:

  • Impersonate servers
  • Decrypt secure communications

Why It Was Hard to Detect?

Unlike many attacks, Heartbleed didn’t:

  • Modify files
  • Leave logs
  • Trigger alerts

This made it:

  • Silent
  • Stealthy
  • Extremely dangerous

How Was It Fixed?

Once discovered, developers:

1. Released Patches:

Updated versions of OpenSSL fixed the bug.

2. Replaced Keys:

Organizations had to:

  • Generate new SSL certificates
  • Revoke old ones

3. Forced Password Resets:

Users were advised to:

  • Change passwords

Fixing Heartbleed required major global effort.

Lessons from Heartbleed (Very Important)

Heartbleed taught the cybersecurity world valuable lessons. They are

1. Even Trusted Software Can be vulnerable:

OpenSSL was widely trusted but still had a critical flaw.

2. Code Auditing is Essential:

Small bugs can cause huge damage.

3. Patch Quickly:

Delays increase risk.

4. Encryption Alone is Not Enough:

If keys are exposed, encryption fails.

5. Security is Continuous:

You must:

  • Monitor
  • Update
  • Improve

Can Beginners Practice Heartbleed?

Yes, but safely.

Use Lab Environments:

Practice on:

  • Vulnerable virtual machines
  • Training platforms

Never Test on Live Systems:

Without permission, this is illegal. Always stay ethical.

Common Beginner Mistakes

Here are some common mistakes beginners make about HeartBleed vulnerability.

Thinking it’s “Just an Old Bug”:

Even though being an old vulnerability, Heartbleed still teaches important concepts.

Ignoring Memory-Based Attacks:

Not all attacks target websites directly.

Skipping Fundamentals:

Understanding how protocols work is key.

Why You Should Learn About Heartbleed?

Even though it’s old, it helps you understand:

  • How vulnerabilities work
  • Why validation is important
  • How attackers think

It builds your security mindset.

Conclusion

The Heartbleed vulnerability is one of the most important lessons in cybersecurity history. It shows that a small mistake in code can expose millions of systems.

Posted on

DNS Footprinting for Beginners (Simple & Practical Guide)

Hello, aspiring Ethical Hackers. In our previous blogpost on Footprinting guide, you learnt about various techniques of Footprinting. In this blogpost, you will learn about DNS Footprinting which is one of the techniques of Footprinting in detail. If you’re starting your journey in ethical hacking, one of the most important skills to learn is DNS footprinting.

It may sound technical at first but the concept is actually simple. DNS footprinting is about understanding how a domain connects to real systems on the internet. In this beginner-friendly article, you’ll learn:

  • What DNS footprinting is
  • Why it matters
  • How to do it step by step
  • What to look for as a beginner

What is DNS Footprinting?

To understand DNS footprinting, you need to first understand what DNS is. DNS stands for Domain Name System. It acts like the phonebook of the internet. When you type a name of the website (like example.com), DNS translates it into an IP address that computers understand.

DNS footprinting means collecting information about a domain using DNS records.

Why is DNS Footprinting Important?

DNS footprinting reveals a lot about a target’s infrastructure. It helps you:

1. Understand System Structure:

You can see how a website is set up.

2. Discover Hidden Assets:

Discover subdomains like:

  • dev.example.com
  • admin.example.com

3. Identify Services:

DNS can reveal information about:

  • Email servers
  • Hosting providers

4. Map Attack Surface:

You get a clearer picture of what can be tested.

Hence, DNS footprinting is a key part of reconnaissance (information gathering).

Key DNS Records Explained for Beginners

When you perform DNS footprinting, you’ll encounter different types of records. Let’s simplify them:

1. A Record:

This record maps a domain to an IP address. For Example,

example.com --> 192.168.x.x

2. MX Record:

This record specifies mail servers used for email delivery.

3. NS Record:

This record shows name servers. Also indicates who manages DNS.

4. CNAME Record:

Alias for another domain. Helps redirect traffic.

5. TXT Record:

Stores text information related to the domain. Often used for:

  • Verification
  • Security policies

Understanding these records is important while performing DNS Footprinting.

How to Perform DNS Footprinting (Step-by-Step)

Let’s break down how to perform DNS Footprinting into simple steps.

STEP 1: Choose a Target Domain:

Start with:

  • Your own website
  • Or Practice domains

Always stay within legal boundaries.

STEP 2; Query DNS Records:

You can use:

  • Online DNS lookup tools
  • Command line tools

STEP 3; Analyze A Records:

Find:

  • IP addresses
  • Hosting information

STEP 4; Check MX Records:

Identify:

  • Email infrastructure

STEP 5; Look at NS Records:

Understand:

  • DNS providers

STEP 6; Discover Subdomains:

Find additional assets connected to the domain.

STEP 7; Document everything:

Note down:

  • Records
  • Findings
  • Patterns

This builds your analysis skills.

Example: What You Might Discover

With DNS footprinting, you might find:

  • Multiple subdomains
  • External email servers
  • Cloud hosting providers

This will help you to understand:

  • System architecture
  • Potential weak points

Tools for DNS Footprinting

Start with simple tools:

  • DNS lookup tools like nslookup and dig
  • Subdomain discovery tools
  • Command-line utilities

Here’s an example command with nslookup

nslookup example.com

Here’s another example with dig.

dig example.com

These help you to query DNS records quickly.

Common Mistakes Beginners Make

Here are some common mistakes beginners make during DNS Footprinting. Avoid making these.

Ignoring DNS Records:

Many beginners skip this step entirely.

Not Understanding Output:

Focus on meaning, not just data.

Collecting Too Much Data:

Filter the output to collect what’s useful.

Not connecting the collected Information:

Combine DNS with:

  • WHOIS
  • Subdomain discovery

Tips To Improve Your DNS Footprinting Skills

1. Be curious:

Ask yourself:

  • What else is connected?

2. Connect the Dots:

Combine multiple sources of information.

3. Take Notes:

Track everything you find.

4. Practice Regularly:

Try different domains.

Legal & Ethical Reminder

DNS footprinting is generally safe but you must stay ethical.

Never:

  • Use information for illegal purposes
  • Target systems without permission

Always:

  • Practice responsibly
  • Use labs or your own domains

Conclusion

DNS footprinting is a fundamental skill in ethical hacking. It teaches you how to:

  • Understand infrastructure
  • Gather intelligence
  • Think like a security professional

And the best part is that you can start learning it today with minimal tools.

Posted on

Google Dorking (Google Hacking) for beginners (Simple & Practical Guide)

Hello, aspiring Ethical Hackers. In our previous blogpost on Footprinting, you learnt various techniques by which hackers gather information about their targets. In this blogpost, you will learn about Google Dorking or Google Hacking, one of the techniques by which real-world hackers gather information.

Everyone knows what Google is. It is the most popular Search Engine that provides answers for anything we want, almost anything. Just a click away. However, if you think Google is just for searching websites, you’re only scratching the surface. For ethical hackers, Google is a powerful information-gathering tool—so powerful that it can reveal hidden data, login pages and even sensitive files. This technique is called Google Hacking (also known as Google Dorking).

Don’t worry—it’s not as complicated as it sounds. In this beginner-friendly guide, you’ll learn what Google hacking is, how it works and how to start using it safely and effectively.

What Is Google Dorking (Google Hacking)?

Google Dorking is the process of using advanced search techniques to find information that is not easily visible through normal searches. Instead of typing simple keywords, you use special search operators to filter results.

In simple terms:
You tell Google exactly what to find.

Why is Google Dorking Important?

Google indexes a huge portion of the internet. Sometimes, websites accidentally expose:

  • Login pages
  • Documents
  • Backup files
  • Sensitive information

Google dorking helps you:

  • Discover hidden data
  • Understand a target better
  • Find potential weaknesses

It’s a key skill in footprinting (reconnaissance).

Basic Google Search Operators

Let’s learn about some of the basic Google dork operators.

1. site:

This operator helps you to search for something within a specific website.

For example:

site: example.com

query finds all pages indexed from the domain example.com.

2. intitle:

Uisng this you can search for keywords in page titles.

For example:

intitle: "login"

This query is useful for finding login pages.

3. allintitle:

Works similarly to “intitle” but will show pages containing all the multiple keywords specified.

For example:

allintitle: "Best Project tools"

Shows the pages having all the words given above present.

4. inurl:

Search within URLs.

For example:

inurl:admin

query finds pages with “admin” in the URL.

5. allinurl:

Displays pages containing all the specified keywords in the URL.

For example:

allinurl:login.php

This query displays all the pages having both words in the URL.

6. filetype:

This query is used to search for specific file types.

For example:

filetype:pdf

query can reveal:

  • Documents
  • Reports
  • Public files
  • and all other files in PDF format.

7. intext:

This query is used to search for a text within page content.

For example:

intext:"confidential"

query reveals pages containing text “confidential”.

8. allintext:

This query is used to search for web pages containing all of the specified words within the body text of the page.

For example:

allintext:"About us"

This query will display all the webpages containing the above two keywords in the body text.

9. cache:

This query displays the last cached version of a website stored by Google.

For example:

cache:example.com

This query displays the last cached version of the website example.com

Google Dorking examples for beginners

Here are some real-world examples of Google hacking for beginners.

1. Find all pages of a website:

site:example.com

This query helps you to map the entire website.

2. Find Login page of a specific website:

site:example.com intitle:"login"

3. Find Documents:

site:example.com filetype:pdf

Helps find you all PDF documents (reports, internal documents) on the website.

4. Find Admin Panels:

inurl:admin

Shows pages that may be restricted.

How Google Hacking Fits in Ethical Hacking

Google hacking is part of Footprinting (Reconnaissance phase). Before testing a system, you need to gather information. Google helps you:

  • Discover assets
  • Identify exposed content
  • Understand structure

It’s often the first step in any security assessment.

Tips for Better Google Hacking

To get better results with Google dorking, you should follow these tips.

1. Combine Operators:

For example:

site:example.com inurl:login filetype:php

This narrows results significantly.

2. Think Like a Search Engine:

Ask yourself:

  • What words would appear on this page?
  • How would it be structured?

3. Experiment:

Try different combinations and observe results.

4. Take Notes:

Track:

  • Useful queries
  • Interesting findings

Common Beginner Mistakes

Beginners often make these mistakes while using Google Dorking. Avoid these.

Using only Basic Searches:

Normal searches won’t reveal hidden data.

Not Understanding Results:

Don’t just search. Analyze what you find.

Trying To Do Too Much:

Start simple. Master basics first.

Ignoring Ethics:

This is the biggest mistake.

Real-world Use Cases

Google dorking can help you:

  • Discover exposed files
  • Identify login portals
  • Find outdated pages
  • Understand system structure

No doubt security professionals use this technique daily.

Beginner Practice Plan

Here’s a simple plan for you to practice Google dorking.

Day 1:

Learn basic operators

Day 2:

Practice on safe websites

Day 3:

Combine operators

Day 4:

Analyze results

Day 5:

Repeat with new queries

Within a week, you’ll see improvement.

Conclusion

Google hacking is one of the easiest ways to start learning ethical hacking. You know why? Because

  • Advanced tools
  • Complex setups

Just your brain and a search bar.

Posted on

OSI Model for beginners (Simple & Practical Guide)

If you’re starting your journey in networking or ethical hacking, one concept you’ll hear again and again is the OSI Model. At first, it might look complicated. Seven layers? Strange names? Technical terms? Don’t worry. In this guide, you’ll learn the OSI Model in a simple, beginner-friendly way, without any confusion.

What is the OSI Model?

The OSI Model stands for Open Systems Interconnection Model. It is a framework that explains how data travels from one computer to another over a network. Instead of thinking of communication as one big process, the OSI model breaks it into 7 layers.

Each layer has a specific role. Think of it like sending a package:

  • You pack it
  • Label it
  • Ship it
  • Deliver it

Each step is handled separately.

Why is the OSI Model Important?

If you are learning ethical hacking, You might wonder as to why you should learn about OSI Model. Here’s why:

1. It Helps You Understand Networks:

When you learn OSI model, you’ll know how data moves step by step from one device to another device.

2. It Makes Troubleshooting Easier:

You can easily identify where a problem is occurring in a network.

3. Essential for Ethical Hacking:

Many attacks target specific OSI layers. So, this is important for ethical hackers.

4. Foundation for Cybersecurity:

You may not like this but without this, advanced topics in cybersecurity won’t make sense.

The 7 Layers of the OSI Model

The seven layers of the OSI Model, from top to bottom are the Application Layer, Presentation Layer, Session Layer, Transport Layer, Network Layer, Data Link Layer and Physical Layer. Let’s break them down in the simplest way possible.

7. Application Layer (Top Layer):

The Application Layer is the top most layer of the OSI Model and is responsible for providing a user interface for network applications. Simply put, this is the layer users interact with. For example,

  • Web browsers
  • Email apps

It allows applications to communicate with the network. The Application Layer performs several key functions, including:

  • Network Services: It provides network services to applications, including file transfer, email and other network-based applications.
  • User Interface: It provides a user interface for network applications, allowing the user to interact with the network.
  • Network Resource Access: It provides a means for applications to access network resources, such as databases or file servers.

Some protocols in Application Layer are,

  • HTTP (Hypertext Transfer Protocol): This is the primary protocol used for web browsing and web application access.
  • FTP (File Transfer Protocol): This is a protocol for transferring files between systems.
  • SMTP (Simple Mail Transfer Protocol): This is a protocol used for sending mails.

6. Presentation Layer:

The Presentation Layer is responsible for providing a common format for data exchange between applications. This layer handles:

Simply put, it makes sure data is readable. Some of the Presentation Layer protocols are:

  • MIME (Multipurpose Internet Mail Extensions): This is a protocol for the representation of multimedia content.
  • SSL (Secure Sockets Layer) and TLS (Transport Layer Security): These are protocols for securing data transmission over the internet.

5. Session Layer:

The Session Layer is responsible for establishing, managing and terminating communication sessions between applications. A session is a continuous exchange of information between two applications and can involve multiple data transfers.

It provides a framework for applications to communicate with each other. It coordinates the communication process between the applications and ensures that the data is transmitted in an orderly and synchronized manner. The Session Layer also ensures that the communication between the applications is maintained until it is terminated by either the sender or the receiver. In simple words, it starts, maintains and ends sessions.

Some of the Session Layer protocols are,

  • NFS (Network File System): This is a popular protocol for sharing files over a network.
  • RDP (Remote Desktop Protocol): This is a protocol for remote access to a desktop.
  • SSH (Secure Shell): This is a protocol for secure remote access to a computer.

4. Transport Layer:

The Transport Layer of the OSI (Open Systems Interconnection) Model is responsible for reliable data transfer between end systems. It is the layer that divides entire data being sent into manageable segments and ensures that each segment reaches its destination without any errors or lost data.

These segments are then transmitted and reassembled at the destination end. This layer also provides flow control, which prevents the sender from overwhelming the receiver and error control which detects and corrects any errors that may occur during transmission. In simple words, this is where data delivery is controlled.

Key functions:

  • Error checking
  • Data flow control

There are two main types of protocols in Transport Layer. They are,

  • TCP (Transmission Control Protocol): This is a reliable, connection-oriented protocol which ensures that data is transmitted accurately and completely.
  • UDP (User Datagram Protocol): This is an unreliable, connectionless protocol that does not guarantee the delivery or accuracy of data. It is used for applications that do not require reliable data transmission, such as video streaming.

3. Network Layer:

The Network Layer is deals with the routing of data between computer networks. It provides the means for transmitting data from one network to another and ensures that data is delivered to its intended destination. It also ensures that data is delivered to its intended destination by routing it through the network in an efficient and effective manner.

This layer handles:

  • Routing
  • IP addresses

It decides the best path data should take to reach its destination. Some examples of Network Layer protocols include IP (Internet Protocol) and ICMP (Internet Control Message Protocol).

2. Data-Link Layer:

The Data Link Layer is concerned with the delivery of data frames between computers belonging to a same network. It provides error detection and correction functions and defines the format of the data frames that are transmitted between devices in the same network.

The Data Link Layer is responsible for several key functions in a network, including:

  • Defining the format of the data frames that are transmitted between devices
  • Error detection and correction
  • Flow control and media access control
  • Media-independent transmission of data frames

This layer works with:

  • MAC addresses
  • Physical addressing

Simply put, it ensures data moves between devices on the same network.

1. Physical Layer:

The Physical Layer is the bottom most layer of the OSI Model. It ensures physical transmission of data between computers. It defines the electrical, mechanical and functional specifications for the physical connection between devices.

This is the hardware layer and includes:

  • Cables
  • Signals
  • Bits

It physically transmits data.

How Data Travels (Simple Example)

Let’s see a simple example of OSI model in action when data travels. Let’s say you open a webiste in your favorite browser. Here’s what happens at each layer.

Step 1: Application Layer

You open your browser and visit a specific website.

Step 2: Presentation Layer

Data of your requested website is formatted and encrypted.

Step 3: Session Layer

A Connection is established.

Step 4: Transport Layer

Data is broken into small packets.

Step 5: Network Layer

These data packets are routed using IP protocol.

Step 6: Data Link Layer

Once packets reach your network, MAC addresses are used for delivering the data to your device.

Step 7: Physical Layer

Data is sent as electrical signals.

The same process happens in reverse on the receiving side.

Easiest Way to Remember OSI Layers

You can easily remember all OSI Layers from top to bottom by making the sentence given below with the first letter of all layers.

All People Seem To Need Data Processing

  • Application
  • Presentation
  • Session
  • Transport
  • Network
  • Data Link
  • Physical

OSI Model in Ethical Hacking

Understanding OSI model helps you see where attacks actually happen in hacking. For example,

Application Layer Attacks:

Web attacks like SQL Injection and XSS attacks.

Presentation Layer Attacks:

SSL Striping and other decryption attacks.

Session Layer Attacks:

Session Hijacking and other Man in the Middle (MiTM) attacks.

Transport Layer Attacks:

DoS attacks

Network Layer Attacks:

IP Spoofing

Data Link Layer Attacks:

MAC spoofing, MAC flooding and EVil Twin in Wireless.

This helps ethical hackers:

  • Identify weaknesses
  • Choose attack methods
  • and Defend systems

OSI Model in Real-world

In real-world networking, the TCP/IP model is more commonly used. But OSI is still the best way for beginners to learn concepts clearly.

Common Mistakes Beginners Make While Learning OSI Model

Here are some common mistakes beginners make while learning about OSI model.

1. Trying to memorize Without Undertanding:

Focus on what each layer does, not just their names.

2. Skipping the OSI Model altogether:

I did this mistake in my beginner days because I thought OSI model was boring. Don’t make the same mistake. This creates confusion later.

3. Overcomplicatng it:

Keep it simple. You don’t need to know deep technical details yet.

Tips to Learn Faster

Here are some tips for you to master OSI model faster.

1. Visualize it:

Imagine data moving through layers like a pipeline.

2. Relate to Real Life:

Think of sending a parcel or message.

3. Practice explaining:

If you can explain it simply, that means you understood it.

4. Revise Regularly:

Repetition helps retention.

Conclusion

The OSI Model is not just theory. It’s the foundation of networking and ethical hacking. Once you understand it:

  • Networks become easier to understand
  • Troubleshooting becomes logical
  • Cybersecurity concepts make a LOT MORE sense

Posted on

WHOIS Footprinting for beginners (Simple & Practical Guide)

Hello aspiring Ethical Hackers. In our previous blogpost, footprinting guide, you lave learnt what is footprinting and various types of footprinting techniques. In this article, you will learn in detail about WHOIS footprinting.

If you’re starting your journey in ethical hacking, one of the easiest and most powerful skills you can learn is WHOIS footprinting. It’s simple, beginner-friendly and gives you valuable information about a target without doing anything risky. In my opinion, Whois footprinting is the first method of footprinting that should be used while starting information gathering.

In this guide, you’ll learn:

  • What WHOIS footprinting is
  • Why it’s important
  • How to do it step by step
  • What to look for as a beginner

What is WHOIS?

WHOIS is actually a protocol running on port 43. When you or any organization register a domain (eg: example.com), a record is created. This record is known as WHOIS record and is created by an organization called Internet Corporation for Assigned Names and Numbers (ICANN) which regulates domain name registration and ownership. WHOIS records are maintained by Regional Internet Registries (RIR’s). At present, there are five RIR’s allocated to specific regions.

  1. American Registry for Internet Numbers (ARIN)
  2. African Network Information Center (AFRINIC)
  3. Asia Pacific Network Information Center (APNIC)
  4. Reseaux IP Europeens Network Coordination Centre (RIPE)
  5. Latin American and Caribbean Network Information Center (LACNIC)

What is WHOIS Footprinting?

WHOIS footprinting is the process of collecting information about a domain name using WHOIS databases. As already explained, every website (like example.com) is registered somewhere and that registration contains details.

Using WHOIS, you can find:

  • Domain owner (although sometimes hidden)
  • Registration and expiry dates
  • Name servers
  • Registrar details

In simple terms: WHOIS tells you who owns a website and how it’s set up.

What information does WHOIS reveal?

When you run a WHOIS lookup, you’ll see a lot of data. Let’s simplify the important parts for you.

1. Creation Date:

Shows when the domain was registered. This reveals if the domain is older or new. This is important because older domains may have:

  • Legacy systems
  • Outdated security

2. Expiry Date:

This tells you when the domain will expire. Expired domains can sometimes be,

  • Re-registered
  • Misused

3. Registrar:

This gives you information about the company where the domain is registered. Examples of some domain registrars are GoDaddy, Namecheap etc.

4. Name Servers:

Nameservers are specialized servers within the DNS that act as the internet’s phonebook, translating human-readable domain names (e.g., example.com) into numerical IP addresses (e.g., 192.0.2.1). These tell you where DNS is managed. This information is Important for understanding:

  • Hosting setup
  • Infrastructure

5. Registrant Information:

This gives you information about the person or entity who registered the domain. It may include:

  • Name
  • Email
  • Organization

However, in most cases it is hidden due to privacy protection.

How to Perform WHOIS Footprinting (Step-by-Step)?

Let’s look at step-by-step process of performing WHOIS Footprinting.

Step 1: Choose a Target Domain

Start with something simple like your own website or a test domain. Remember, always stay within legal boundaries.

Step 2: Use a WHOIS Lookup Tool

Do a simple Google search for WHOIS Lookup tools. Not only there are many tools for this but also there are many online services providing this service.

Step 3: Enter the Domain Name

Once you select a tool or service, enter the domain name. For example,

example.com
  • example.com

Then, run the lookup.

Step 4: Analyze the Results

The lookup runs and displays the results. After the results are out, analyze the results. Focus on:

  • Registration dates
  • Name servers
  • Registrar

Don’t try to understand everything at once.

Step 5: Take Notes

It is a very good practice to take notes in your journey of ethical hacking. Write down:

  • Interesting findings
  • Patterns

This helps you build investigation skills.

Let’s see a simple example of what you might discover after performing WHOIS lookup. From a simple WHOIS lookup of a domain, you might find:

  • The domain is 10 years old
  • It uses specific name servers
  • The registrar is a known provider

What does it tell you? This tells you that infrastructure might follow certain patterns. The system may be stable but possibly outdated.

How to Use WHOIS Effectively?

Here’s how you can use WHOIS more effectively.

1. Look for Patterns:

Always Check for:

  • Similar domains
  • Same name servers

2. Combine with Other Techniques:

WHOIS footprinting in itself will not give you complete information about the target domain. It is best to combine WHOIS with:

3. Practice Regularly:

Try WHOIS on:

  • Different websites
  • Practice labs

Tools for WHOIS Footprinting

You will not need complex tools to perform WHOIS Lookup as a beginner. You can start with:

  • Online WHOIS lookup websites like whois.com, who.is.com etc
  • Linux whois command
  • Sysinternals Whois command utility for Windows.

Why is WHOIS Important in Ethical Hacking?

With all said and done how to perform WHOIS footprinting, let’s see the importance of this in ethical hacking. WHOIS is often the first step in reconnaissance (footprinting). Here’s why it matters:

1. Understand the Target:

You get basic information about:

  • Your target organization
  • Their Domain structure

2. Discover Infrastructure Clues:

WHOIS can reveal information about:

  • Hosting providers
  • Name servers

This information helps you map the system.

3. Find Related Assets:

In some cases, it helps you to identify other domains owned by the same organization.

4. Detect Weak Points:

In some cases, it can reveal weak points in an organization. Old domains or misconfigured records can indicate poor security practices.

Common Mistakes Beginners Make

Many beginners make some common miastakes while performing this footprinting. Please avoid these mistakes.

1. Expecting Too Much Data:

If fotprinting is the first stage of ethical hacking, then WHOIS footprinting is the first stage of footprinting itself. So, may be due to excitement or something else, beginners expect too much data to be revealed. But this may not be the case in real-world. Many domains use privacy protection. Don’t worry, this is normal.

2. Ignoring Small Details:

In footprinting, even minute details matter. Even simple data like name servers can be useful.

3. Not connecting collected information:

WHOIS is just one piece of the puzzle. Combine it with:

  • DNS analysis
  • Subdomain discovery

4. Skipping Documentation:

Always write down your findings.

Legal & Ethical Reminder

WHOIS footprinting is generally safe but you must still follow some rules.

Never and NEVER:

  • Use information obtained through WHOIS for illegal purposes
  • Target systems without permission

Always:

  • Practice ethically
  • Stay within legal limits

Conclusion

WHOIS footprinting is one of the simplest and most powerful starting points in ethical hacking. It teaches you how to:

  • Gather information
  • Analyze systems
  • Think like an investigator

And the best part? You can start learning it today with zero risk.