If you’re learning ethical hacking, penetration testing or cybersecurity, you’ll eventually come across the term OS fingerprinting. One of the first goals during network reconnaissance is understanding what systems are connected to a network. Knowing whether a device is running Windows, Linux or another operating system can help security professionals better understand the environment they are assessing.
This process of identifying an operating system is known as OS fingerprinting.
Think of it like being a detective. You may not see the operating system directly, but by observing how a device behaves and responds to network communication, you can often make an educated guess about what it’s running.
In this beginner-friendly guide, you’ll learn:
- What OS fingerprinting is
- Why it’s important
- How it works
- Types of OS fingerprinting
- Information it can reveal
- Common beginner mistakes
- Safe ways to practice
New to Ethical Hacking?
Start your journey with The Beginner Ethical Hacker Starter Kit (2026 Edition).
Inside the free guide, you’ll learn:.
- Ethical hacking fundamentals
- Beginner cybersecurity roadmap
- Essential hacking tools
- Common vulnerabilities explained

What is OS Fingerprinting?
OS fingerprinting is the process of identifying the operating system running on a device by analyzing its network behavior and characteristics. The goal is to determine whether a system is running:
- Windows
- Linux
- Unix
- macOS
- Network appliance software
- Embedded operating systems
OS fingerprinting helps build a technical profile of a system without directly logging into it.
In simple terms:
OS fingerprinting is the process of identifying a device’s operating system based on how it responds to network communication.
Why is OS Fingerprinting Important?
Understanding operating systems provides valuable context during security assessments.
Better Understanding of the Environment:
Knowing the operating system helps security professionals understand what type of system they are dealing with.
Improved Asset Identification:
Organizations often have many different devices connected to their networks. OS fingerprinting helps identify them.
Security Assessment Preparation:
Different operating systems may have different security considerations. Understanding the platform helps guide further analysis.
Network Visibility:
OS fingerprinting contributes to building a complete picture of a network environment.
If a hacker or pen tester can find out the operating system of the target system, he/she can know which vulnerabilities to exploit or which payloads to design to gain access to the target system (For example, Windows need EXE payloads whereas Linux systems require .sh payloads).

Why Operating Systems Matter?
Every operating system has unique characteristics. Examples include:
- Network behavior
- Default configurations
- Service implementations
- Communication patterns
These differences create clues that can be observed remotely. Just like handwriting can help identify a person, network behavior can help identify an operating system.
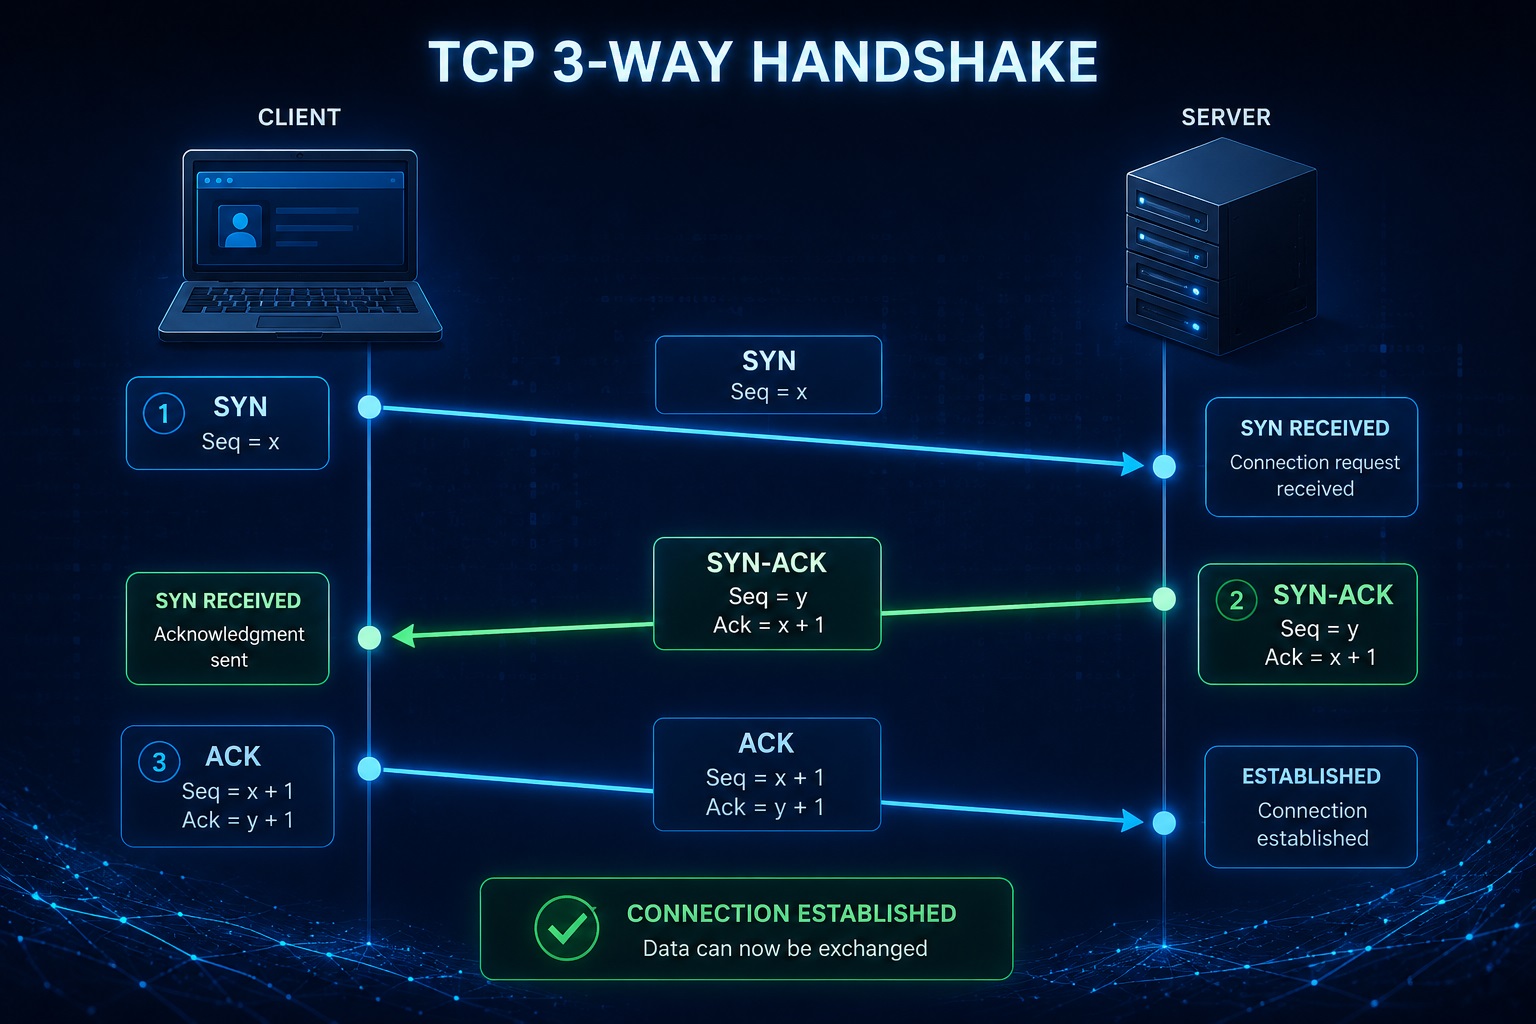
How OS Fingerprinting Works
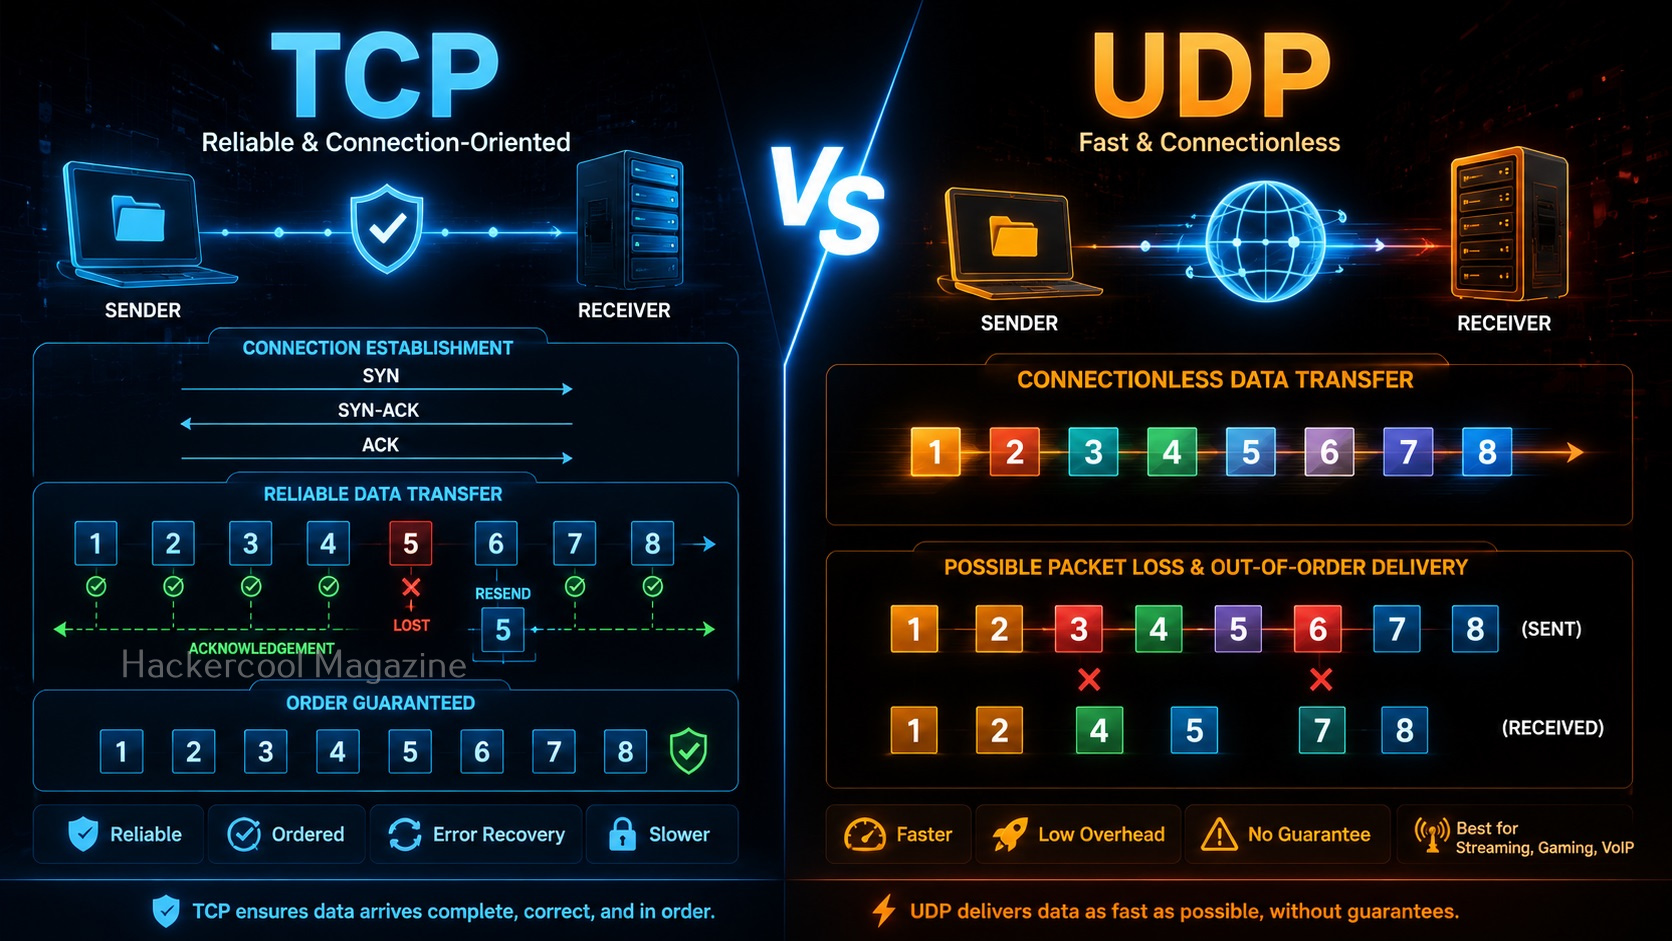
When devices communicate over a network, they exchange information using protocols. Different operating systems often implement these protocols slightly differently.
Examples include:
- Packet structure
- Response timing
- Protocol settings
- Network characteristics
By analyzing these differences, security professionals can estimate what operating system is running.
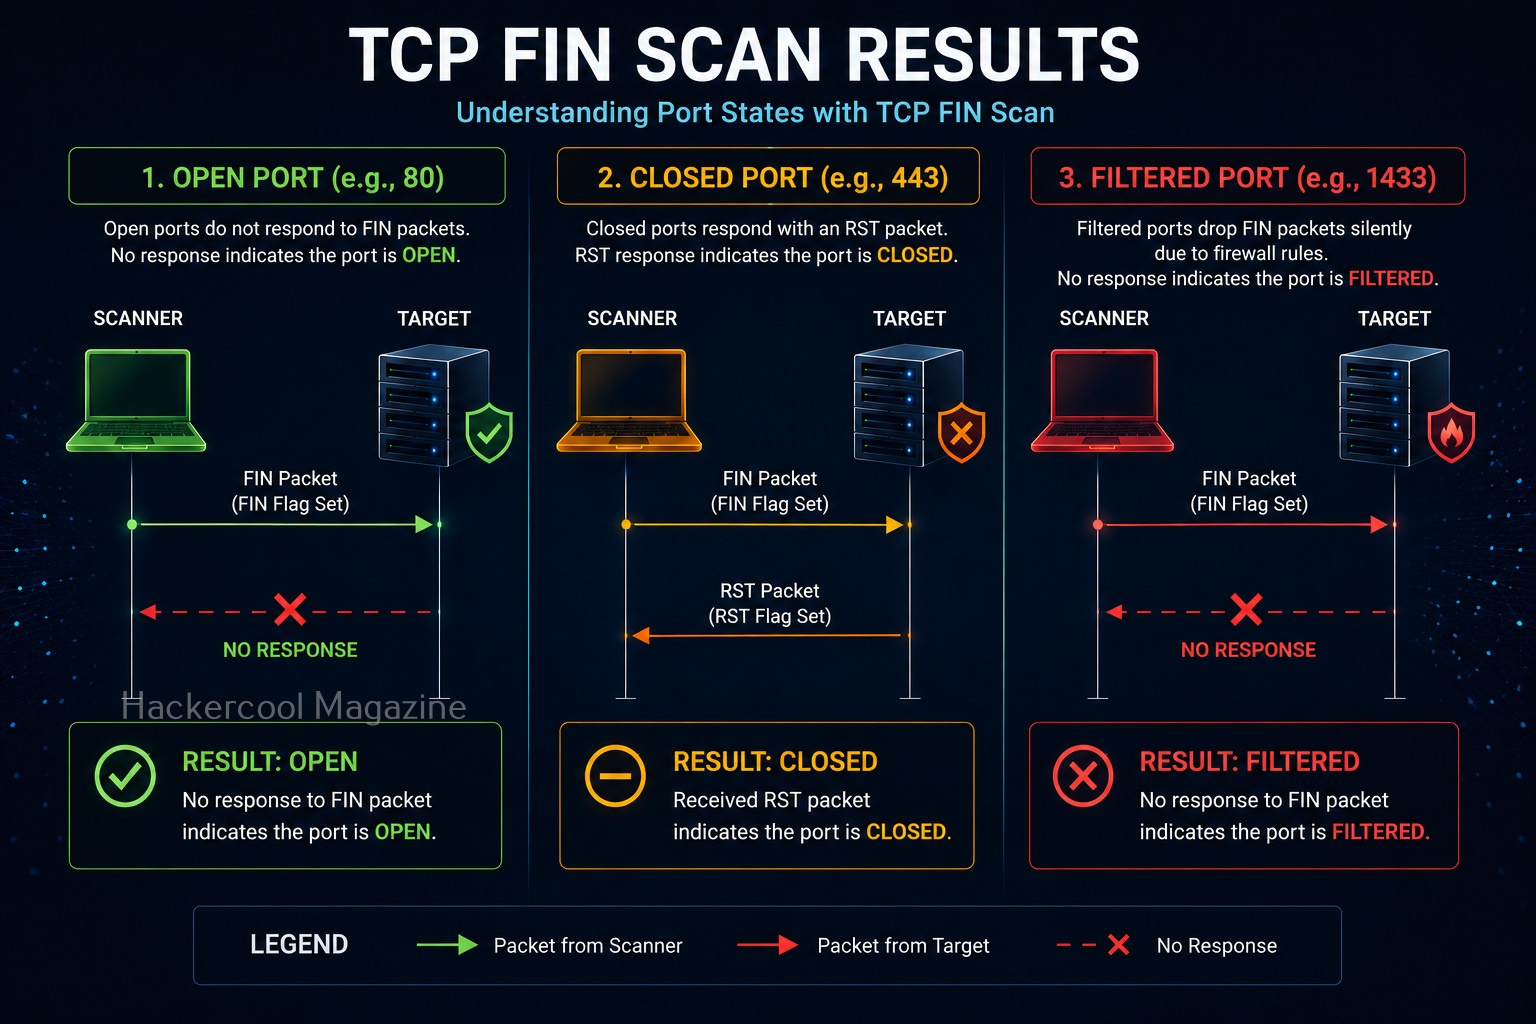
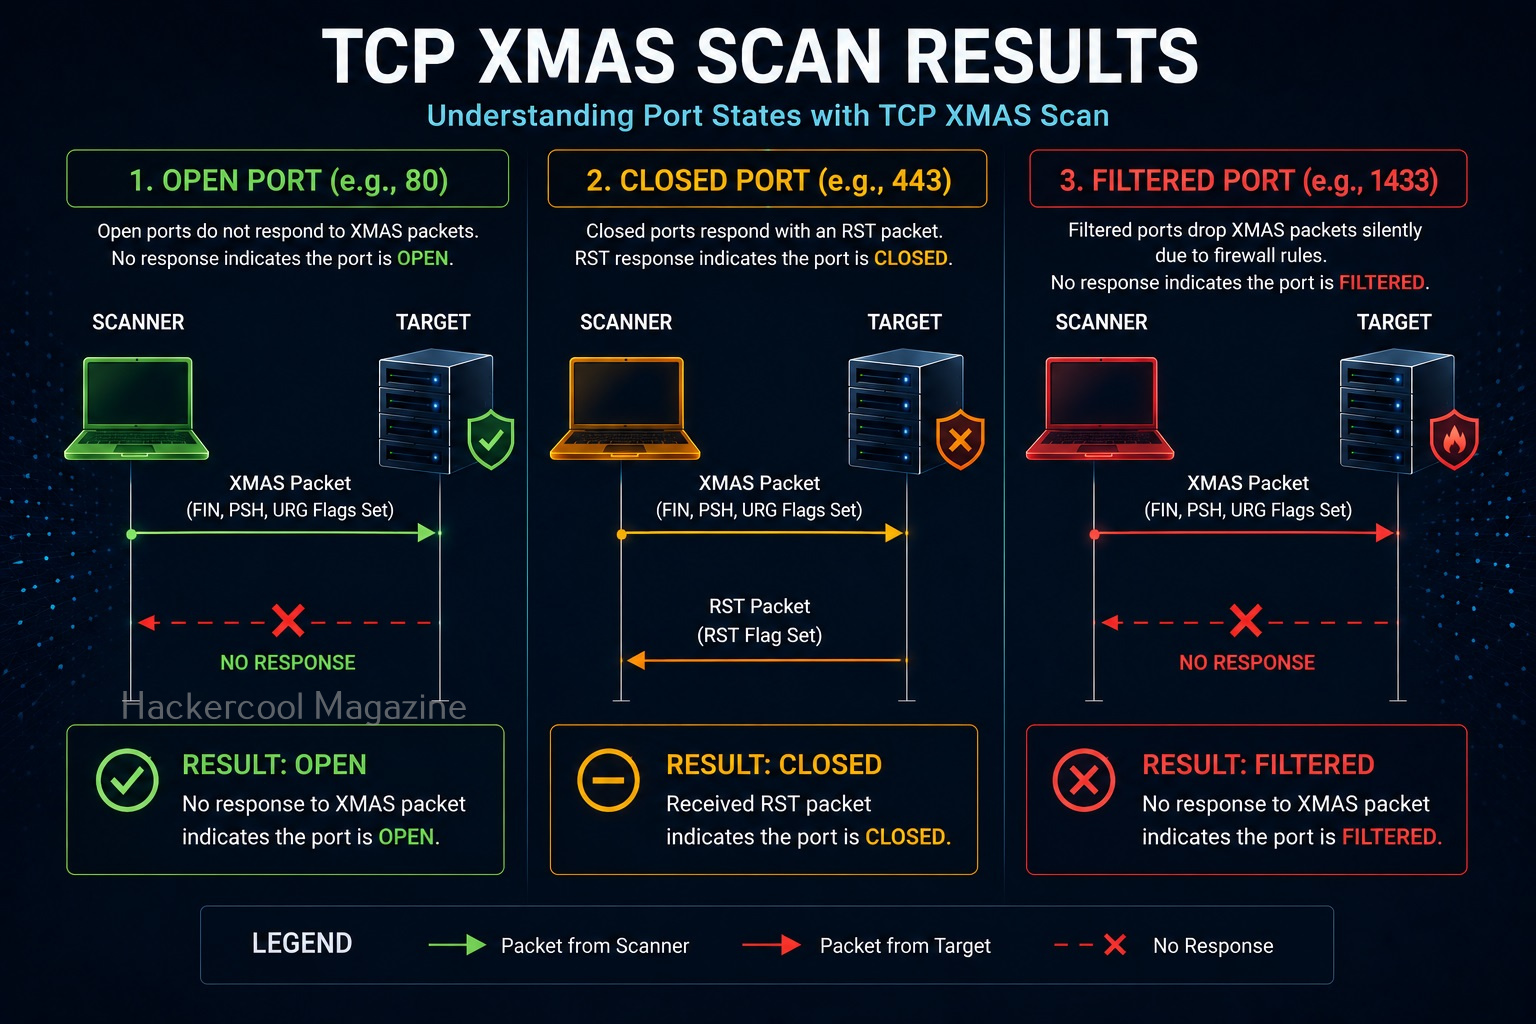
Active vs Passive OS Fingerprinting
There are two main approaches to determine a operating system. They are Active and Passive OS fingerprinting.

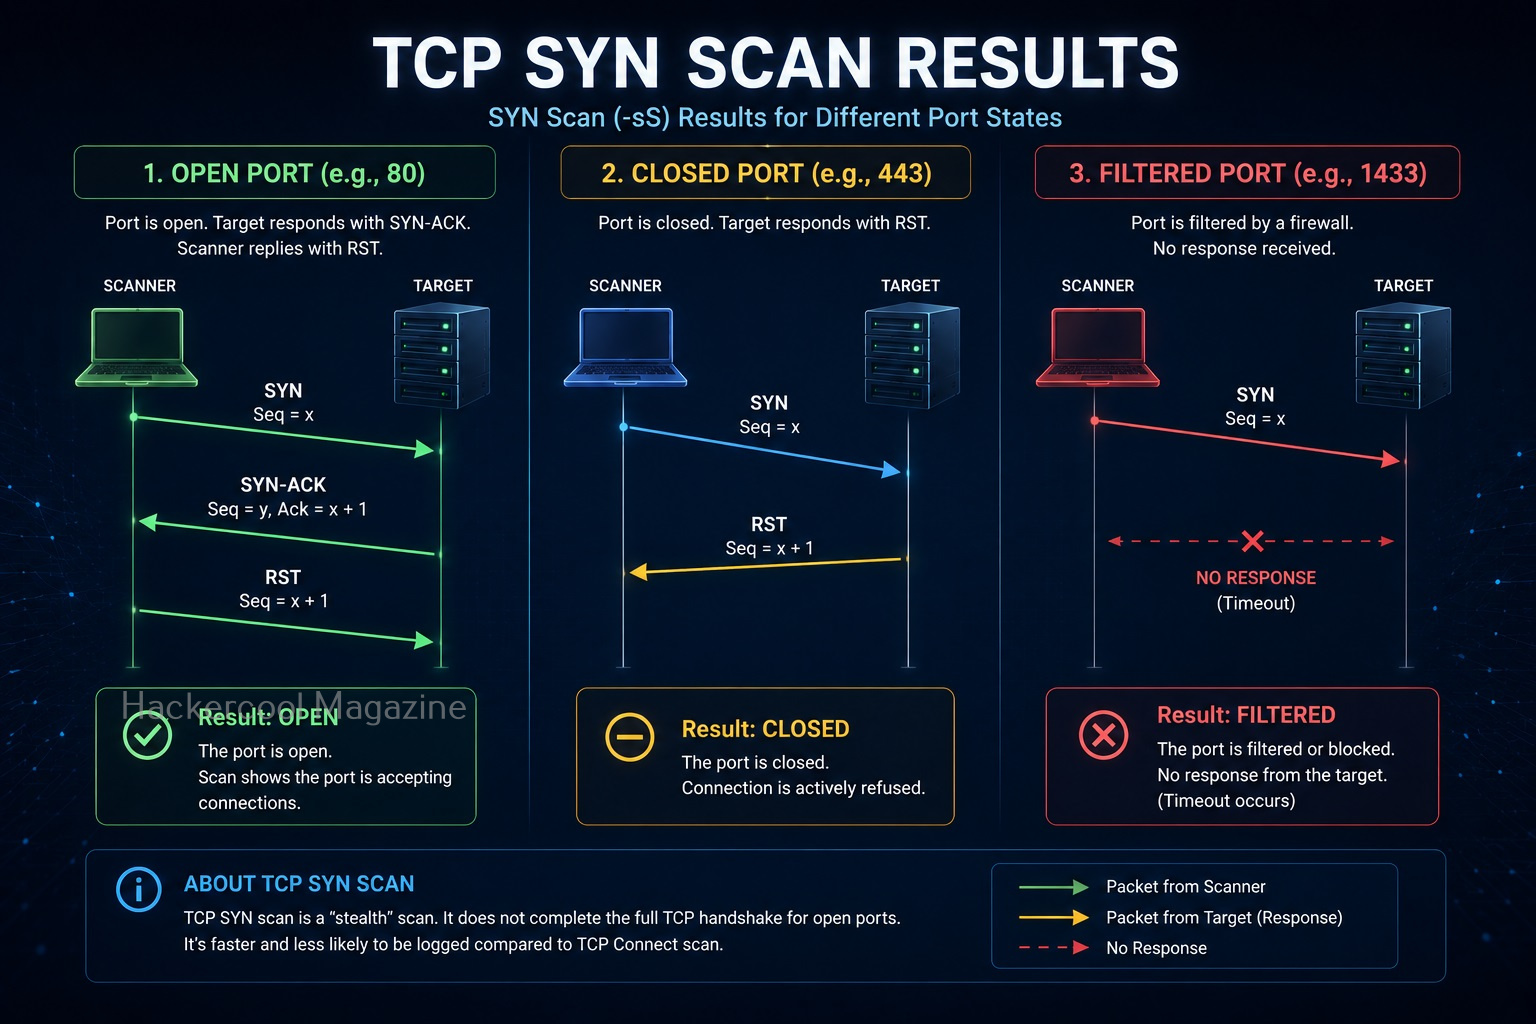
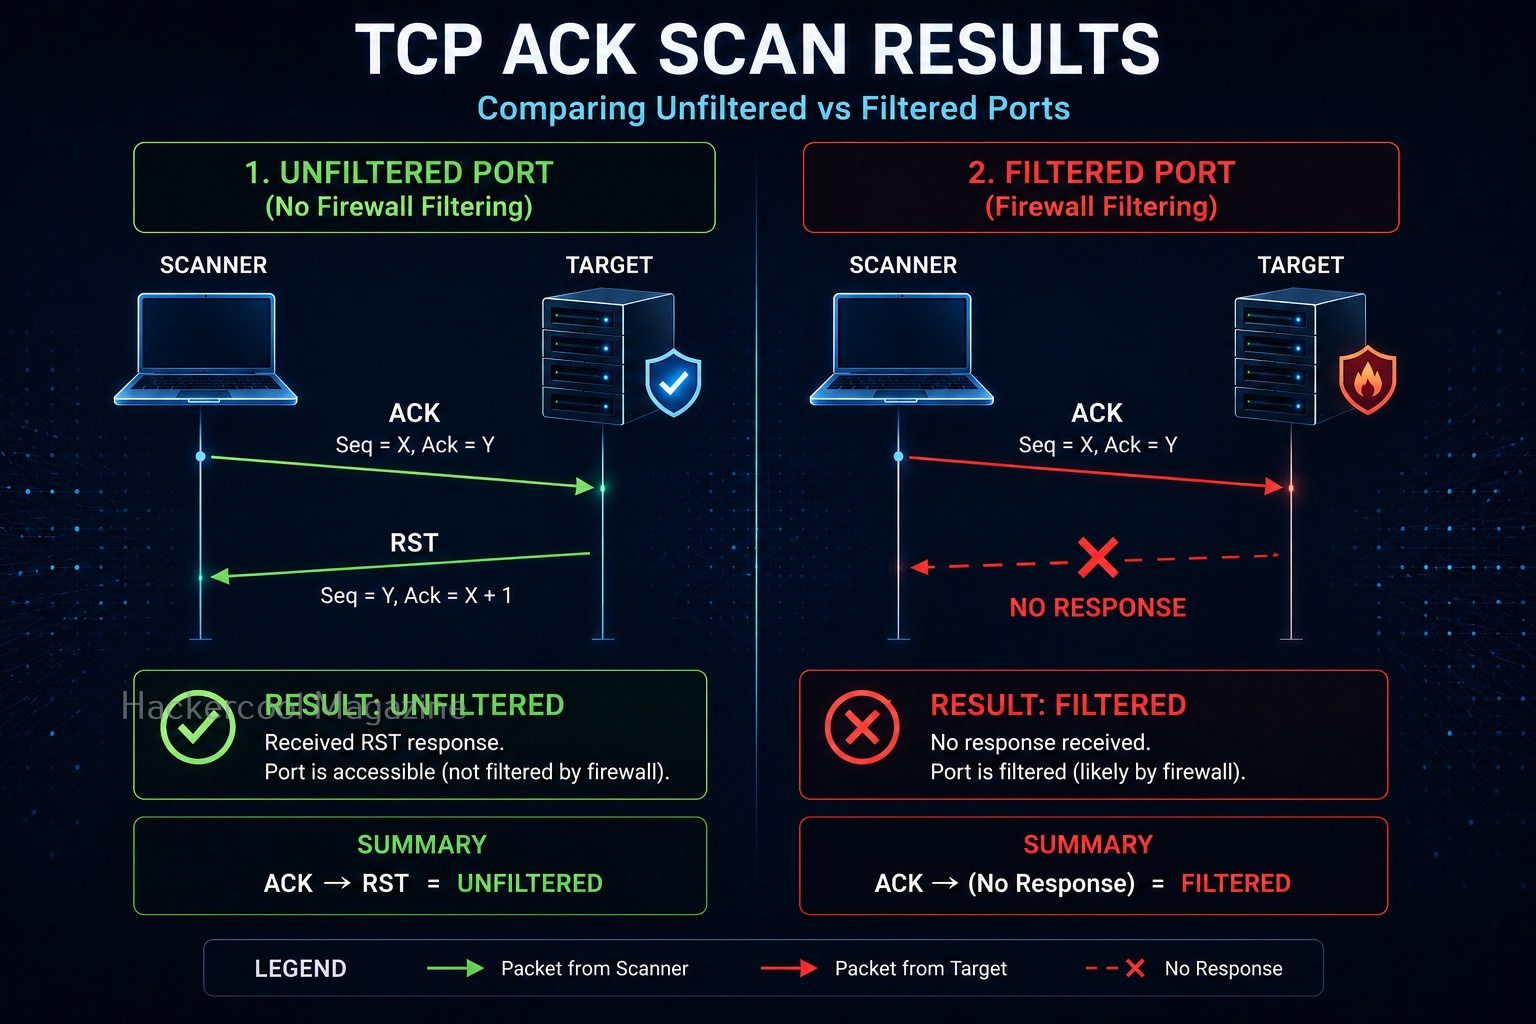
1. Active OS Fingerprinting:
In Active OS fingerprinting, we directly interact with the target system to determine its operating system. The scanner sends network requests and analyzes the responses.
How It Works
The system is queried. Responses are then compared against known operating system characteristics.
Advantages
- Can provide detailed information
- Often produces accurate results
Disadvantages
- Generates network activity
- Easier to detect
Example
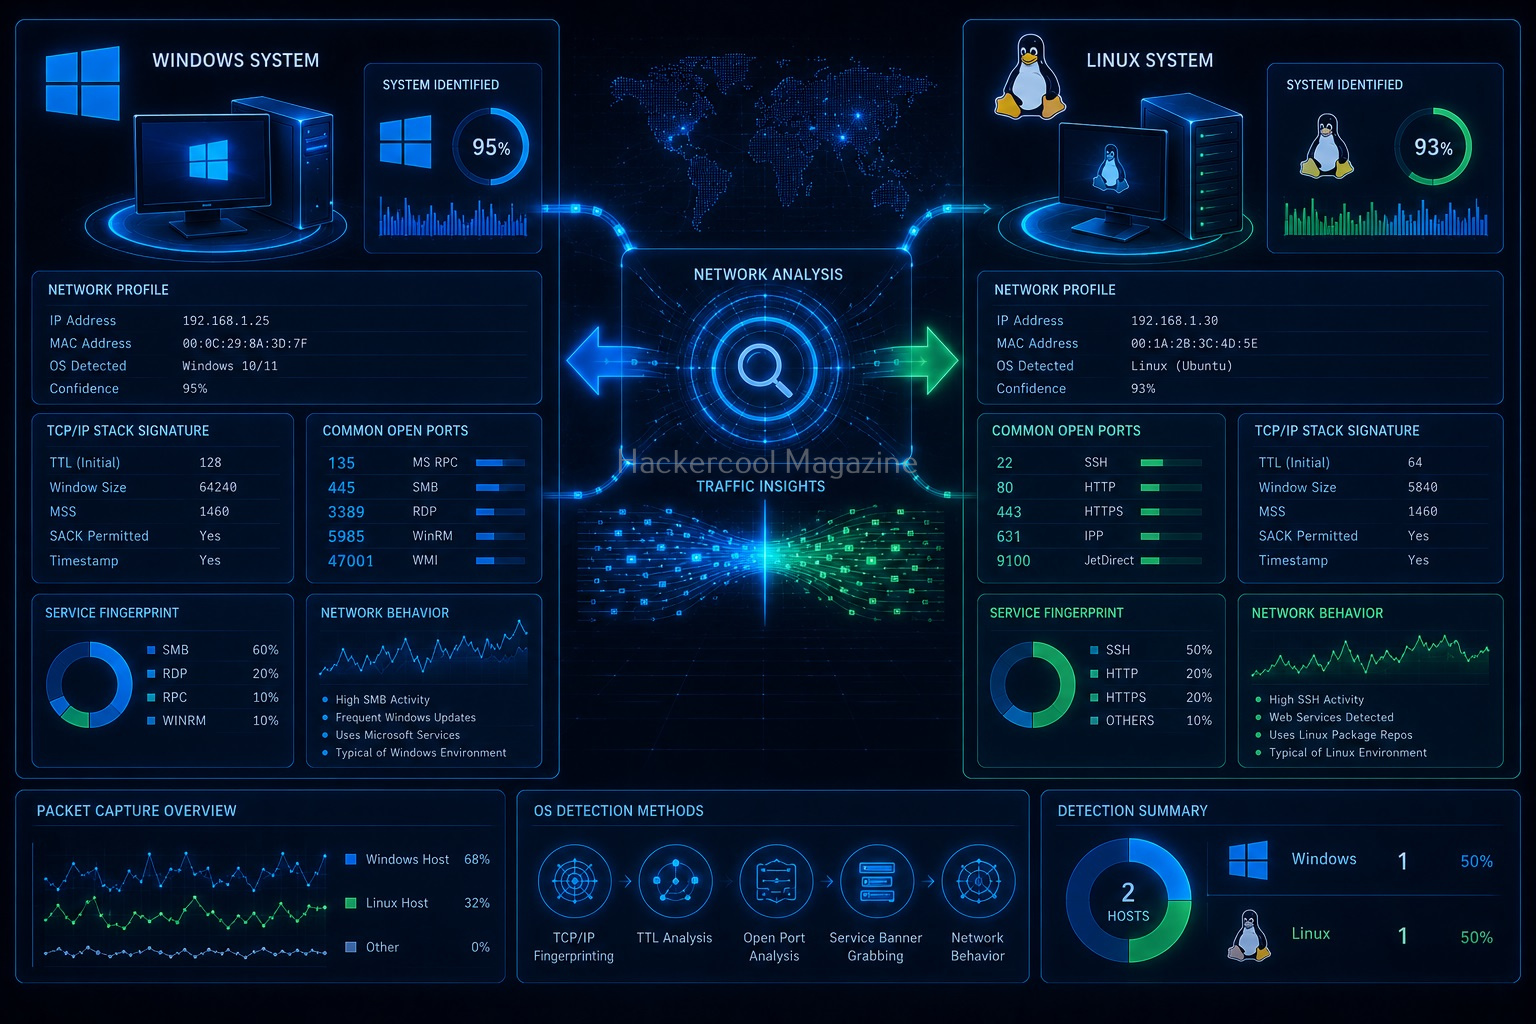
In Active OS Fingerprinting, specially crafted packets are sent to the target system and its responses are analyzed to determine the operating system of target computers. This interaction can be as simple as a ping or a scanner like Nmap. Using ping, we can detect a target operating system by observing the Time To Live (TTL) values as shown below.


Time To Live (TTL) is the amount of time or “hops” that is set to a packet to exist inside a network before discarded by a router. In simple words, it is the period of time that a packet or data should exist on a network before being discarded. This value differs from operating system to operating system. Here are the default TTL values of some operating systems.

Another way to perform Active Foot printing is by sending specially crafted packets to the target system.


2. Passive OS Fingerprinting:
In Passive OS fingerprinting, network traffic is observed without directly interacting with the target. Instead of sending requests, it analyzes existing communication.
How It Works
Traffic is monitored and patterns are examined. No direct probing is required.
Advantages
- Less intrusive
- Harder to detect
Disadvantages
- Requires existing traffic
- May provide less information
In passive OS fingerprinting, a sample of packets coming from the target we are interested in are analyzed. For this purpose, we use a Packet Capture API. It relies on guessing the target OS by observing their TCP/IP implementation. Apart from TTL, this type of fingerprinting will observe window size, Don’t Fragment (DF) bit and Type Of Service (TOS).
Want to Learn Ethical Hacking Step-by-Step?
If you’re serious about learning cybersecurity, a structured roadmap makes the journey much easier.
Download The Beginner Ethical Hacker Starter Kit (2026 Edition) and discover:
✔ The ethical hacking learning path
✔ Beginner-friendly security concepts
✔ Essential tools ethical hackers use
✔ The most common vulnerabilities explained
Common Clues Used in OS Fingerprinting
Operating systems often reveal subtle differences. Examples include:

1. Network Packet Characteristics:
Different systems may structure network packets differently.

2. Time-to-Live (TTL) Values:
As you have already seen, Operating systems often use different default TTL values. These values can provide useful clues.

3. TCP Behavior:
Systems may implement TCP differently. Small differences can help identify the platform.

4. Service Responses:
Applications running on the system may provide hints about the underlying operating system.
5. Network Configuration Patterns:
Configuration behavior sometimes reveals operating system characteristics.
What Information Can OS Fingerprinting Reveal?
OS fingerprinting does not always provide exact answers. Instead, it often provides estimates.
Examples:
- Likely operating system family
- Possible operating system version
- Device type
- Network appliance identification
This information contributes to a broader understanding of the environment.
OS Fingerprinting and Ethical Hacking
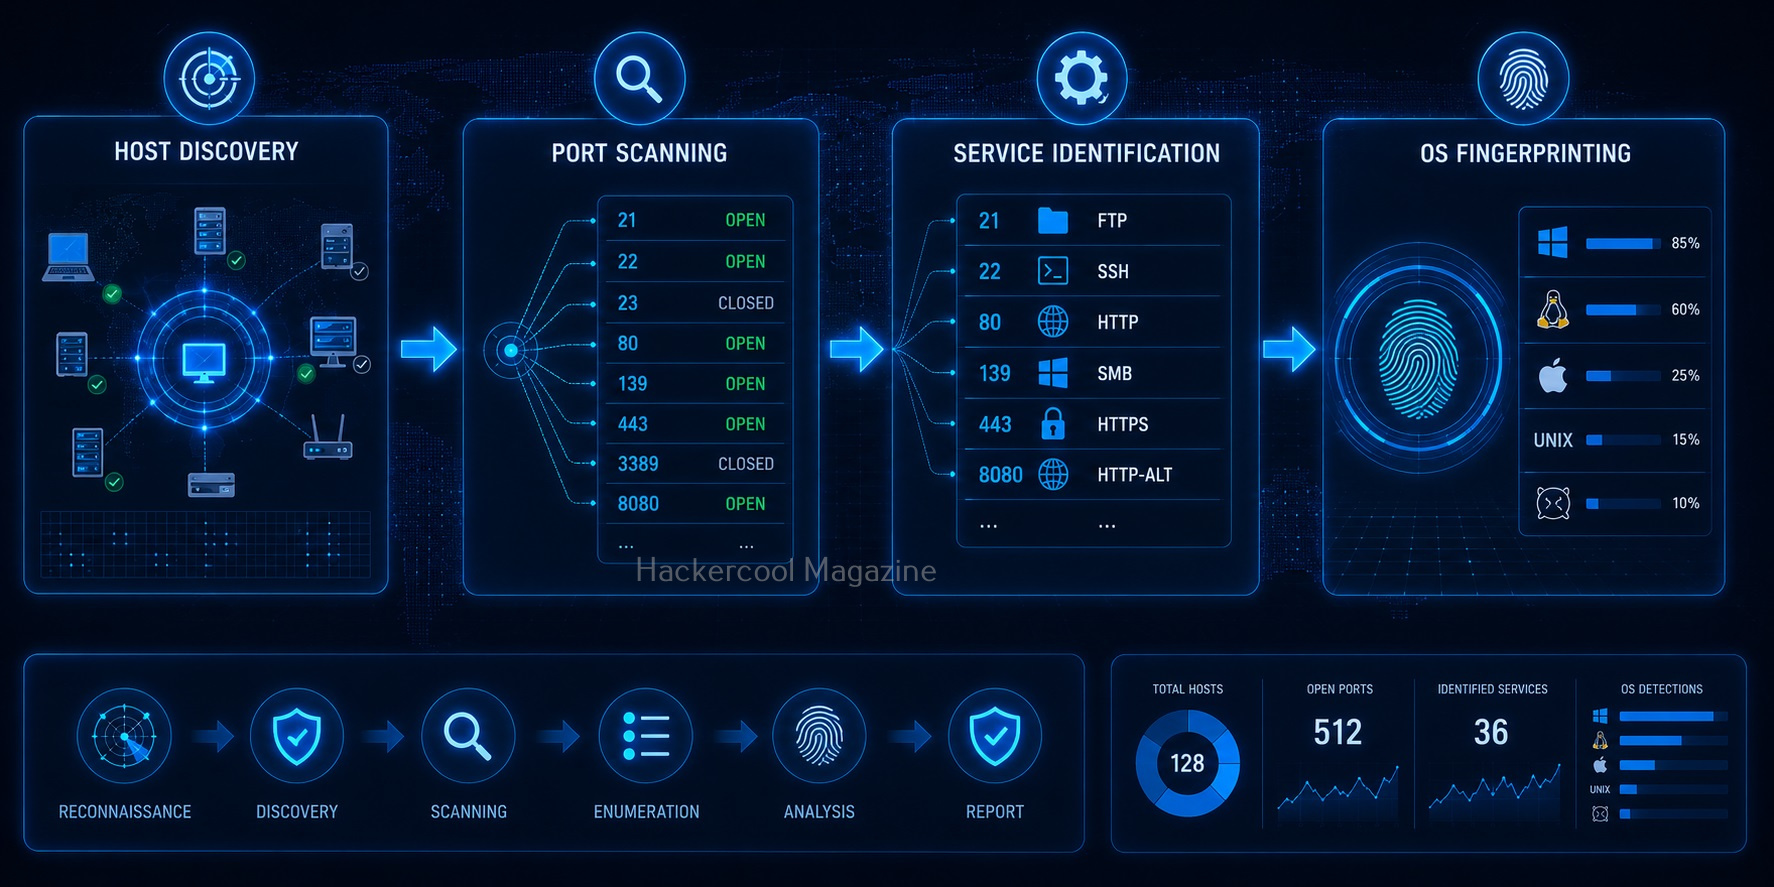
OS fingerprinting is commonly performed during reconnaissance and enumeration. A typical workflow might be as shown below:
- Information Gathering
- Host Discovery
- Port Scanning
- Service Identification
- OS Fingerprinting
- Analysis
- Reporting
OS fingerprinting helps security professionals understand what systems they are analyzing.
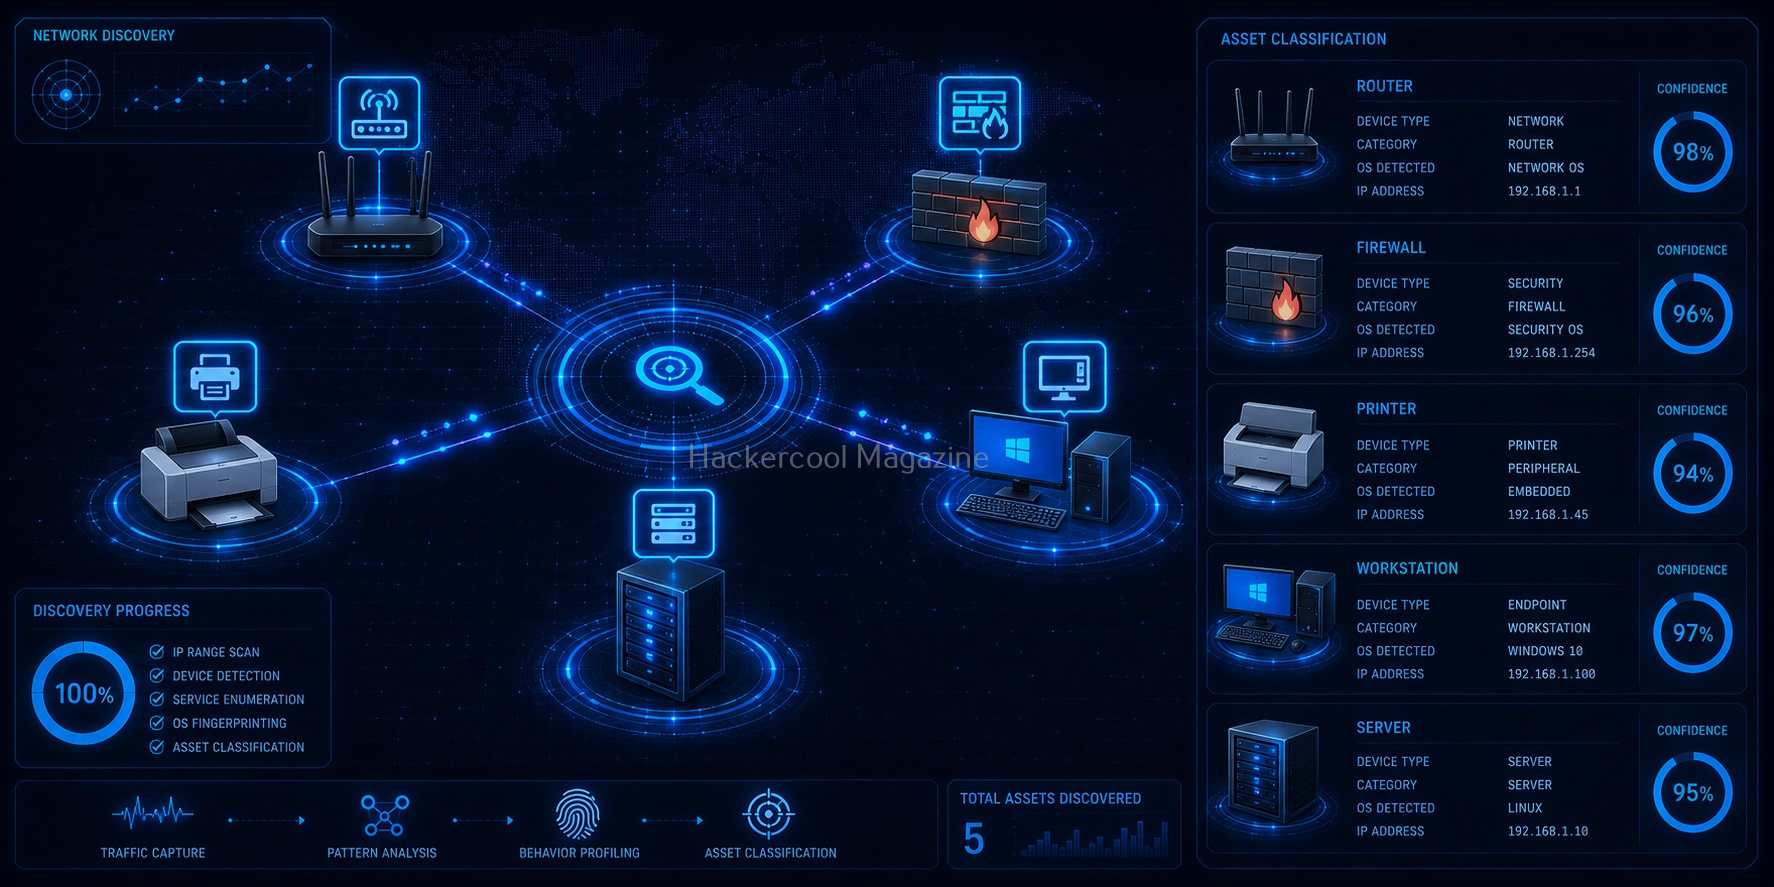
Real-World Example
Imagine a network contains:
- A Windows workstation
- A Linux web server
- A router
- A printer
At first glance, all you may see are IP addresses. OS fingerprinting helps determine what type of devices are behind those addresses. This makes the network much easier to understand.
Why OS Fingerprinting Isn’t Always Perfect
Many beginners assume OS fingerprinting provides exact answers. In reality, results are often estimates. Several factors can affect accuracy.
Security controls may alter network behavior.
Network Devices:
Routers and security appliances may modify traffic.
Custom Configurations:
Administrators can change default operating system settings.
Similar Implementations:
Different operating systems sometimes behave similarly.
Because of this, OS fingerprinting should be viewed as one piece of evidence—not absolute proof.

Common Beginner Mistakes
Many beginners make these mistakes when learning OS fingerprinting. Please avoid doing them yourself.
Trusting Results Blindly:
Always remember that fingerprinting results are estimates. Verification is important before taking any action based on them.
Ignoring Networking Fundamentals:
Without understanding networking basics, fingerprinting results may seem confusing. Learn:
- IP addresses
- TCP/IP
- Ports
- Routing
These concepts make fingerprinting easier to understand.
Focusing Only on Tools:
Tools provide information. Your job is to interpret it. Understanding the underlying concepts is more important than memorizing commands.
Forgetting Documentation:
Document observations and findings. Good documentation improves learning and professionalism.
Scanning Unauthorized Systems:
Always practice ethically. Only analyze:
- Your own systems
- Home labs
- Educational environments
- Authorized networks
Permission matters.

Safe Ways to Practice
You don’t need access to large networks to be able to practice OS fingerprinting. Beginner-friendly practice options include:
Home Networks:
Observe devices you own.
Virtual Machines:
Create multiple operating systems in a lab environment.
Educational Cybersecurity Platforms:
Many learning environments provide safe practice opportunities.
Local Test Environments:
Build small practice networks and compare system behavior.
Skills Developed Through OS Fingerprinting
Learning OS fingerprinting improves several important cybersecurity skills. They are,
Observation:
Learning to notice subtle clues.
Analysis:
Interpreting technical information.
Investigation:
Connecting multiple pieces of evidence.
Documentation:
Recording findings clearly.
Network Understanding:
Developing deeper networking knowledge.

OS Fingerprinting and Cybersecurity Careers
OS fingerprinting is useful in many cybersecurity roles such as:
- Security Analyst
- Penetration Tester
- Incident Responder
- Network Security Engineer
- Vulnerability Analyst
Understanding how systems identify themselves is a valuable skill across multiple disciplines.

Conclusion
OS fingerprinting is one of the most interesting aspects of network reconnaissance. It demonstrates how much information can be learned simply by observing network behavior. For beginners, OS fingerprinting teaches an important lesson:
Every system leaves clues.
By learning how to recognize those clues, you become better at understanding networks, analyzing systems and conducting security assessments.
Remember:
✔ OS fingerprinting identifies operating systems through network behavior
✔ Active and passive techniques gather information differently
✔ Results are often estimates rather than guarantees
✔ Networking fundamentals improve understanding
✔ Practice should always occur in authorized environments
As you continue learning cybersecurity, OS fingerprinting will become another useful tool in your investigative toolkit.
Start Your Ethical Hacking Journey Today
Learning cybersecurity can feel overwhelming at first. The best way to start is with a clear roadmap and the right resources.
Download The Beginner Ethical Hacker Starter Kit (2026 Edition) and get instant access to:
✔ Ethical hacking fundamentals
✔ A beginner cybersecurity learning roadmap
✔ Essential hacking tools every beginner should know
✔ Common vulnerabilities explained simply