Posted on

Beginners guide to XSSer

Hello, aspiring ethical hackers. In one of our previous blogposts, you learnt what XSS vulnerability is, what are the different types of XSS vulnerabilities and its impact on web security. Wouldn’t it be good if there was a tool that can automatically detect and exploit XSS vulnerabilities? In this blogpost, you will be learning about one such tool named XSSer which is an automatic framework to detect, exploit and report XSS vulnerabilities in web applications.

XSSer is a python script and can be installed on all Linux systems with python installed. It is installed by default in Kali Linux and we are going to use the same for this tutorial. See how to install kali Linux in virtual Box. We will be using Mutillidae in Metasploitable 2 as target to test with XSSer as it is easily available to download and this tutorial is easily reproducible. See how to install Metasploitable 2 in VirtualBox.

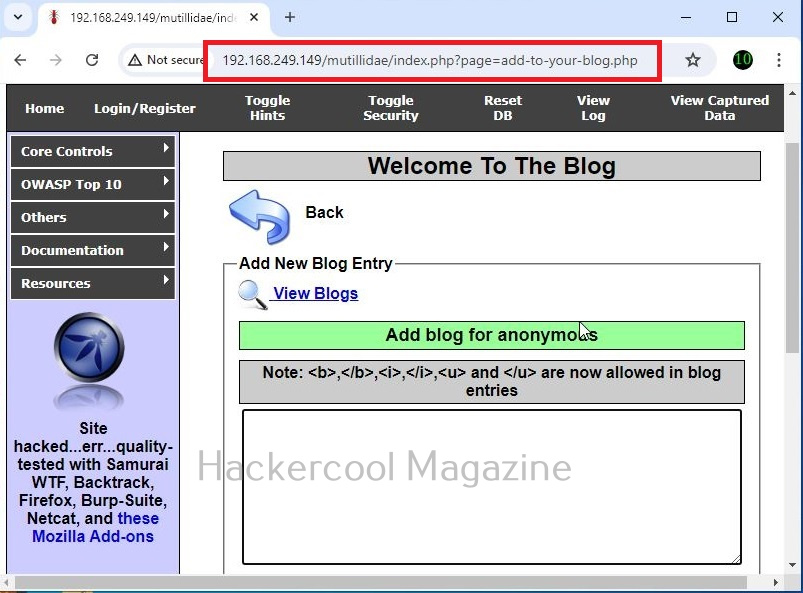
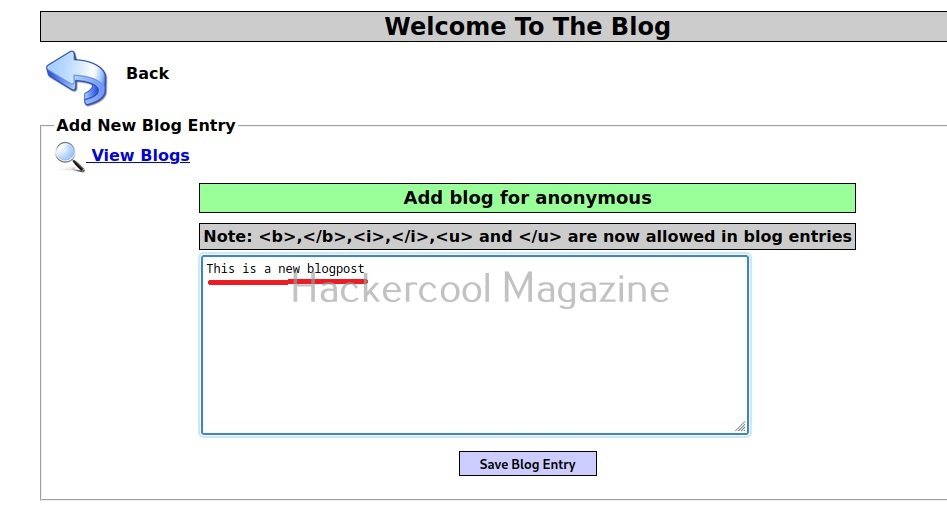
Mutillidae is a vulnerable web app that intentionally consists of all OWASP 10 vulnerabilities for practicing web application hacking. Also see how to create a virtual hacking lab in virtual Box. In the page shown below belonging to Mutillidae, the blog entry field consists of a XSS vulnerability. These vulnerable pages can be detected using web vulnerability scanners like OWASP ZAP aka Zaproxy, Nikto and Burpsuite etc.

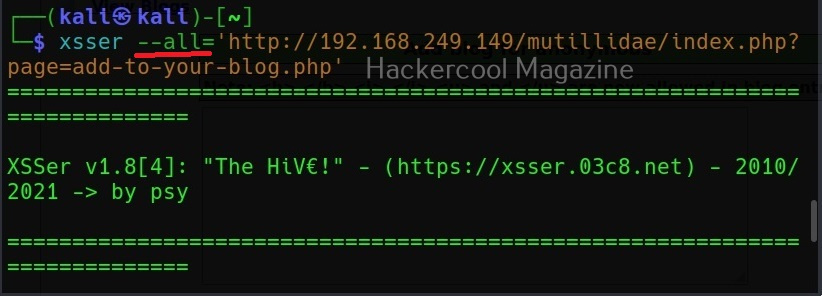
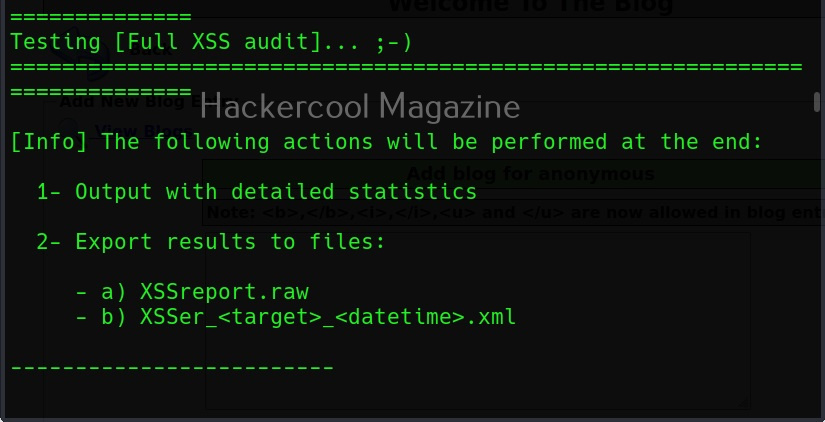
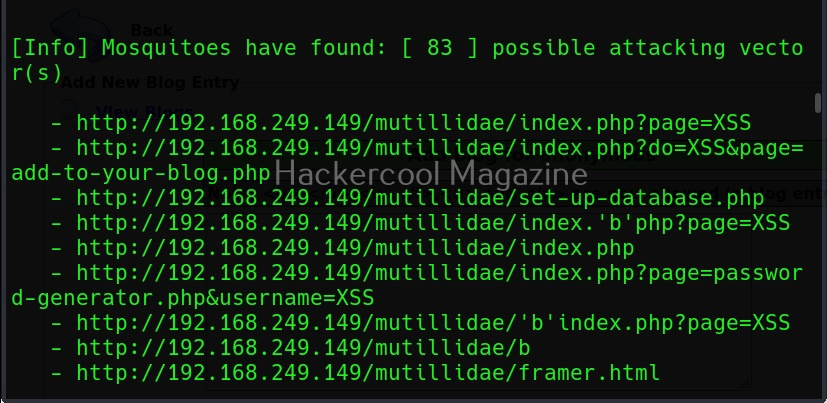
XSSer can also be used to scan for XSS vulnerabilities using the “–all” option” as shown below.

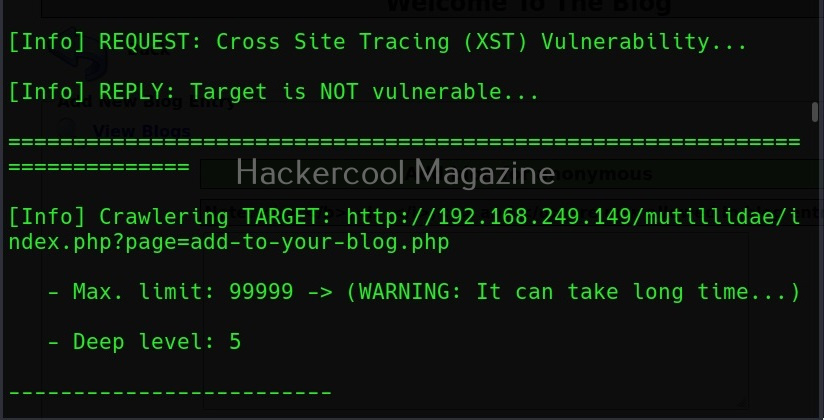
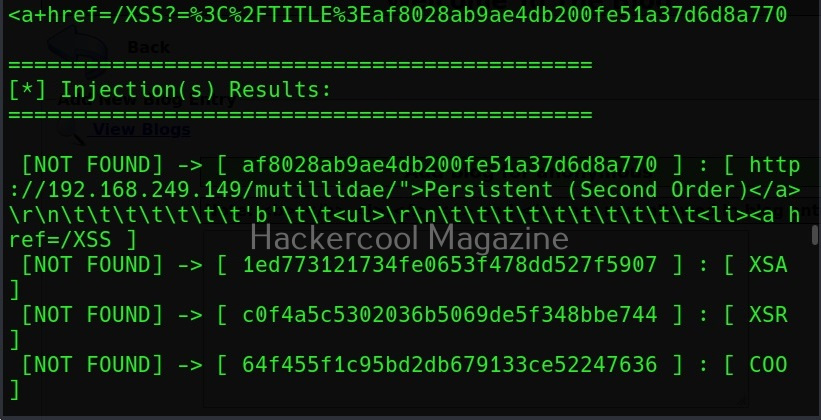
However, here XSSer failed to find any XSS vulnerability. Let’s see how to find any XSS vulnerability in this specific section. For this, I start OWASP ZAP as intercepting proxy to capture web requests. Then, I change the setting in the browser to access the web through this proxy and visit the vulnerable page again on this browser.

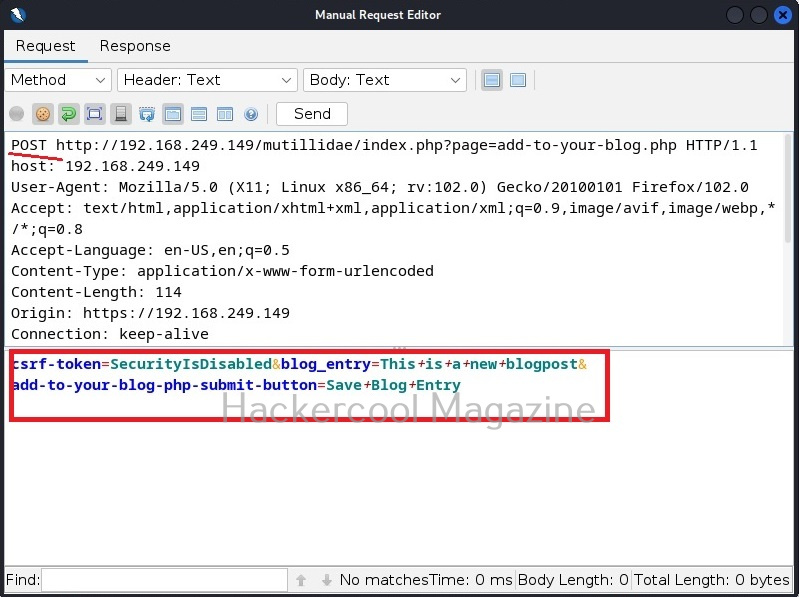
I type “This is a new blogpost” in the blogpost entry and save the blogpost. Now, when we view the captured web request in OWASP ZAP as shown below, we can see the request being sent to the target.

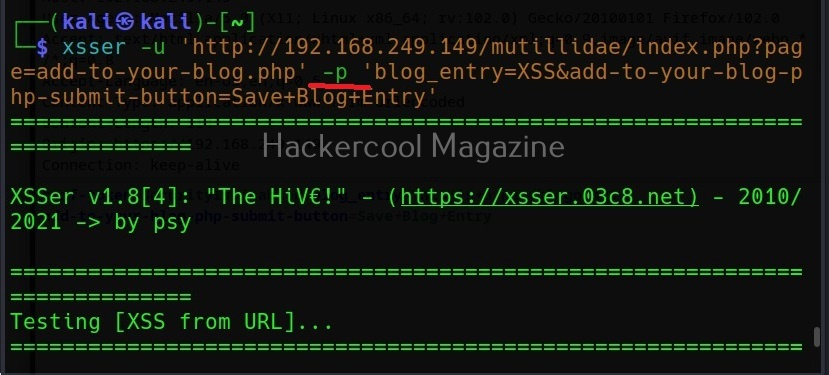
Now, we copy the highlighted data above and use it in our XSSer tool. The only difference is to find out the XSS vulnerability, we add text “XSS” in the place of any vector that us vulnerable to XSS.

Note the method the query is using to pass this data. There are two methods by which data is sent and received: GET and POST. XSSer has an option to use both the methods: (-g) for GET method and (-p) for POST method. OWASP ZAP has shown us that this data is being passed using the POST method. So, we will be using the same with XSSer.

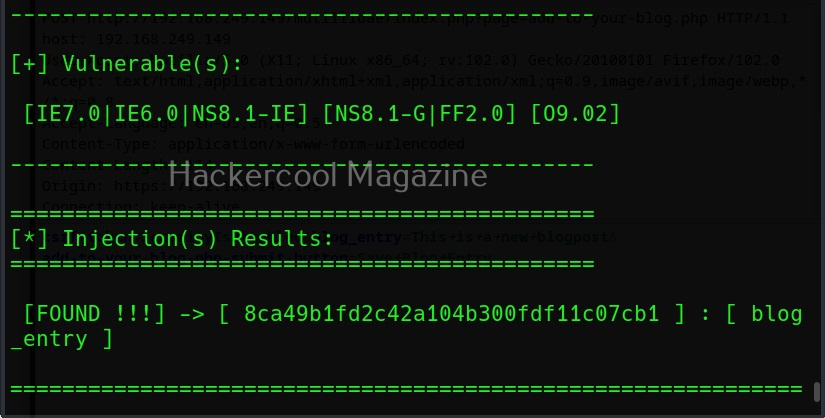
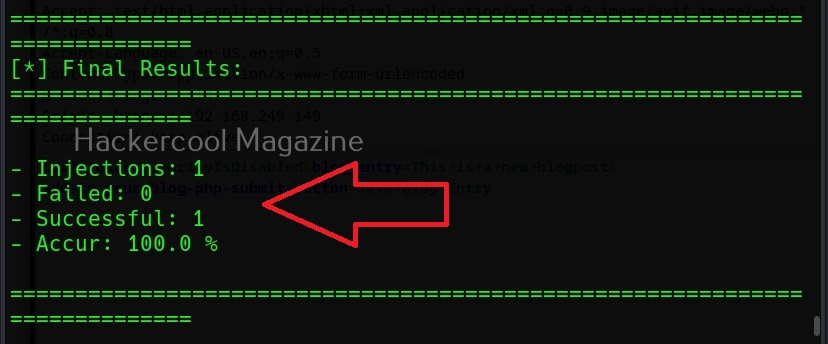
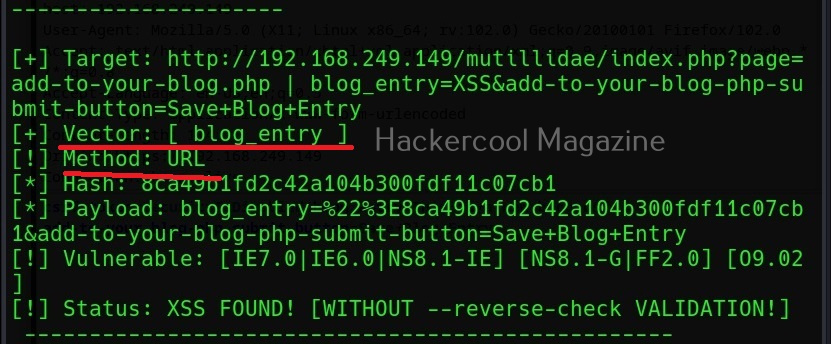
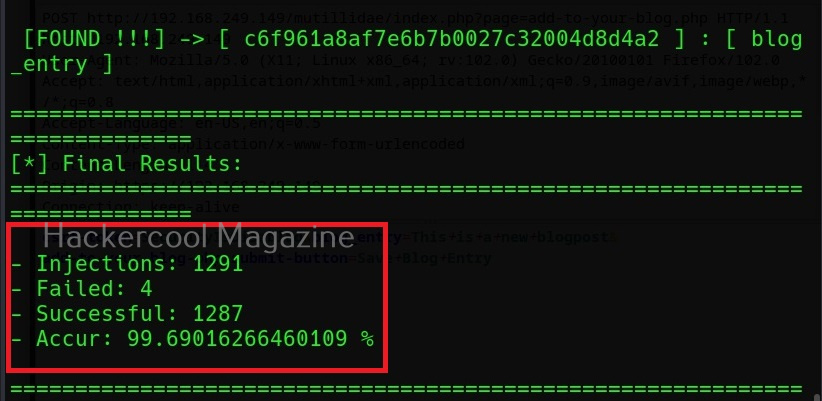
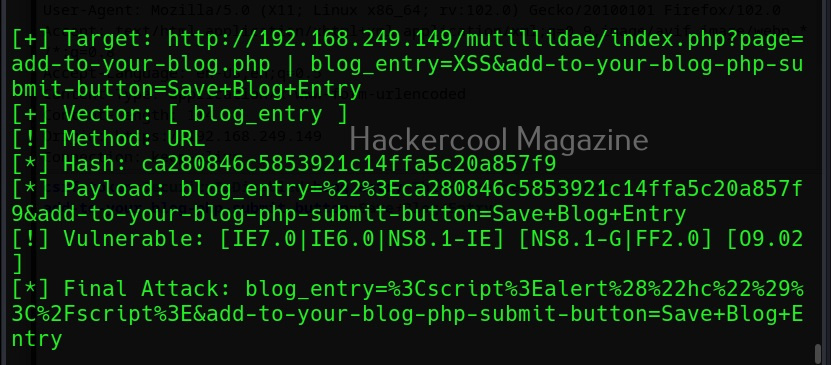
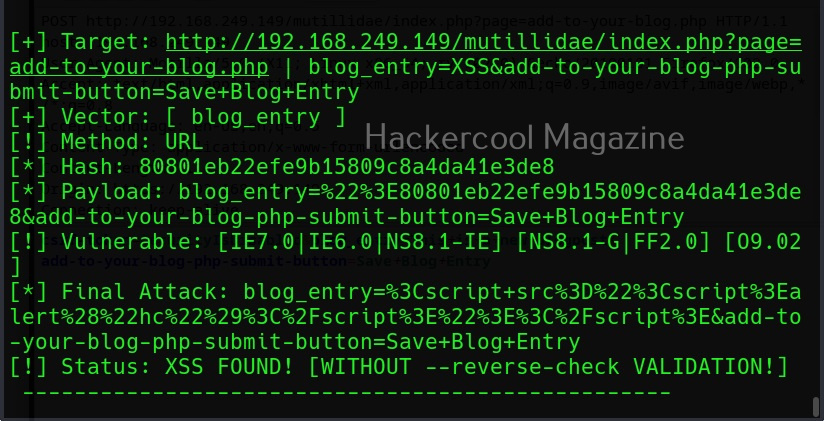
Now, you can see that vector “blog_entry” is vulnerable to cross site scripting using URL method. Here, we tried one vector. XSSer provides an option to inject a list of vectors provided by XSSer. To test all these vectors, we can use the “—auto” option. XSSer in total has 1291 injection vectors.

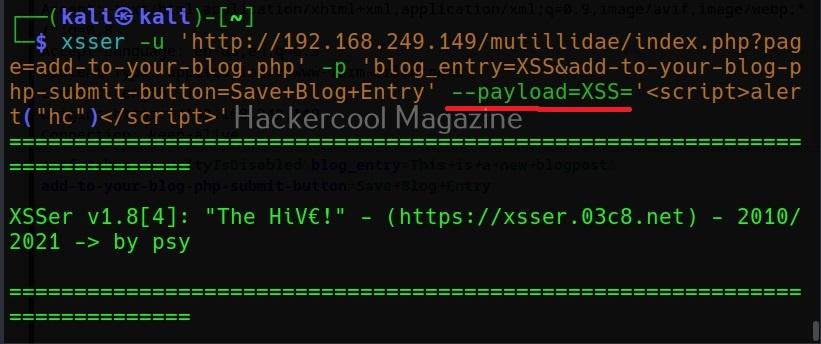
As you can see, XSSer found 1287 of 1291 injection vectors in the web app. XSSer also has the option of using payloads. Here the payload can be anything even the most popular <script> alert (“HC”)</script). Here is how we specify the payload in XSSer.

Here I have given the same above-mentioned script as payload.

Specify your own payload

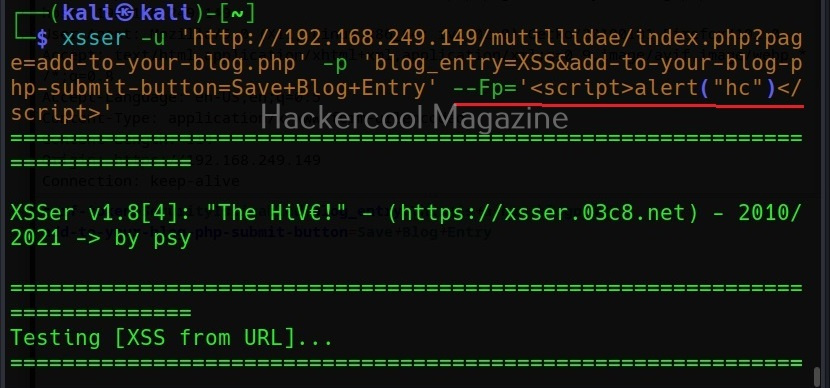
Using the “-Fp” option, you can even specify your own payload for final injection.

Execute payload remotely

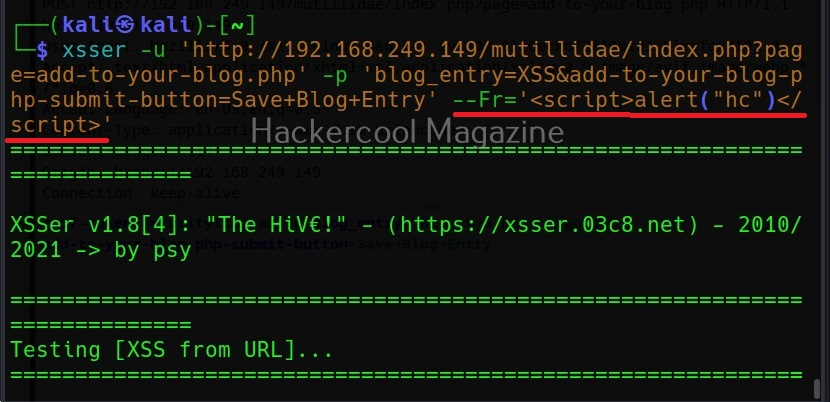
The “-Fr” option is used to execute the payload remotely.

Posted on

Complete guide to web application hacking

Hello, aspiring ethical hackers. In this blogpost, you will learn about web application hacking. Based on research of Verizon, web applications were the most exploited vector in hacking incidents and data breachers that happened last year (2023).

According to the CyCognito State Of Web application Security Testing 2024 report, each organization exposes 100s of web applications to the web out of which 70% are untested for any security vulnerabilities. These web applications provide a large attack surface which can easily be exploited by hackers. To understand threats to web applications you need to thoroughly understand what a web application is, what is web application hacking, types of attacks that affect web applications etc.

What is a web application?

A web application is any program or application that is rendered through web browsers. Any app that you use through the browser without downloading it to your Desktop or Laptop is a web app. Example of web applications are Gmail, Netflix, Yahoo, Canva etc.

A web application is hosted on a web server and application server. A web server consists of both hardware and software components. Examples of popular web server software are Apache, NGINX, Microsoft IIS, Lighthttpd, node.js, Apache Tomcat and LiteSpeed etc. To store data, web servers use a database. Most popular databases in use are MySQL, Oracle, Microsoft SQL Server, PostgreSQL, MongoDB, Redis, MariaDB, Splunk, SQLite etc.

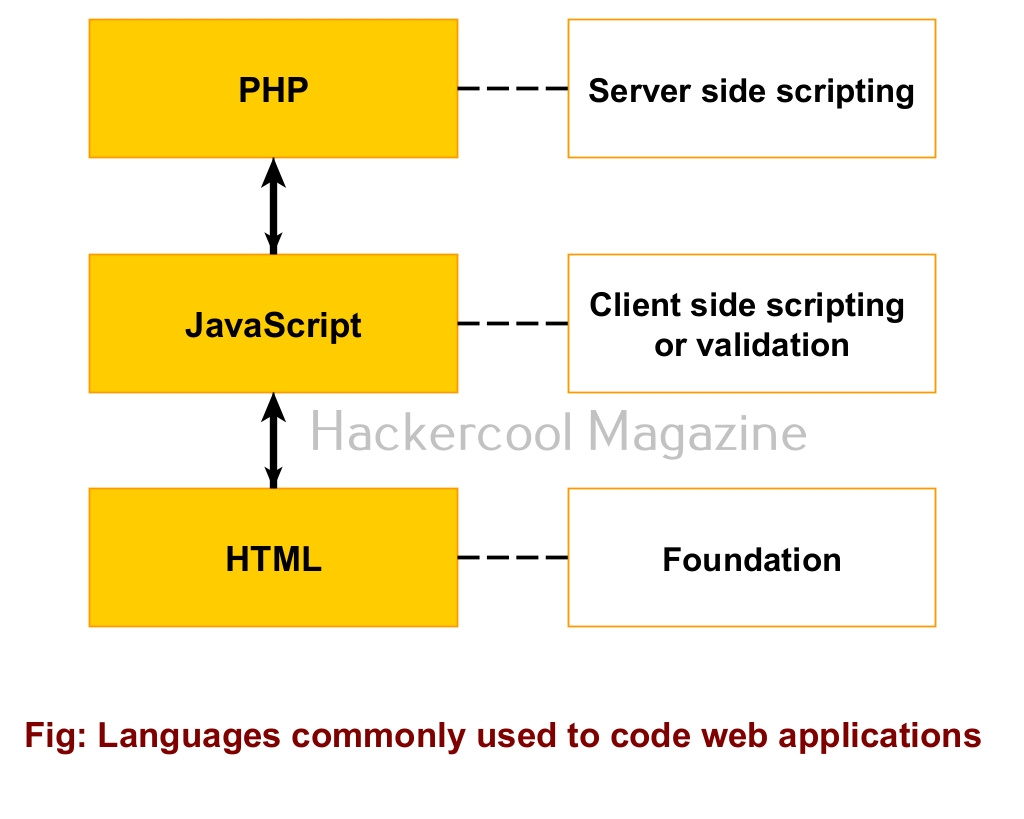
Similar to a website, a web application is written in HTML/CSS, JavaScript and it uses PHP/ASP for server side programming and Database for storing data etc. Apart from a web server there is also presence of an application server to serve web apps.

What is web application hacking?

Hacking of these web applications to compromise the entire web server or the entire network is known as web application hacking.

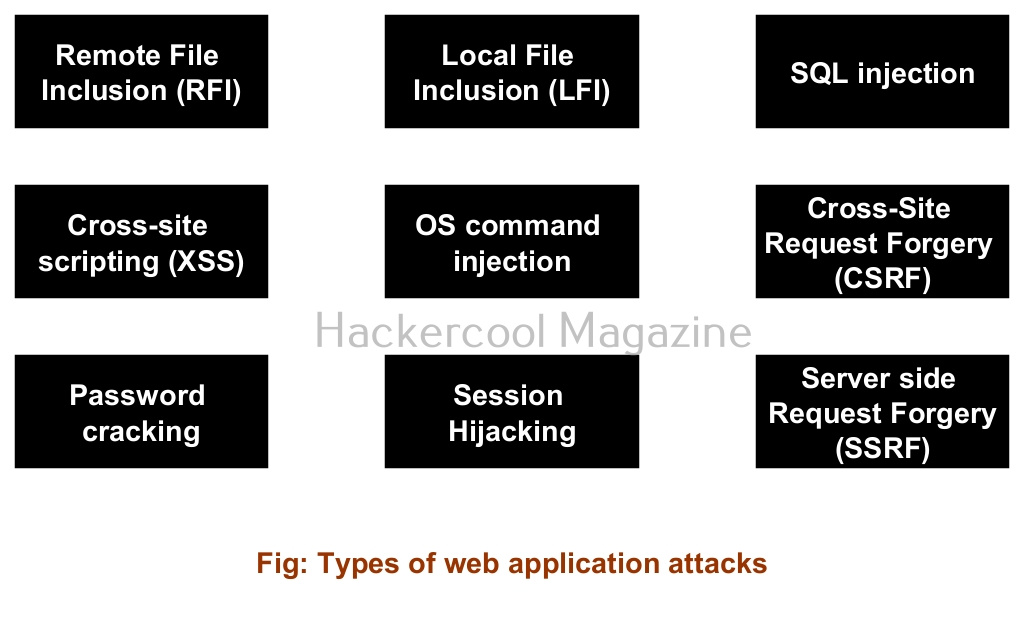
Types of web application attacks

There are many attacks that can be used to compromise web applications..

1. Remote File Inclusion (RFI) attack

2. Local File Inclusion attack

3. SQL injection attack

4. Cross-site scripting (XSS) attack

5. OS Command Injection attack

6. Cross site Request Forgery (CSRF) attack

7. Password cracking attack

8. Session Hijacking attack

9. Server side request forgery (SSRF) attack

Impact of a web application hacking

Compromise of a web application can have many affects. Most important of them are,

1. Data breach and Data theft:

Compromise of a web application can result in a data breach and data theft.

2. Leak of sensitive information:

Sometimes, a web application compromise can leak sensitive information about a company or organization.

3. Web app defacement:

Every web application has an index page that is the page that loads when you visit a website. When hackers change the index page and replace it with another page, it is known as website defacement.

4. Secondary attacks:

Once a web application is compromised, it can be used by hackers for other malicious purposes like hosting malware, to perform a DDoS attack or using it as a proxy to perform attacks on other websites.

Posted on

Complete guide to web server hacking

Hello, aspiring ethical hackers. This blogpost is a complete guide to web server hacking. To understand web server hacking, you need to first understand what is a web server.

What is a web server?

A web server is a server that serves webpages. Every organization nowadays definitely has a website which is important for their business. To serve these websites, web servers are needed.

Structure of a web server

A webserver consists of both hardware and software components. Examples of popular web server software are Apache, NGINX, Microsoft IIS, Lighthttpd, node.js, Apache Tomcat and LiteSpeed etc. To store data, web servers use a database. Most popular databases in use are MySQL, Oracle, Microsoft SQL Server, PostgreSQL, MongoDB, Redis, MariaDB, Splunk, SQLite etc.

Web pages on the web server can be accused using web clients which are also called as browsers. You already know about various popular browsers. Typical web server uses various languages to build a website. The basic languages and their purpose are given below.

What is web server hacking?

Hacking or compromising of a web server is known as web server hacking. Web servers provide easier access to a company’s network as nobody is blocked from accessing a web server. So, a vulnerability in web server can easily provide hackers access to the company’s network.

Web server Hacking Methodology

The methodology of web server hacking is similar to hacking anything in cybersecurity.

1. Information gathering / Footprinting:

This can be done by whois footprinting, DNS footprinting, website footprinting and banner grabbing.

2. Scanning:

This includes port scanning, service scanning and vulnerability scanning with Nikto and other tools.

3. Exploiting any vulnerabilities and gaining access

Types of web server attacks

There are many attacks that can be used to compromise web servers.

1. Website Defacement:

As you have read earlier, website defacement is the changing of the visual elements of a webpage (most probably, index page) to display a message or simply as nuisance.

2. Misconfiguration attack:

Sometimes, hackers can exploit misconfigurations in the configuration of a web server to hack web servers (For example, use of default credentials or using default setting).

3. DNS Server Hijacking:

A DNS server resolves hostnames to its IP addresses. If the DNS server is breached, hackers can lead genuine users or visitors of a website to a fake website.

4. Web Cache poisoning attack:

The temporary web cache can be poisoned with malicious entries to lure victims to a malicious url.

5. FTP brute force attack:

Many web servers use FTP service to upload files to the web server. If hackers can brute force the credentials of the FTP server, he can upload malicious files to by webserver. Learn more about FTP hacking.

5. SSH brute force attack:

Similarly, if the SSH credentials the web server as compromised, attackers can take control of the entire web server.

6. File upload attack

7. Directory traversal / LFI attack

8. Cross-site scripting (XSS) attack

9. CSRF attack

10. Command Injection attack

11. SQL injection attack

12. Phishing attack

13. Password cracking attack

14. Session Hijacking attack

15. Packet sniffing attack

16. Server side request forgery (SSRF) attack

17. Buffer overflow attack

18. DoS / DDoS attack

Impact of a web server hacking

Compromise of a web server can have many affects. Most important of them are,

1. Data breach and Data theft:

Compromise of a website can result in a data breach and data theft.

2. Leak of sensitive information:

Sometimes, a web server compromise can leak sensitive information about a company or organization.

3. Website defacement:

Every website has an index page that is the page that loads when you visit a website. When hackers change the index page and replace it with another page, it is known as website defacement.

4. Secondary attacks:

Once a web server is compromised, it can be used by hackers for other malicious purposes like hosting malware, to perform a DDoS attack or using it as a proxy to perform attacks on other websites.

Posted on

Nikto Vulnerability Scanner: Complete Guide for Beginners

Web servers are an essential part of modern applications. They handle requests from browsers, deliver websites, communicate with applications and often connect to databases and other services.

As web servers are exposed to users and networks, security professionals need to regularly check them for outdated software, insecure configurations and other potential weaknesses.

One tool beginners may encounter while learning web security is Nikto. Nikto is an open-source web server scanner designed to identify potentially dangerous files, outdated software, insecure configurations and other issues associated with web servers.

In this beginner-friendly guide, we’ll explain what Nikto is, how it works, what it can identify, how it fits into a security assessment and how beginners can safely practice with it.

What Is Nikto?

Nikto is an open-source web server scanner used to assess web servers for potential security problems. It performs various checks against a web server and compares what it discovers against its collection of security tests.

Nikto can help security professionals identify issues involving:

  • Outdated server software
  • Potentially dangerous files
  • Insecure configurations
  • Default or unusual resources
  • Known server-related problems

Nikto is primarily an assessment and reconnaissance tool. It should not be viewed as a tool that automatically compromises a web server.

Why Is Nikto Useful?

Web applications can contain many components.

A typical website might involve:

Browser → Web Server → Application → Database

The web server is an important part of this architecture. If it is outdated or incorrectly configured, it can introduce security risks. Nikto helps automate some of the initial checks that a security professional might otherwise have to perform manually. This makes it useful for learning the basics of web-server security assessment.

How Does Nikto Work?

At a high level, Nikto follows a straightforward process.

1. Connect to the Authorized Web Server:

The tester identifies a web server they are authorized to assess.

2. Identify Server Information

Nikto attempts to determine information about the web server and its configuration.

3. Perform Security Checks

It performs various tests designed to identify potentially interesting files, configurations and known issues.

4. Analyze the Responses

The tool examines how the server responds to its requests.

5. Display Findings

Potential issues are presented to the security professional for further investigation.

The important point is that Nikto automates discovery and checking; the security professional still needs to interpret the results.

What Can Nikto Detect?

Nikto performs many different checks. The exact findings depend on the server and its configuration.

Outdated Server Software

Older web-server versions may contain known security vulnerabilities. Nikto can help identify server information that may indicate an outdated component. However, version information should be verified before concluding that a vulnerability exists.

Dangerous or Unnecessary Files

Web servers may accidentally expose files that shouldn’t be publicly accessible.

Examples might include:

  • Backup files
  • Configuration files
  • Temporary files
  • Default resources

These can sometimes reveal useful information about the server.

Insecure Configuration

A web server may function correctly while still having security weaknesses. Examples include unnecessary services, insecure settings or information disclosure. Nikto can identify some of these conditions.

Default Files and Resources

Default server pages and sample files can reveal information about the underlying software. They may also indicate that a server has not been fully hardened.

Information Disclosure

Some server configurations reveal details such as:

  • Server software
  • Technology versions
  • Directory information
  • HTTP headers

This information can help security professionals understand the environment.

Nikto and HTTP

To understand Nikto, beginners should first understand HTTP. HTTP is the protocol that allows web browsers and servers to communicate.

A simplified interaction looks like:

Browser → HTTP Request → Web Server

and then:

Web Server → HTTP Response → Browser

Nikto sends requests to an authorized web server and analyzes the responses. Therefore, learning basic HTTP concepts will make Nikto’s output much easier to understand.

Nikto and HTTPS

Modern websites commonly use HTTPS rather than plain HTTP. HTTPS provides encrypted communication between the client and server.

When assessing an authorized HTTPS-enabled application, security professionals need to understand how encrypted web communication differs from traditional HTTP.

Learning the basics of:

  • TLS
  • Certificates
  • HTTPS
  • HTTP headers

will help beginners understand modern web-server assessments.

Understanding Nikto Results

One of the most important skills is learning how to interpret the output. Nikto may produce numerous findings. Beginners shouldn’t automatically assume every finding represents a serious vulnerability.

Instead, investigate each result.

Ask yourself:

What did Nikto discover?

Understand exactly what the finding represents.

Is the finding actually relevant?

Some findings may simply provide information rather than indicate an exploitable vulnerability.

What system is affected?

Determine which server or resource produced the result.

What is the potential impact?

Consider whether the issue could expose sensitive information or create a security weakness.

How can it be fixed?

A useful security assessment should ultimately lead to remediation.

Nikto vs Nessus

Beginners often ask how Nikto compares with vulnerability scanners such as Nessus. The biggest difference is scope. Nikto is primarily focused on web servers and HTTP-related assessment. Nessus is a broader vulnerability assessment platform that can assess many types of systems and technologies.

Think of it this way:

Nikto → Focused web-server assessment

Nessus → Broader vulnerability assessment

They can therefore complement each other rather than being direct replacements.

Nikto vs Burp Suite

Nikto and Burp Suite also serve different purposes. Nikto focuses heavily on automated web-server checks. Burp Suite provides a broader set of tools for analyzing web application traffic and testing application behavior.

For example, Burp Suite can help you understand:

  • HTTP requests
  • HTTP responses
  • Cookies
  • Sessions
  • Authentication
  • Application inputs

Learning both can give beginners a broader understanding of web security.

How Beginners Can Practice Nikto Safely

Never point security tools at random websites. Instead, use a controlled laboratory.

A beginner lab could contain:

  • A virtualization platform
  • A Linux security-testing machine
  • A deliberately vulnerable web application
  • An isolated virtual network

Training applications such as DVWA, OWASP Juice Shop, or WebGoat can provide safe environments for learning web security concepts. You can then study how a web server responds to assessment requests without interacting with systems you don’t own.

What Should You Learn Before Nikto?

Nikto becomes much easier once you understand the fundamentals.

Start with:

Networking

Learn IP addresses, ports, DNS, TCP/IP and basic network architecture.

Linux

Understand files, permissions, processes, services and the command line.

HTTP

Learn requests, responses, methods, status codes, headers, cookies and sessions.

Web Servers

Understand the basic role of Apache, Nginx and other web-server technologies.

Web Security

Study common vulnerabilities and security misconfigurations.

Once these concepts make sense, Nikto becomes much more useful.

Practical Walkthrough

Let’s see a practical walkthrough of how Nikto works.

Let’s start with a version check (-Version):

The “version” option of Nikto checks for the version of the software, plugins and database versions.

Checking Database (-dbcheck):

It’s always a good thing to check for any errors in the scan database before scanning. The “-dbcheck” option of Nikto checks the scan databases for any errors.

The Host option (–host) (-h)

To scan a target using Nikto, first we need to specify a target. To set the target, we need to use the “host” option. This is shown below.

The target can be IP address of the webserver or URL of the website. This scan took 45 seconds to finish.

The Host option (–ssl):

To scan a website with HTTPS enabled with nikto, we can use the “SSL” option.

The Port option (–port):

By default, Nikto scans the default HTTP and HTTPS ports when specified. However, if the target web server is running on a custom port you can set Nikto to scan a different port by using the “port” option.

Scanning for CGI directories (–Cgidirs):

To scan for the presence of all CGI directories on the target webserver, the “cgidirs” option can be used.

You can specify a specific CGI directory to search or you can use “all” value to scan for all CGI directories on the target.

What output you want Nikto to show? (–Display):

To control the type and amount of output Nikto shows after finishing the scan, we can use the “Display” option. Here are the values that can be set for the Display option.

How much time you want Nikto to spend on a scan? (–maxtime):

Using the “maxtime” option, we can specify the maximum time to spend for scanning a target. This time can be specified in seconds.

As you can see, the scan ended in 2 seconds while earlier the same scan took 45 seconds.

Don’t look for names (-nolookup):

The “nolookup” option specifies Nikto to not query for names when an IP address is specified.

Don’t look for pages that are not there (–no404):

The “no404” option specifies Nikto to disable “file not found” checking. This will reduce the total number of requests made to the target.

Just discover the ports (–findonly):

If you want to just find the HTTP(S) ports of a target without performing any security scan, you can use the “–findonly” option. Specifying this option allows Nikto to connect to HTTPS or HTTP ports and report the server header.

The Timeout option (–timeout):

The “–timeout” option specifies time to wait before timing out a request. The default timeout of Nikto is 10 seconds.

The Pause option (–Pause):

By using “–Pause” option in Nikto, we can specify delay between each test Nikto performs.

What if we have to authenticate? (–id):

With the “-id” option, you can use Nikto to perform basic authentication to the target.

The tuning option (–tuning):

With the “-Tuning” option, we can control the test that Nikto will use against a target. It can take the following values.

For example, this is how we test for misconfigured files on the target.

See all Nikto plugins (–list-plugins)

Nikto has lot of plugins that can be used against various targets. To view all these plugins, we can use the “–list-plugins” option.

Use a particular plugin (–Plugins):

To use a particular plugin, we can use the “Plugins” option. For example, let’s use the robots plugin as shown below.

Can Nikto evade detection? (–evasion):

While scanning, Nikto can use various techniques to evade Intrusion Detection System (IDS). The evasion techniques of Nikto are given below.

Saving output (-o):

Nikto can save the output of the scan in a file with the “output(-o)” as shown below.

Formats in which you can save output (-Format):

You can save in different formats you like using the “-Format” option. Valid formats are csv, htm, txt and xml.

Common Beginner Mistakes

Treating Every Finding as a Vulnerability

Some results are informational. Always investigate before assigning severity.

Scanning Unauthorized Websites

Having access to a website does not automatically give you permission to security-test it. Only scan systems you own or have explicit authorization to assess.

Ignoring False Positives

Automated tools can produce inaccurate or incomplete findings. Important results should be validated.

Focusing Only on Tools

A tool can identify a problem, but understanding the underlying technology is what makes you a security professional.

Ignoring Remediation

A security assessment isn’t complete simply because you found something.

You should also understand how the issue can be corrected or mitigated.

A Simple Nikto Learning Path

Beginners can follow this path to master Nikto quickly.

Step 1: Learn basic networking.

Step 2: Learn Linux fundamentals.

Step 3: Understand HTTP and HTTPS.

Step 4: Learn how web servers work.

Step 5: Set up an isolated web-security lab.

Step 6: Use Nikto against your authorized practice server.

Step 7: Study the results carefully.

Step 8: Research the underlying security issue.

Step 9: Apply appropriate remediation in the lab.

Step 10: Scan again and verify the improvement.

This approach teaches much more than simply running a scanner.

Concluision

Nikto is a useful tool for beginners who want to understand web-server security assessment. It can help identify potentially outdated software, interesting files, insecure configurations, information disclosure and other issues that deserve investigation.

However, Nikto should be viewed as one component of a broader security workflow.

Learn networking. Understand HTTP. Study Linux and web servers. Practice inside an isolated lab. Learn to interpret scanner results and most importantly, only assess systems you own or have explicit permission to test.

Once you understand the fundamentals, Nikto becomes more than a scanning utility. It becomes a practical way to learn how web servers expose information and how security professionals identify and reduce potential weaknesses.

Posted on

Nessus Vulnerability Scanner: Beginner’s Guide

If you’re starting to learn cybersecurity, vulnerability scanning is one of the skills you’ll encounter early in your journey. Organizations need to identify weaknesses across servers, workstations, applications and network devices before those weaknesses become serious security problems.

One of the well-known tools used for vulnerability assessment is Nessus. Nessus is a vulnerability assessment platform that helps security professionals identify potential security weaknesses, outdated software, configuration problems and other security issues.

For beginners, Nessus is useful because it provides an opportunity to understand how vulnerability scanners work and how security teams analyze large numbers of potential findings. In this guide, we’ll explore what Nessus is, how vulnerability scanning works, what Nessus can identify, how beginners can learn it safely and why scanner results still require human analysis.

What Is Nessus?

Nessus is a vulnerability assessment tool developed by Tenable. It is designed to scan systems and identify potential vulnerabilities and configuration issues. Security professionals can use vulnerability scanners to assess environments containing:

  • Servers
  • Workstations
  • Network devices
  • Applications
  • Cloud infrastructure
  • Other connected systems

Rather than manually checking every system for known security problems, a scanner can automate much of the initial assessment process.

Why Is Vulnerability Scanning Important?

Modern organizations may have hundreds or thousands of assets. Manually checking every operating system, application and configuration would be extremely time-consuming. Vulnerability scanners help security teams discover potential problems more efficiently.

A scanner may identify issues such as:

  • Missing security updates
  • Outdated software
  • Known vulnerabilities
  • Insecure configurations
  • Exposed services
  • Weak security settings

The results give security teams a starting point for investigation and remediation.

How Does Nessus Work?

At a high level, vulnerability scanning with Nessus follows a relatively simple process.

1. Identify the Target:

The security professional selects systems that are authorized for assessment. These might include servers, workstations or network devices.

2. Discover Information:

The scanner gathers information about the target, including available services and software.

3. Perform Security Checks:

Nessus compares what it discovers against its collection of vulnerability and configuration checks.

4. Generate Findings:

Potential security issues are organized into a report.

5. Analyze and Remediate:

Security professionals investigate important findings and determine how they should be fixed or mitigated.

The scanner automates much of the repetitive work but people remain responsible for interpreting the results.

What Can Nessus Detect?

The exact findings depend on the target, configuration, plugins and scan type. Nessus can help identify areas such as:

1. Outdated Software:

Older versions of software may contain publicly known security vulnerabilities. A scanner can help identify potentially outdated components that require review.

2. Missing Security Updates:

Unpatched operating systems and applications can create unnecessary security exposure. Vulnerability scanning can help organizations identify systems that may require updates.

3. Configuration Problems:

Security isn’t only about software vulnerabilities. Incorrect configurations can also create risk. A scanner can identify certain insecure settings and configuration weaknesses.

4. Network Services:

Scanning can provide information about services exposed by systems. Understanding which services are available helps security teams determine whether they are necessary and appropriately protected.

5. Known Vulnerabilities:

Nessus can identify potential vulnerabilities associated with software and system configurations. Findings may reference standardized vulnerability identifiers such as CVE entries.

Understanding Nessus Plugins

One important concept beginners should understand is the plugin. Nessus uses plugins to perform different security checks. Each plugin is designed to identify a particular type of vulnerability, configuration issue or other security condition.

Think of plugins as individual security checks that collectively allow the scanner to assess a system from many different angles. This architecture allows vulnerability assessment capabilities to evolve as new security issues are discovered.

Understanding Nessus Scan Results

After a scan completes, you’ll typically see a collection of findings. Beginners should learn to pay attention to information such as:

  • Vulnerability description
  • Severity
  • Affected asset
  • Evidence
  • References
  • Recommended remediation

Don’t simply look at the highest severity number and stop there.

Ask:

What is affected?
Why is it vulnerable?
How could the issue affect the organization?
Is the finding accurate?
How can it be fixed?

These questions turn vulnerability scanning into a real cybersecurity skill.

Nessus Severity Ratings

Vulnerability scanners commonly organize findings by severity.


You may encounter categories such as:

  • Informational
  • Low
  • Medium
  • High
  • Critical

Severity helps security teams prioritize their work. However, severity alone doesn’t always represent real-world risk. For example, a high-severity vulnerability affecting an isolated test server may be less urgent than a medium-severity issue affecting an Internet-facing business-critical system. This is why vulnerability management requires context.

Nessus and CVSS

You will often encounter CVSS or Common Vulnerability Scoring System when studying vulnerability reports. CVSS provides a standardized way of describing the severity of vulnerabilities. A CVSS score can help security teams compare findings and prioritize investigation.

However, beginners should remember:

CVSS severity is not the same as organizational risk. Security teams should also consider asset importance, network exposure, exploitability, business impact and available security controls.

False Positives and Validation

Automated vulnerability scanners are powerful but they aren’t perfect. A scanner may occasionally report a vulnerability that doesn’t actually affect a particular system. This is known as a false positive.
Possible reasons include:

  • Incorrect software version detection
  • Configuration differences
  • Missing information
  • Environmental conditions

Important findings should therefore be investigated and validated before major remediation decisions are made. This is one of the most valuable lessons beginners can learn from vulnerability scanning.

Nessus for Beginners

Beginners shouldn’t try to scan large networks immediately. Instead, create a controlled cybersecurity lab.

A simple setup might contain:

  • A virtualization platform
  • A Linux virtual machine
  • A Windows virtual machine
  • An intentionally vulnerable practice machine
  • An isolated virtual network

You can then learn how vulnerability scanners identify software, services, configurations and potential weaknesses. Start with small scans and gradually increase the complexity of your environment.

What Should Beginners Learn Before Nessus?

Nessus becomes much easier to understand when you already know basic networking. Before focusing heavily on vulnerability scanning, study:

Networking:

Learn IP addresses, ports, protocols, services and basic network architecture.

Operating Systems:

Understand basic Windows and Linux administration.

Vulnerabilities:

Learn why software vulnerabilities and configuration weaknesses occur.

CVE and CVSS:

Understand how vulnerabilities are identified and scored.

Remediation:

Learn how organizations patch, configure and otherwise reduce vulnerabilities.

With these foundations, Nessus results become much more meaningful.

Practical Walkthrough

Nessus has two important components: Server and Client. Nessus server can be installed on Unix, Linux and FreeBSD whereas Nessus client is available for Unix and Windows based operating systems. For this tutorial, we will be installing Nessus on Kali Linux. Nessus can be downloaded from here. It can also be downloaded using curl as shown below (version may change).

Once the installation is finished, enable nessus as shown below.

Then start nessus using command shown below.

sudo systemctl start nessusd

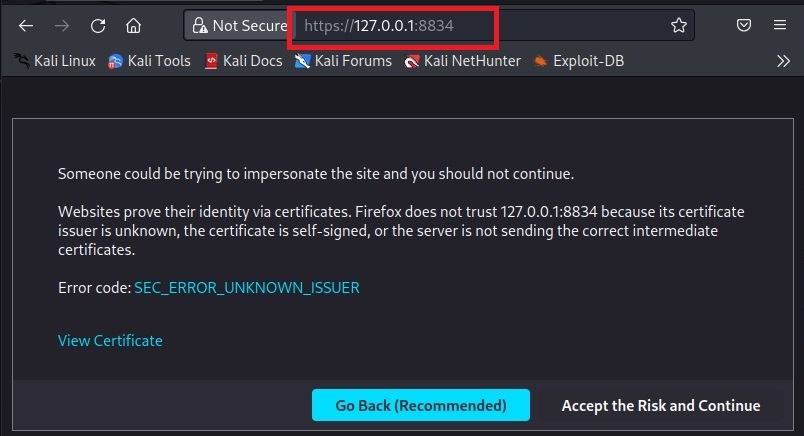
Nessus runs on port 8834 by default. It can be viewed in browser.

Click on “Accept the risk and continue”.

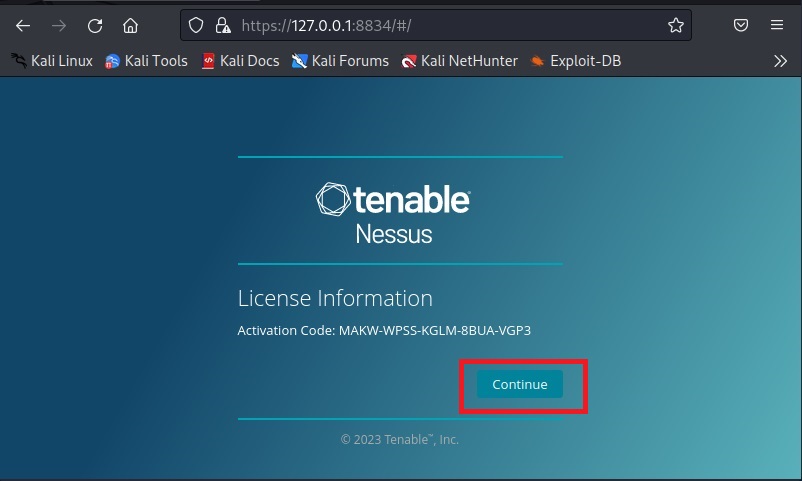
Click on “Continue”. Select the type of Nessus install you want. Since we are using a Free version of Nessus for this tutorial we select “Register for Nessus Essentials”. Click on “continue”.

To run Nessus Essentials, you need an activation code. Get the activation code by entering the following details.

You need a user account to login into Nessus. Create an account and most importantly remember the user account information.

Then, Nessus will download all the required plugins. This may take some time (a bit long time sometimes).

Once all the plugins are finished downloading, you should see this.

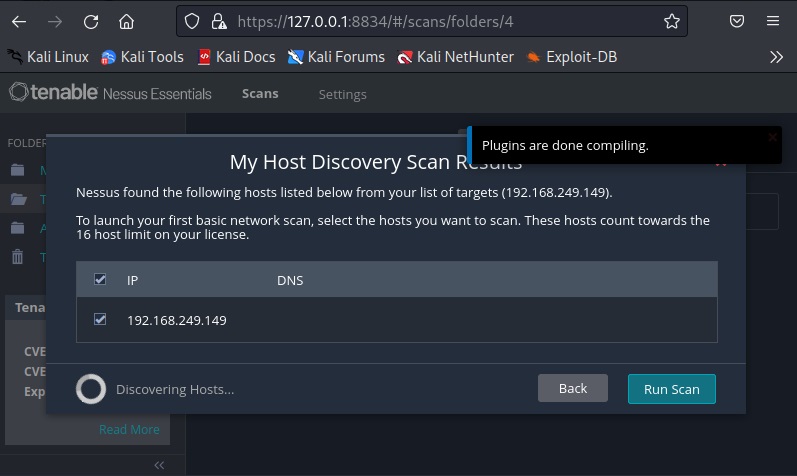
The installation is finished. Now, it’s time to start scanning with Nessus. Click on “New scan”. A new popup opens. Assign a target.

Click on “Run scan”.

The scan will start and take some time to finish. For this tutorial, we are using “Metasploitable 2” as target. See how to install Metasploitable 2 in VirtualBox.

The vulnerabilities are classified into five categories by Nessus. They are Critical, High, Medium, Low and Information. You can view detailed information about the detected vulnerabilities by clicking on them.

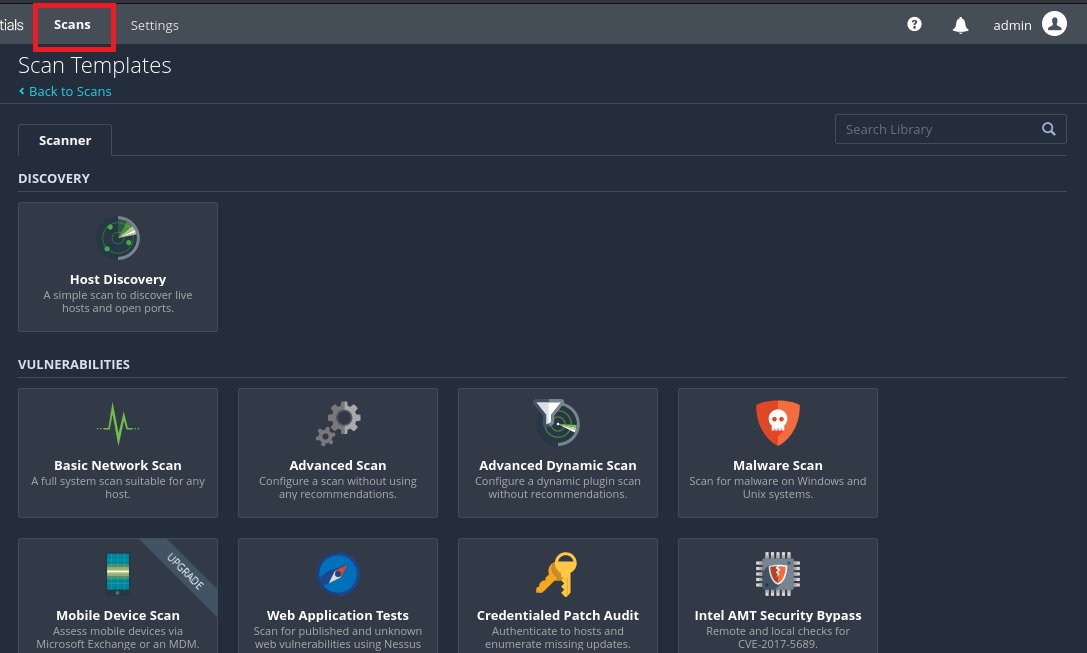
All the scans you perform are located in “My scans” section.

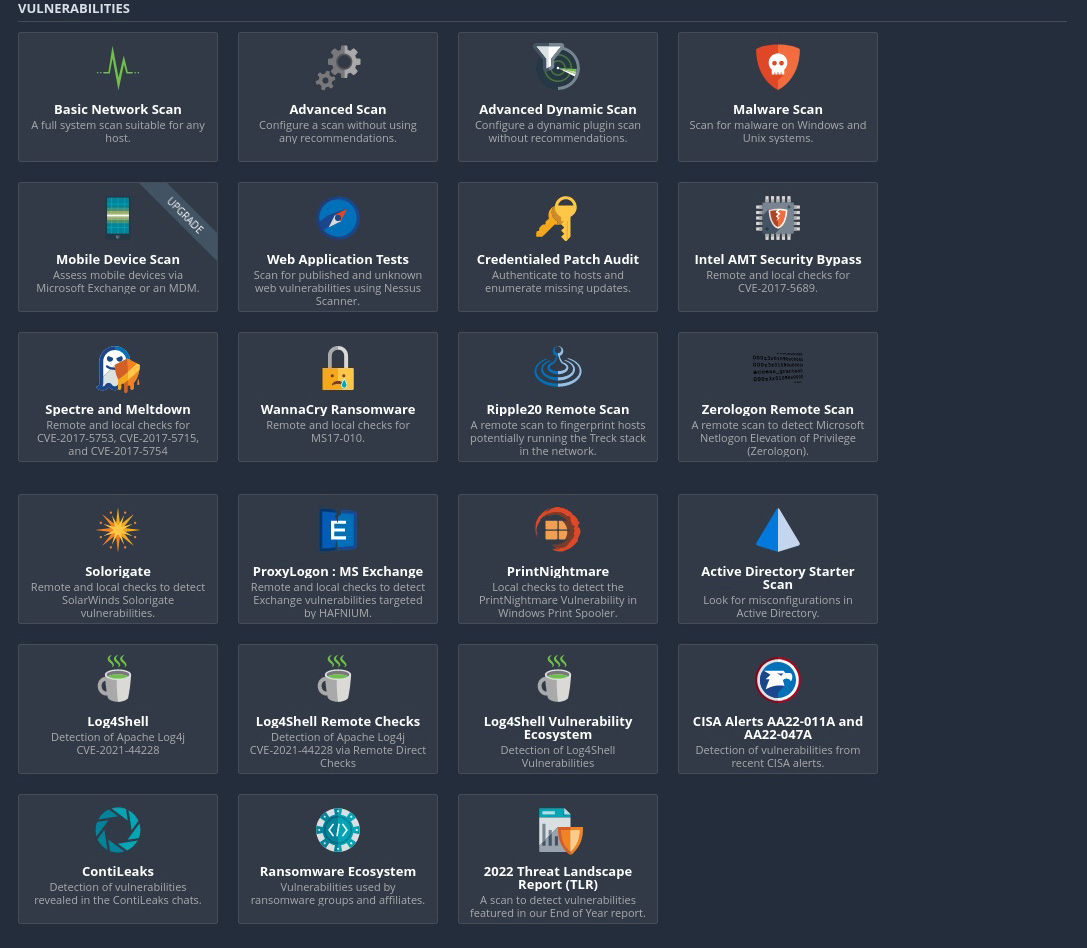
Nessus allows different types of scans. All the scans that can be performed using Nessus can be viewed from “All scans” section.

Common Beginner Mistakes

Treating Nessus as a Hacking Button:

Nessus is primarily a vulnerability assessment tool. It doesn’t replace understanding or professional security methodology.

Trusting Every Finding:

Always validate important findings.

Focusing Only on Critical Issues:

Lower-severity findings can become important when combined with other weaknesses.

Ignoring Remediation:

Finding vulnerabilities isn’t enough. Security teams need to fix or mitigate them.

Scanning Without Permission:

Only scan systems you own or have explicit authorization to assess.

Nessus vs Manual Security Testing

Automated vulnerability scanning is only one part of cybersecurity. A scanner can efficiently identify potential weaknesses across many systems. Manual security testing can provide deeper analysis of how vulnerabilities interact with an application, system or environment.

A professional security assessment may therefore combine:

Discovery → Scanning → Analysis → Validation → Remediation → Verification

Learning Nessus gives beginners an introduction to the scanning stage of this broader process.

Conclusion

Nessus is a valuable tool for learning how modern vulnerability assessment works. It can help security teams identify potential vulnerabilities, outdated software, missing updates and configuration issues across large environments.

For beginners, however, the most important lesson isn’t learning how to click the scan button. It’s learning how to understand the results.

Study networking.
Understand operating systems.
Learn CVE and CVSS.
Practice in an isolated lab.
Investigate findings carefully.

and learn how vulnerabilities can be remediated. Most importantly, always perform vulnerability scans only against systems you own or have explicit permission to assess.

Once you understand the fundamentals, Nessus becomes more than a vulnerability scanner—it becomes a practical tool for learning how security professionals discover, prioritize and reduce risk.