Posted on

Beginners guide to chntpw

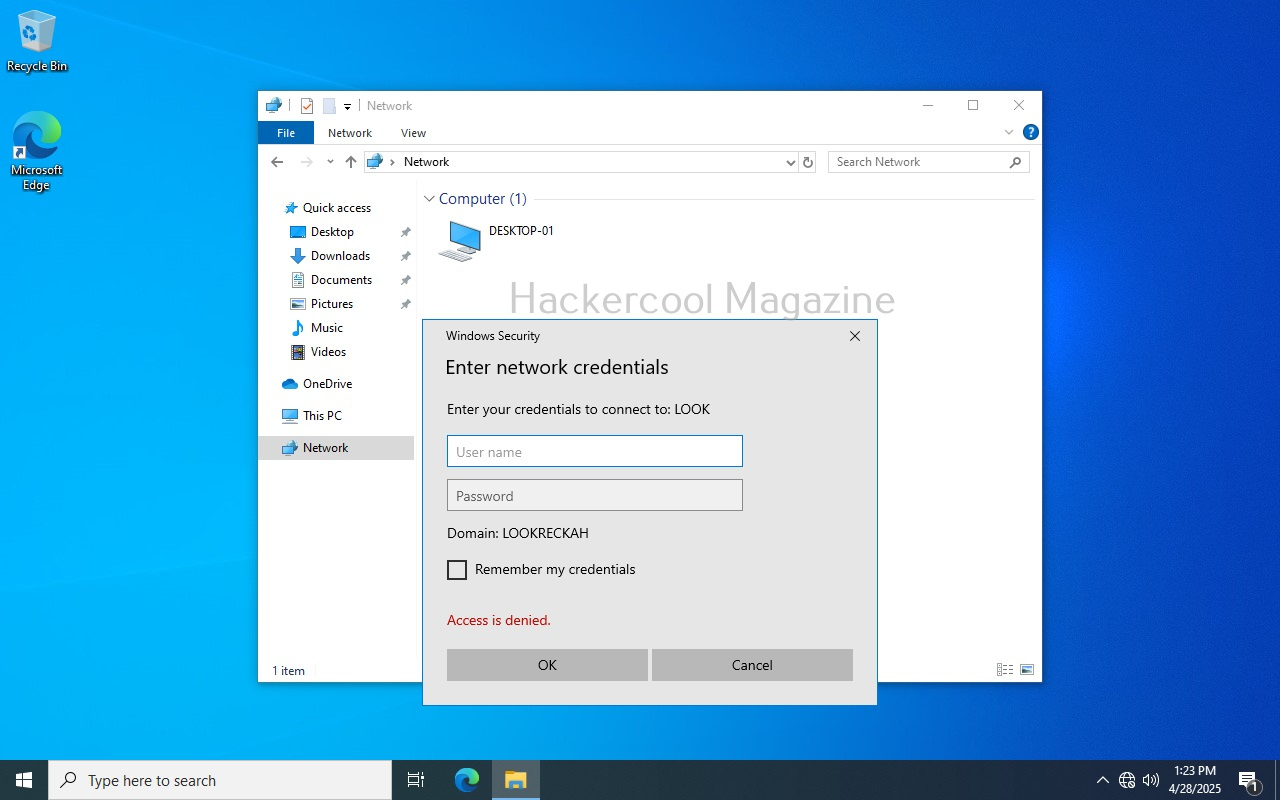
Hello, aspiring ethical hackers. In our previous blogpost, you learnt how Windows authentication works. In this article, you will learn about chntpw, a offline Windows password and Registry Editor that can be used to reset or blank local passwords on Windows NT operating systems.

Chntpw or Change NT Password is a utility that does the above actions by editing the SAM database where Windows stores its hashes.

Let’s see how this tool works. We can use this tool in two ways. The first method is using it as a package installed in cybersecurity operating systems like Kali, Parrot Security etc. The second method is via a bootable CD/USB image. For this tutorial, we will be using the bootable CD/USB image. It can be downloaded from here.

Using chntpw, we can reset local account passwords of all NT Windows operating systems like Windows NT, 2000, XP, Vista , Windows 7 , windows 8, windows Server 2003 and 2008 etc. We will test this tool on Windows XP SP2.

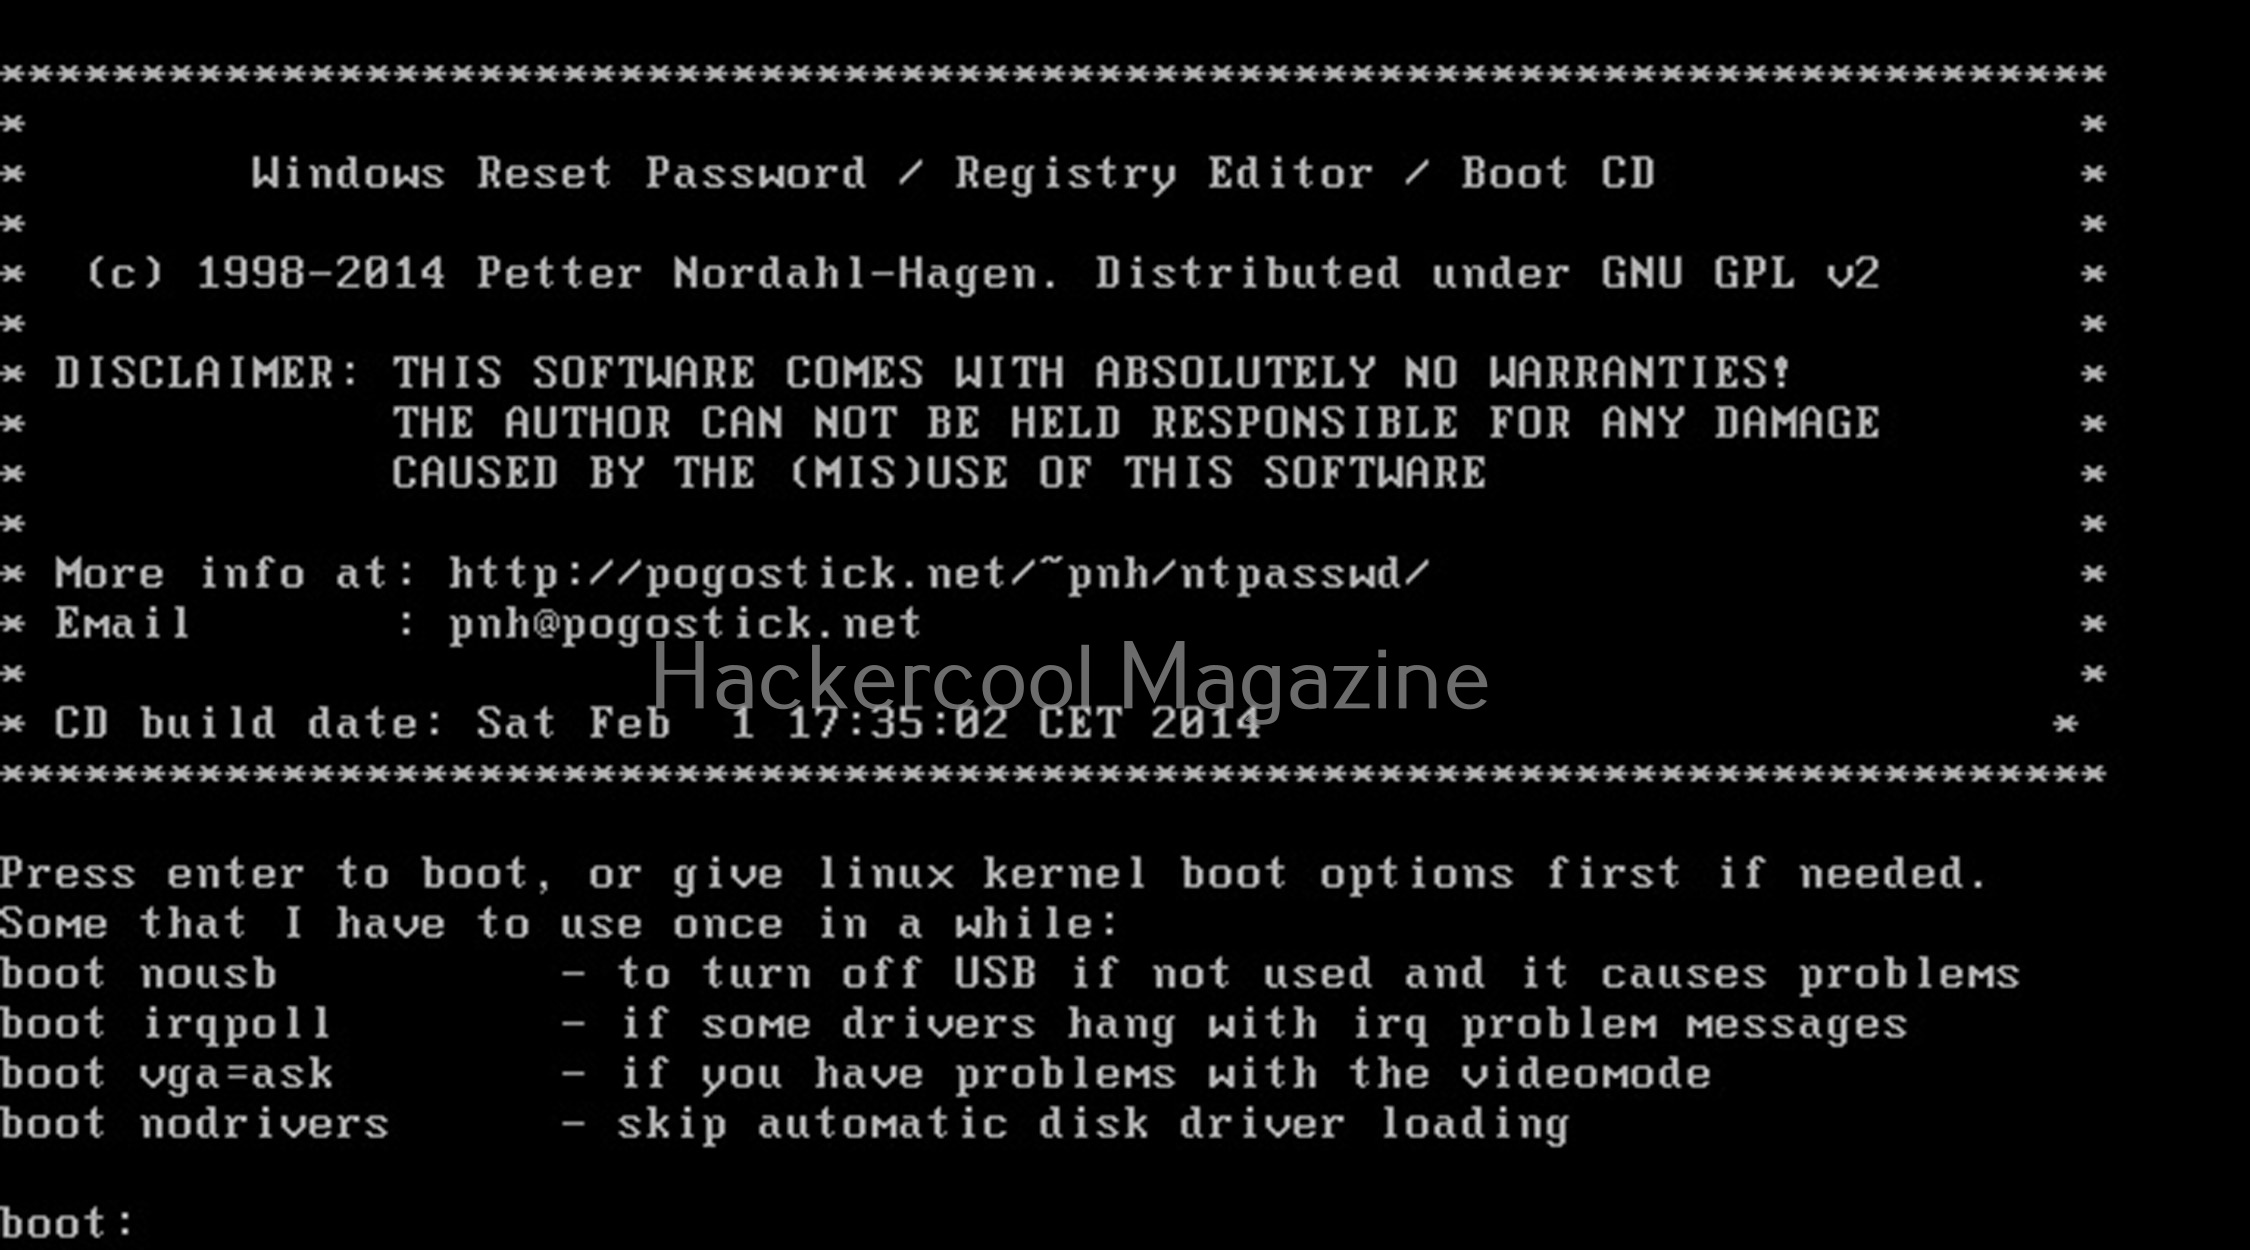
After making a bootable USB from files downloaded, insert the bootable USB drive of chntpw and power on into BIOS. You should use the screen shown below.

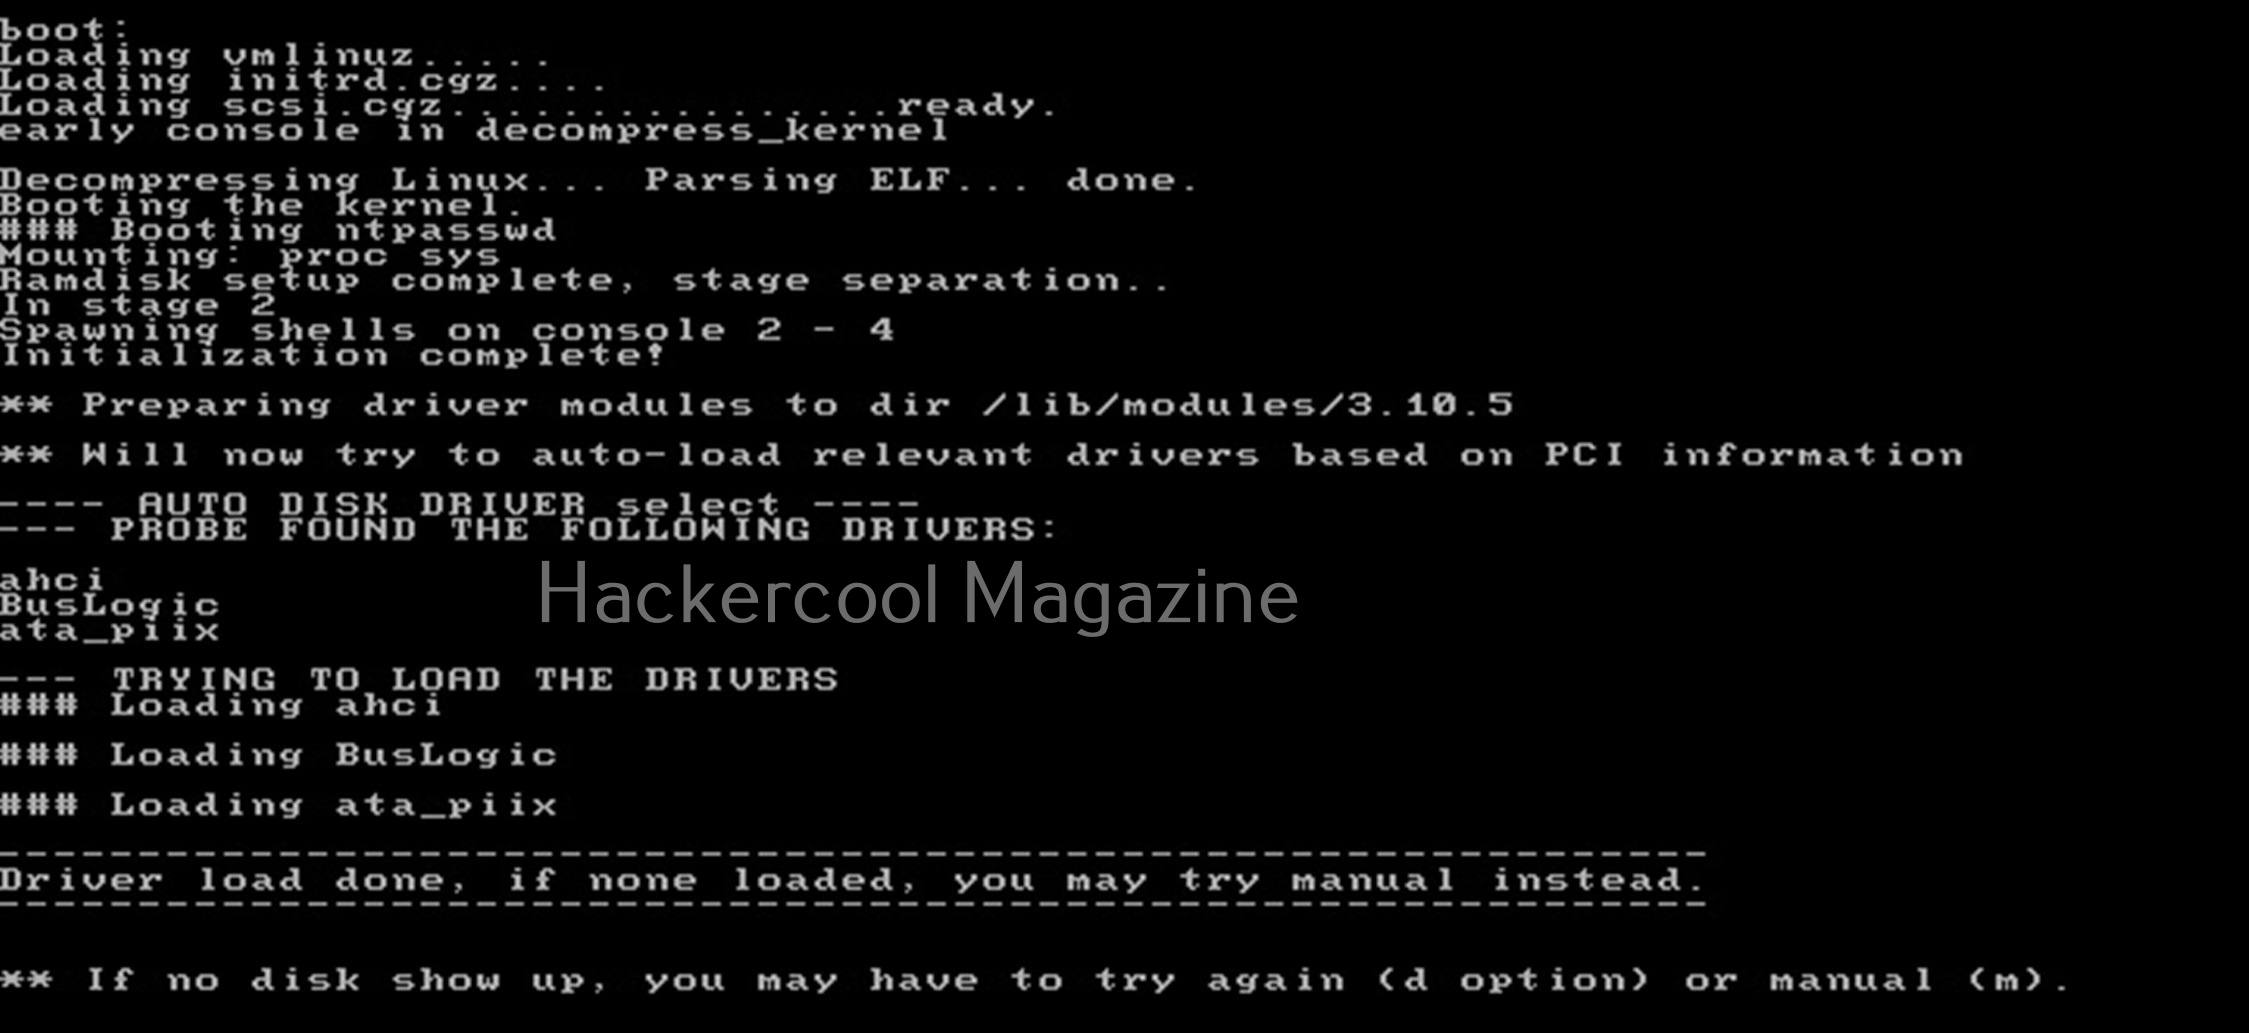
Hit ENTER. You should see the screen shown below.

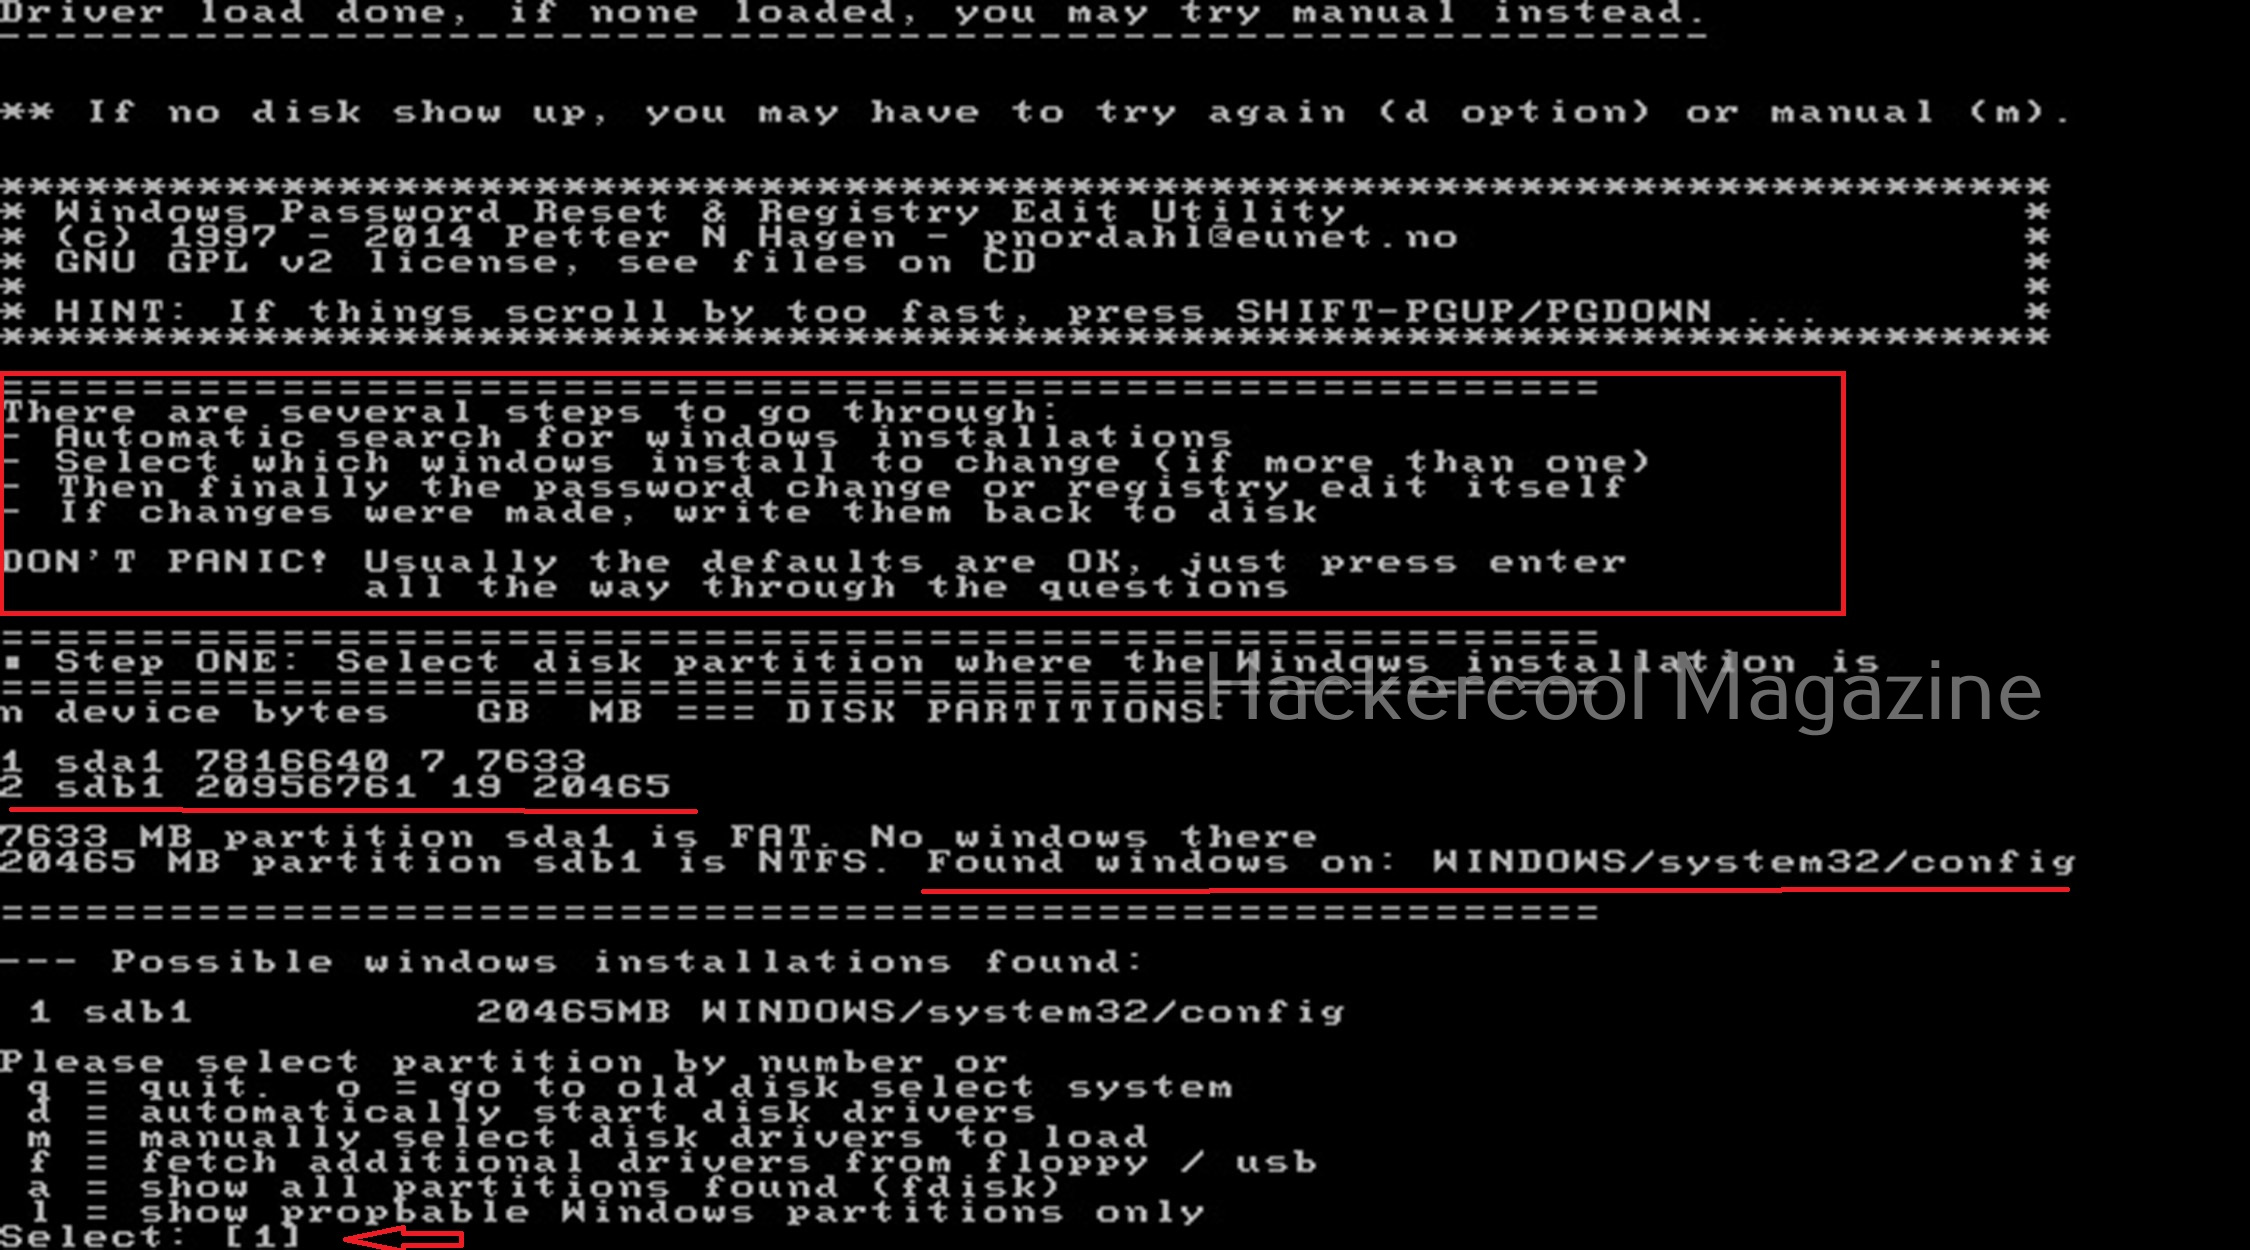
Then, it will show you all the steps to take (total 4 steps). In the first step, you have to select the disk you want to make changes to (The disk on which Windows is installed). In our case, it is disk “sdb”. It will automatically show you disk partitions. All you have to do is select. It will automatically also find Windows installations and show it to you. In this example, there is only one disk set.

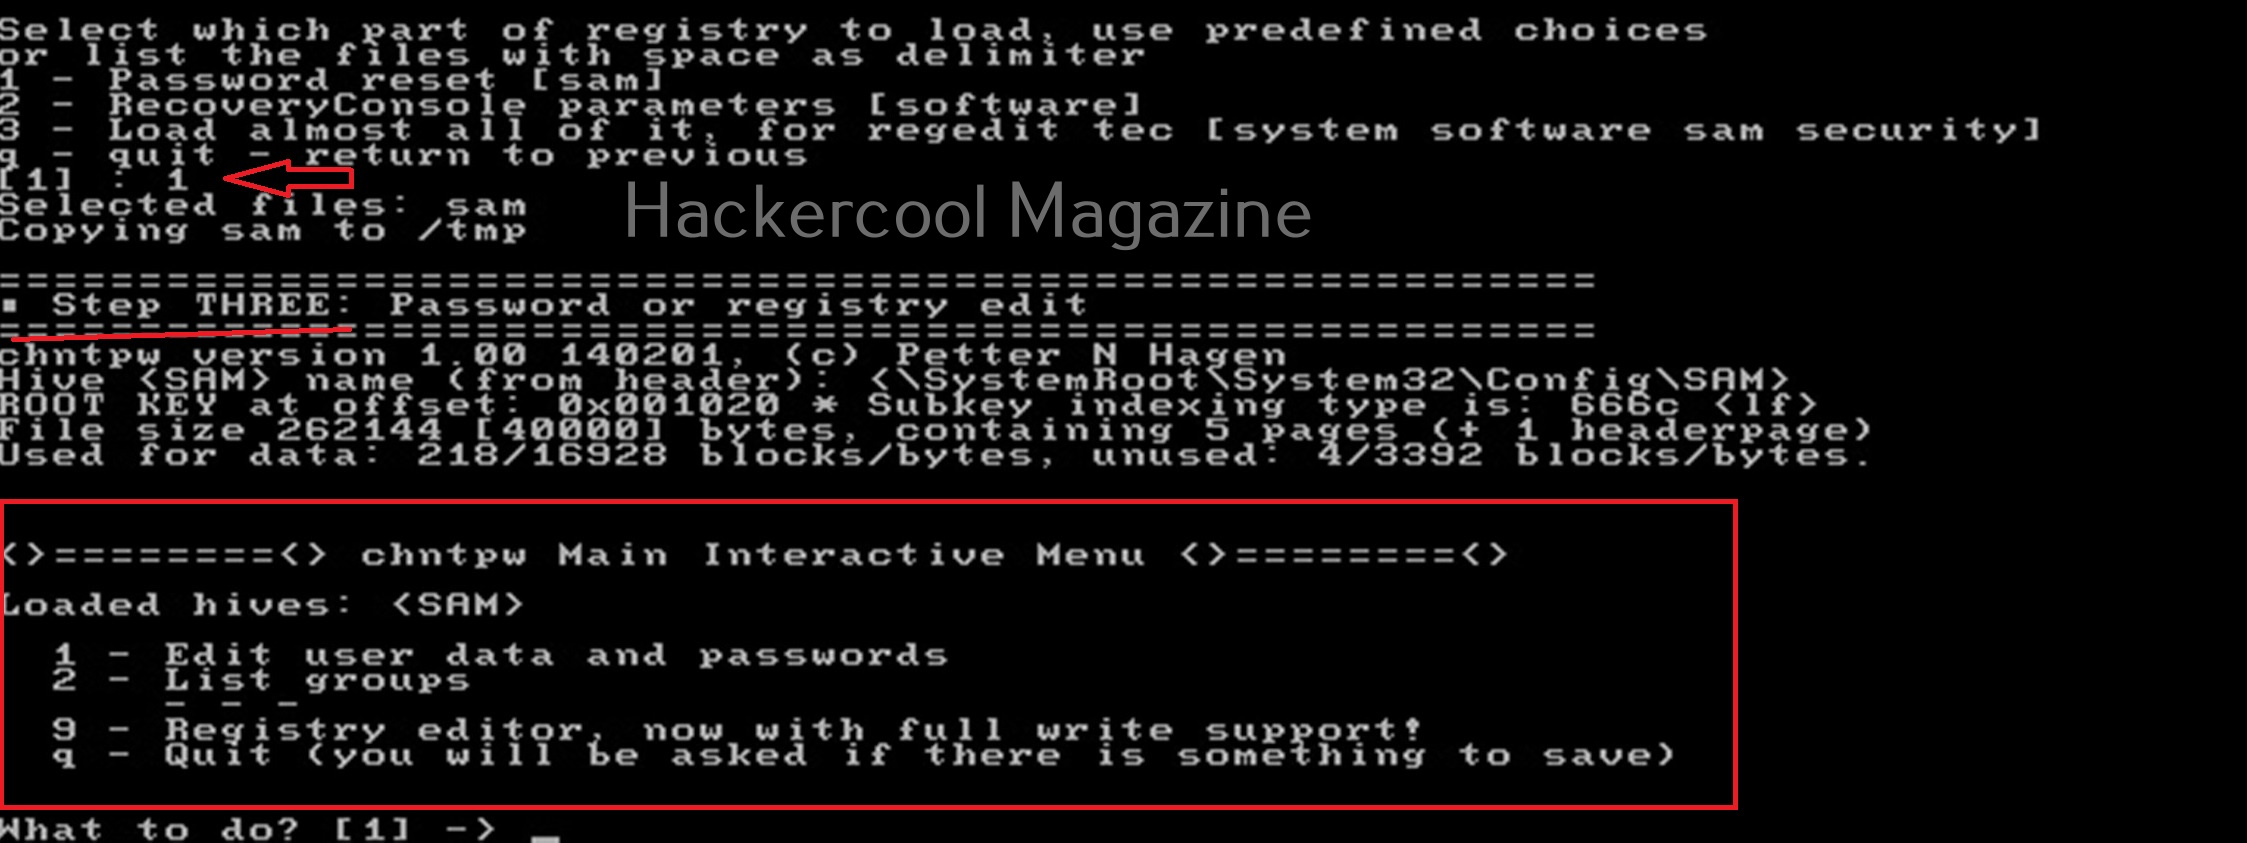
Select ‘1’. The disk will be mounted. The second step is to select the registry files you want to make changes to. It will prompt you to select the part of registry you want to make changes to from the predefined choices listed. The options given are,
1. Password reset
2. Recovery/ console parameters (software).
3. Loading almost all registry files.

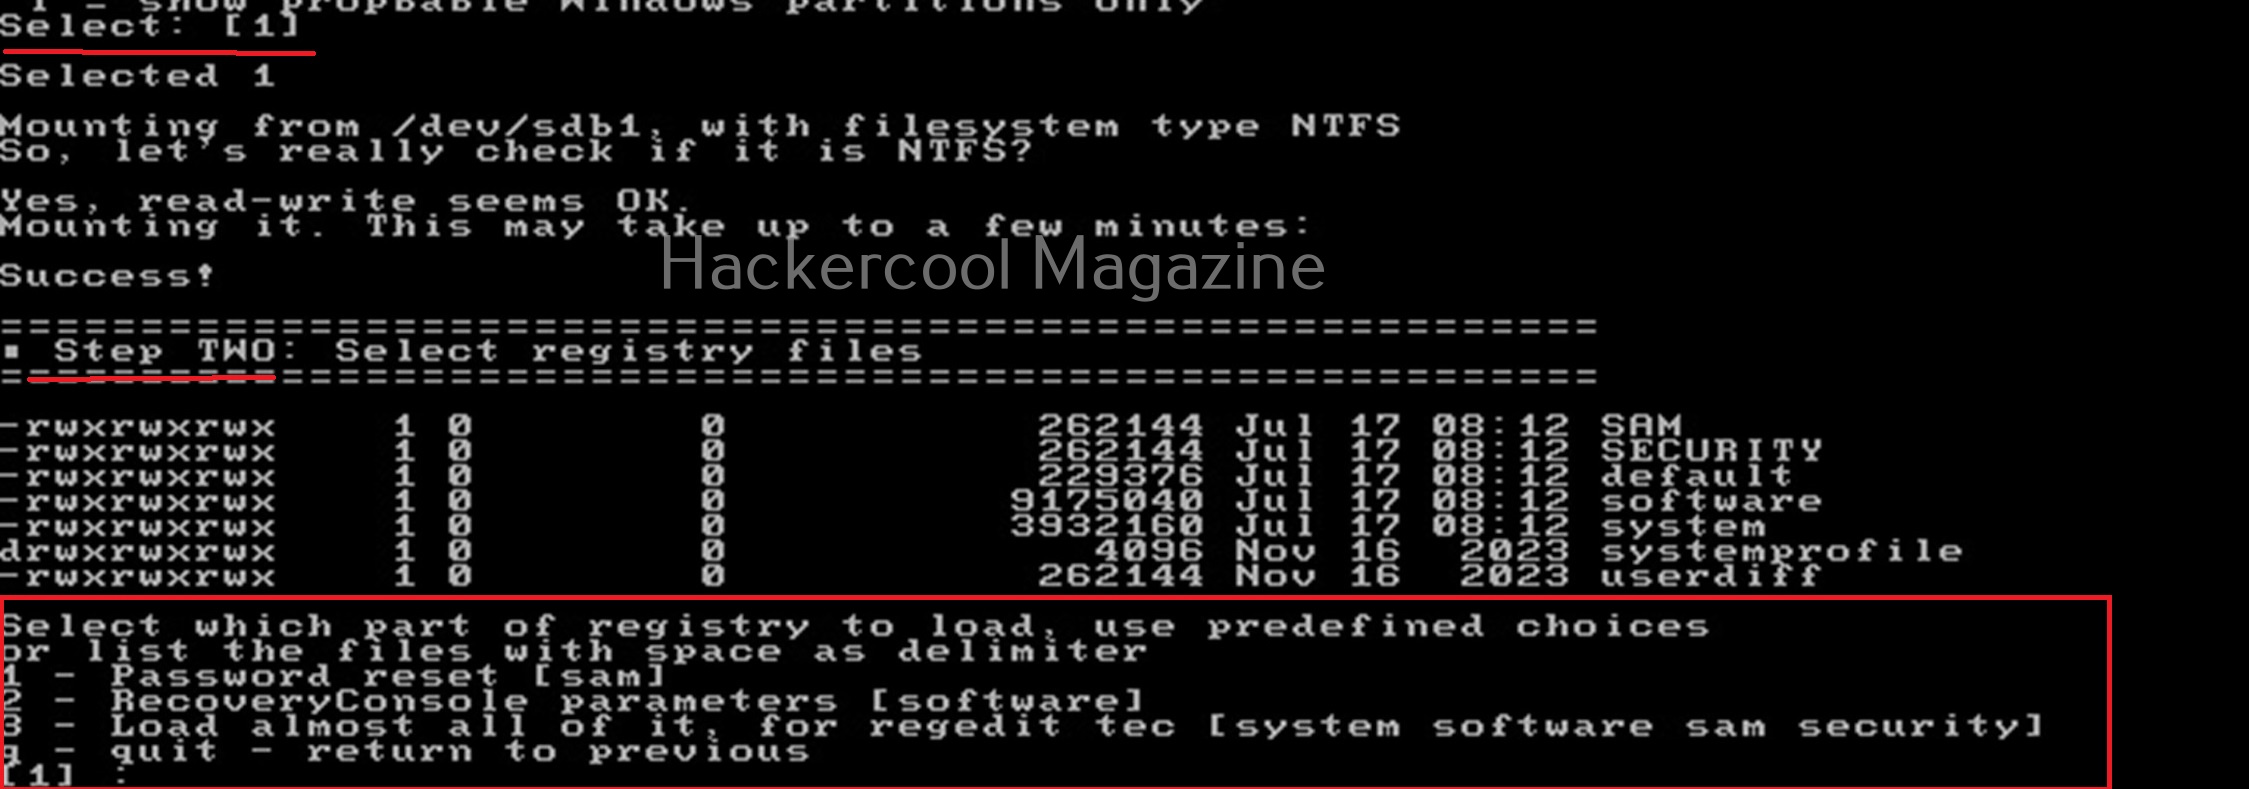
For this tutorial, let’s select the option of “password reset”. Then SAM file will be loaded to the /tmp directory. In the third step, more options are shown as shown below.

Let’s select the option of “Edit user data and passwords”. Then it will list all the users present on the local system.

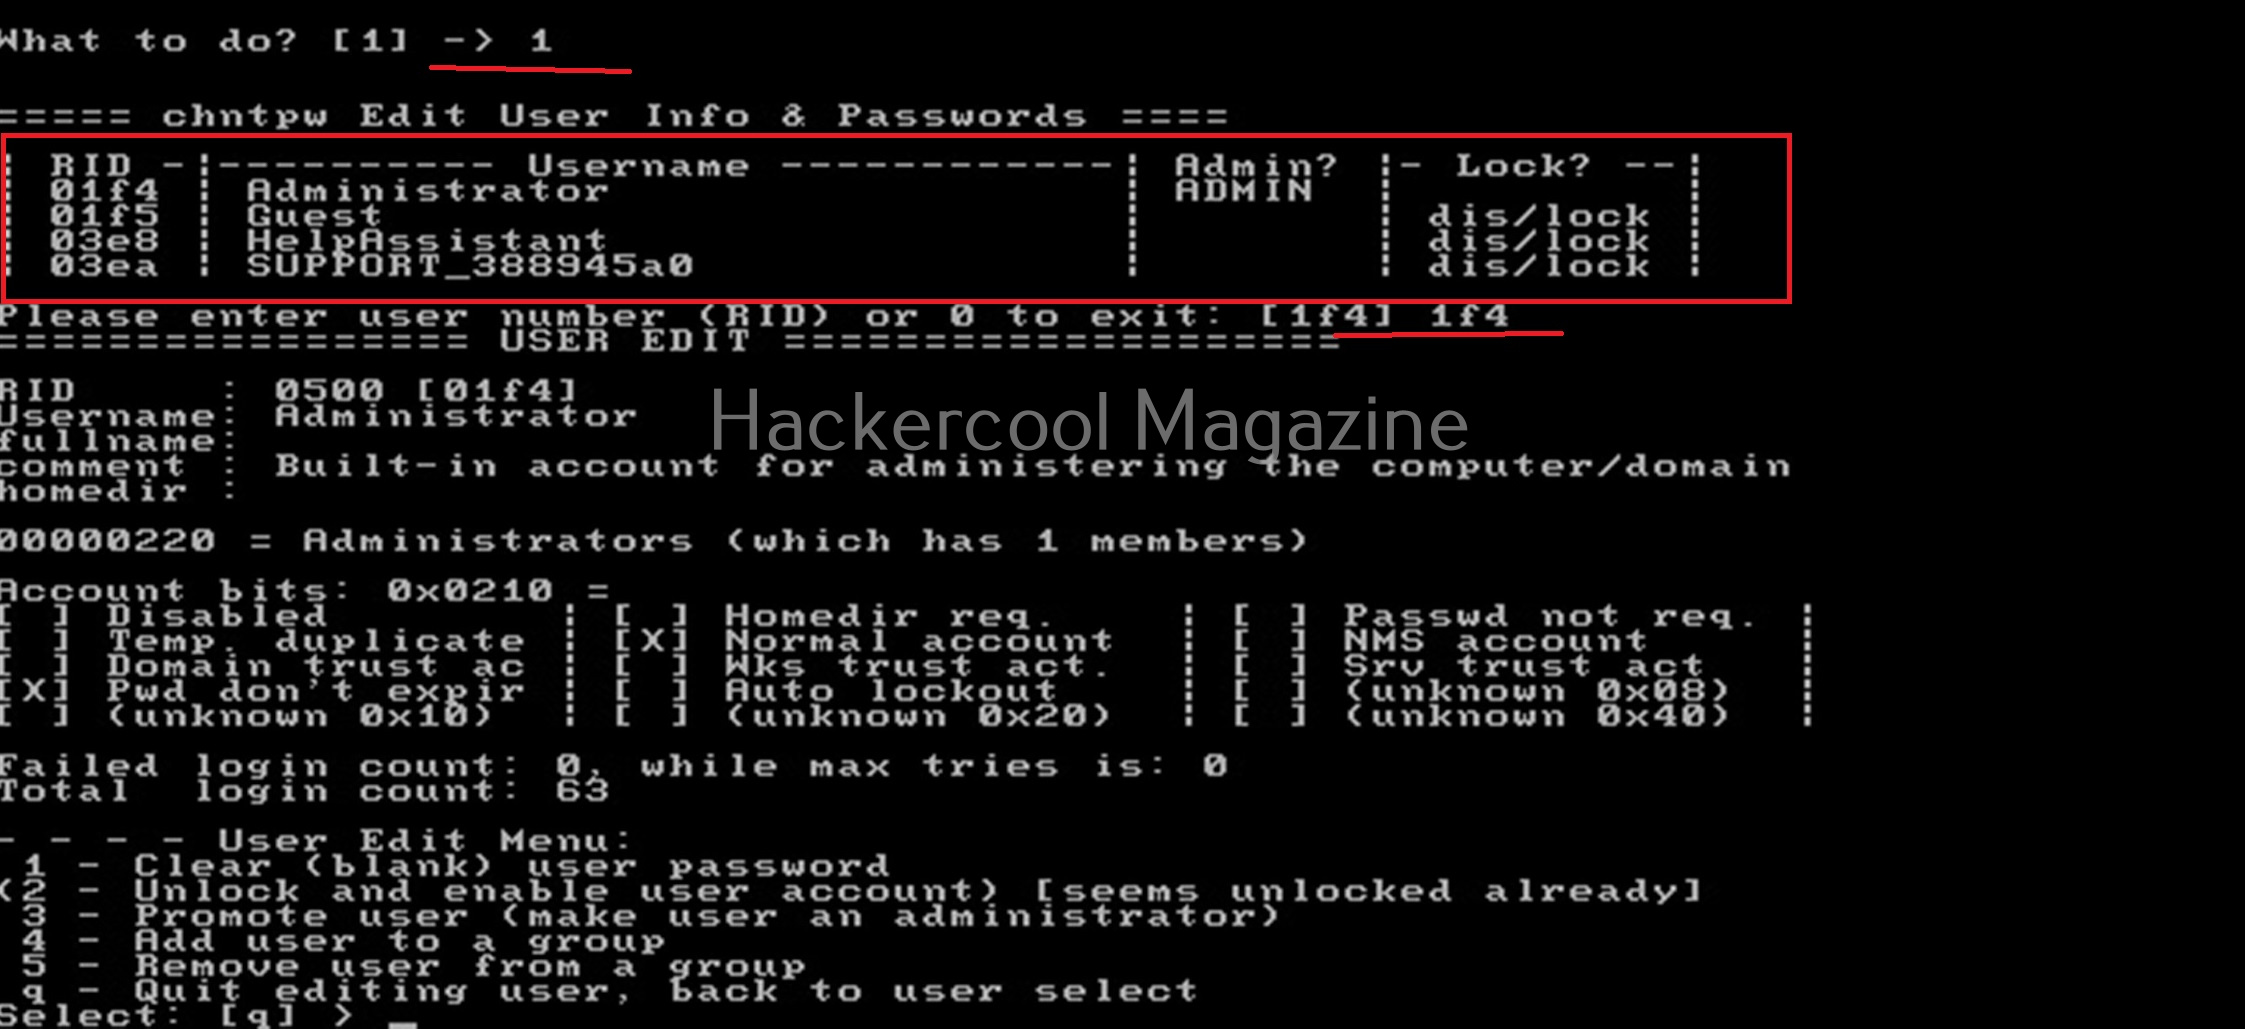
Then it will ask you to select the “RID” of the user you want to make changes to. Let’s select the user with RID ‘rf4’, the Administrator user. Once you select the user, it will present the ‘User edit’ menu asking you to select what changes you want to make.

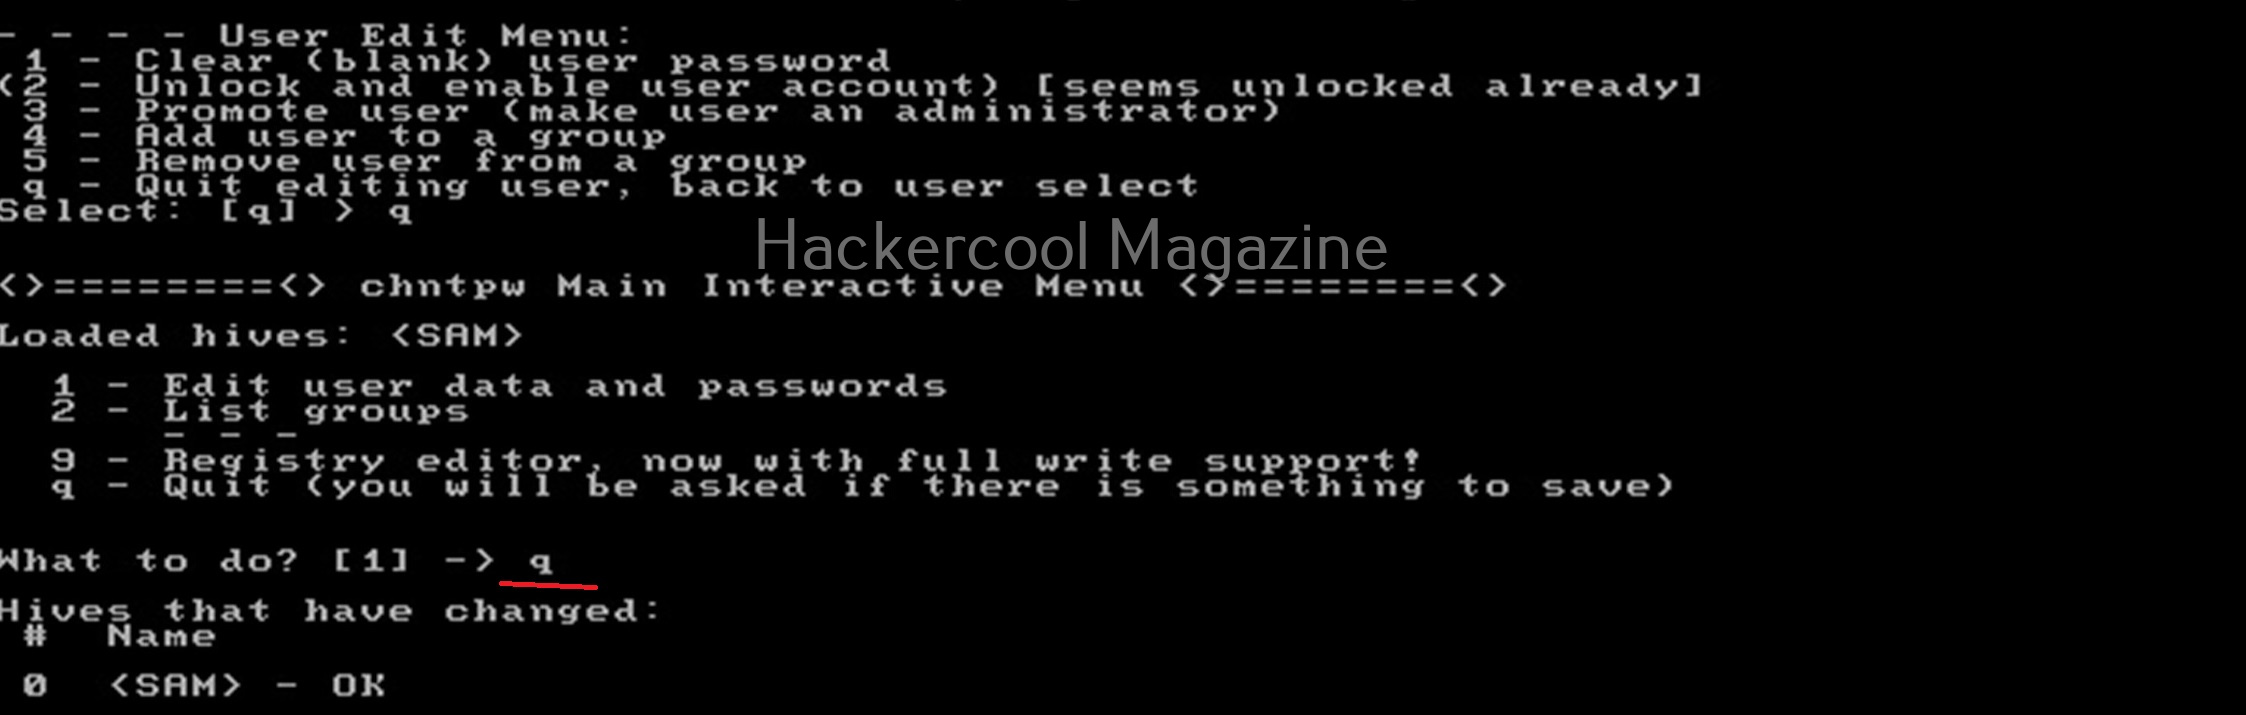
Let’s select the option to clear the password (making blank). Then, it will automatically blank the password of the user. Changes are made but not written to the disk yet. Type ‘q’ to quit the menu.

The fourth step is to write the changes to the disk. The tool will prompt you asking if you want to write changes to the disk. Select ‘Yes’ to do it.

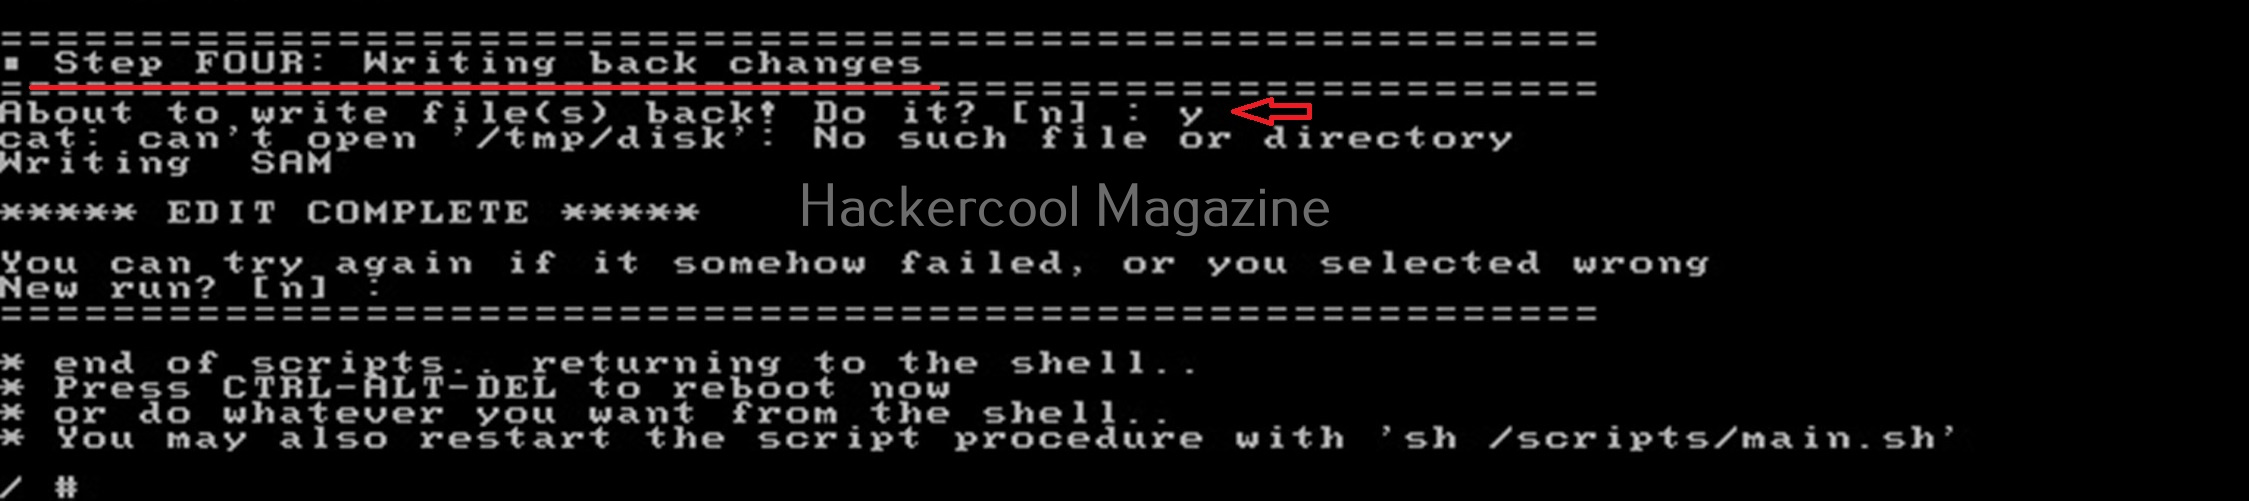
That’s how you can use chntpw to change or blank passwords of local Windows users.  

Posted on

Beginners guide to Responder

Hello, aspiring ethical hackers. In this article, you will learn about Responder tool, a tool that is helpful in harvesting credentials and passwords on the target network. It is useful mostly in internal penetration testing of services.

What is Responder?

Responder is a LLMNR, NBT-NS and MDNS poisoner with a built in HTTP, SMB, MSSQL, FTP, LDAP rogue authentication servers. It harvests credentials and password hashes by answering to specific NBT-NS (NetBIOS Name Service queries). The goal of responder is to stay stealthy on the network without making much noise.

Let’s see how this tool works. For this, we will be using Kali Linux as attacker system as Responder is installed by default on it. We are performing this tutorial in an Active Directory Hacking Lab. In this lab, Windows 10 is a client system (although any other Windows OS will do), PFSense firewall acts as gateway and firewall and Windows Server 2016 is the server. To use Responder on Kali , Kali Linux needs to be connected to the LAN network in the Active Directory. i.e the internal network.

Kali Linux, the attacker system however need not be joined to the domain. But it will still collect password hashes below belong to users in the network. In real-world scenarios, Responder tool is uploaded to the target system or network.

Once Kali is connected to the internal network, all you have to do is to start Responder on the interface you want as shown below.

sudo responder -I <network_interface>

For example, here are are starting it on interface eth1 where our target domain network is connected.

It starts poisoners and servers as shown below.

Now, all we have to do is WAIT for any user in the network to do a mistake. For example, lets say a user of the organization tries to access a local network share “LOOKRECKAH” and makes a mistake while doing it as shown below. He wants to access network share “LOOKRECKAH” but hits ‘ENTER’ after only typing “LOOK”.

As soon as he does that, he is prompted for his network credentials. This is done by Responder tool.

However, there is no need for any credentials. Responder already logs lots of traffic on the attackers machine i.e. kali.

While we scroll down the traffic, we can see password hash of that user and his username.

While waiting patiently, we can also grab credentials of different users.

All this information is stored by Responder in the /usr/share/responder/logs directory on Kali.

In this directory, credentials and hashes are stored in text files.

Analysis mode

Responder has different modes of operation. Analysis mode is one such mode. In this mode, Responder allows users to see NBT-NS, BROWSER, LLMNR and DNS requests on the network but doesn’t perform any poisoning. Analysis mode can be started using command shown below.

sudo responder -I <interface_name> -A

This mode can still reveal some information about the network.

Using WPAD Proxy Server

WPAD stands for Web Proxy Auto-Discovery protocol. Organizations often make their users connect to a web server through proxies. WPAD allows web browsers and other clients to automatically discover the URL of a proxy server pac files. You can use responder tool to poison these web requests as shown below. WPAD proxy can be started on Responder using command show below.

sudo responder -I <interface_name> -wd

As you can see in the above image, WPAD proxy is on. Now, when a employee of an organization tries to access the internal website and mistypes it on a browser, he will be prompted with a credential screen as shown below.

When he enters his credentials assuming it to be a genuine prompt

We get the user’s password hashes as shown below.

That’s all in Responder tool for now.

Posted on

Beginners guide to OllyDbg

Hello, aspiring ethical hackers. In our previous blogpost, you learnt about reverse engineering. In this article, you will learn about OllyDbg, a debugger that is used to reverse engineer programs.

OllyDbg is an X86 debugger that is used to perform binary code analysis even when source code is not available. It can trace registers, switches, tables, constants, strings, recognize procedures, API calls and can even locate routines, object files and libraries. At present, this debugger can only disassemble binaries compiled for 32 bit processors.

Let’s see how this tool works. For this, I will be using Kali Linux as OllyDbg is available in its repositories.

Note that OllyDbg can only run on Windows systems. To run it on Kali, you need to install wine.

After wine is successfully installed, you can start Ollydbg using command shown below.

ollydbg

If it shows up wine error like this, just use the command shown below to fix it.

mv ~/.wine ~/.wine.old

Now, OllyDbg should start normally. The interface looks as shown below.

To see the working of Ollydbg, we need an executable file to disassemble. To help you understand how OllyDbg works in detail, I have written a simple program in C. The program is nothing new. It just adds two numbers provided by the users and displays the result. I name it “hc_app.c”.

Then I compile it as shown below to get an exe file named “hc_app.exe”.

Let’s first check if the program works as expected.

The program “hc_app.exe” is working as expected. Now, let’s load this into OllyDbg. This can be done by dragging hc_app.exe to OllyDbg or by going to File menu>Open (F3) as shown below.

This will open file explorer.

Navigate to the location of the app we just created and select it.

Doing this will open a terminal as shown below.

Minimize the terminal window for now. After minimizing it, you will see this on OllyDbg.

If you are a normal human like me, you will not understand anything. This is assembly code. The interface of OllyDbg is divided into 4 sections.

The first section is CPU window. This contains all virtual addresses of instructions. This window is located to the upper left of OllyDbg.

The second section is located to the upper right of the program and contains CPU registers.

The third section is located to the lower left. This has data residing in memory.

The fourth section, located to the bottom right is the stack.

Apart from this, I have assigned number ‘5’ in yellow. It shows if the program we loaded (hc_app.exe) is paused or running. Before doing anything, go to the Debug menu and hit “Run”. Now, bring forward the the command window we minimized earlier. It will change to this.

That’s all good. Now, let’s make something sense out of what looks like gibberish. Right click inside the CPU window, a menu should open. Select “Search for” and in the sub menu “All referenced text strings” as shown below.

What we are doing is searching for all text strings referred to in the program. This will give output as shown below.

Here, you can see “Enter two integers:” and “The final number is :”. You remember something from the source code of the program. But note here that, we don’t have access to source code and only loaded the compiled program (hc_app.exe). To the left, highlighted in red, you can see the address at which this string is present. The address is “00401576”. Go to that address in CPU window.

See the disassembled code here. It is this.

MOV DWORD PTR SS: [ESP], hc_app.00411044

The important thing here is the address “00411044”. Pointers in C point to a memory address. So, this command is pointing to a memory address “00411044”. Once again right click in CPU window select “Go to” this time and select “Expression” (shortcut for this is CTRL+G).

In the window that opens, enter address value as shown below and click on “OK”.

You should see this in CPU window. At address “00411044”, you should see a command “INC EBP”. Right click on that command and go to Binary>Edit as shown below.

A new window opens as shown below.

Observe the ASCII value. It is ‘E’. Similarly do it for next four commands.

Here are the combined ASCII values. They are ‘E’ ‘n’ ‘te’ ‘r’. What does it become? “Enter”.. I think you have figured out where this is going. This is part of the text, “Enter two integers:”. Right.

Now let’s do one thing. Change the ASCII value of ‘E’ ‘n’ ‘te’ ‘r’ to ‘H’ ‘E’ ‘LL’, ‘O’. respectively as shown below.

Now, when we go to debug menu and run the code again, instead of “Enter Two integers” we got “HELLO two integers” as shown below.

Here, you can see that we have successfully altered the code of a program without even knowing its source code. Next, learn how to perform static analysis of a program or malware with PEframe.

Posted on 1 Comment

Beginners guide to Routersploit

Hello, aspiring ethical hackers. In our previous blogpost on Data link layer attacks, you learnt about various devices that are present in a LAN. You also learnt that one of the devices is a router. In this article, you will learn about Routersploit, a tool that is used to test security of a routers and other embedded devices in a LAN.

A router is a computer and networking device that forwards data between two different networks. For example, between internet and a LAN. A router is usually placed at the entrance of the network where the external network is connected. It is known as a gateway. In some cases, a router also acts as a firewall, IDS & IPS.

Routersploit framework is an open-source exploitation framework for embedded devices like routers. Let’s see how this tool works. For this, we will be using Kali Linux as our attacker system as routersploit is available by default on Kali repositories. As target system, we will be using IPFire (past version).

Routersploit can be started using the command shown below.

The interface of Routersploit is almost similar to Metasploit. So use command “use” and double press “Tab” button to see options of Routersploit.

Similar to Metasploit, Routersploit also has different modules divided based on the functions they perform. These are creds modules, exploit modules, payload modules, encoder modules, generic modules and scanner modules.

These are further divided into modules based on their sub functions. To see them, type any of the module type and once again hit tab two times. For example, let’s select scanner module.

As, you can see, different scanner modules are displayed. There are scanner modules for routers, cameras etc. You can select any module as shown below. For example, let’s select the autopwn module. The autopwn module of Routersploit tries all the exploits and modules it has on the target device and prints out the result.

Once you have chosen a module, use the “show options” command to see all the options this module needs. For example, the autopwn module just needs the target IP address. Set the target IP as shown below.

After setting all the options, just execute the module using command “run”. In the same manner, you can see and use different exploit modules on Routersploit.

If you know the make of target router, you can even search for all the exploit modules belonging to it. For example, let’s search for modules for our target router i.e IPfire.

In the above image you can see all the modules related to Ipfire. Let’s see if our IP fire target is vulnerable to shellshock vulnerability.

As you can see, the target is indeed vulnerable.

After setting all the options and executing the module, Routersploit successfully exploited the IP Fire shellshock vulnerability and exposed the /etc/passwd file of the target device.

Now, let’s see one of the credentials module.

This module I selected below, checks if our target IPfire is using default credentials for FTP service.

In this case, our target doesn’t expose FTP and hence is not vulnerable.

Posted on

Complete guide to Stegseek

Hello, aspiring ethical hackers. In our previous blogposts, you learnt what is steganography, its uses and how to hide secret data in an image using the tool Steghide. In this blogpost, you will learn about a tool that can retrieve this hidden data from an image. The tool’s name is Stegseek.

Although the working of Stegseek is same as Stegcracker, it is a lightning fast steghide cracker that is thousands of times faster than other crackers and can run through the entirety of rockyou.txt wordlist in under 2 seconds. Let’s see how this tool works. For this article, we will be using Kali Linux as our attacker system as this tool is installed by default on Kali Linux. For performing steganography attack, we will be using same image in which we have hidden data using Steghide, “Volcano_with_Secret,jpg”.

All you need to retrieve the hidden information from the image with this tool is to just supply the path of the image as shown below.

The “-sf” option stands for stego file. A stego file is a file that contains hidden information in it.

As you can see in the above image, Stegseek cracked the password (123456) of this file and successfully retrieved the hidden data. That too in lightning speed pace. The retrieved data from the image is saved in a file named <name of the file.jpg.out>. By default, Stegseek uses rockyou.txt wordlist to brute-force the password.

Specify a different wordlist (-wl)

We can even specify a different dictionary or wordlist if needed as shown below.

Select file name for extracting data (-xf)

As you already read at the beginning of this article, stegseek saves retrieved hidden data to a file named “<name-of-the-file>.out”. To extract the hidden data to a different fie, we can use this option. For example, let’s save the retrieved data to a file named “secret.txt” as shown below.

Overwrite existing file (-f)

In the above image, you can see that when we extracted hidden information to a file named “secret.txt”, we got prompted saying that there is already a file with the same name and if I wanted to overwrite it. Well, using this option, we can force overwrite already existing file.

Get detailed output (-v)

This option gives us detailed output while using Stegseek.

Quiet mode(-q)

On the contrary, you can run Stegseek in quiet mode. Running in this mode will just display the cracked password of the file as shown below and of course retrieve the hidden data. Status updates or other output is not displayed.

Skip defaults (-s)

Specifying this option skips adding default guesses while cracking like using an empty password, the name of the file etc to the wordlist.

Number of threads (-t)

By default, stegseek uses 4 threads while cracking the password. Increasing the number of threads can lead to better performance. Threads can be increased or decreased using this option. For example, let’s increase the number of threads to 10.